Usage
⚠️ It's recommended to always back up your database before making any manual edits. Additionally, while this application does work when PMS is running on some platforms, it's strongly recommended to shut down PMS before performing any actions, both to help prevent any potential corruption, and because many aspects of this application don't expect Plex to add media/modify markers while the application is running.
Some images may be slightly out of date as the UI gets updated over time. Any fundamental changes should be reflected below, however.
After following the installation instructions (and optionally setting up your config file), you can launch the editor. If you downloaded and extracted a package from the releases page simply run that executable. On some systems, you may need to first open a terminal window, cd to the directory with MarkerEditorForPlex, and then run the binary:
~ $ cd /path/to/MarkerEditorForPlex
MarkerEditorForPlex $ ./MarkerEditor
If you are running from source, you can launch the editor with node. Open a terminal/command prompt window, navigate to the MarkerEditorForPlex folder, and run node app.js:
C:\Users\Username\Documents\MarkerEditorForPlex> node app.js
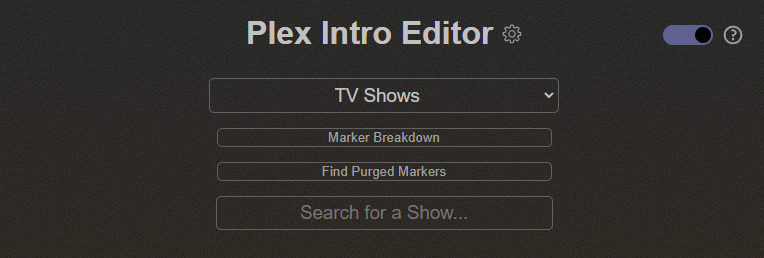
If autoOpen is enabled, a new browser tab should open. Otherwise, navigate to host:port in your browser. If everything worked correctly, you should see something like the following:

If you only have a single TV Show library on your server, the library should already be selected:
After selecting a library, you can search for a show or movie in that library. It can detect displayed titles, sort titles, and original titles (if set):
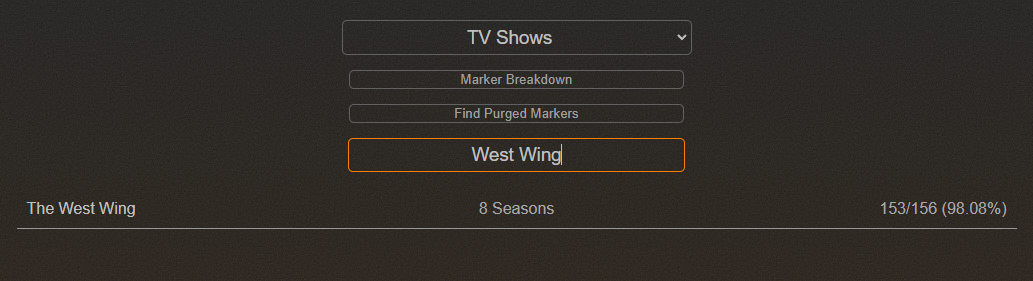
From there, for TV libraries you can click on a show to view its individual seasons. Also note the right-hand side, which shows some overall stats about the markers of a show. This will only be visible if extendedMarkerStats is enabled. In the example above, we see that 153 of 156 episodes have at least one marker. In the example below (after clicking on the show), we see that it's the two specials and one episode from season 1 that don't have any markers:

Just like the show itself, you can click on an individual season to dig into the episode details, and click on an episode to see the individual markers:

In the example above, S03E01 has three markers, with the bold 'Date Added' of the first marker indicating that it's user added/modified. Hovering over the marker will give you an exact date with more details. Additionally, if you Ctrl+Click on an episode, all marker tables will be expanded/contracted.
For movie libraries, each result is a single movie, and clicking on the row will show its associated markers, as there is no Show > Season > Episode hierarchy:

After navigating to the movie/episode you want to add a marker to, click 'Add Marker' to open the marker editor:

If previewThumbnails are enabled and the item has thumbnails available, there will be two thumbnail images in addition to the main text boxes. Pressing Enter in the text box will refresh the thumbnail, or you can enable auto load to have them refresh automatically after a short (250ms) delay. If preview thumbnails are enabled but aren't helpful in your given situation, you can click 'Hide Thumbs' to get rid of them.
Note: If
preciseThumbnailsare not enabled, thumbnails will not be exact. Plex defaults to thumbnail previews every 2 seconds, so the thumbnail image at 2.001 will be the same as the one at 3.999. Additionally, if Plex's advancedGenerateBIFKeyframesOnlysetting is enabled (which it is by default), thumbnails may be even more sparse if the video has a longer keyframe interval.
When setting the timestamps, two syntaxes are supported, plain milliseconds, and hh:mm:ss.000. A marker at exactly one hour could be either 3600000 or 1:00:00, 2 minutes could be 120000 or 2:00, and 4.5 seconds could be 4500, 0:04.500, or just 4.5.
In this case, I want to create a marker to skip the "previously on XYZ" segment at the beginning of the video, which starts at 0, and ends at around 35 seconds:

In addition to the timestamps, on the left is a dropdown for the type of marker, intro or credits. If 'credits' is selected and the end of the marker is the end of the file (Ctrl+Shift+E to auto-populate it, or enter -0), the marker will be considered 'final', meaning Plex will use it to calculate watch status (if enabled), as well as end-of-playback behavior (e.g. send you to the PostPlay screen once it's hit). Once I click the green checkbox to confirm the addition, it gets added to the table, and as mentioned above, hovering over the 'Date Added' will give you specifics about when the marker was modified:

Editing a marker is essentially identical to adding one. Instead of 'Add Marker', click 'Edit', and a similar view is displayed:

Just like adding a marker, click the green 'Confirm Edit' check icon to commit the changes:

As you would expect, clicking 'Delete' will delete the given marker, after confirming that you want to do so:

After which it will be removed from the table.
In addition to raw timestamps, embedded chapter markers that Plex has analyzed can be used to add and edit markers as well. After clicking 'Add Marker' or 'Edit', there will be a 'Chapters' option. If no chapter data is available it will be greyed out, but otherwise clicking it will switch to chapter-based editing. Shift+Click add/edit to immediately start in chapter mode if available.
Click for preview

When editing/adding a marker timestamp, the following keyboard shortcuts are available:
| Key | Description | Shift+Key |
Alt+Key |
Alt+Shift+Key |
|---|---|---|---|---|
= (+) |
Add 10 seconds | Add 60 seconds | Add 50 seconds | Add 5 minutes |
- |
Subtract 10 seconds | Subtract 60 seconds | Subtract 50 seconds | Subtract 5 minutes |
] |
Add 1 second | Add 0.1 seconds | Add 5 seconds | Add 0.5 seconds |
[ |
Subtract 1 second | Subtract 0.1 seconds | Subtract 5 seconds | Subtract 0.5 seconds |
\ |
Round to nearest second | Round to nearest 0.1 | Round to nearest 5 | Round to nearest 0.5 |
i |
Change marker type to Intro | - | - | - |
c |
Change marker type to Credits | - | - | - |
t |
Show/hide thumbnails | - | - | - |
+/- are the "big" modifiers, and Shift makes them bigger. Similarly, ]/[ are "small" modifiers, and Shift makes them smaller. Alt always multiplies by 5.
In addition to standard tab-based navigation, the following shortcuts are available when in a movie/episode/marker table:
| Base Key | Modifier(s) | |||||
|---|---|---|---|---|---|---|
| None | Ctrl | Alt | Shift | Ctrl+Shift | ||
| Up Arrow | Previous navigable item [1] [2] | First item [2] [3] | Previous visible marker table | Previous item [2] | First focusable item | |
| Down Arrow | Next navigable item [1] [2] | Last item [2] | Next visible marker table | Next item [2] | Last focusable item | |
| Left Arrow | Hide marker table | Hide all marker tables | ||||
| Right Arrow | Show marker table | Show all marker tables | ||||
1. Previous/next navigable item. It could be the last row of the previous base item's marker table, a bulk action, or another movie/episode row.
2. Also applies when a Show/Season is focused.
3. Does not include header rows like section options, bulk actions, and 'back to seasons/results'.
| Base Key | Modifier(s) | |||||
|---|---|---|---|---|---|---|
| None | Ctrl | Alt | Shift | Ctrl+Shift | Ctrl+Alt+Shift | |
| Up Arrow | Previous row or base item | Jump to first table row [1] | Jump to previous base row | Jump to previous visible table | Jump to first focusable item | Jump to first visible table |
| Down Arrow | Next row or base item | Jump to last table row [1] | Jump to next base row | Jump to next visible table | Jump to last focusable item | Jump to last visible table |
| Left Arrow | Previous row input | Jump to first row input | Right Arrow | Next row input | Jump to Last row input | |
1. If a dropdown is currently focused, goes to the next/previous row, as a normal up/down changes the selected option.
In most scenarios, negative timestamps can also be used to indicate an offset from the end of an episode. E.g. if you want to bulk add a Credits marker to a season that covers the last 30 seconds of the episode, you could enter -0:30 for the start time and -0 for the end time.
There are several client-side settings that can be configured by clicking on the cog next to the main web app title:

In the top-right of the settings dialog, there are three icons
The left-most icon will pause the application (after confirmation). If you play it safe (as recommended) and shut down Plex before editing markers, but want to continue using Plex after making some edits, you can pause the server, which will disconnect from the Plex database and allow you to safely run Plex without completely shutting down the application. When you want to start editing markers again, simply click Resume:

If you want to restart the server (e.g. if you changed config.json and want to reload with the new settings, or Plex was running at the same time (not recommended) and some new items were added), you can click the middle restart icon. After confirmation, the server will disconnect from everything, reload the configuration file, and start fresh.
If you want to cleanly shut down the server, click the right-most icon. Note that Ctrl+C in the console window you used to start the application will also perform a clean shutdown.
As the name implies, enables or disables dark mode. By default, the application will try to determine your browser/system theme and follow that, but it can be overridden both here, and using the toggle in the top-right of the application:

Click to view light theme
Click to also view light theme bulk action overlay


If enabled, will remember the last library you selected so you don't have to select it from the dropdown after every reload.
Even if your files have preview thumbnails and previewThumbnails is enabled, you might not want to display them at all. Unchecking this will do that.
This is a middle ground between the default behavior of displaying thumbnails whenever adding or editing a marker, and disabling thumbnails completely. If enabled, thumbnails will be collapsed by default, with the option to show them by clicking 'Show Thumbs':

If enabled, preview thumbnails will load automatically for the current timestamp after a very brief period of inactivity so that you don't have to press 'Enter' every time you want to view a new thumbnail.
Even if extendedMarkerStats are enabled, you might not care about all the extra information right now. Disabling this will show simpler data in the right column of results, only showing the number of episodes in a show/season instead of full marker statistics:

This setting determines how "sticky" your choices are. As an example, the bulk add dialog defaults to timestamp-based intro markers, and the add will fail if any markers overlap with existing ones. If Remember User Choices is set to "Don't Remember," those defaults will be applied every time the bulk add dialog is launched. However, if set to "Per Session," any modifications to the default options will be remembered until the browser tab is closed or refreshed. As you would expect, setting this to "Across Sessions" will remember your choices across browser sessions.
Currently, this setting affects bulk actions (add, shift, delete) as well as adding individual markers.
This will affect both the client and server log level. If something isn't working as expected and you want to debug an issue, or just want to get more details about what the application is doing, you can set it to Verbose (or if you want too much information, TMI). Or if you don't want log messages cluttering your console windows you can set it to Warn or Error. For most people, the default of Info is fine.
Clicking "Server Settings" will display the server settings dialog, allowing you change core server configuration settings, as outlined in Marker Editor Configuration.
In addition to adding/editing/deleting individual markers, operations can also be done on an entire show or season (bulk actions are not available at the movie or episode level).
When navigating to a particular item, the first result row will be the Bulk Actions row, with buttons containing the available actions:

When performing any bulk operation, there will be a customization option that will display a table of all markers/episodes affected:

As you would expect, clicking the checkbox will check/uncheck the row, and clicking the checkbox in the table header will check/uncheck all rows. Any rows that are unchecked will not have the bulk operation applied. Multiselect is also supported by clicking anywhere else in the row. Following most file explorers, Ctrl+Clicking a row will select/unselect it, Shift+Clicking a row will select everything between the current row and the previously selected row (unselecting everything else), and Ctrl+Shift+Clicking will select (or unselect) everything between the current row and the previously selected row, preserving any other selected items. Two checkboxes will appear next to the first selected item in the list once 2 or more rows are selected, which allows you to check/uncheck all selected items.
Expand to see a multiselect example


With the bulk add dialog, you can add a marker with the given timestamp to all episodes of a show or season. However, this may result in conflicts with existing markers, and there are several ways to handle those conflicts, selected via the Apply Action dropdown:
-
Fail: If any added marker conflicts with an existing marker, fail the entire operation. This will ensure that you don't end up in a state where some episodes don't have the marker applied, while others do. When this action is selected and the customization table is visible, markers that will cause the operation to fail will be shown in red.
Expand to view overlap error example

-
Overwrite: If any added marker conflicts with existing markers, delete the existing markers. This can be helpful in cases where Plex's autogenerated markers are incorrect, and you want to essentially combine a bulk delete with a bulk add. The customization table will look the same as the Fail table above, except the overlapping markers will be deleted when you attempt to apply the operation.
-
Merge: If any added markers conflict with existing markers, merge them with into the existing markers. In the customization table, the start/end time will be adjusted to display the merged marker bounds, and shown in yellow.
Expand to view overlap warning example

-
Ignore: If any added markers conflict with existing markers, only apply the marker to episodes that have no conflicting markers, ignoring the others. In the customization table, the start/end time will be shown in red, and the text greyed out.
Expand to view ignored marker error

In all three cases, if a start/end time is yellow/red, hovering over the timestamp will display a tooltip indicating what marker(s) conflict with the bulk add.
In addition to the standard bulk add process above, markers can also be bulk added based on chapter data, assuming at least one episode being modified has chapter data available. Clicking the 'Chapter Mode' button will adjust the UI:

The Baseline episode will be used to calculate markers for everything else in the customization table. Since there aren't any guarantees that a particular chapter will be shared across all episodes, there is some fuzzy matching involved. There are four levels of confidence:
- Most confident - the episode has a chapter name that matches the currently selected chapter in the baseline. These episodes will be highlighted in green in the customization table.
- Moderately confident - the episode has a partial match - either the start or end matches the name or timestamp of the baseline chapters. These will be highlighted yellow in the customization table.
- Low confidence - the episode has chapter data to compare, but a timestamp/name match could not be found. The chapter with the closest timestamp will be selected. These will also be highted yellow in the customization table.
- No confidence - the episode doesn't have any chapter data, so no comparisons can be made. Timestamps fall back to the baseline's chapter timestamps. These will be highlighted red in the customization table.
In all the above cases, hovering over the title will show a tooltip explaining what calculation was done.
Expand for example

However, there may be scenarios where the fuzzy matching doesn't match chapters correctly. In this case, there's also the option to force index matches. This means that regardless of the underlying timestamps, the same chapter number will be used across all episodes. That is, if the baseline is using the 10th chapter, all other episodes will also use the 10th chapter, even if there is another chapter that more closely matches the baseline chapter's timestamp.

The bulk shift operation allows you to shift all markers for a given show/season by a set amount of time. Like the bulk add operation and modifying individual markers, the offset can be specified with either millisecond values or mm:ss[.000]. Adding a negative in front of the time will shift the markers backwards.
If you only want to shift the start or end, but not both, you can check 'Shift start and end times separately', which will allow you to choose custom start and end shift times.
There are two ways to attempt to apply the shift, 'Apply' and 'Force Apply', outlined below.
This will try to apply the given time shift to all applicable markers. There are several cases where this will fail to apply:
- When the customization table isn't showing:
- There are episodes with multiple markers.
- The shift results in at least one marker being completely pushed off the start or end of the episode.
- When the customization table is showing:
- There are episodes with multiple markers that haven't been addressed in the customization table.
- There are markers where the shift would cut off the start or end of the marker.
- The shift results in at least one marker being completely pushed off the start or end of the episode.
If the operation fails and the customization table isn't showing, it will subsequently be displayed.
This will attempt to force apply the shift to all applicable markers, even if some episodes have multiple markers. However, it will still fail if the shift results in at least one marker being completely pushed off the start or end of the episode. If the customization table is showing, any unchecked markers will also be ignored.
If the operation fails and the customization table isn't showing, it will subsequently be displayed.
Selecting this will show a table of all applicable markers, their existing timestamps, and their potential new timestamps. In the ideal case, the shifted times will be green, as there are no conflicts.
(Expand to view ideal case example)

If a shift causes a the start/end of a marker to be cut off, the time will be displayed in yellow.
(Expand to view trimmed marker example)

If a shift causes a marker to be cut off completely, it will be displayed in red, and won't be applied, even if checked (also indicated by the greyed out times shifting from the old times to the new times):
(Expand to view completely trimmed marker example)

If an episode has multiple markers, the SXXEYY text will start out yellow and unchecked.
(Expand to view multi-marker episode example)

Checking one marker in the episode will mark all linked rows that are unchecked in red, indicating the shift won't be applied to them. 'Apply' will not continue until all marker groups are resolved (i.e. at least one marker in the group is checked)
(Expand to view resolved multi-marker episode example)


As the name implies, the Bulk Delete action allows you to delete all markers for a given show/season. Selecting Customize will allow you to ignore specific markers. Checked/red markers will be deleted. You can also quickly filter to just intro or credits markers.
(Expand to view bulk delete customization example)

The following options are available at the library-level, accessible via 'Section Options' at the top of the library listing:

Clicking on 'Sort/Filter' will bring up a simple menu that allows you to filter results based on the number of intro and/or credits markers an item has, and sort by title, marker count, and marker percentage (TV libraries only):

Both sorting and filtering is pretty basic right now, simply letting you find items with a marker count less than, equal to, or greater than a given number. If a value is not provided, that marker type will not be filtered.
When a sort or filter is active, the button will be highlighted, with a tooltip describing the current sort/filter applied. Also, if any items have been filtered out of the current view, a filter icon will be visible, with a tooltip explaining how many items have been hidden:

Version 2.2 introduced basic import/export functionality, allowing you to save all markers in your database to a file that can then be imported at a later date. The import/export menu can be found under the 'More...' menu item shown above:

The exported markers are tied to the movie's/episode's GUID, meaning that you could export markers from one server and import them into another server, as long as both servers/libraries used the same agent.
Clicking 'Export' will bring you to a confirmation screen, optionally allowing you to export markers from all libraries, not just the current one. From there, confirming 'Export' will download the exported marker file:

In the same 'More...' menu, 'Import markers' will take you the Import screen:

There are three fields to fill out:
- Select a file: 'Choose File' will open up a file picker, where you can select your previously exported file from your filesystem.
- Apply to all libraries: This checkbox controls whether the markers in the imported file should be applied to all libraries or just the currently selected one. As mentioned above, the markers are tied to a Plex GUID, so as long as libraries are using the same agent, they can be applied to all libraries of the same type.
- Conflict Resolution Type: This determines what to do when markers in the imported file conflict with existing markers. These options behave the same as the purged marker restoration options listed below.
Once everything is in place, click 'Import' to import the markers. If the operation succeeded, you'll be taken to a screen summarizing what happened:

If you want to delete all markers from a section, custom or otherwise, you can select 'Delete all markers' from the section options menu. As the name implies, this will delete all markers from the library, in addition to wiping out any backup information associated with the library, meaning the operation cannot be undone:

Because of its destructive nature, you must type DELETE into the text field before confirming the action. A dropdown is also provided, allowing you to delete intro markers, credits markers, or both.
One thing to note, however, is that this won't get rid of Plex's intro detection data that is stored in the blobs database and as extra_data in the media_parts table of the main database. So for now, if you're hoping to delete all markers and start intro analysis from scratch, you'll have to do that yourself by running some variation of the following on your blobs database:
DELETE FROM blobs WHERE blob_type=5;That will delete all intro detection data for all episodes in your server, allowing (and forcing) intro detection to run again when an episode is reanalyzed.
Another feature of the Marker Editor is a high-level breakdown of marker counts in your library. If extendedMarkerStats is enabled, the breakdown should appear quickly. Otherwise, the application will scan all markers in the library to create the breakdown, which may take some time depending on the size of your library. Hovering over a particular segment will tell you the marker count that it represents
Click to see example marker breakdown

Unfortunately, there are some scenarios that will cause Plex to reset markers for an item. Reanalyzing a season, or adding a new episode to an existing season will reset the markers for that season. Similarly, analyzing a movie will wipe out customizations for that movie. This application tries to account for this by recording all user actions in a separate database, and on app boot checking those actions against all markers in the Plex Database.
Note: Library-level purged marker detection is only available if
extendedMarkerStatsare enabled.
After selecting a library, there will be a 'Find Purges' button below 'Marker Breakdown'. Clicking this will initiate the search for purged markers, and launch an overlay with the results. In the ideal case this will show a message indicating that no purged markers were found, but if any were found, they will be displayed:

From there, you can choose whether to restore the missing markers or ignore them, at either the individual marker level, the show/movie level, or the entire library level. As one might expect, restoring will attempt to add the marker back to the database, while ignoring them will not add the marker back to the database, but instead prevent it from ever being displayed again.
In some cases, the markers that were purged overlap with existing markers, for example if you bulk-shifted intro markers 2 seconds because Plex showed the skip button too soon. In those cases, there are several resolution strategies that can be used:

- Overwrite: If any existing markers overlap with the restored marker, delete the existing marker. This is useful if you previously tweaked Plex-generated markers and analyzing the item reset them.
- Merge: If any existing markers overlap with the restored marker, merge them into one marker that spans the full length of both.
- Ignore: If any existing markers overlap with the restored marker, keep the existing marker and permanently ignore the purged marker.
Outside of the main purge dialog, there will also be an indication of purged markers when digging into individual shows (and at the search result level if extendedMarkerStats are enabled), in the form of a warning triangle that will indicate the number of purged markers when hovering over it:

When clicking on the icon, a dialog similar to the one above will appear, scoped down to whatever item you drilled down into.
In the web app, a banner should appear when a new version is available:

If you don't want to upgrade yet, choose when you want to be reminded next (if at all for this version), and 'Ignore for Now'. Otherwise, 'Go to Release' will take you to the latest release. To upgrade, first ensure the application isn't running. From there, the update process will depend on how you installed the application:
-
If you are on Windows and downloaded the executable, download the latest .zip release and extract the contents to the same folder that you extracted the previous release, overwriting all contents (your configuration and backup database won't be affected).
-
If you downloaded an archive of the source, similarly download the latest zip/tar.gz source and extract it to the same location as the previous release, overwriting all contents. To ensure a clean state, you can first delete everything except the
Backupfolder andconfig.json. After extracting the new release, runnpm installto pick up any new dependencies/remove any old dependencies. -
If you used
git clone, you can checkout the latest tag indicated on the release page (replacingv1.2.4below with that tag):$ git pull $ git checkout tags/v1.2.4If you want to create a permanent branch for the release:
$ git pull $ git checkout tags/v1.2.4 -b v1.2.4