Tut 05
![]()
You can see the parts of this series here:
- Tut 01 - Introduction
- Tut 02 - Extending the example
- Tut 03 - Services and all
- Tut 04 - ...and services for all
- Tut 05 - This article
- Tut 06 - Custom Custom Custom
- Tut 07 - Custom like a bike
- Tut 08 - Dr. Ferris, I presume? Web Geography, injected with Rust! [P. I]
- Tut 09 - It rains cats and dogs... and crabs! Rusty Meto-Geography [P. II]
In this fifth part we are going to see how to use external libraries in our app.
The code has been tagged with the relative tutorial and part.
git clone https://github.com/davidedelpapa/yew-tutorial.git
cd yew-tutorial
git checkout tags/v5p1Easy to answer: NPM. Little presentation for those who do not know, skip ahead to the first section (index.html) at will.
NPM stands for who knows what (check it on their website), and we already used it to install rollup, back in Tutorial 1:
npm install --global rollupOf course this is the command line utility, to fetch and install javascript libraries and tools in the system, or in the current node project.
However, we need not to install a library in our project as code running on our machine (which is still doable, but only if you are using rust/wasm to create libraries for the back-end. Or, for some help as we will see very soon). Instead, we need the code to be usable in the front-end, that is, the code must be downloaded from the client's browser.
For these cases there is another tool that will come to our rescue UNPKG: this is in fact a repository of the same libraries that are on NPM, but available as CDN (content deliverly network). Of course, we already were using it, in the index.html there's the line to summon our css framework, picnic, but I didn't linger too much on it:
<link rel="stylesheet" href="https://unpkg.com/picnic" />Both npm and unpkg are ways to manage JavaScript libraries, so why are we discussing them in a Rust/WASM context? Well, as of today the development in the web technologies is tied to JavaScript: we can copile Rust into WASM, but the WASM itself is loaded trhough JS. Even other, similar technologies, such as TypeScript, or even Flutter, all compile (better still, traspile) to JS. There's not going around in the Web without JS. Even using server side languages (Perl, PHP, Python, the same Javascript through Node, ...) they have to resort many a time to Javascript in the browser to be usable.
Of course, I do not want to transform this in a JS course; I don't want to transform it in a HTML5 or CSS course either. However, when dealing with web technologies some JS, HTML5, or CSS will be useful. We'll restrict ourself here to the bare minimum. In a way it is also useful, because many will want to use WASM in conjunction with the other web technologies. Going on writing this series I realized that the more I want to teach something useful, the more we need to touch arguments which are not strictly connected to Rust/Yew/WASM. For example, in the next installment we will talk about a little more nuanced devops, for example, involving hot reload in the browser, node apps, and shell (Bash) scripts. I'll leave these as optional, but I really think we should take advantage of the whole available stack whenever posssible.
So many times this means loading and use JS libraries, and that we will presently do.
Back to work: as usual we'll go about with a practical approach. We'll start off with a minimalist example, though.
In our index.html we have to link the libray we are going to use: uuid! This JS library is used to create a universally unique identifier: uuid (I know there's already the Rust one, but it's for semplicity's sake).
<!DOCTYPE html>
<html lang="en">
  <head>
    <title>Yew Tutorial</title>

    <meta charset="utf-8" />
    <meta name="viewport" content="width=device-width, initial-scale=1" />

    <script src="/pkg/bundle.js" defer></script>
    <script src="https://unpkg.com/uuid@latest/dist/umd/uuidv4.min.js"></script>
  </head>

  <body></body>
</html>
We took away the css framework (going really minimalist here), and put in our external library.
We are going to put our external service to a file on its own, src/external.rs, thus we need to create it and write its content.
use wasm_bindgen::prelude::*;
use web_sys::console;
We'll use some from wasm_bindgen and the console from web_sys; don't worry we are going to update the Cargo.toml (or skip ahead and update it already, if you want).
#[wasm_bindgen]
extern "C" {
    #[wasm_bindgen]
    fn uuidv4() -> JsValue;
}- We are going to use an external JS libray, therefore we need to import with the FFI interface all the object and functions we need to use, remembering to bind each with the
#[wasm_bindgen] - We are using the uuid version 4, so we only need to interface with that funtion (
uuidv4), we can skip interfacing other JS modules in this libray and concentrate only on what is needed. -
JsValueis the type for all values coming from JavaScript. We can use it as return type from JS functions, then try to convert it to Rust types. We already use it all the times as part of the return type ofrun_app()in our src/app.rs so it should not be shockingly new. However up to now we have not got around to play with it: coming up very soon.
#[derive(Default)]
pub struct ExternalService();
We declare a struct for the service. We did not have any need really, but in this way we can modify it later on.
Time to impl our struct!
impl ExternalService {
    pub fn new() -> Self {
        ExternalService()
    }

    pub fn uuidv4(&mut self) ->String {
        let v = uuidv4();
        v.as_string()
        .unwrap_or_else(|| {
            console::log_1(&JsValue::from_str("Can't get a uuid"));
            "".to_string()
        })
    }
}
the new() function does not present any difficulty, that is why it's there without further thought.
Instead we have a more interesting function uuidv4 which will manage for us the connection with the uuid package. We have defined the return type of the external uuidv4 as a JsValue; now ve have to call it and convert the result to a more useful String
-
let v = uuidv4(): we assign the result of the JSuuidv4()function to the variablev: this variable is effectively a (web_sys)JsValuenow. -
v.as_string(): we try to convert theJsValueinto a RustString; -
.unwrap_or_else: the as_string() may fail, so we need to uwrap its return type; in case it fails we use anunwrap_or_elsethat allows us to get the result from the return of a closure. -
console::log_1(&JsValue::from_str("Can't get a uuid")): we start the closure by logging the sentence "Can't get a uuid", however to do so we need to pass a reference to our JsValue to theconsole::log_1, which is theweb_sysconsole. Why would we not use Yew's own console? First of all, Yew's console service is for the Yew part, while the code in src/external.rs is more general, and low level. Secondly, we can instantiate Yew's services in the Yew part, creating theServiceConsolethere; here we are in the low side of the stack, better to use some more appropriate low-level tools. However, it is always doable, but I mainly did it to show you how to use a console independently of Yew ( 😉 ). - After logging, we return an empy string. Why would we do so? well, in src/app.rs this will be more evident, but just as is: generally speaking if a front-end control is returning an error, it is less ugly to not show red errors and whistles to the user. If the user for example pushes a button and nothing happens, the user will think the interface is broken and still go on. However, if the user starts to see error codes, messages, and all, the user will start to get worried about what really is happening under the hood, what went wrong, and so on. A better solution that showing nothing is a system that catches the error, and just shows to the user a message saying what went wrong in plain and simple English (if it's not accurate, no problem); the important is not to worry people with debugging messages, which, at the end of the day, are meant for developers, not for users. A simple "The service is not working at the moment", would suffice, so if you want to substitute the empy string with this message, go ahead. I know I am opinionated. In any case, if you need to show a modal to the user, you already know how to do it from previous articles.
Our src/external.rs is complete, fully functional, and modular enough to accept improvements.
The addition to the src/lib.rs is minimal: we just need to add a mod external; after mod app;, in order to use the src/external.rs
The whole file looks like the following:
#![recursion_limit = "256"]
mod app;
mod external;
use wasm_bindgen::prelude::*;

#[wasm_bindgen]
pub fn run_app() -> Result<(), JsValue> {
    yew::start_app::<app::App>();

    Ok(())
}
We really do not need the recursion_limit at this point in time, yet if the code for the html! macro gets more complicated, we will quiclky need less strict recursion limits.
Our app needs instead an heavy decluttering and rewriting intervention.
use crate::external::ExternalService;
use yew::prelude::*;
We just use Yew's prelude and our src/external.rs identified with the somewhat new use crate:: ... way (if you are a Rust programmer since longer times, do you remeber the way we used to do it before?)
pub enum Msg {
    PollService,
}
Just one message, to poll the external service.
pub struct App {
    link: ComponentLink<Self>,
    service: ExternalService,
    uuidv4: String,
}
Beside the omnipresent ComponentLink, we need to summon the ExternalService (you see, how did we get a more standardized way?), and we need a String to hold our uuid version 4.
    fn create(_: Self::Properties, link: ComponentLink<Self>) -> Self {
        App {
            link,
            service: ExternalService::new(),
            uuidv4: "".to_string(),
        }
    }
The create function does not need any special attention.
    fn update(&mut self, msg: Self::Message) -> ShouldRender {
        match msg {
            Msg::PollService => {
                self.uuidv4 = self.service.uuidv4();
            }
        }
        true
    }
The update function is easy enough, we assign to the App.uuidv4 the result of our external service's uuidv4() function.
    fn view(&self) -> Html {
        html! {
            <div>
                <button onclick=self.link.callback(|_| Msg::PollService)>{ "Get a UUID" }</button>
                <p>{ format!("{}", &self.uuidv4) }</p>
            </div>
        }
    }
Also the view function is not complex at all, we diplay a button to request the uuid, that we will display inside the <p> tags. Notice that if the string is new, the <p> tags will be empty, likewise if there is an error. The console though, will show that error, as we discussed above for the external.rs file: in this way user needs are kept separated from dev needs.
We just need to update the [dependencies] section
[dependencies]
wasm-bindgen = "^0.2"
yew = "0.12"
web-sys = { version = "0.3", features = ["console"] }
The console is feature-gated in web-sys, that is, we need to compile web-sys explicitly with the feature console in order to use it.
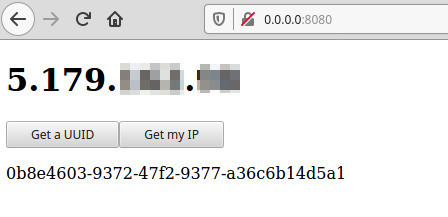
There is nothing left for us, but to run our app.

As we can see, the <p> tags are empty, as noticed before.

Here an image of a uuid we got.
API is the real deal in the external servces world. However, API discoverability is a huge problem (don't let me started rambling on this).
However, if you know of an API and need to integrate it directly in your app, look no further than this Part here.
git checkout tags/v5p2We will add a src/api.rs to our project, so that we can keep everything organized. Let's procede in an orderly fashion.
We here need a new Rust library, anyhow; we brought back also serde
[dependencies]
wasm-bindgen = "^0.2"
yew = "0.12"
web-sys = { version = "0.3", features = ["console"] }
anyhow = "1"
serde = "1"
Anyhow is a crate for error managment. It is a solution that allows a fair balance between control and semplicity. It does not allow for fine-graded granular error messages, but this is not its target. After all, custom error messages are good for building a library, not for frontend developers. Instead what it lacks in control is given back by the ease of use. We shall see it in action very soon.
Same drill as usual, we add mod api
#![recursion_limit = "256"]
mod api;
mod app;
mod external;
use wasm_bindgen::prelude::{wasm_bindgen, JsValue};

#[wasm_bindgen]
pub fn run_app() -> Result<(), JsValue> {
    yew::start_app::<app::App>();

    Ok(())
}Our new shiny api interface. To test a web API, we shall try hostip.info. They have an API that checks your host ip adress, and sends it back in a JSON object, together with other information (the other info is seldom available, and it is of no use for this specific task anyway). In other words, it acts like a echo server, but for the caller address. It is very useful for geo-related applications.
Two words about the fetch architecture. Yew relies on the browser's standard, wich is build around JavaScript Promises. Thus it is a inherently async task. Wat it means is that there will be a fair bit of ping-pong between the browser and the API server. For this reason our code can be thought this way:
browser --->  Request ---> server
                             ||
  ====                  (elaboration)
                             ||
browser <--- Response <--- server
Between request and response the browser does not sit there waiting, that is, we can't allow our users to have a frozen page, they can and should continue with the regular use. This is especially good when a page has to handle many different services: if we can do other stuff between request and response, we can handle many services at the same time.
In order to have such a mechanism in place, we need a way to poll the server with a function, and a way in whcih the server's answer may call one of our functions once it is ready, in order to get executed.
These kinds of functions are called callback. We will se in the src/app.rs code: the fetch service will handle an appropriate Msg for the callback results, but this Msg will not be called from anywhere in the view function's components. Instead, it will be called by the callback.
More on that later on.
With these things in mind, let's start the analysis of our src/api.rs
use anyhow::{anyhow, Error};
use serde::Deserialize;

use yew::callback::Callback;
use yew::format::{Json, Nothing};
use yew::services::fetch::{FetchService, FetchTask, Request, Response};
We are using anyhow and serde as promised, but also a use yew::callback::Callback, to manage our callback.
We are using also an impressive series of elements in the fetch service, use yew::services::fetch::{FetchService, FetchTask, Request, Response}.
Topping it all, we have the use yew::format::{Json, Nothing} formats, since usually all API services get objects and send objects in the JSON format. Nothing will be needed in the GET request body (pun intended).
Next, we'll have a struct to handle the JSON response from the server.
#[derive(Deserialize, Debug, Clone)]
pub struct ServerResponse {
    pub country_name: String,
    pub country_code: String,
    pub city: String,
    pub ip: String,
}
When designing an API interface it is best to explore the server response, and mimick it in our code, so that we can save the entire response, and parse it later on.
In this case, we are interested only in the ip field. However, the server will answer with a JSON response such as the following:
{
  "country_name": "(Unknown Country?)",
  "country_code": "XX",
  "city": "(Unknown City?)",
  "ip": "XXX.XXX.XXX.XXX"
}
I invite you always to check carefully and reproduce the server response. Go visit http://api.hostip.info/get_json.php.
Of curse, there are ways to get in a somewhat hacky manner just the one ip field needed.
However, many times you will need more than one field; moreover, it is easier to adapt the code, should the server's response signature, or version, change afterwards.
Next we will instantiate the main struct, HostipService:
#[derive(Default)]
pub struct HostipService {
    fetchserv: FetchService,
}
We just need it to contain the FetchService in this case. A good addition to it would be the use of options.
impl HostipService {
    pub fn new() -> Self {
        Self {
            fetchserv: FetchService::new(),
        }
    }
We start the impl of our HostipService struct. Nothing new in the new function (I shuld quit making puns, it became a vice).
    pub fn get_response(&mut self, callback: Callback<Result<ServerResponse, Error>>) -> FetchTask {
        let url = format!("http://api.hostip.info/get_json.php");
        let handler = move |response: Response<Json<Result<ServerResponse, Error>>>| {
            let (meta, Json(data)) = response.into_parts();
            if meta.status.is_success() {
                callback.emit(data)
            } else {
                callback.emit(Err(anyhow!(
                    "{}: error getting ip from http://api.hostip.info/get_json.php",
                    meta.status
                )))
            }
        };
        let request = Request::get(url.as_str()).body(Nothing).unwrap();
        self.fetchserv.fetch(request, handler.into())
    }
}
Don't get scared: we will analyze the get_response very carefully:
- First thing we can notice: it gets a
Callbakas argument, of the type Result. We are Handling Error through theanyhowcrate for this Result. - The function returns a
FetchTaskthat we will store in our App - We first store the Web API URL in a url variable, and we create a named closure that will be called by the fetch architecture, when the response from the API arrives to the page.
- Inside the closure we have to move first the response that we will receive by the server.
- We unpack the response into the meta (headers), and data (body of the response). We wrap in
Jsonthe data - as usual for HTTP based services, the header will contain a code 200 if all went well, otherwise an error code. Thus we check if the status is a success (200), or not (all other codes).
meta.status.is_success()is useful for the purpose. - In case of success, we need to return our result. The problem is that this is no ordinary function, with a
returnkeyword. In this case we have toemitourcallback, that is, we will send the return of the API service to the callback, in this case the JSON wrapped data. We have to return the response in this indirect way (through side effects), because we will return aTaskService, that is needed to handle the fetching process. - In case of failure, we
emitthe error, using theanyhow!macro to raise the error with a custom message, in which we embed also thestatus, so we know the error status of the API Server. - Now to the meatier part of the get_response: we prepare Request for the server, as a
GETrequest, usingRequest::get; we pass to it the url of the API server, andNothingas the body. In reality it is not "nothing", but a formatted body that counts as a no-body (because there's no need) for the server. That is where we use ouruse yew::format::Nothing. - Finally we return the
fetchtask (which actually can be sent now). To this task we pass both the request we just prepared, and the closure to be called when the response by the server is back.
To recap, the process unfolds this way:
- we send a request to the server API through the FetchService
self.fetchserv.fetch(request, handler.into()), to which we pass the request we want to send and a closure to handle the callback - FetchService sends the requests to the web API service, and waits for its answer, which it then passes on to the closure.
- the closure is responsible to call the
Callback<Result<ServerResponse, Error>>, through theemitfunction, in order to emit the data of the response or the error (both areemitted trhough the sameCallback). - the callback will take care of calling the appropriate Msg, but we will see this in the src/app.rs
As we can see, the answer is first taken care of by the first closure, then the closure has the possibility to pass the control to a callback, in order to inform the relevant components in the User Interface. There must be a chain of pieces of code that takes care of the response for a reason: one thing is to handle the response at the level of http requests, responses, and errors, and quite another thing is to deal with the content of the response, and render the user interface accordingly (do you remember the 7 application layers of the internet?)
We shall see the callback in action very soon, inside the src/app.rs.
Let's start as usual with the use section
use crate::api::{HostipService, ServerResponse};
use crate::external::ExternalService;
use anyhow::Error;
use yew::format::Json;
use yew::prelude::*;
use yew::services::fetch::FetchTask;
use yew::services::ConsoleService;
Besides Yew's prelude and ExternalService, we added a few other use.
We have Yew's ConsoleService service, Json format, and the FetchTask to use the API service. We have also anyhow, and of course our src/api.rs with use crate::api.
We added two messages to the Msg structure,
pub enum Msg {
    PollService,
    GetIpResponse,
    IpResponseReady(Result<ServerResponse, Error>),
}
GetIpResponse is used to poll the api.rs, IpResponseReady will be triggered when the response has arrived from the server, and has been processed; it contains ServerResponse, wrapped in a Result.
The App struct has grown considerably.
pub struct App {
    link: ComponentLink<Self>,
    service: ExternalService,
    uuidv4: String,
    ipservice: HostipService,
    r: Option<ServerResponse>,
    callback: Callback<Result<ServerResponse, Error>>,
    task: Option<FetchTask>,
    console: ConsoleService,
    ip: String,
}
We added a ipservice to hold the HostipService, r will hold the ServerResponse, wrapped in a Option. HostipService.get_response() returns a FetchTask, but we'll initialize r with None in our new(), and then we'll assign to it the response from HostipService.get_response().
As we said, we have a callback property to hold our Callback; task and console will hold the FetchTask and the ConsoleService respectively.
We added ip as the final prop: at the end of the day, when we have to render the UI, it will be much easier if we extract just this one info from the JSON object containing the api server response. This way we do not have some data handling code (for the extraction) in the view, but it will stay in the update where this logic belongs.
Time to impl the App.
impl Component for App {
    type Message = Msg;
    type Properties = ();

    fn create(_: Self::Properties, link: ComponentLink<Self>) -> Self {
        App {
            link: link.clone(), // watchout!
            service: ExternalService::new(),
            uuidv4: "".to_string(),
            ipservice: HostipService::new(),
            callback: link.callback(Msg::IpResponseReady),
            r: None,
            task: None,
            console: ConsoleService::new(),
            ip: "".to_string(),
        }
    }
In create, as usual, we initialize our struct. Everything goes nice and smooth, but do watch out for the line where I wrote watchout! We clone() the link, because we will really need not to move it just at this point. As we know, the borrow checker does not know what mercy is, it is an Angel of Justice, and may justice be done! So remember to clone if you need to use it again afterwards: it will spare you a long list of errors and a red stained console, which is the usual job made by this Angel of Destruction.
All jokes apart, we do love Rust because of the power given us by the borrow checker, don't we?
The focus point here, though, is the App::callback: In fact it is here that the 'magic' will happen, as we pass the Msg::IpResponseReady to the Callback, and our code in the src/api.rs will trigger this message with te response needed. Thus, the message IpResponseReady will not be triggered by the UI, but by the code.
Notice that the callback() belongs to link: that is why we needed to clone the link before otherwise we could not generate a callback.
The rest of the constructor is simple init logic.
Our update has grown in response to the Msg growth, and then some more.
In fact, since Msg::IpResponseReady contains an Option, we need to have it unpacked for the match: a branch for the Ok(), and another for the Err(): that makes for two additional branches, instead of one.
    fn update(&mut self, msg: Self::Message) -> ShouldRender {
        match msg {
            Msg::PollService => {
                self.uuidv4 = self.service.uuidv4();
            }
            Msg::GetIpResponse => {
                let task = self.ipservice.get_response(self.callback.clone());
                self.task = Some(task);
            }
            Msg::IpResponseReady(Ok(r)) => {
                self.r = Some(r);
                self.console
                    .log(format!("Response: {:?}", Json(self.r.clone())).as_str());
                self.ip = self.r.as_mut().unwrap().ip.clone();
            }
            Msg::IpResponseReady(Err(e)) => {
                self.console.log(format!("Error: {:?}", e).as_str());
            }
        }
        true
    }
Msg::GetIpResponse calls the ipservice.get_response() passing to it the Callback and returning the response (which is a FetchTask) as an Option, as we have discussed before.
The Msg::IpResponseReady Ok() branch first saves in App::r the response, wrapped in Option with Some(). After this, we want to print to the JS Console the JSON wrapped response, just for reference (delete it at will). Then, as said, we extract the ip field from the JSON response, and assign it to our App::ip prop; of course to do so we need to get a reference to the response, uwrap it, get the field and clone it...
One thing to notice: we could really spare us to save the response in App::r if we really need only to extract the ip field. In fact, we could refactor the code deleting it altogether. We have no need also to print the response to the Console. We just are showing the code, because it might well be that in a real world situation we need the whole response, or to serialize it inside different props.
The Msg::IpResponseReady Err() branch instead just logs the error to the console.
The view is quite minimalist indeed:
    fn view(&self) -> Html {
        html! {
            <div>
                <h1>{ format!("{}", self.ip ) }</h1>
                <button onclick=self.link.callback(|_| Msg::PollService)>{ "Get a UUID" }</button>
                <button onclick=self.link.callback(|_| Msg::GetIpResponse)>{ "Get my IP" }</button>
                <p>{ format!("{}", &self.uuidv4) }</p>
            </div>
        }
    }
We fire the Msg::GetIpResponse message trough a button, and we added code to show the ip prop wrapped in a <h1> tag. As promised: the view logic should refrain from handling too much backstage logic, it should just show a nice view (well, sometimes it is unavoidable, but still).
In this example we can appreciate how a well prepared handling of the props results in a terser view code. This is needed also because many times the view is already cluttered by CSS related classes, etc...
In action it looks like this:

Here when you ask for your IP:
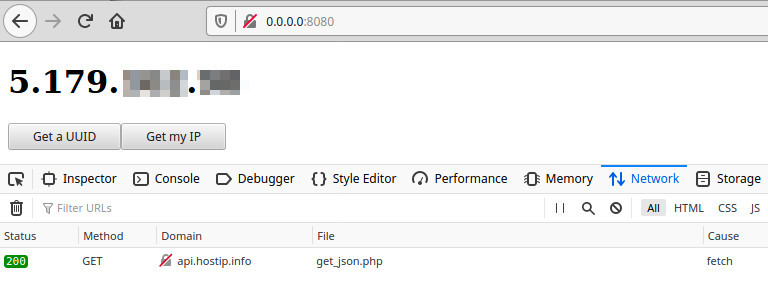
Notice how the request goes out to the web api, and how it is logged in the console.

Finally both the services of this tutorial in action.
Lots of words for today, I hope you enjoyed working with APIs, because it will be our bread and butter for the next tutorials and for real world apps. Stay tuned and excited.