


Install and have your USB Rubber Ducky working in less than 5 minutes.
-
Download CircuitPython for the FeatherS2. Currently version is 7.0.0
-
Plug the device into a USB port. Press the Reset button, then within a second it the boot button. It will show up as a removable media device named
UFTHRS2BOOT. -
Copy the downloaded
.uf2file to the root of the Pico (RPI-RP2). The device will reboot and after a second or so, it will reconnect asCIRCUITPY. -
Download
adafruit-circuitpython-bundle-7.x-mpy-YYYYMMDD.ziphere and extract it outside the device. -
Navigate to
libin the recently extracted folder and copyadafruit_hidto thelibfolder on your FeatherS2. -
Also from
lib, copy adafruit_wsgi to thelibfolder on your FeatherS2. -
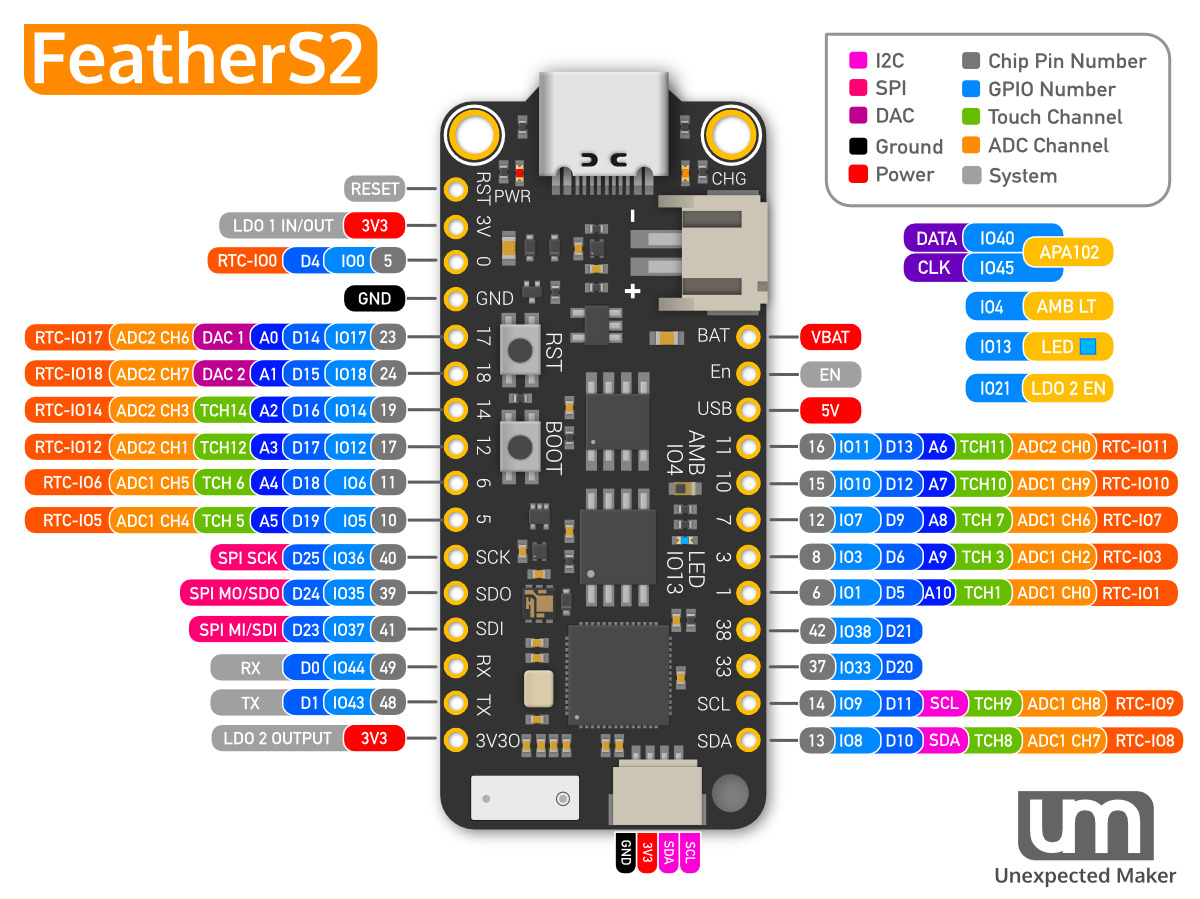
Connect pin IO35 (
IO35) to pin 4 (GND). This will enable setup mode once the files are copied to the FeatherS2. -
Download boot.py, code.py, ducyinpython.py, webapp.py, and wsgserver.py.
-
Download
adafruit_wsgi/wsgi_app.pyand copy tolib/adafruit_wsgion the FeatherS2. Removewsgi_app.mpyfrom that folder. -
Copy boot.py, code.py, ducyinpython.py, webapp.py, and wsgserver.py to the root of the FeatherS2.
-
Find a script here or create your own one using Ducky Script and save it as
payload.ddon the FeatherS2. -
Create the file
secrets.pyin the root of the FeatherS2. This contains the AP name and password to be created by the FeatherS2.
secrets = { 'ssid' : "BadAPName", 'password' : "badpassword" } -
Unplug the FeatherS2, remove the jumper from
IO35, and plug back in your FeatherS2. -
The FeatherS2 should reboot into AP mode, serving from the address of
http://192.168.4.1 -
Navigating to
http://192.168.4.1should list out the available payloads. You can run the scripts from the menus.
To edit the payload, enter setup mode by connecting the pin IO35 (IO35) to pin 4 (GND), this will stop the feathers2-ducky from starting the Wifi and will reenable USB drive function.
The easiest way to so is by using a jumper wire between those pins.


See the Wiki
pico-ducky tutorial by NetworkChuck
USB Rubber Ducky playlist by Hak5
CircuitPython tutorial on the Raspberry Pi Pico by DroneBot Workshop