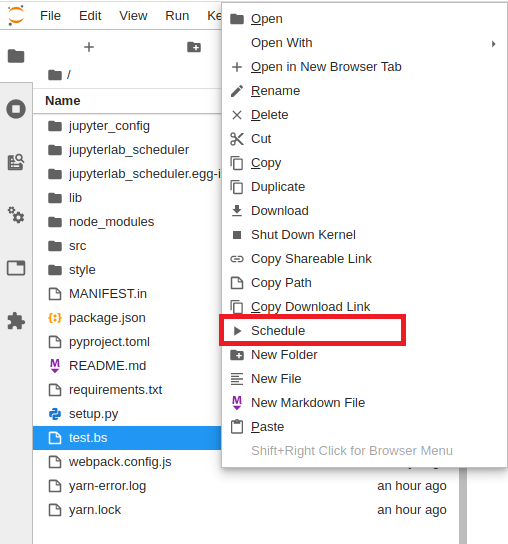
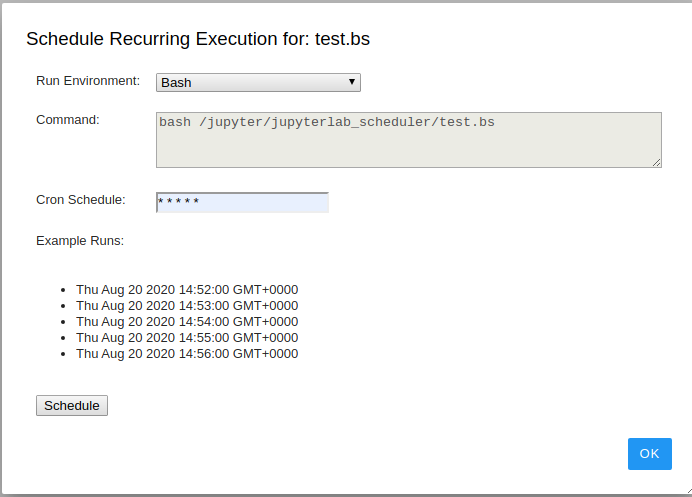
A simple plugin for scheduling files for recurring execution using the cron utility within the Jupyter Lab UI. Use cases
Security Note: Cron jobs are executed under the permission set of the JupyerLab process; if you start jupyter as root (not recommended!) every job that is scheduled via the UI will also run as root.


- JupyterLab
- Cron installed on the JupyterLab host
To install using pip:
pip install jupyterlab_scheduler

jupyter labextension install jupyterlab_scheduler
Installation in the Jupyterlabs Docker images is slightly different, because the base Jupyter Docker image is missing some of the pre-requisities. Here's an example Dockerfile that installs the required deps & scheduler plugin:
FROM jupyter/scipy-notebook:latest

# Switch to root user to install cron
USER root
RUN apt-get update && apt-get install --yes cron

# Switch back to Jupyter user
USER $NB_USER

RUN fix-permissions $CONDA_DIR && \
    fix-permissions /home/$NB_USER

# Set USER to the env variable jupyter uses for the default account
ENV USER=$NB_USER

RUN jupyter labextension install jupyterlab_scheduler
Running into this error?
ERROR: Service 'jupyter' failed to build: The command '/bin/bash -o pipefail -c jupyter labextension install jupyterlab_scheduler' returned a non-zero code: 1
... basically means you ran out of memory on your host. The jupyter plugin installation process is quite memory intensive.
For a development install (requires npm version 4 or later), do the following in the repository directory:
# Clone the repo to your local environment
# Move to jupyterlab_scheduler directory
# Install dependencies
npm install

# Install your development version of the extension
jupyter labextension install .
You run JupyterLab in watch mode to watch for changes in the extension's source and automatically rebuild.
# Run jupyterlab in watch mode & compile JS on change
npm run watch & jupyter lab --watch
Now every change will be built locally and bundled into JupyterLab. Be sure to refresh your browser page after saving file changes to reload the extension (note: you'll need to wait for webpack to finish, which can take 10s+ at times).
# Run jupyterlab in auto reload mode & compile JS on change
npm run watch &  jupyter lab  --autoreload --NotebookApp.token='' --NotebookApp.password='' --no-browser
Works better when developing server extensions
Note: Make sure to close any old npm run watch jobs that may be running in the background.
Update version number in:
- package.json
- jupyterlab_scheduler/_version.py
Update JavaScript files:
npm installBuild the server-side portion of the plugin for disitibution on Pypi:
python3 setup.py sdist bdist_wheel

python3 -m twine upload --repository pypi dist/*jupyter labextension uninstall jupyterlab_schedulerWhen I click "schedule" an error message "There was an error submitting job" appears
- Solution 1: If you're installing this plugin in Docker, follow the Docker instructions above - you're likely missing the cron dependency
- Solution 2: Your operating system isn't using the USER environment variable to track the current user (common in Docker images) - manually set the USER environment variable to your current user
When installing, I get an error "ERROR: Service 'jupyter' failed to build: The command '/bin/bash -o pipefail -c jupyter labextension install jupyterlab_scheduler' returned a non-zero code: 1"
- Solution 1: Check your system's memory, you've likely exceeded your memory - the jupyter installation process is resource intensive.
- Solution 2: Check your system's disk space, you may have run out of capacity