devon4j layers
As we already mentioned in the introduction to devon4j the components of our Java back-end apps will be divided into three layers: service, logic and dataaccess.
-
service: The layer that contains the REST services to exchange information with the client applications. -
logic: The layer hosting the logic of the application (validations, authorization control, business logic, etc.). -
dataaccess: The layer that communicates with the database.
|
ℹ️
|
If you haven’t learned about Dependency Injection yet, please visit the devon4j guide to Dependency Injection. Dependency Injection is an important principle in enterprise software development, that enables separation of concerns, decouples interfaces from their implementation and allows us to potentially reuse code. |
Following the devon4j recommendations for Dependency Injection in MyThaiStar’s layers we will find:
-
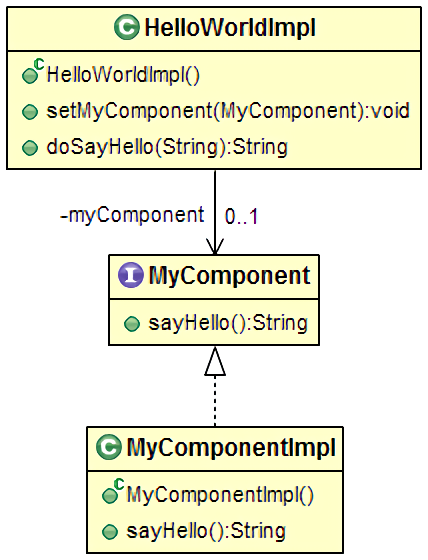
Separation of API and implementation: Inside each layer we will separate the elements in different packages:
apiandimpl. Theapiwill store theinterfacewith the methods definition and inside theimplwe will store the class that implements theinterface:
-
Usage of JSR330: The Java standard set of annotations for Dependency Injection (
@Named,@Inject,@PostConstruct,@PreDestroy, etc.) provides us with all the needed annotations to define our beans and inject them:
@Named
public class MyBeanImpl implements MyBean {

  @Inject
  private MyOtherBean myOtherBean;

  @PostConstruct
  public void init() {
    // initialization if required (otherwise omit this method)
  }

  @PreDestroy
  public void dispose() {
    // shutdown bean, free resources if required (otherwise omit this method)
  }
}The communication between layers is solved using the described Dependency Injection pattern, based on Spring and the Java standards: java.inject (JSR330) combined with JSR250.

import javax.inject.Inject;
import javax.inject.Named;

import com.devonfw.application.mtsj.bookingmanagement.logic.api.Bookingmanagement;

@Named("BookingmanagementRestService")
public class BookingmanagementRestServiceImpl implements BookingmanagementRestService {

  @Inject
  private Bookingmanagement bookingmanagement;

  @Override
  public BookingCto getBooking(long id) {
    return this.bookingmanagement.findBooking(id);
  }

  ...

}import javax.inject.Inject;
import javax.inject.Named;
import javax.transaction.Transactional;
import com.devonfw.application.mtsj.bookingmanagement.dataaccess.api.repo.BookingRepository;
@Named
@Transactional
public class BookingmanagementImpl extends AbstractComponentFacade implements Bookingmanagement {
@Inject
private BookingRepository bookingDao;
@Override
public boolean deleteBooking(Long bookingId) {
BookingEntity booking = this.bookingDao.find(bookingId);
this.bookingDao.delete(booking);
return true;
}
...
}As we mentioned at the beginning, the service layer is where the services of our application (REST or SOAP) will be located.
In devon4j applications the default implementation for web services is based on Apache CXF, a services framework for Java apps that supports web service standards like SOAP (implementing JAX-WS) and REST services (implementing JAX-RS).
In this tutorial we are going to focus only on the REST implementation of services.
The services definition is done by the service interface located in the service.api.rest package. In the booking component of MyThaiStar application we can see a service definition statement like the following:
@Path("/bookingmanagement/v1")
@Consumes(MediaType.APPLICATION_JSON)
@Produces(MediaType.APPLICATION_JSON)
public interface BookingmanagementRestService {

  @GET
  @Path("/booking/{id}/")
  public BookingCto getBooking(@PathParam("id") long id);

  ...
}
JAX-RS annotations:
-
@Path: Defines the common path for all the resources of the service.
-
@Consumes and @Produces: Declares the type of data that the service expects to receive from the client and the type of data that will return to the client as a response.
-
@GET: Annotation for the HTTP GET method.
-
@Path: The path definition for the
getBookingresource. -
@PathParam: Annotation to configure the id received in the url as a parameter.
The service implementation is a class located in the service.impl.rest package that implements the previous defined interface.
@Named("BookingmanagementRestService")
public class BookingmanagementRestServiceImpl implements BookingmanagementRestService {

  @Inject
  private Bookingmanagement bookingmanagement;

  @Override
  public BookingCto getBooking(long id) {

    return this.bookingmanagement.findBooking(id);
  }

  ...
}
As you can see, this layer simply delegates method-calls to the logic layer, in order to resolve business logic requirements of the app.
In this layer we store all the custom implementations we will need to fulfill the requirements of our application. Including:
-
business logic
-
delegation of the transaction management to Spring framework
-
object mappings
-
validations
-
authorizations
Within the logic layer we must avoid including code related to services or data access, we must delegate those tasks to the suitable layers.
As in the service layer, the logic implementation will be defined by an interface located in a logic.api package.
public interface Bookingmanagement {

  BookingCto findBooking(Long id);
  ...
}In a logic.impl package an "…Impl" class will implement the interface defined in the previous section.
@Named
@Transactional
public class BookingmanagementImpl extends AbstractComponentFacade implements Bookingmanagement {

  // @see #getBookingDao()
  @Inject
  private BookingDao bookingDao;

  // The constructor.
  public BookingmanagementImpl() {

    super();
  }

  @Override
  public BookingCto findBooking(Long id) {

    BookingEntity entity = getBookingDao().findOne(id);
    BookingCto cto = new BookingCto();
    cto.setBooking(getBeanMapper().map(entity, BookingEto.class));
    cto.setOrder(getBeanMapper().map(entity.getOrder(), OrderEto.class));
    cto.setInvitedGuests(getBeanMapper().mapList(entity.getInvitedGuests(), InvitedGuestEto.class));
    cto.setOrders(getBeanMapper().mapList(entity.getOrders(), OrderEto.class));
    return cto;
  }

  public BookingDao getBookingDao() {
    return this.bookingDao;
  }

  ...
}
In the above MyThaiStar logic layer example we can see:
-
business logic and object mappings
-
delegation of the transaction management through Spring’s
@Transactionalannotation
In the code examples of the logic layer section you may have seen a BookingCto object. This is one of the transfer objects defined in devon4j. It is used to transfer data between the layers.
The main benefits of using Transfer Objects are:
-
Avoid inconsistent data (when entities are sent across the app, changes tend to occur in multiple places).
-
Clearly define how much data to transfer (direct relations often lead to the transfer of too much data).
-
Hide internal details.
In devon4j we can find two different Transfer Objects (TOs):
-
Have the same data-properties as their underlying entity.
-
Hold no relations to other entities.
-
Provide simple and solid mapping.
-
Have no data-properties at all.
-
Only hold relations to other TOs.
-
Either a 1:1 reference or a Collection (List) of TOs.
-
Are easy to map manually by reusing ETOs or other CTOs.
The third — and last — layer of the devon4j architecture is the one responsible for storing all the code related to the connection and access of the database.
For mapping Java objects to the database, devon4j use the Java Persistence API (JPA). Explicitly, the JPA implementation devon4j uses is Hibernate.
Apart from the Entities of components, we are going to find the same elements, that we saw in other layers, in the dataaccess layer: a definition (i.e. an interface) and an implementation (a class that implements that interface).
However, in this layer the implementation is slightly different: The [Target]Repository extends com.devonfw.module.jpa.dataaccess.api.data.DefaultRepository, which provides us with the basic dataaccess methods: save(Entity), findOne(id), findAll(ids), delete(id), etc.
Because of that, in the [Target]Repository implementation of the layer, we only need to add the custom methods that are not implemented yet. Following the MyThaiStar component example (bookingmanagement), we will only find the paginated findBookings implementation here:
import org.springframework.data.jpa.repository.Query;
import com.querydsl.jpa.impl.JPAQuery;

...

public interface BookingRepository extends DefaultRepository<BookingEntity> {

  @Query("SELECT booking FROM BookingEntity booking WHERE booking.bookingToken = :token")
  BookingEntity findBookingByToken(@Param("token") String token);

  default Page<BookingEntity> findBookings(BookingSearchCriteriaTo criteria) {

    BookingEntity alias = newDslAlias();
    JPAQuery<BookingEntity> query = newDslQuery(alias);

    ...
  }
}
The implementation of findBookings uses Spring Data and QueryDSL to manage dynamic queries.
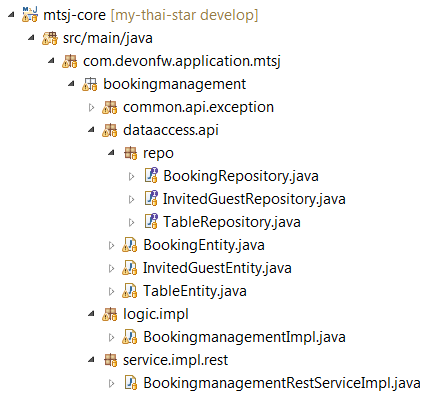
The sections above describe the main elements of layers of the devon4j components. If you have completed the exercise in the previous chapter, you may have noticed that all those components are already created for us by CobiGen.
Take a look to our application structure:
Visitor Component Core (without Relations)

You’ll see the following components:
-
Definition for
dataaccesslayer repository. -
The entity that we created to be used by CobiGen to generate the component structure.
-
Definition of abstract usecase in the
logiclayer. -
Implementation of the
usecasefindlayer in thelogiclayer. -
Implementation of the
usecasemanagelayer in thelogiclayer. -
Implementation of the
logiclayer. -
Implementation of the rest service.
Visitor Component API (without Relations)

-
definition for entity in the
apilayer. -
Entity Transfer Object located in the
apilayer. -
Search Criteria Transfer Object located in the
apilayer. -
Definition of
usecasefindin thelogiclayer. -
Definition of
usecasemanagein thelogiclayer. -
Definition of the
logiclayer. -
Definition of the rest service of the component.
The queue component will have a similar structure. The access code component will also have a similar structure — with minor differences — since it has some relations with visitor and queue.
Access Code Component Core (with Relations)

There is only a single difference in the core. If you look closely, you’ll see that CobiGen didn’t generate the usecasemanage implementation. This is due to the complexity of entities with relations. In this case CobiGen will leave us to create the save and delete methods, so we can properly address them.
Access Code Component API (with Relations)
There is two differences here:
-
As you can see, CobiGen generated a CTO for our entity with relations.
-
As explained in the core, the usecasemanage definition is missing.
So, as you can see, our components have all the layers defined and implemented following the devon4j principles.
By using CobiGen we have created a complete and functional devon4j application without the necessity of any manual implementation (except for more complex entities which will be explained to the next chapter).
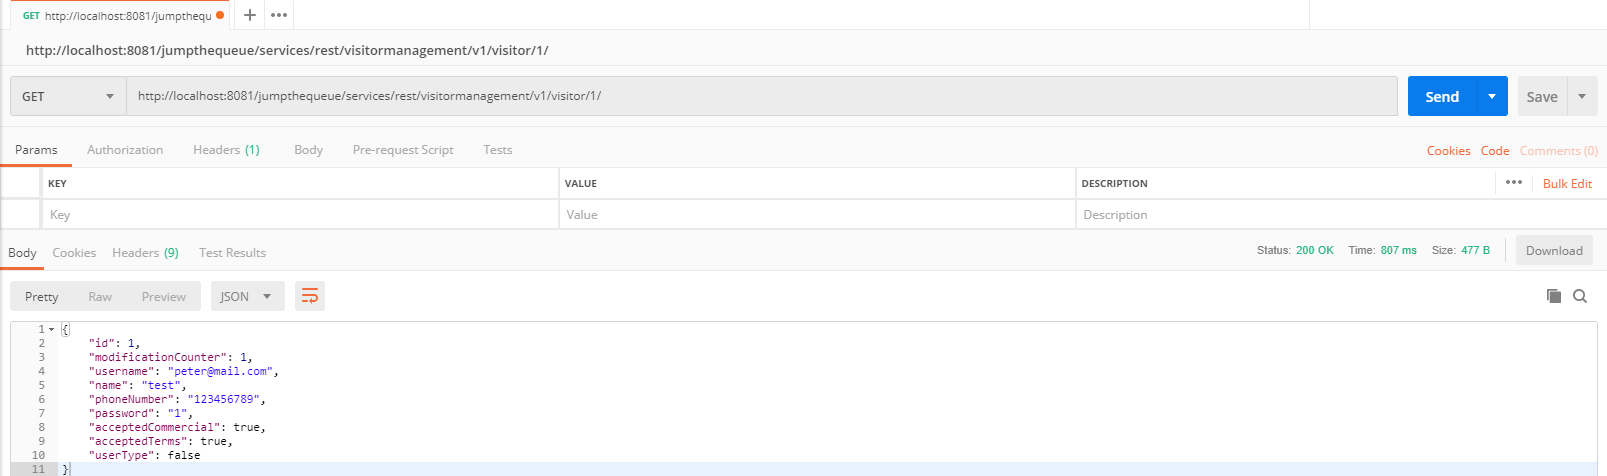
Now we’ll run the application and try to use the REST service to save a new visitor:
As already mentioned, in this tutorial we will be using Postman to test our API.
First, open your JumpTheQueue project in Eclipse and run the app (right-click SpringBootApp.java > Run as > Java Application.
If you remember, we added some mock data previously, to have some visitor info available. Let’s try to retrieve a visitor’s information by using our visitormanagement service.
Select the service GET and send:
http://localhost:8081/jumpthequeue/services/rest/visitormanagement/v1/visitor/1/
We hope to obtain the data of the visitor with id 1.

Instead we get a response containing the login form. This is because devon4j applications, by default, implement Spring Security. So we would need to login to access this service.
To make testing easier, we are going to "open" the application, to avoid the security filter, and we are going to enable the CORS filter to allow requests from (Angular-) clients.
In the file general/service/impl/config/BaseWebSecurityConfig.java edit the configure() method and remove the HTTP request filter. This will authorize every request and allow us access to the app:
@Override
public void configure(HttpSecurity http) throws Exception {

  http.authorizeRequests().anyRequest().permitAll().and().csrf().disable();

  if (this.corsEnabled) {
    http.addFilterBefore(getCorsFilter(), CsrfFilter.class);
  }
}
Finally in the file /jtqj-core/src/main/resources/application.properties set security.cors.enabled to true:
security.cors.enabled=trueNow we run the app again and send the same GET request. We should now be able to obtain the data of our visitor:
CobiGen has created a complete set of services for us, so we can access a paginated list of visitors without any extra implementation.
We are going to use the following service defined in visitormanagement/service/api/rest/VisitormanagementRestService.java:
@Path("/visitor/search")
@POST
public Page<VisitorEto> findVisitors(VisitorSearchCriteriaTo searchCriteriaTo);
The service definition states, that we will need to provide a Search Criteria Transfer Object. This object will work as a filter for the search, as you can see in visitormanagement/dataaccess/api/repo/VisitorRepository.java in the findByCriteria method.
If the Search Criteria Transfer Object is empty, we will retrieve all visitors. However, if we pass data with the object, the result will be filtered.
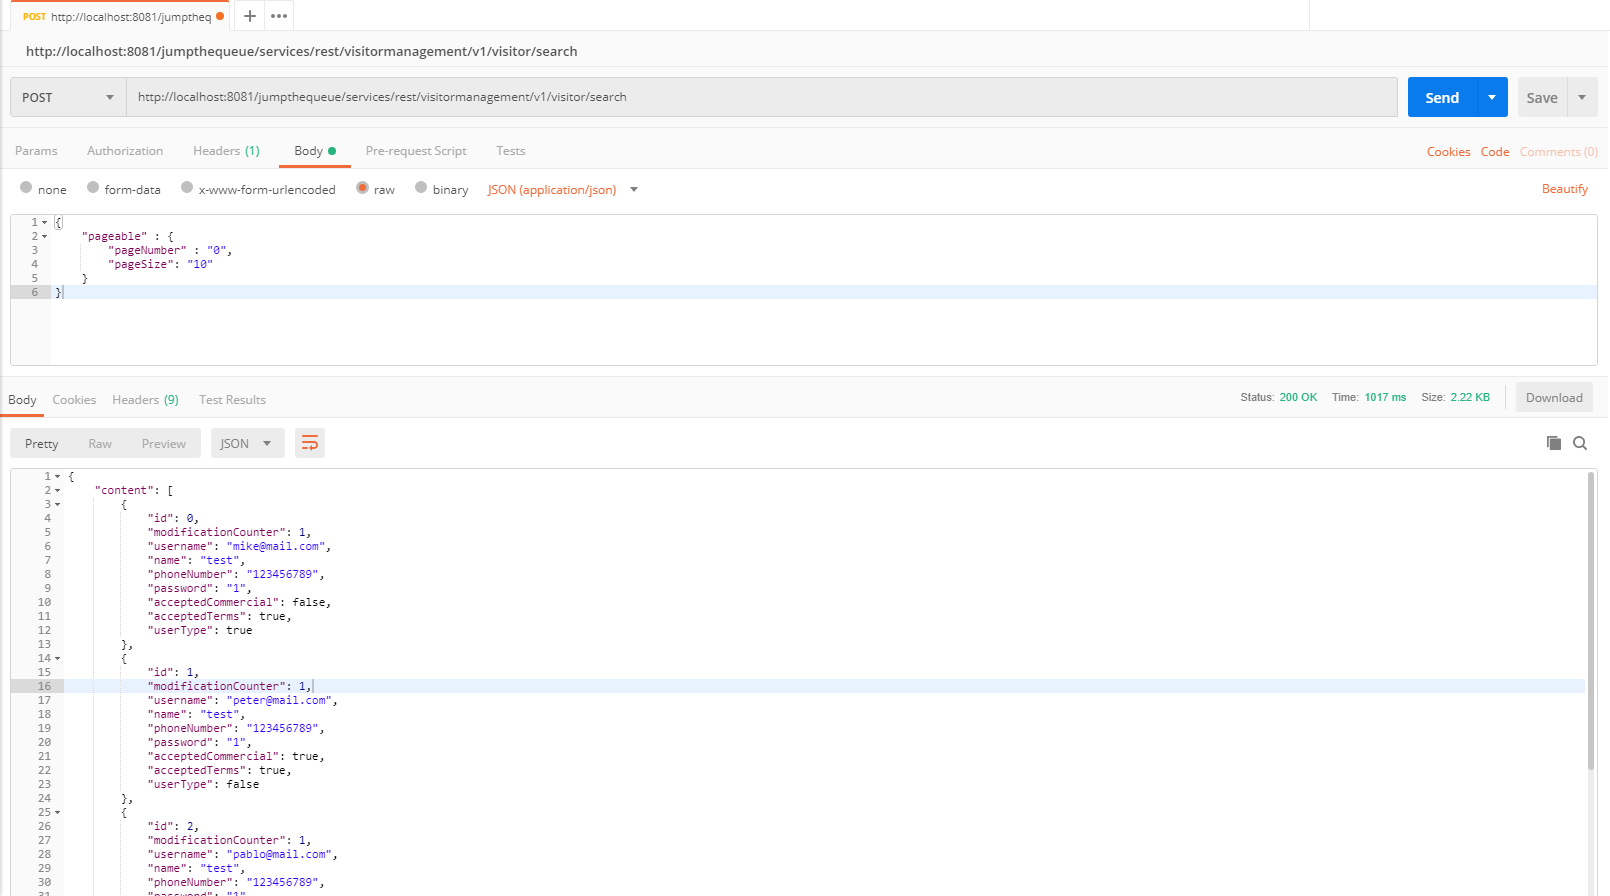
Select the service POST and enter:
http://localhost:8081/jumpthequeue/services/rest/visitormanagement/v1/visitor/search
In the 'Body' tab, below the address bar, we’ll have to define a SearchCriteria object, which will have a pageable defined (make sure, the 'raw' option is selected):
{
	"pageable" : {
		"pageNumber" : "0",
		"pageSize": "10",
		"sort": []
	}
}
In the 'Headers' tab we’ll have to ensure that Content-Type application/json is set, indicating to the server, that it’ll have to interpret the body as JSON format (otherwise, you may face an 415 unsupported type error).
|
ℹ️
|
You can see the definition of the |
The result will appear in the 'Headers' tab and look something like this:
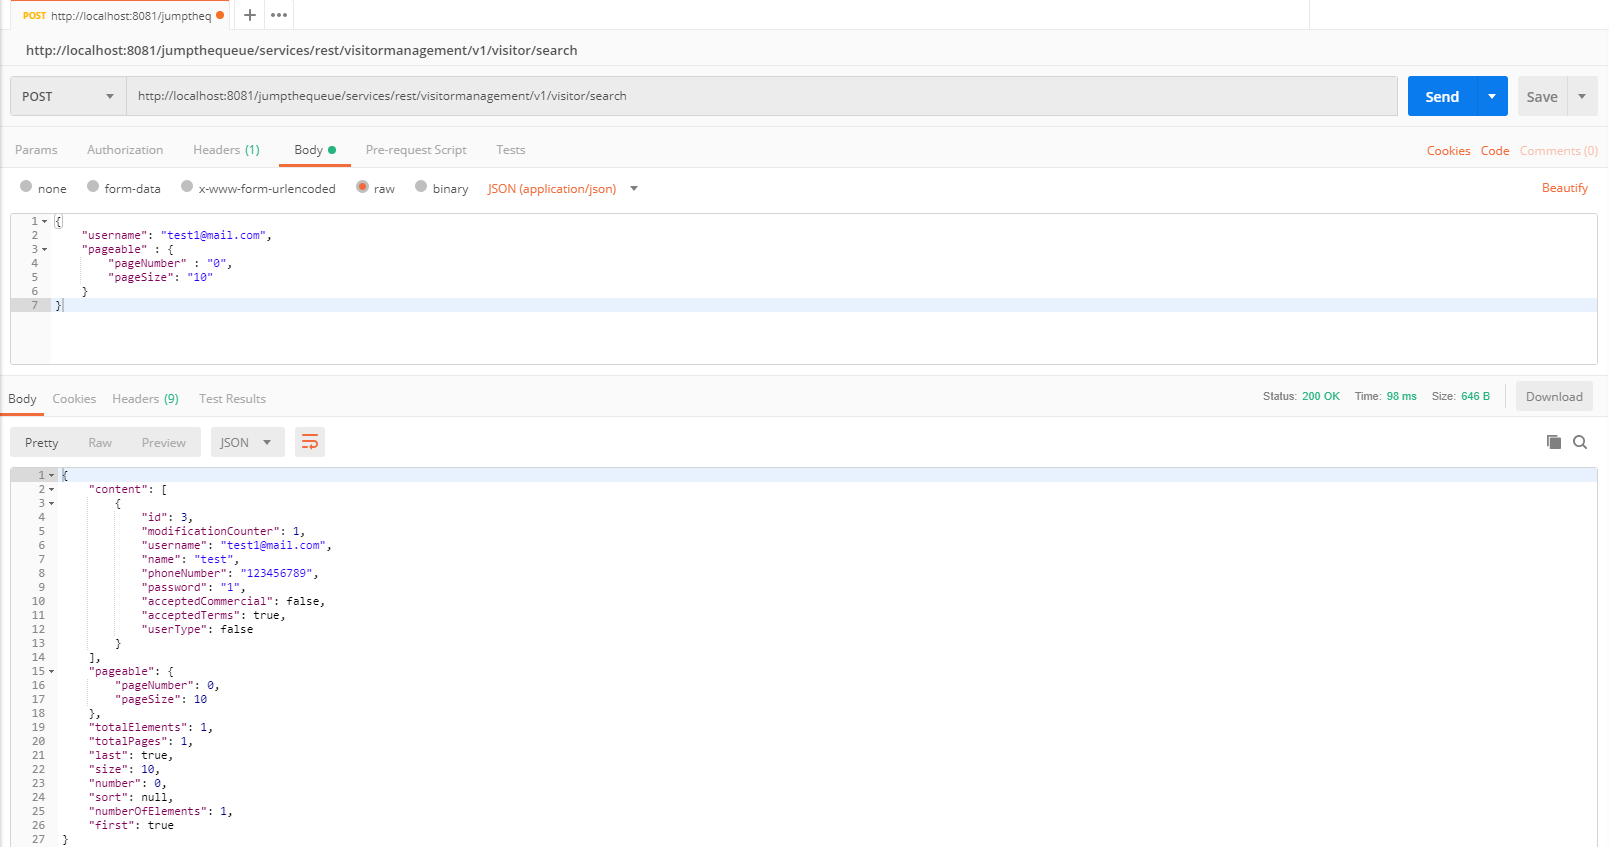
If we want to filter the results, we can define a criteria object in the body. Instead of the previously empty criteria, we now provide an object like this:
{
	"username": "test1@mail.com",
	"pageable" : {
		"pageNumber" : "0",
		"pageSize": "10",
		"sort": []
	}
}
This will filter the results to find only visitors with username test1@mail.com. If we repeat the request now, the result will be this:
We could customize this filter by editing the visitormanagement/logic/impl/usecase/UcFindVisitorImpl.java class.
To meet the requirements of the User Story: Register, we need to register a visitor and return an access code.
By default CobiGen has generated the Read operation in the UcFindEntityImpl for us, as well as the rest of the CRUD operations in UcManageEntityImpl. So we are already able to create, read, update and delete visitors in our database, without any extra implementation required.
To delegate Spring to manage transactions, we only have to add the @Transactional annotation to our usecase implementations. Since devonfw 2.2.0 CobiGen adds this annotation automatically, so we don’t have to do it manually. Check your logic implementation classes and add the annotation in case it’s not present:
@Named
@Validated
@Transactional
public class UcManageVisitorImpl extends AbstractVisitorUc implements UcManageVisitor {
  ...
}
To save a visitor we only need to use the REST resource /services/rest/visitormanagement/v1/visitor and provide the visitor definition for VisitorEto in the body.
|
ℹ️
|
You can see the definition for |
Select the service POST and enter:
http://localhost:8081/jumpthequeue/services/rest/visitormanagement/v1/visitor
Provide a Visitor object in the body, such as this:
{
	"username": "mary@mail.com",
	"name": "Mary",
	"phoneNumber": "1234567",
	"password": "12345",
	"acceptedCommercial": "true",
	"acceptedTerms": "true",
	"userType": "false"
}
We will get the following result:
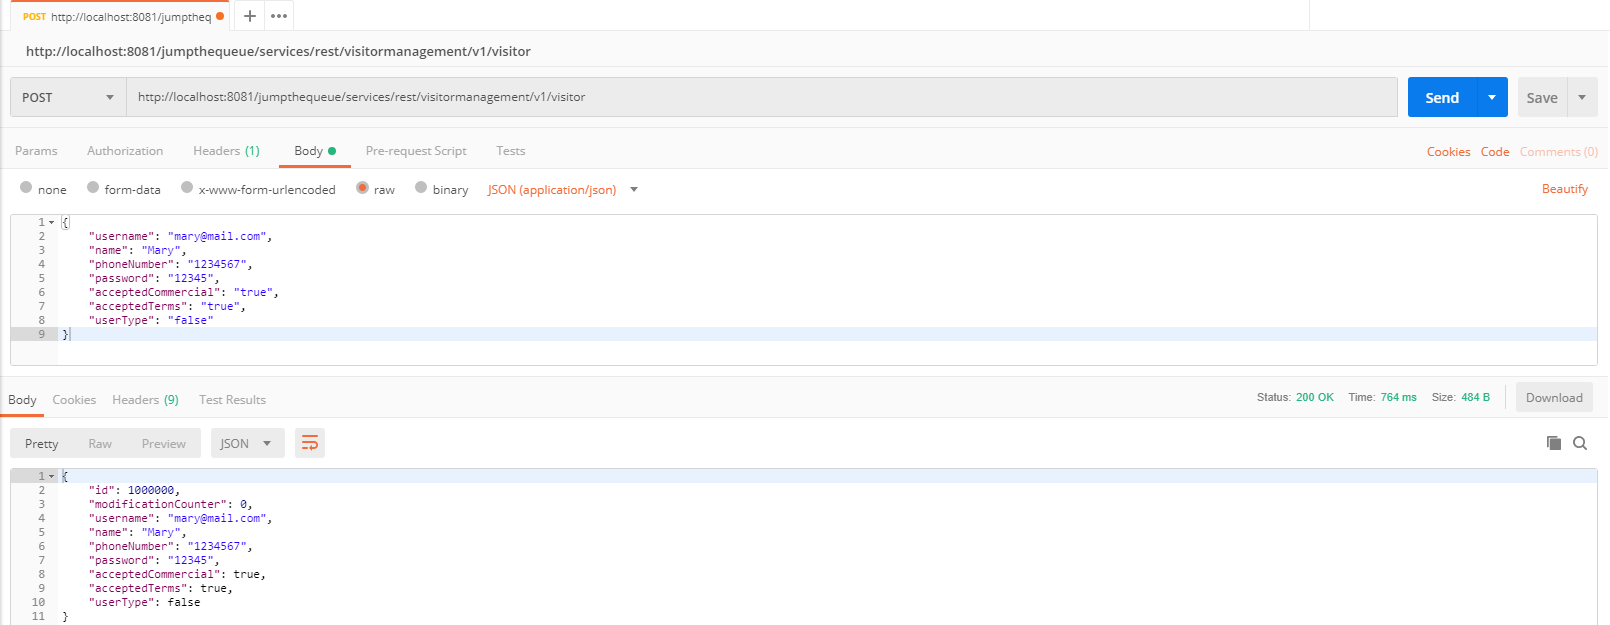
In the body of the response we can see the default content for a successful service response; the data of the new visitor. This is the default implementation when saving a new entity with devon4j applications. However, the JumpTheQueue design defines, that the response must provide the access code created for the user as well, so we will need to change the logic of our application to fit this requirement.
In the next chapter we will learn how to customize the code generated by CobiGen to adapt it to our needs.
Next Chapter: Customizing a devon4j Project
This documentation is licensed under the Creative Commons License (Attribution-NoDerivatives 4.0 International).
