If you have made heating or cooling controls on Node-red you will need nice thermostat widget to display and control your device via Node-red dashboard.

Fully responsive design. Touch enabled set-point makes it even more interactive. Press and hold finger or mouse and it will activate the set-point sliding function.
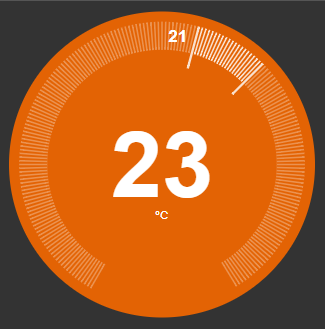
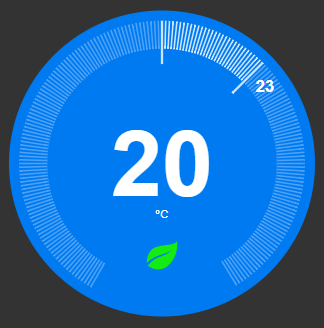
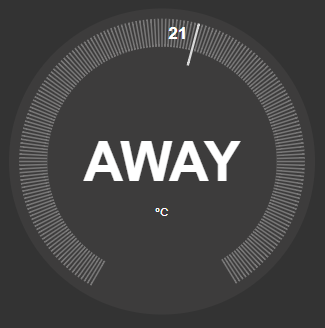
Also it has several display modes like heating, cooling and away. It makes it more interactable and user intuitive. For ECO friendly folks there is possible to turn on and off that little green leaf.
Open and copy all text from flow.js then go to your node-red application and press import > cliboard paste the text and you are done.
After import you should see something like this:

You can push the folowing values in json format. When target temperature is changed from UI node will push new values in the same structure in the output.
ambient_temperatureyour temperature readings numeric payloads.target_temperatureyour thermostat setpoint numeric payloads.hvac_statestring (off,heating,cooling) payload.has_leaveboolean (true,false) payloads.awayboolean (true,false) payloads.
msg.payload = {
    "ambient_temperature": 21.1,
    "target_temperature": 23,
    "hvac_state": "heating",
    "has_leaf": false,
    "away": false
}
If you are familiar with CSS and JAVASSCRIPT there there are more stuff to customize dial colors nd ranges etc.
options = {
       diameter: options.diameter || 400,
       minValue: options.minValue || 10, //Minimum value for target temperature
       maxValue: options.maxValue || 30, //Maximum value for target temperature
       numTicks: options.numTicks || 200, //Number of tick lines to display around the dial
       onSetTargetTemperature: options.onSetTargetTemperature || function() {}, // Function called when new target temperature set by the dial
};

var properties = {
       tickDegrees: 300, // Degrees of the dial that should be covered in tick lines
       rangeValue: options.maxValue - options.minValue,
       radius: options.diameter/2,
       ticksOuterRadius: options.diameter / 30,
       ticksInnerRadius: options.diameter / 8,
       hvac_states: ['off', 'heating', 'cooling'],
       dragLockAxisDistance: 15,
       labels: {
              targetLabel: 'Set',
              ambientUnits: 'ºC'
       }
};
Mode, target and units labels can be edited inside properties part of the code.
import several widgets just make sure you edit uniq ID in these 2 lines inside the code of UI_Template block. Top of the code.
<div id="thermostat1"></div>
var thermostatId = "thermostat1";
change minValue and maxValue temperatures to Farenheit in the options part of the code. The rest should be fine.
options = {
       targetOnCenter: options.targetOnCenter || true, //Display target temperature in center of dial. Otherwise, display ambient temperature
       diameter: options.diameter || 400,
       minValue: options.minValue || 50, // Minimum value for target temperature Farenheit
       maxValue: options.maxValue || 86, // Maximum value for target temperature Farenheit
       numTicks: options.numTicks || 200, // Number of tick lines to display around the dial
       onSetTargetTemperature: options.onSetTargetTemperature || function() {}, // Function called when new target temperature set by the dial
};
Search the code and find roundHalf function:
function roundHalf(num) {
       return Math.round(num*2)/2;
}
Change to this:
function roundHalf(num) {
       return Math.round(num*10)/10;
}
Search the code and find targetOnCenter and set it to false
options = {
       targetOnCenter: false, //Display target temperature in center of dial. Otherwise, display ambient temperature
};
Use the GitHub issues log for raising issues or contributing suggestions and enhancements. GITHUB