control your Nintendo Switch using an Arduino UNO R3 and a Raspberry Pi
- Arduino Uno (R3) + USB cable
- Computer with Serial support via TXD/RXD (I used a Raspberry Pi)
- Nintendo Switch
- Xbox 360 controller (attached to RPi during record, optional but helpful)
- Level Shifter (3 to 5 Volt) for serial communication between RPi and Arduino
- Tiny jumper cable (female female) to flash intermediate device chip
- Linux System like Ubuntu (Debian)
git clone --recursive git@github.com:dornbirndevelops/nintendo-switch-controller-arduino.git
- AVR Compiler (if you wish to build from source)
- DFU Programmer (required to flash Arduino USB2Serial-Controller):
- Python packages
sudo apt install gcc-avr avr-libc dfu-programmer
pip install -r requirements.txt
for minimal setup, note that a precompiled binary is provided in firmares directory.
make
IMPORTANT FOR NOTEBOOK USERS: turn off autosuspend before flashing because dfu-programmer does not recognize your device otherwise. this change can be reverted afterwards.
-
connect the Arduino UNO via USB Cable to your computer
-
verify that the Arduino gets discovered
lsusb
# Bus 001 Device 004: ID 2341:0043 Arduino SA Uno R3 (CDC ACM)
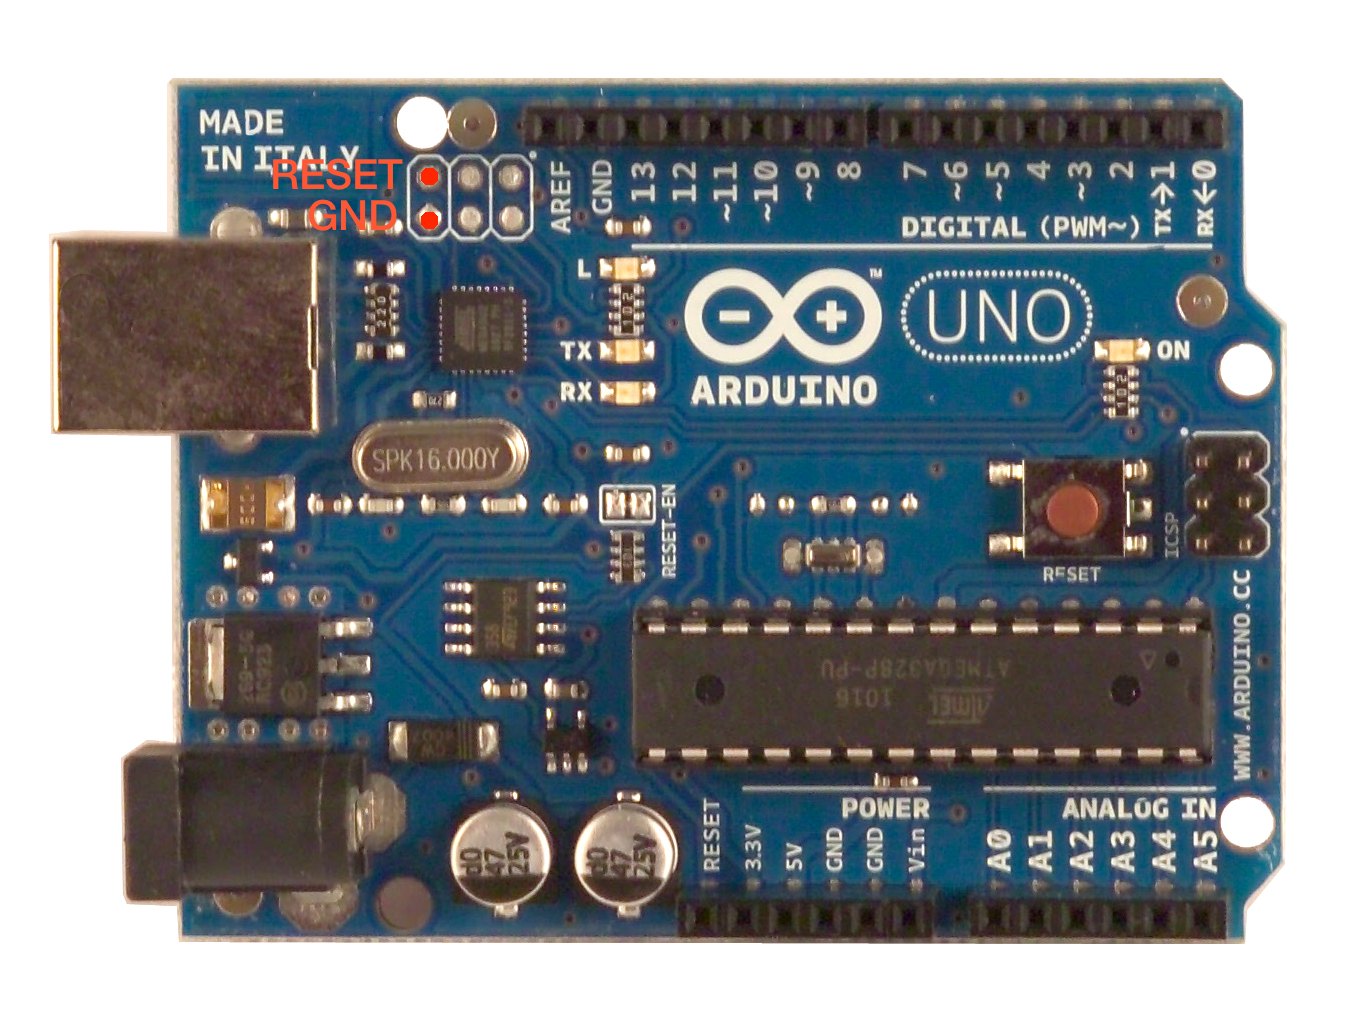
- connect RESET to GND like in the image below for about 1 second:
- verify that the Arduino is now in DFU mode
lsusb
# Bus 001 Device 005: ID 03eb:2fef Atmel Corp.
- decide, which .hex-file you want to flash onto your atmega16u2:
default firmware
sudo dfu-programmer atmega16u2 erase
sudo dfu-programmer atmega16u2 flash firmwares/Arduino-usbserial-atmega16u2-Uno-Rev3.hex
sudo dfu-programmer atmega16u2 reset
serial-controller (apply inputs received from Serial port at 9600 baud, 8 bit data, 1 stop, no parity)
sudo dfu-programmer atmega16u2 erase
sudo dfu-programmer atmega16u2 flash firmwares/serial-controller.hex
sudo dfu-programmer atmega16u2 reset
any other firmware
sudo dfu-programmer atmega16u2 erase
sudo dfu-programmer atmega16u2 flash path/to/firmware.hex
sudo dfu-programmer atmega16u2 reset
- disconnect arduino from computer
The connection chain looks like the following: Nintento Switch <- USB -- Arduino UNO R3 <- Serial (TX PIN!!!) + Serial connection <- Raspberry Pi (also TX!!!) <- (Xbox360Controller)
Wire them in the following order (with no power on!!):
For Serial Communication between these two, it is recommended to use a Voltage Level Shifter (3.3/5 Volt) On Rasperry Pi side:
- GND to Level Shifter GND (low voltage side)
- 3.3V to Level Shifter 3.3V (low voltage side)
- TXD to Level Shifter Channel (low voltage side)
On Arduino Uno R3 side:
- GND to Level Shifter GND (high voltage side)
- 5V to Level Shifter 5V (high voltage side)
- TXD to Level Shifter Channel (high voltage side)
Before asking why you should connect TX from Raspberry (sender) and the TX from Arduino UNO R3 (also sender?!?), note that the usually programmed Chip on the Arduino is the ATmega328P. The chip involved in this project usually is the middleman, a USB to Serial converter. In conclusion, from the ATmega16U2 point of view the external TX and RX pins are swapped. Therefore on the ATmega16U2 the sender is the RX port from the board and vice versa.
Just plug in the USB cable into a USB Port of the Docking Station.
When you have everything connected properly, start the Raspberry Pi first. Start the Nintendo Switch next. Start the Arduino UNO R3 by connecting the USB cable to the Nintendo Switch.
To run a Bot input routine, execute the bot_player.py python script:
python bot_player.py -f path/to/botfile -s /dev/myserial0
this transmits the controller commands listed in path/to/botfile to the serial connection /dev/myserial0
Thanks to Shiny Quagsire for his Splatoon post printer and progmem for his original discovery. Also thanks to bertrandom for his snowball thrower and all the modifications.