
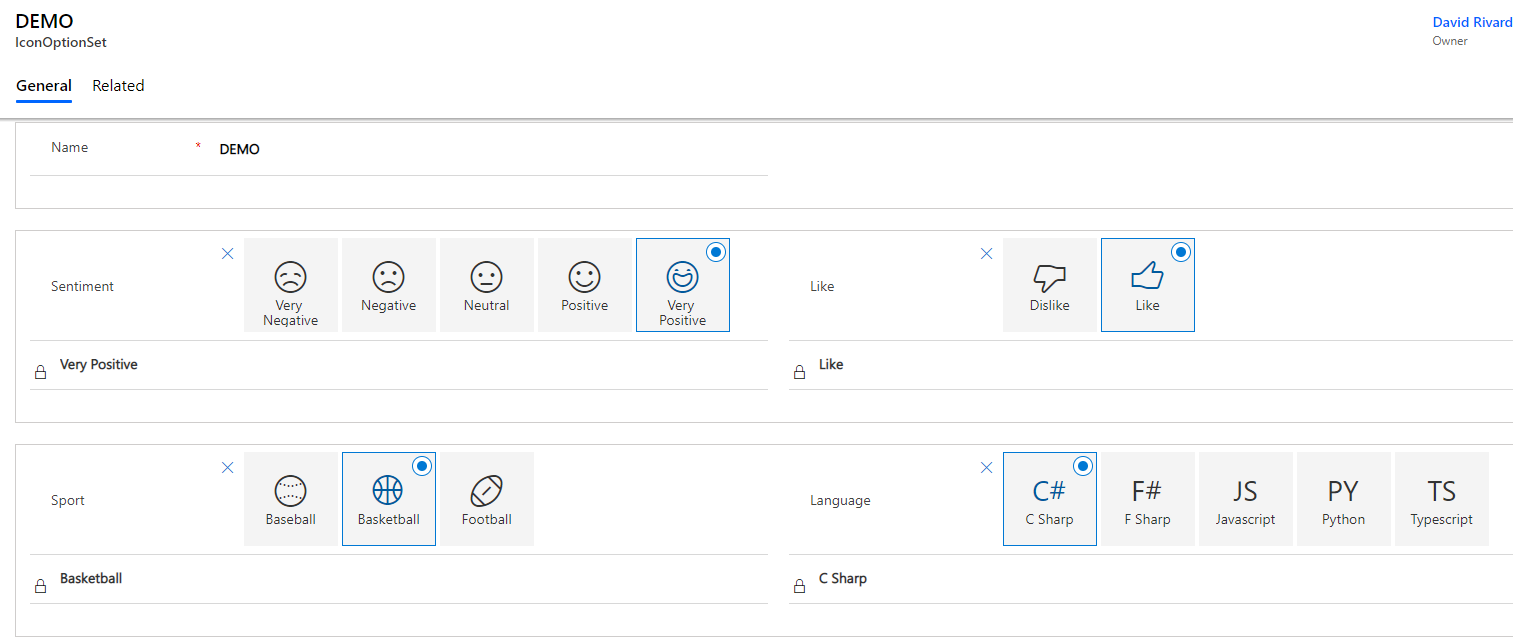
IconOptionset PCF (PowerApps Component framework) Control that turns a PowerApps optionset field into a configurable FluentUI Choice group with Icons. Compatible with up to five options. Optionset labels are used as icon labels.
-
Download latest version here : https://github.com/drivardxrm/IconOptionSet.PCF/releases/latest
-
Available icons here : https://developer.microsoft.com/en-us/fluentui#/styles/web/icons#available-icons
fluentui/react : https://github.com/microsoft/fluentui
| Parameter | Description | Default |
|---|---|---|
| Primary Optionset | Select Optionset (5 values max) | |
| Icon #1 | Name of icon #1, see Available icons link. | EmojiDisappointed |
| Icon #2 | Name of icon #2, see Available icons link. | Sad |
| Icon #3 | Name of icon #3, see Available icons link. | EmojiNeutral |
| Icon #4 | Name of icon #4, see Available icons link. | Emoji2 |
| Icon #5 | Name of icon #5, see Available icons link. | Emoji |
| Selected icon color | Color of selected icon.Supports literal (ex. blue, red) and RGBA color codes (ex. #da9494) | #005A9E |

You can install the component directly from solution files containes in the 'Release' section https://github.com/drivardxrm/IconOptionSet.PCF/releases
To use Microsoft PowerApps CLI, do the following:
-
Install Npm (comes with Node.js) or install Node.js (comes with npm). We recommend LTS (Long Term Support) version 10.15.3 LTS as it seems to be most stable.
-
Install .NET Framework 4.6.2 Developer Pack.
-
If you don’t already have Visual Studio 2017 or later, follow one of the options below:
- Option 1: Install Visual Studio 2017 or later.
- Option 2: Install .NET Core 2.2 SDK and then install Visual Studio Code.
-
Install Microsoft PowerApps CLI.
Be sure to update your Microsoft PowerApps CLI to the latest version:
pac install latest- Clone the repo/ download the zip file.
- Navigate to ./IconTwoOption/ folder.
- Copy the folder path and open it in visual studio code.
- Open the terminal, and run the command the following command to install the project dependencies:
npm installThen run the command:
npm run start- Create a new solution folder and open the Developer command prompt.
- Change the directory to the newly created folder in previous step.
- Init the future solution:
pac solution init --publisherName someName --customizationPrefix someSolutionPrefix- Add the control to your future solution:
pac solution add-reference --path provide path of control project folder where the pcf.proj is available- Build 1/2:
msbuild /t:restore- Build 2/2:
msbuild- You will have the solution file in SolutionFolder/bin/debug folder!
If you want to change the solution type you have to edit the .cdsproj file:
Solution Packager overrides, un-comment to use: SolutionPackagerType (Managed, Unmanaged, Both)
  <PropertyGroup>
    <SolutionPackageType>Managed</SolutionPackageType>
  </PropertyGroup>