Learn how to use Redash to query and display your data in a dashboard.
Technical team members can easily access a project's data writing SQL queries in the command line however for non-technical team members this is not the case. Having access to a project's data is valuable. It allows you to analyse and evaluate users' behaviours in order to make informed decisions about what the project needs going forward.
Dashboards are an appealing means of displaying a project's data in a user-friendly way. Whilst you can custom make a dashboard for your project this can be complex and time-consuming according to the needs of the client. Redash is a pre-made dashboard tool that is easy to connect to your data and offers a lot of inbuilt functionality to help solve these problems.
Redash is a paid for service that provides an online, up to date, queryable dashboard of a project's data. Prices start from $29 a month with a free 30 day trial, which is useful for those who may be using it as a stop-gap or want to test the waters of whether it will truly benefit them. To follow the instructions in this readme your project must be hosted on Heroku and using PostgreSQL.
- Building a new application and looking to gain a better understanding of user's behaviours. Redash proved a helpful and more detailed layer to complement Google Analytics and Tag Manager.
- A platform with different user types where admins need the ability to query and search the data. Doing so will help the project management and give admins a better understanding of how the app is being used.
- A client in need of a reporting tool. Rather than having to build a bevy of reports (ranging from simple to complex) into the core of their application, many of which would be used only by one client or as a one-off, they have chosen to create these in Redash. They'll create dashboards for their clients and this also reduces the client team's dependence on developers.
Your needs and interaction with Redash will vary according to your technical proficiency:
-
For basic view only access login and take a look either at your list of dashboards or queries from the main menu. Can't see anything? Ask your technical team to make sure they have 'published' the queries and dashboards they've created which will make them visible to you.
-
To learn how to write your own basic queries see learning SQL.
-
As a developer looking to set up and configure Redash start by creating an account in the next section.
To set up Redash on your project start by going to redash.io and entering in basic details to create an account (name, email, org name, password). You will be able to create accounts for other users at a later date but this number is capped on the free version, so it may be advisable to set up the account using a project email address if you have one.
Having successfully created an account, next you need to connect your account to a 'data source' ie. your project! To connect your data source you will need to fill out the following page:

- If your page doesn't look like this to start, ensure your first option 'Type'
has
PostgreSQLselected. - For the 'Name' value enter a name of your choice
- To fill in the remaining values you need to extract this data from your
DATABASE_URLconfig variable found on Heroku (under 'Settings' , 'Reveal Config Vars'). The url is structured in the following way and you must dissect the values for each of these things:
postgres:// user : password @ host : port / name
Once you've entered your user/password/host/port and name values in you're ready to hit 'save' and your data source is now set up! You can click the 'Test Connection' button just to be sure everything's working ok.
Next to display your data to your client you should set up a query. Queries should be written in SQL to extract the information you desire. You should establish the technical proficiency and level of control a client wishes to have in order to decide what queries to write and who should be writing them. The results / data from all Redash queries can be downloaded into excel files so as a starting point you may wish to write a simple query to display the basic values of each of your tables and then less technical users can explore this data in excel which may be more familiar to them. Exploring data in downloaded files is also lower risk because if you change/delete data using your queries on Redash you will be editing your live data!
To set up a new query go to:

And create a simple query such as SELECT * FROM your-table-name; to get all of
the data from a given table:
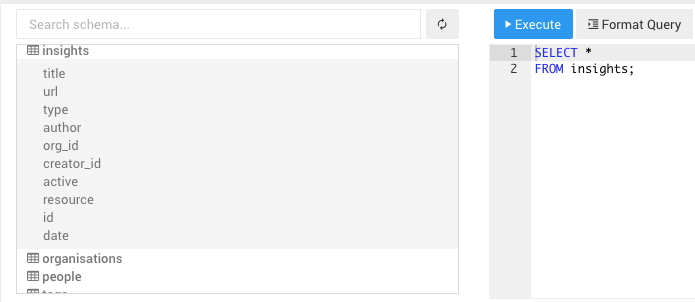 Conveniently, Redash provides you with the schema of your db so you can look up
table and column names by exploring the box on the left hand side.
Conveniently, Redash provides you with the schema of your db so you can look up
table and column names by exploring the box on the left hand side.
Once you've written your query click 'Execute' and then wait until the results of your query are displayed below:

In this example, as our query asked for the entire table, this is what our result shows. If you are happy with the query/results remember to click 'Save' so you can return to your query in the future! You can also see the option to download this content as a .csv or excel file on the right which is the option you may wish to select if choosing to share your data with your client in this way. If you want other team members to be able to see your query you should 'publish' it, then it will be visible to all users.
If you don't yet know SQL and want to know how to write more queries take a look at the following section:
A query is a request you make to your database for some information. The most simple query you can run is one which displays data for you. So if your database had a table called 'People' that looked like this:
People
| User ID | Name | Age | Occupation |
|---|---|---|---|
| 1 | Amy | 29 | Violinist |
| 2 | Bob | 55 | Tree Surgeon |
| 3 | Clarissa | 42 | Physiotherapist |
and you wanted to write a query that would display all of this data to you you would write:
SELECT * FROM people;
In this command you are selecting all of the data (the asterisk represents all values) from your table called 'People'. All SQL commands must end with a semi-colon to indicate that this is the end of your query.
In order to display data from two tables together you can do an inner join. So if I wanted to combine the values from the people table above with the pets table:
| pet_id | pet_name | animal | owner_id |
|---|---|---|---|
| 9 | Fido | Dog | 1 |
| 10 | Tiddles | Cat | 1 |
| 11 | Spot | Dog | 2 |
You would write:
SELECT * FROM people
JOIN pets
ON people.user_id = pets.owner_id;
An inner join will combine rows from different tables if the join condition is true. So joining the people and pets tables we would get a result like this:
| user_id | name | age | occupation | pet_id | pet_name | animal | owner_id |
|---|---|---|---|---|---|---|---|
| 1 | Amy | 29 | Violinist | 9 | Fido | Dog | 1 |
| 1 | Amy | 29 | Violinist | 10 | Tiddles | Cat | 1 |
| 2 | Bob | 55 | Tree Surgeon | 11 | Spot | Dog | 2 |
Notice how Amy appears twice because she has 2 pets whereas Clarissa no longer appears as she has no pets.
If you just want to see one column of data run the following command:
SELECT people.name
FROM people;
Which will give you:
| Name |
|---|
| Amy |
| Amy |
| Bob |
If you've got time to learn a bit more about SQL why not try:
- The Codeacademy tutorial - https://www.codecademy.com/learn/learn-sql
- Or this one from Mode - https://community.modeanalytics.com/sql/tutorial/introduction-to-sql/
Here's a glossary of terms for those more familiar with SQL looking for a reminder: https://www.codecademy.com/articles/sql-commands?r=master
Depending on which Redash package you are paying for you have the opportunity to set up multiple users. You can put users into groups to determine what access rights they should have either read only or full.
To amend the permissions of your users start by going to the settings page which can be accessed via the cog in the top right navbar:

From here select the Groups tab:

Automatically all users are part of the 'Default' group. Select or create the group whose permissions you wish to set. If you are creating a new group you will need to select from the dropdown the users you wish to add to the group.
Then select the data source you wish to apply these permissions to (you may
just have one):

Then select the permission level, you can choose from either: full access or read-only:

In some instances you may wish to share data with someone who is external to your company. Rather than setting up this user with an account you can either download and share your data or send them a shareable link. Here's how:
To download a query, select the query in your queries list and then click:

You also have this option when viewing queries in your dashboard:

To download a visualization as an image file hover over the top right area of the visualization and click the camera icon. It will be downloaded to your device.
If you wish to send a link to someone without an account add the queries you wish to share to a dashboard. You can do this using the ellipsis menu on your dashboard and then by selecting add widget:

Select the name of the query you wish to add and click 'Add to Dashboard':

Once you've added the queries you wish to share, on the dashboard page click the share icon:

Then tick the checkbox to generate a shareable url:

If you want to make sure the external user has access to the latest live data you can set your dashboard up with a regular refresh. Click 'Refresh' to open a dropdown with options of how regularly to refresh the query on the dashboard.

You may want to query your data but you have one column which contains sensitive data. Unfortunately it is not possible in Redash to hide or encrypt a portion of your data. The best way to achieve this would be to create a seperate view of your database. When you build that view only select the columns from each table that you wish to include rather than selecting 'all'. Then connect the view of your database up with Redash so the sensitive fields are no longer included.