
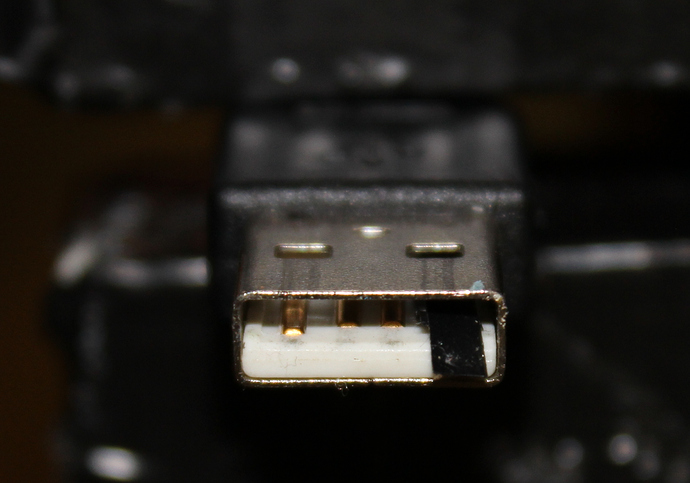
To get root in the device, we have to reflash it to the modded firmware which is included in the soft/ folder. Before you begin make sure you have a computer running Linux and USB-A-to-A cable as shown in the picture:

You have to mask VCC (Power +) on one side of the USB cable using something like this
Turn on your Linux machine and dissasemble the modem. Disconnect the power from the modem, connect device to your computer via this USB cable, when you have power it on while handling some metal object to short the pins shown in this picture
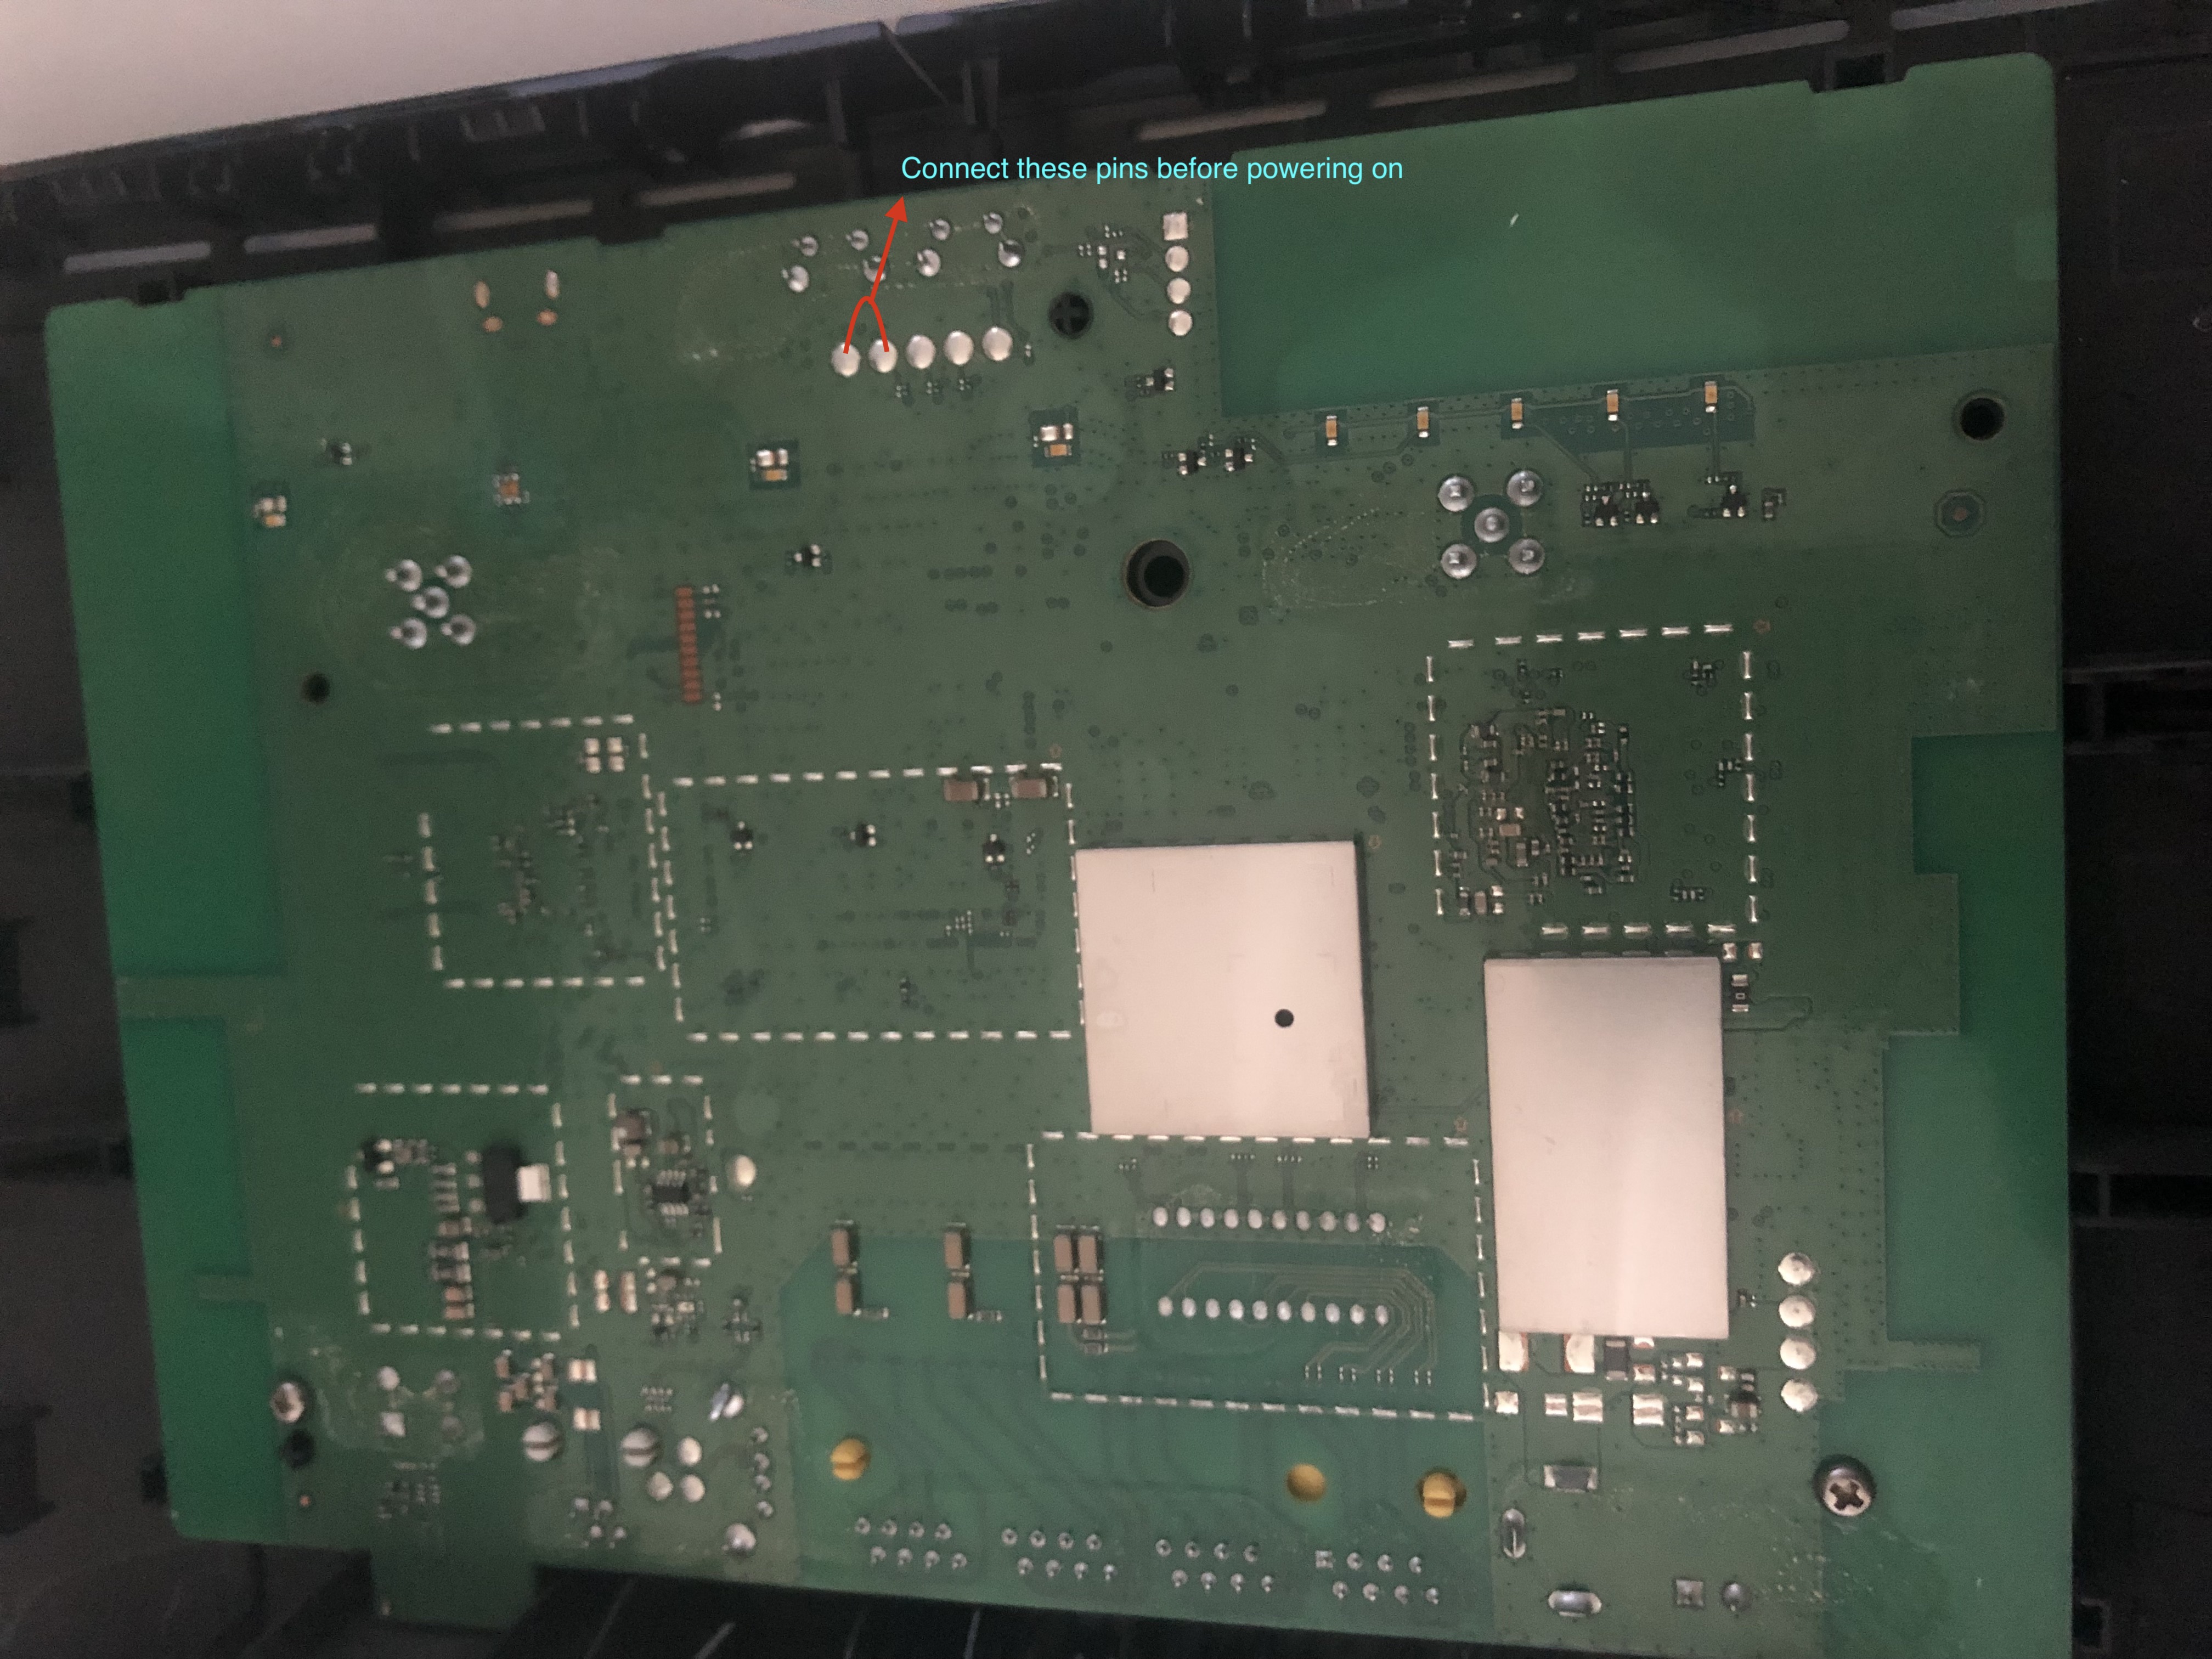
After the device turns on after 5 or more seconds you can release the pins and look at your Linux machine, the two new usb devices should by recognized by the Linux kernel
# dmesg
[ 1580.884761] usb 2-1: new high-speed USB device number 5 using ehci-platform
[ 1581.042528] usb 2-1: New USB device found, idVendor=12d1, idProduct=1c05, bcdDevice= 1.02
[ 1581.042573] usb 2-1: New USB device strings: Mfr=1, Product=2, SerialNumber=0
[ 1581.042598] usb 2-1: Product: HUAWEI_MOBILE
[ 1581.042616] usb 2-1: Manufacturer: HUAWEI_MOBILE
[ 1581.059106] option 2-1:1.0: GSM modem (1-port) converter detected
[ 1581.059758] usb 2-1: GSM modem (1-port) converter now attached to ttyUSB0
[ 1581.060628] usb-storage 2-1:1.1: USB Mass Storage device detected
[ 1581.061721] scsi host0: usb-storage 2-1:1.1
[ 1581.062948] option 2-1:1.2: GSM modem (1-port) converter detected
[ 1581.063614] usb 2-1: GSM modem (1-port) converter now attached to ttyUSB1
Now you have to install necessary tools to manage the attached usb device:
# apt-get install git zlib1g-dev build-essential
# git clone https://github.com/forth32/balong-usbdload.git
# cd balong-usbdload
# make
# git clone https://github.com/forth32/balongflash.git
# cd balongflash
# make
Now prepare and flash the modem:
# cd balong-usbdload
# ./balong-usbdload -p /dev/ttyUSB0 usbloader-b525.bin
# cd ../balongflash
# ./balong_flash -p /dev/ttyUSB1 ../../B525s-23a_Update_81.191.27.00.00_M_AT_04.01-WebUI_81.100.33.03.03.bin
bin file is from extracted B525s-23a_Update_81.191.27.00.00_M_AT_04.01-WebUI_81.100.33.03.03.7z archive
The system will now reboot, after reboot you can connect to it via telnet
# telnet 192.168.8.1
Change the root password
mount -o remount /system
passwd
reboot
iptables -t mangle -I POSTROUTING -o eth_x -j TTL --ttl-set 65
iptables -t mangle -I PREROUTING -i eth_x -j TTL --ttl-set 65
This workaround will avoid speed throttle
To make it persistent add commands to the /system/etc/autorun.sh
MacOS
brew install android-platform-tools
wget https://busybox.net/downloads/binaries/1.28.1-defconfig-multiarch/busybox-armv7l
adb connect 192.168.8.1
adb push busybox-armv7l /tmp/busybox-armv7l
If you are unable to connect to the device using adb, that means that the adb daemon is not running, you need to manually start it:
telnet 192.168.8.1
adbd
Repeat the push procedure and proceed with system prepare for opkg bootstrap..
telnet 192.168.8.1
mount -o remount,rw /system
cp /tmp/busybox-armv7l /system/bin/busybox-armv7l
rm /tmp/busybox-armv7l
chmod 755 /system/bin/busybox-armv7l
mkdir /online/opt
echo -e "\n\nbusybox ln -sf /system/bin/busybox-armv7l /bin/wget" >> /system/etc/autorun.sh
echo -e "busybox ln -sf /system/bin/busybox-armv7l /bin/gzip" >> /system/etc/autorun.sh
echo -e "ln -s /online/opt /opt" >> /system/etc/autorun.sh
echo -e "mount -o remount,exec,rw,relatime /online" >> /system/etc/autorun.sh
echo -e "#User's autorun\n/online/opt/user-autorun.sh" >> /system/etc/autorun.sh
echo -e "#!/system/bin/busybox-armv7l sh\n" > /online/opt/user-autorun.sh
chmod 755 /online/opt/user-autorun.sh
mount -o remount,ro /system
reboot
Now we can bootstrap the opkg
unset LD_LIBRARY_PATH
unset LD_PRELOAD
mkdir -p /opt/bin
mkdir -p /opt/etc
mkdir -p /opt/lib/opkg
mkdir -p /opt/tmp
mkdir -p /opt/var/lock

DLOADER="ld-linux.so.3"
URL=http://bin.entware.net/armv7sf-k3.2/installer
wget $URL/opkg -O /opt/bin/opkg
chmod 755 /opt/bin/opkg

wget $URL/opkg.conf -O /opt/etc/opkg.conf
wget $URL/ld-2.27.so -O /opt/lib/ld-2.27.so
wget $URL/libc-2.27.so -O /opt/lib/libc-2.27.so
wget $URL/libgcc_s.so.1 -O /opt/lib/libgcc_s.so.1
wget $URL/libpthread-2.27.so -O /opt/lib/libpthread-2.27.so
cd /opt/lib
chmod 755 ld-2.27.so
ln -s ld-2.27.so $DLOADER
ln -s libc-2.27.so libc.so.6
ln -s libpthread-2.27.so libpthread.so.0

/opt/bin/opkg update
/opt/bin/opkg install busybox
/opt/bin/opkg install entware-opt
echo -e ". /opt/etc/profile" >> /opt/user-autorun.sh
reboot
Please note that this setup requires that you already have managed to install OPKG package manager, see previous section..
Transfer files to the router:
adb connect 192.168.8.1
adb push soft/wireguard.ko /tmp/wireguard.ko
adb push soft/wireguard.sh /tmp/wireguard.sh
Connect to the router and configure the wireguard tunnel:
telnet 192.168.8.1
mv /tmp/wireguard.ko /opt/etc/wireguard/
mv /tmp/wireguard.sh /opt/
chmod 755 /opt/wireguard.sh
insmod /opt/etc/wireguard/wireguard.ko
/opt/bin/opkg install wireguard-tools
mkdir /opt/etc/wireguard
cd /opt/etc/wireguard
wg genkey | tee privatekey | wg pubkey > publickey
Edit /opt/wireguard.sh and set all required parameters
echo "/opt/wireguard.sh" >> /opt/user-autorun.sh
reboot
Some useful iptables commands:
iptables -L --line-numbers # Show rules with line numbers
iptables -D FORWARD 13 # enable access internal network access from vpn
iptables -D INPUT_SERVICE_ACL 2 # icmp block remove
iptables -D FWD_FIREWALL 1 # enable ping local lan
Values: 0 -> Off, 10 -> On
echo 0 > /sys/class/leds/wifi_led\:white/brightness # Wireless led indicator
echo 0 > /sys/class/leds/power_led\:white/brightness # Power led indicator
echo 0 > /sys/class/leds/lan_led\:white/brightness # Lan led indicator
echo 0 > /sys/class/leds/mode_led\:green/brightness  # 4G Mode Green led indicator
echo 0 > /sys/class/leds/mode_led\:red/brightness # 4G Mode Red led indicator
echo 0 > /sys/class/leds/mode_led\:blue/brightness # 4G Mode Blue led indicator
echo 0 > /sys/class/leds/signal1_led\:white/brightness # Signal 1 bar led indicator
echo 0 > /sys/class/leds/signal2_led\:white/brightness # Signal 2 bar led indicator
echo 0 > /sys/class/leds/signal3_led\:white/brightness # Signal 3 bar led indicator
echo 0 > /sys/class/leds/signal4_led\:white/brightness # Signal 4 bar led indicator
echo 0 > /sys/class/leds/signal5_led\:white/brightness # Signal 5 bar led indicator
Checks network connection by pinging to the specified ip and if it does not succeed turns on the red led
#!/system/bin/busyboxx sh

LED=/sys/class/leds/mode_led\:red/brightness
TARGET=1.1.1.1

while true;
do
  ping -c3 $TARGET > /dev/null
  if [ $? -eq 0 ]
  then
    echo 0 > $LED # 4G Mode Red led indicator
  else
    echo 10 > $LED # 4G Mode Red led indicator
  fi
  sleep 3
done