![]()
My blog uses Mkdocs and mkdocs-material as a blogging platform.
This git repository has 2 branches:
maincontains the source of my bloggh-pagescontains the published version of my blog.
You need Python3 installed
# ⓵ Install Python3 (see link above)

# ② Clone the Project
git clone git@github.com:ebouchut/ebouchut.github.io.git
cd ebouchut.github.io

# ③ Create a Python virtual environment in your project
# IMPORTANT: Do this once
python3 -m venv venv

# ④ Activate the virtual environment
# IMPORTANT: Do this each time you open a new shell/window/tab
source venv/bin/activate

# ⓹ Install the project's required packages
python -m pip install -r requirements.txt
Let's break down each of the above steps:
- Install Python 3.
Review Properly Installing Python for help on getting Python installed. - Clone this project
- Install Python Virtual Environment.
In this example, I usevenv, but use whichever you prefer. - Activate the Virtual Environment.
Do not forget this step or else you will get errors saying that a command or a package cannot be found.
IMPORTANT: Activate the virtual environment once each time you open a new shell window/tab. - Install the project's required Python packages
You can preview the blog locally as you edit the files.
-
Run the command below
mkdocs serve
This builds the website locally then runs a local web server listening on port
8000.If the default port (
8000) is already used, you can use another one like8080for example:mkdocs serve -a 127.0.0.1:8080
ℹ️ Keep this command running as you make changes to the blog because it will continuously watch for file changes, build the changed files, and ask the browser to reload the updated pages. However, If you change the configuration file (
mkdocs.yml), you will need to restartmkdocs serve. -
Open this URL in your web browser: http://127.0.0.1:8000/
To create a new blog post:
- Create a new Markdown file under
docs/blog/postswith this naming convention
YYYY-MM-DD-post_title_here.md, where:YYYYdenotes the year number in a four-digit format (for instance2023)MMdenotes the month number in a two-digit format within the01to12range (where01is January and12is December)DDdenotes the day of the month in two-digit format within the range01to31post_title_heredenotes the title of the blog post. Separate each word with an underscore (_).mdis the Markdown file suffix
- Edit the blog post (for instance
docs/blog/posts/2023-08-14-post_title_here.md).
Use the below documentation to learn more:- Python Markdown
- Python Markown Extensions
- mkdocs-material extensions
Most of the extensions mentioned in the docs are already installed and configured in
mkdocs.yml.
- Commit your changes on the
mainbranch and push to youroriginrepository when you are done.git add docs/blog/post/2023-08-14-post_title_here.md git commit -m "Add a new blog post..." git push # origin main
There are 2 ways to publish/deploy the blog, using one of the following methods:
- Command Line Interface (CLI)
CLI deployment is a manual process.
You must run a command to trigger the deployment.
You run themkdocs gh-deploycommand from the local repository to build the blog from the current branch and deploy it to the repository website hosted on GitHub. - Continuous Integration
CI deployment is an automated process that is triggered every time you push themainbranch to the repository. It deploys the blog to the GitHub repository website.
IMPORTANT: Both methods require GitHub Pages to be enabled and configured (one-time) beforehand.
The following sections describe these two deployment methods.
Requirement: You must first configure GitHub Pages for your repository.
Deployment consists of using Mkdocs to convert the source to the published version and sending it to GitHub, which will deploy it to your repository's GitHub website.
Summary
# ⓵ Switch to the branch containing the source of the blog
git switch main

# ② Go to the project's root directory 🤓
cd $(git rev-parse --show-toplevel)

# ③ Trigger the deployment of the current branch
mkdocs gh-deploy
Let's break down what is happening here:
git switch main
Switch to themainbranch which contains the source of the blog.- Make sure you are in the project's root folder
mkdocs gh-deploy- Build the blog from the current branch (
main) - Place the build output in the
sitefolder - Commit the contents of the
sitefolder to thegh-pagesbranch - Push
gh-pagesto theoriginremote repository on GitHub - GitHub Pages will notice the
gh-pagesbranch has been pushed and will automatically deploy its latest commit to your GitHub repository website.
- Build the blog from the current branch (
Requirements:
- You must first configure GitHub Pages for your repository.
- You need the
publish.ymlGitHub Action script to automate things.
You already have it if you cloned this repository.
This method is fully automated and runs server-side.
The only thing you have to do is push the main branch to trigger the deployment.
git push origin mainWhen is CI triggered?
This remote deployment method is triggered each time you push the
mainbranch to the repository.
What does the CI do?
It clones the repository, installs the required packages, builds and commit the site to the
gh-pagesbranch and pushgh-pagesto the repository, which triggers its deployment to the repository Website.
How long does the CI run?
Deploying the blog with the CI can take from 1 to several minutes. To monitor what is happening, take a look at the Github Actions.
Summary
# ⓵ Configure and enable (one-time) GitHub Pages

# ② You need the `.github/workflow/publish.yml` GitHub Action.
# You already have it if you cloned this repository.

# ③ Push the main branch
git push origin main

# ④ Open your repository "GitHub Actions" tab on GitHub Web
#  and watch the GitHub Action do the work for you on GitHub https://github.com/YOUR_GITHUB_USERNAME_HERE/YOUR_GITHUB_USERNAME_HERE.github.io/actions
The main difference with Publish with CLI is that mkdocs-deploy is automatically launched on the GitHub servers without any manual action on your part.
What is GitHub Pages?
GitHub Pages is a static site hosting service provided by GitHub that allows users to publish web pages directly from their GitHub repositories. It utilizes the repository content to automatically generate and serve web pages.
It is free of charge.
It is disabled by default and can be enabled per repository.
How does GitHub Pages work?
Whenever the
gh-pagesbranch is pushed to your repository, GitHub Pages will automatically deploy its latest commit to your personal GitHub website:
https://YOUR_GITHUB_USERNAME_HERE.github.io/
Now, that you know what it is and how it works, let's configure and enable GitHub Pages:
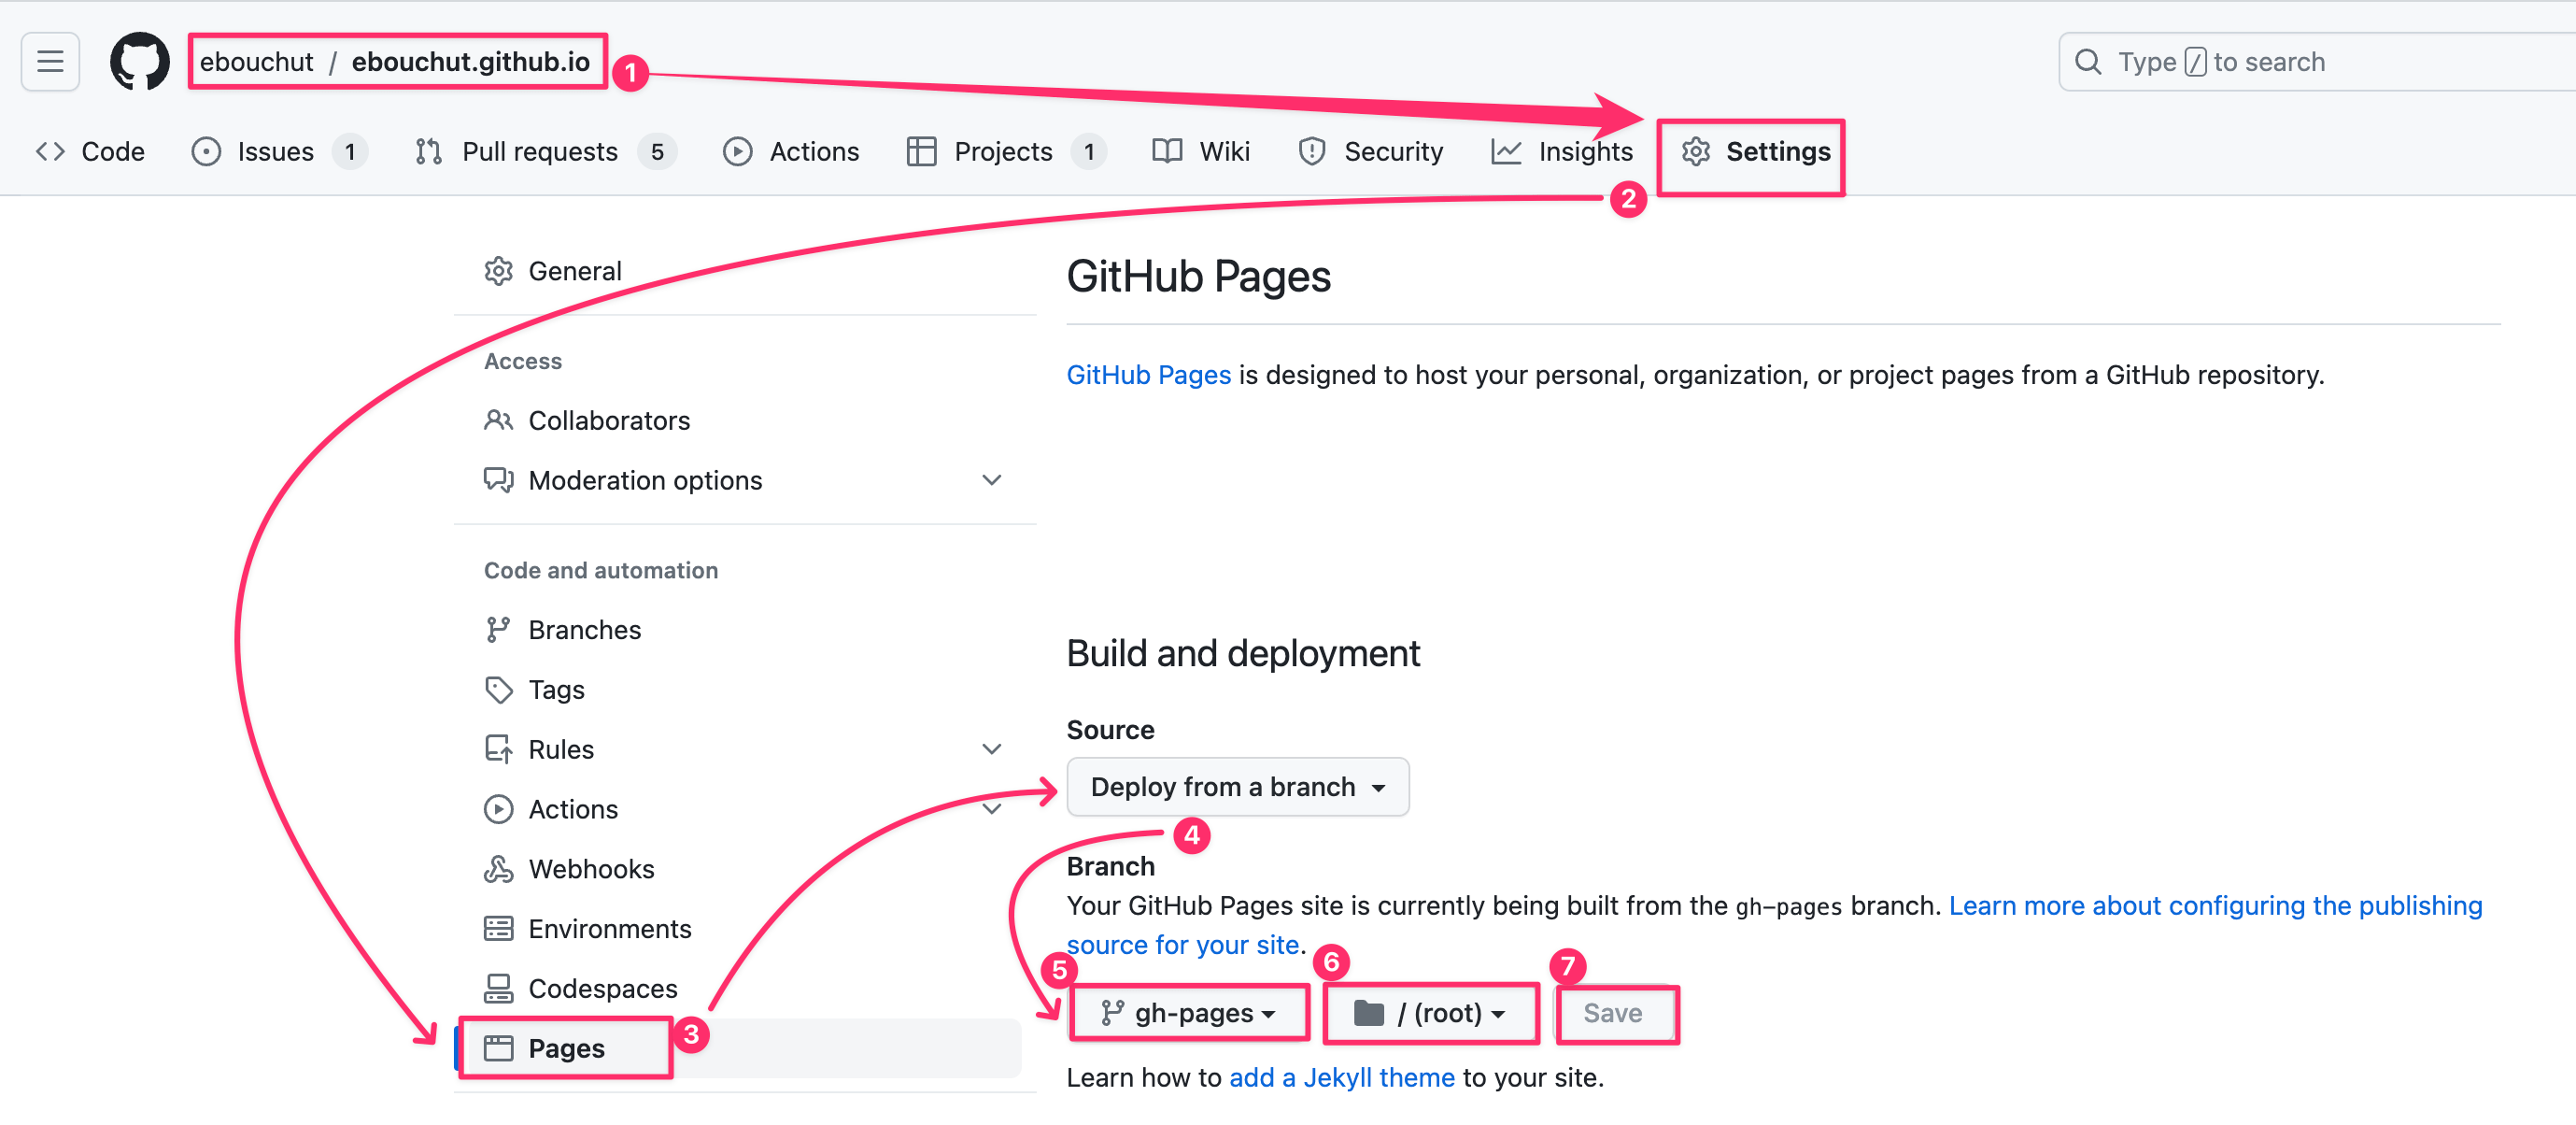
- Open your blog repository on GitHub
If you are using your own repo, the URL should rather look like so:https://github.com/YOUR_GITHUB_USERNAME_HERE/YOUR_GITHUB_USERNAME_HERE.github.io - Click the ⚙️
"Settings"tab (last one on the right) - Click
Pageslocated under theCode and Automationsection - In the
Sourcefield, selectDeploy from a Branch - First drop-down under the
Branchsection: Selectgh-pages - Second drop-down: Select
"/(root)" - Click
Save