- This repo adds an inference GUI for so-vits-svc 4.0,
inference_gui2.py.- Inference GUI 2 features experimental TalkNet integration, in-program recording, as well as other features like timestretching with rubberband and crepe pitch detection. Instructions can be found below under
Inference GUI 2header.
- Inference GUI 2 features experimental TalkNet integration, in-program recording, as well as other features like timestretching with rubberband and crepe pitch detection. Instructions can be found below under
- 4.0 is now the default branch for this repo.
On Windows, try the script under releases.
Otherwise: pip install -r requirements.txt in a Python 3.8/3.9 (conda) environment. Additional features may be available based on other dependencies:
- OPTIONAL - You PROBABLY DO NOT NEED THIS: For timestretching support, you need to install BOTH the rubberband standalone program, ensuring the rubberband executable is on your PATH, and the python module
pip install pyrubberband. Note that installing pyrubberband installs PySoundFile which needs to be uninstalled, and SoundFile will need to be reinstalled. - OPTIONAL - For TalkNet support, you need to
pip install requestsand also install this ControllableTalkNet fork. - OPTIONAL - For crepe pitch detection support,
pip install tensorflow crepe - OPTIONAL - For auto playback,
pip install pygame - OPTIONAL - For auto recording/playback using a hotkey without window focus,
pip install keyboard. Requires sudo on Linux. Please note thatkeyboarduses OS keyboard hooks. This allows it to read your keystrokes without window focus. This also could result in unexpected keyboard behavior in the event of a crash. - OPTIONAL - For VST3 support,
pip install pedalboard. Please note that pedalboard's support for VST3 is fairly temperamental and crashes may result. Additionally, plugins are not guaranteed to function correctly.
Models should be placed in separate folders within a folder called models, in the same directory as inference_gui2.py by default. Specifically, the file structure should be:
so-vits-svc-eff\
	models\
		TwilightSparkle
			G_*****.pth
			D_*****.pth
			kmeans_*****.pt {may or may not be present for some models}
			config.json
If the proper libraries are installed, the GUI can be run simply by running inference_gui2.py. If everything goes well you should see something like this (some features may not be available depending on what extra libraries you have installed):
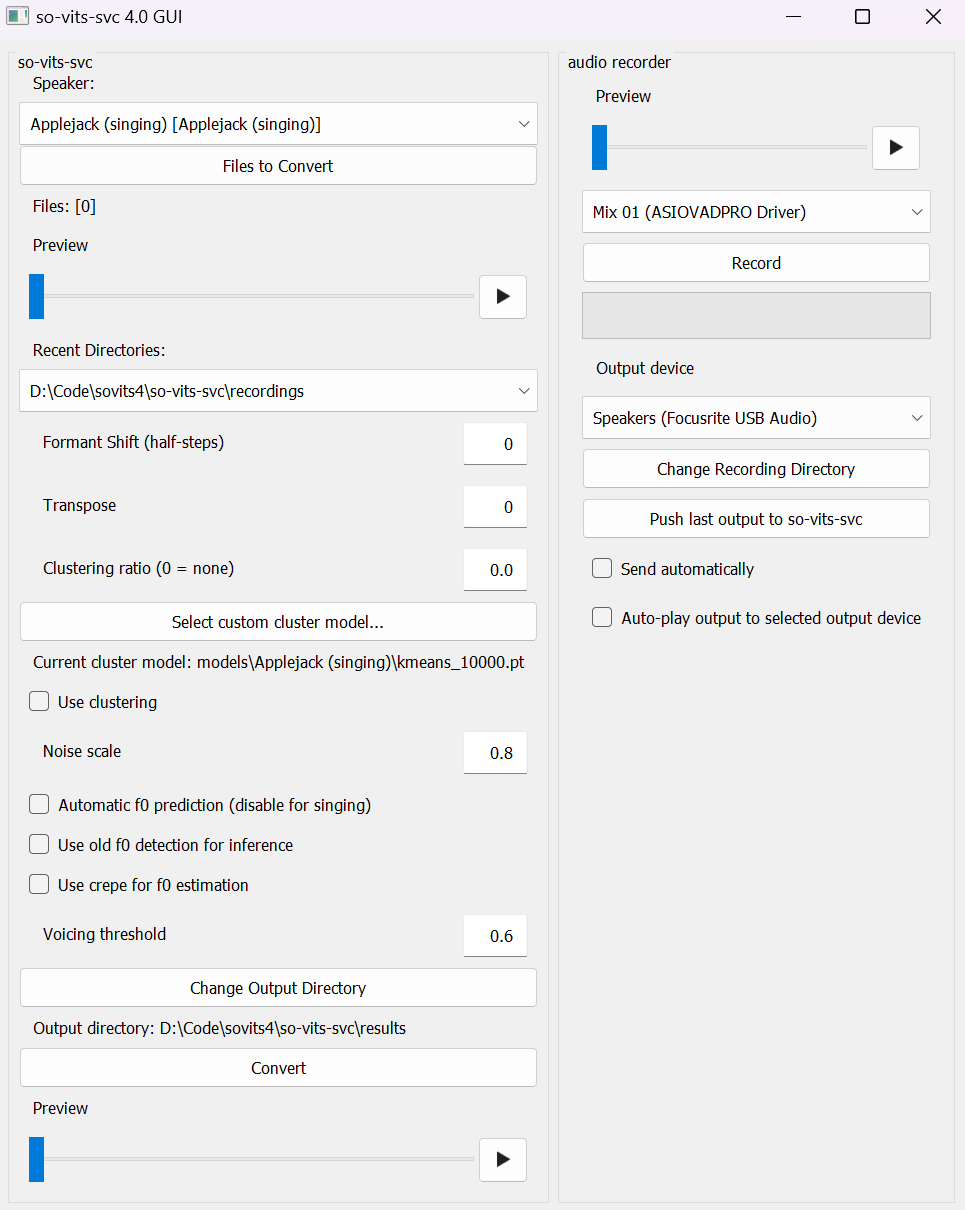
All basic workflow occurs under the leftmost UI panel.
- Select a speaker based on the listed names under
Speaker:. - Drag and drop reference audio files to be converted onto
Files to Convert. Alternatively, click onFiles to ConvertorRecent Directoriesto open a file dialog. - Set desired transpose (for m2f vocal conversion this is usually 12 i.e. an octave, or leave it 0 if the reference audio is female) under
Transpose. - Click
Convert. The resulting file should appear underresults.
The right UI panel allows for recording audio directly into the GUI for quick fixes and tests. Simply select the proper audio device and click Record to begin recording. Recordings will automatically be saved to a recordings folder. The resulting recording can be transferred to the so-vits-svc panel by pressing Push last output to so-vits-svc.
- When converting:
TypeError: Invalid file: WindowsPath('...')Ensure that PySoundFile is not installed (pip show pysoundfile). This may occur after installing rubberband. PySoundFile is a deprecated version of SoundFile. After uninstalling pysoundfile, runpip install soundfile==0.10.3.post1 --force-reinstall - When trying to run with TalkNet:
Couldn't parse TalkNet response.Ensure that you are runningalt_server.pyin the TalkNet fork, and notcontrollable_talknet.py(or related).
- Formant Shift - This option is largely useless now, as the ContentVec speech representation (which replaces HuBERT in 4.0) is intended to be agnostic to speaker formants; however, it may yield amusing nonsense results as a result of artifacting when taken to extreme values.
- Timestretch - Timestretches the input using rubberband.
- Clustering
- Separate k-means cluster models can be trained on speaker data which can be used to improve similarity to the target speaker at the cost of intelligibility. These models can be distributed alongside the speaker models or separately as .pt files.
- To enable clustering (if it is available), click
Use clustering. - To select a custom cluster model, use
Select custom cluster model... - Clustering can be used as a ratio from 0.0 to 1.0 by adjusting
Clustering ratio. - For larger-dataset speakers, a cluster ratio from 0.5 to 1.0; for smaller-dataset speakers, lower ratios may be desired. Generally, the more data there is for a speaker, the higher the cluster ratio can be set without frequent artifacting.
- Noise scale - adjusts the variability of variational inference. Usually low values (0.2) work.
- Automatic f0 prediction - For 4.0, a pitch predictor is trained alongside the speaker model which can be used to impose predicted pitch on speech features.
- Use old f0 detection for inference - Uses praat's
to_pitch_acinstead ofto_pitch_cc. MAY be preferred for speaking inputs with rapidly varying pitch. - Use crepe for f0 estimation - (requires crepe) - Captures generally smoother pitch with fewer artifacts at the cost of GPU time and resources; however, may not be suitable for inputs with rapidly varying pitch.
- Voicing threshold - Alters the tendency for the input (as well as background noise) to be considered voiced vs. unvoiced. 0.0 means that everything is considered to be voiced.
- You can drag and drop files from the audio preview by dragging from the play button, if a sound is present.
- Speaker embedding mixing is supported for speakers within the same model file.
This feature is disabled by default as it seems to be quite temperamental, but
it can be enabled using the commandline switch
custom_merge.
For TalkNet support, you need to pip install requests and also install this ControllableTalkNet fork. Instead of running talknet_offline.py, run alt_server.py (if you use a batch script or conda environment to run TalkNet, you should use it to run alt_server.py). This will start a server that can interface with Inference GUI 2. The TalkNet server should be started before Inference GUI 2.
Next, starting Inference GUI 2 should show a UI like this:

The rightmost panel shows controls for TalkNet which are similar to those used in the web interface. Some items special to this interface:
- There is currently no "Custom model" option. To add additional models you should modify the model jsons in Controllable TalkNet and download the appropriate model files.
- Recordings can be also be transferred from the recording panel to the TalkNet panel.
- Files can be provided under
Provide input audiothrough clicking for a file dialog or drag-and-drop. - TalkNet can now be used to generate without reference audio using
Disable reference audio - In order to push output from TalkNet through so-vits-svc, you can use
Manual push TalkNet output to so-vits-svc section; alternatively, automatically checkAuto push TalkNet output to so-vits-svc. - By default,
Auto push TalkNet output to so-vits-svcignores so-vits-svc parameters on the left side panel, since the intended use of this panel is to improve the quality of so-vits-svc generations; however, this can be changed withApply left-side parameters to so-vits-svc gens
A singing voice coversion (SVC) model, using the SoftVC encoder to extract features from the input audio, sent into VITS along with the F0 to replace the original input to acheive a voice conversion effect. Additionally, changing the vocoder to NSF HiFiGAN to fix the issue with unwanted staccato.
- Note: 3.0 models are not compatible with 4.0.
- This is a fork of the 4.0 branch of so-vits-svc. It implements
the same inference GUI as found in the
effbranch of this repository, with a few extra features relating to 4.0 models (such as automatic pitch prediction and clustering). For instructions on using the GUI see theeffbranch
- Feature input replaced with Content Vec
- Sampling rate changed to 44100hz
- Due to change of parameters such as hop size and simplification of model structures,VRAM usage for inference has been greatly reduced compared to version 3.0.
- Code refactor
- Dataset production and training process are consistent with 3.0; however, models and preprocessed data are not compatible.
- Added automatic pitch f0 prediction for voice conversion (will be out of tune if used with singing voices)
- Reduced timbre leakage through k-means clustering scheme
Demo:
- Download ContentVec model:checkpoint_best_legacy_500.pt
- Place under
hubert.
- Place under
- Download pretrained models G_0.pth and D_0.pth
- Place under
logs/44k. - Pretrained models are required, because from experiments, training from scratch can be rather unpredictable to say the least, and training with a pretrained model can greatly improve training speeds.
- The pretrained model includes云灏, 即霜, 辉宇·星AI, 派蒙, and 绫地宁宁, covering the common ranges of both male and female voices, and so it can be seen as a rather universal pretrained model.
- Place under
wget -P logs/44k/ https://huggingface.co/therealvul/so-vits-svc-4.0-init/resolve/main/G_0.pth
wget -P logs/44k/ https://huggingface.co/therealvul/so-vits-svc-4.0-init/resolve/main/D_0.pthNote that the following notebooks are not maintained by me.
All that is required is that the data be put under the dataset_raw folder in the structure format provided below.
dataset_raw
├───speaker0
│   ├───xxx1-xxx1.wav
│   ├───...
│   └───Lxx-0xx8.wav
└───speaker1
    ├───xx2-0xxx2.wav
    ├───...
└───xxx7-xxx007.wav- Resample to 44100hz
python resample.py- Automatically sort out training set, validation set, test set, and automatically generate configuration files.
python preprocess_flist_config.py- Generate hubert and F0 features/
python preprocess_hubert_f0.pyAfter running the step above, the dataset folder will contain all the pre-processed data, you can delete the dataset_raw folder after that.
python train.py -c configs/config.json -m 44kNote: The old model will be automatically cleared during training, and only the latest 5 models will be kept. If you want to prevent overfitting, you need to manually back up the model record points, or modify the configuration file keep_ckpts 0 to never clear.
To train a cluster model, train a so-vits-svc 4.0 model first (as above), then execute python cluster/train_cluster.py.
For instructions on using the GUI see the eff branch
Otherwise use inference_main.py
Command line support has been added for inference
# Example
python inference_main.py -m "logs/44k/G_30400.pth" -c "configs/config.json" -n "君の知らない物語-src.wav" -t 0 -s "nen"
Required fields
- -m, --model_path: model path
- -c, --config_path: configuration file path
- -n, --clean_names: list of wav file names placed in
rawfolder - -t, --trans: pitch transpose (semitones)
- -s, --spk_list: target speaker names
Optional fields
- -a, --auto_predict_f0:Automatic pitch prediction; do not enable when converting singing or it will be out of tune.
- -cm, --cluster_model_path:Path of cluster model
- -cr, --cluster_infer_ratio:Ratio of clustering to use
The 4.0 model training process will train an f0 predictor. For voice conversion you can enable automatic pitch prediction. Do not enable this function when converting singing voices unless you want it to be out of tune.
Clustering is used to make the model trained more like the target timbre at the cost of articulation/intelligibility. The model can linearly control the proportion of non-clustering scheme (more intelligible, 0) vs. clustering scheme (more speaker-like, 1).
Use onnx_export.py
- Create a new folder:
checkpointsand open it - Create a new folder in the
checkpointsfolder and name it after your project such asaziplayer - Rename your model to
model.pth,rename the config file toconfig.json,and place it in the project folder (aziplayer) - In onnx_export.py change
path = "NyaruTaffy"to your project name e.g.path = "aziplayer" - Run onnx_export.py
- After execution is completed,A
model.onnxfile will be generated in your project folder, which is the exported model