1: User Manual

In this manual, we describe how to implement a Python application using Hecuba and which are the main features that Hecuba implements to boost the performance of an application using Cassandra. Hecuba developers can improve their productivity as Hecuba implements all the necessary code to access the data. Thus, applications can access data as if it was in memory and Hecuba translates this code at runtime to access the underlying storage system. Also, Hecuba implements some optimizations to favor data locality and to reduce the number of interactions with the backing storage and thus, to speedup the accesses to data.
One of the goals of Hecuba is to provide programmers with an easy and portable interface to access data. This interface is independent of the type of system and storage used to keep data, enhancing the portability of the applications. To sum up, using Hecuba the applications can access data like regular objects stored in memory and Hecuba translates the code at runtime into the proper code, according to the backing storage used in each scenario.
The current implementation of Hecuba handles in-memory objects, or persistent data storage provided by Apache Casssandra databases. This chapter guides how to create a Python application that uses Hecuba object abstractions to handle data persistence.
We will start by defining a set of classes that represent the persistent data. The user must inherit from one of the main abstractions provided by Hecuba, thus, a StorageObj or a StorageDict. Programmers can also use StorageNumpy Hecuba class to instantiate persistent numpy ndarrays.
The StorabeObj allows the user to define persistent attributes, accessed with the python object protocol. On the other hand, the StorageDict behaves like a python dictionary, accepting a key to identify the values. In both cases, the in-memory and persistent data will be handled transparently.
Next, the user must define the data model with the concrete data types
that will be stored in a persistent layer. The specification is written
as a Python comment, and the structure differs if we inherit from a StorageObj
or a StorageDict. For instance, to define a set of attributes we will use the @ClassField
with a StorageObj, and to define a dictionary the @TypeSpec with a StorageDict.
from hecuba import StorageObj
import numpy as np

class Dataset(StorageObj):
    '''
    @ClassField author str
    @ClassField open_access bool
    @ClassField injected_particles int
    @ClassField geometry numpy.ndarray
    '''
The user data model expresses that there will be four attributes which must be
stored onto the persistent layer, for each instance of the class. Also, by adding different @ClassField
the user can define any number of persistent attributes. Once the class is defined,
the application can instantiate as many objects as needed. On the other hand,
we can have a StorageDict to store the some persistent results with the following definition:
from hecuba import StorageDict

class Results(StorageDict):
    '''
    @TypeSpec dict <<particle_id:int, step:float>, x:double, y:double, z:double>
    '''

experiment = Results("breathing.results")
And by mixing both definitions we can write a small application. Note that the Dataset class
has an attribute particles referencing the class ParticlesPositions.
from hecuba import StorageObj, StorageDict
import numpy as np


class ParticlesPositions(StorageDict):
    '''
    @TypeSpec dict <<particle_id:int>, x:double, y:double, z:double>
    '''


class Dataset(StorageObj):
    '''
    @ClassField author str
    @ClassField open_access bool
    @ClassField injected_particles int
    @ClassField geometry numpy.ndarray
    @ClassField particles ParticlesPositions
    '''


dt1 = Dataset("breathing.case235")

dt1.author = "BSC"
dt1.open_access = True
dt1.injected_particles = 250000
dt1.geometry = np.load("./geom_file.npy")

for part_id in range(dt1.injected_particles):
    dt1.particles[part_id] = list(np.random.random_sample(3,))
By passing a name of type str to the initializer of a Hecuba class instance, the object becomes persistent and sends the data
to the persistent storage. Said name will act as an identifier for its data and other objects created with
the same name will access the same data. In this way, if we pass a name which was previously used to
create an object we will retrieve the previously persisted data.
Initializing an instance of an hecuba class without a name results in a regular in-memory object.
However, its data can be persisted at any moment by calling the instance method make_persistent,
provided and implemented by all Hecuba classes. This method expects a str name, in the same way the initializer did,
and will be used to identify the data in the future. This method will send the data to the data store,
mark the object as persistent, and, future accesses will access the data store if deemed necessary.
class ParticlesPositions(StorageDict):
    '''
    @TypeSpec dict <<particle_id:int>, x:double, y:double, z:double>
    '''

r=ParticlesPositions()

r.make_persistent("OutputData")The first step is to download the source code from the following
repository:
https://github.com/bsc-dd/hecuba. The directory structure is the following:
-
main folder: contains the following files and sub-folders:
-
README.md: helpful information for the installation and execution.
-
setup.py: Hecuba installer.
-
requirements.txt: requirements needed by Hecuba.
-
hecuba_py folder: contains the Hecuba python code. Should not be modified by users.
-
hecuba_core folder: contains the Hecuba C++ code. Should not be modified by users.
-
tests folder: contains the Hecuba tests. Should not be modified by users.
-
Find the instructions for the Hecuba Installation Procedure.
In this chapter we describe in detail the interface provided by the Hecuba. We also illustrate how the supported data types and operations can be applied.
-
str,bool,decimal,float,int,blob,tuple,buffer. -
doublefloating point numbers will be stored as double precision numbers.
-
numpy.ndarray. -
frozensetsupported in StorageObj only.
-
dict. -
setSubject to restrictions, supported only by StorageDict (development underway). -
listto group a set of values for a given key in a StorageDict. E.g.dict[0] = [1,2,3].
The StorageObj is the simplest abstraction provided by Hecuba. It acts like
a namedtuple, or a dataclass, where the user can define attributes and access them.
However, in this case, the user can choose which attributes will be persisted to the
data store.
To declare instances of the StorageObj, the user first needs to define a class inheriting from the StorageObj as well as define the data model of the persistent attributes. The format of the data model is a Python comment with one line per attribute. Each line must start with the keyword @Classfield and continue with the name of the attributes and its data type specification.
class ClassName(StorageObject):
    '''
    @ClassField attribute_name attribute_type
    '''
For example, the following code shows the definition of a class containing an attribute of type integer.
class MyClass(StorageObj):
    '''
    @ClassField MyAttribute_1 int
    '''
When the user needs to use collections as attributes, the syntax needs to be further elaborated. For example, to define a Python dictionary it is necessary to specify the type of the keys and the type of the values. In this case, after the attribute type we can find the rest of the specifications within angular brackets.
class ClassName(StorageObj):
    '''
    @ClassField attribute_name attribute_type <attribute_type_specification>
    '''
For example, the following code adds a dictionary
attribute: the key is of type Integer and the value a str.
class MyClass(StorageObj):
    '''
    @ClassField MyAttribute_1 int
    @ClassField MyAttribute_2 dict <<int>, str>
    '''
Each additional level required to complete a specification type can be
added within angle brackets. For example, the following code adds the specification of a dictionary that
has a key of type tuple, which is composed of an Integer and a
str, and that has a value of type Integer.
class MyClass(StorageObj):
    '''
    @ClassField MyAttribute_1 int
    @ClassField MyAttribute_2 dict <<int>, str>
    @ClassField MyAttribute_3 dict <<int, str>, int>
    '''
Attributes of type dict allow the programmer to assign a name
to each component of the dictionary (keys and values). These names can
help users to give semantic meaning to the data, for instance when accessing the results
of a dictionary or when exploring the persistent data with external tools.
class MyClass(StorageObj):
    '''
    @ClassField MyAttribute_1 int
    @ClassField MyAttribute_2 dict <<int>, str>
    @ClassField MyAttribute_3 dict <<int, str>, int>
    @ClassField MyAttribute_4 dict <<mykey1:int, mykey2:str>, myvalue:int>
'''The StorageDict abstracts the underlying data model and exposes the
user interface of a python dict. The mechanism to create instances of a StorageDict
is the same as the StorageObj. A class that inherits from the StorageDict must be defined,
and an annotation describing the data model of the keys and values added.
The data model definition must start with the keyword @TypeSpec and continue with the type of the keys, and the values.
class ClassName(StorageDict):
    '''
    @TypeSpec dict <<keys_specification>values_specification>
    '''
For example, the following code shows the definition of a
dictionary with one key of type Integer and a str value.
class MyClass(StorageDict):
    '''
    @TypeSpec dict<<int>, str>
    '''
Also, the user can set names to the keys and values to give semantic meaning. It might be desirable to access the results of a dictionary by their name, or when exploring the persistent data with external tools.
class MyClass(StorageDict):
    '''
    @TypeSpec dict<<mykey1:int>, myvalue:str>
    '''
Additional keys or values can be added to a StorageDict definition.
class MyClass(StorageDict):
    '''
    @TypeSpec dict<<mykey1:int, mykey2:str>, myvalue1:int, myvalue2:int, myvalue3:str>
'''The usage of distributed sets is a bit restricted. When they a set is used in a StorageDict, the persistent object cannot have more attributes than a single set. The set contains all the persistent storage funcionalities for sets, for example:
from hecuba import StorageDict
class DictWithSet(StorageDict):
    '''
    @TypeSpec dict<<k1:str, k2:int>, s1:set<int>>
    '''

my_data = DictWithSet("my_app.my_data")
my_data["1", 1] = {1}
my_data["2", 2] = {1, 2, 3}
my_data["2", 2].remove(2)
other_data = DictWithSet("my_app.other_data")
other_data["2", 2] = my_data["2", 2].union(my_data["1", 1])
for key, set_value in other_data.items():
    if not 2 in set_value:
other_data[key].add(2)A previously defined class can be referenced in the definition of a newer class. For instance, a custom StorageObj can have an attribute of type "MyClass", and the latter, be a custom class that inherits from a StorageObj or StorageDict.
The same is possible the other way around, a StorageDict can have as value(s) other StorageDicts or StorageObjs. In order to do so, the programmer needs to specify the data model of both:
# file is named classes.py
from hecuba import StorageDict, StorageObj
class MyObj(StorageObj):
    '''
    @ClassField a int
    @ClassField b str
    '''

class MyDict(StorageDict):
    '''
    @TypeSpec dict<<key:int>, my_obj:classes.MyObj>
    '''

my_dict = MyDict("my_app.my_data")
obj1 = MyObj()
obj1.a = 2
obj1.b = "hello"
my_dict[0] = obj1With the StorageNumpy class programmers can instantiate numpy ndarrays that eventually can be persisted. Using the StorageNumpy class there is no need to define any additional class, the user can use this Hecuba class directly in the code to instantiate numpys ndarrays. The shape of the array in inferred from the data assigned. Programmers can instantiate volatile numpy ndarrays and make them persistent later or can instantiate persistent numpy ndarrays. The initial value for the StorageNumpy must be passed as a parameter of the constructor.The following fragment of code shows the different options to instantiate a StorageNumpy:
from hecuba import StorageNumpy
import numpy as np
n = StorageNumpy(np.arange(10).reshape(2,5))                  # n is a volatile StorageNumpy
n = StorageNumpy(np.arange(10).reshape(2,5), "persistent)     # n is a persistent StorageNumpy
Once instantiated, the programmer can user the functions of the numpy library to manipulate the StorageNumpys. Hecuba retrieves from disk (if needed) the values of the numpy ndarrays:
from hecuba import StorageNumpy
import numpy as np
A=StorageNumpy(np.arange(10).reshape(2,5), "matrixA")
B=StorageNumpy(np.arange(10).reshape(5,2), "matrixB")
res=np.dot(A,B) #res is a voltile StorageNumpy that programmers can persist if needed
Persistent StorageNumpy are store distributed in the database. They are splitted in blocks, transparently to the programmer. Hecuba assigns to each block an identifier that will act as the key of the block and will decide which node holds it.
Hecuba provides two different constructors to instantiate StorageNumpys and classes that inherit from StorageObjs and StorageDicts. The first one is to instantiate new objects that have no persistent data associated, and data will be kept in-memory until the instance method make_persistent is called.
The second constructor is to instantiate objects that will make use of the persistent storage. In this case, the constructor receives a string as the parameter, which is the identifier of the data inside the data store. Hecuba checks if there already exists some persistent data with that identifier, and if it doesn’t exist Hecuba creates it.
If the identifier is already used in the data store, then Hecuba checks if the schema of that existing object matches with the object that the programmer is trying to instantiate. If this is the case, Hecuba assumes that the programmer wants to get access to that object and completes the instantiation: any access will be performed on the existing object. If the schema does not match, the user code will fail with an exception.
Hecuba allows to deal with hierarchical namespaces and to specify several levels of the hierarchy with just one identifier. For example, directory name and file name, in the case of file systems, or keyspace name and table name, in the case of Apache Cassandra. The format of the identifier specifies that a dot must separate the identifiers of each level in the namespace. If the identifier does not contain a dot then Hecuba interprets that the identifier refers just to the name in the lowest level in the namespace hierarchy (there are default values for the rest of the components to identify the data that the user can configure through environment variables, see section Hecuba configuration parameters)
o1=MyClassName() # o1 is a volatile object

o2=MyClassName("Table") # o2 is a persistent object: the name of the table is "Table" and the keyspace is the default name used in this execution

o3=MyClassName("Keyspace.Table") # o3 is a persistent object: the name of the table is "Table" and the name of the keyspace is "Keyspace"
It is also possible to use the static method get_by_alias to instantiate an already existing persistent object.
o4=MyClassName.get_by_alias("Keyspace.Table")Notice that Hecuba registers the schema of the user defined classes and thus, it is not possible to reuse those class names for a different class definition. The access code to an instance of such a redefined class will fail due to schema mismatch.
From the point of view of the programmers, both objects with persistent data and objects without persistent data are accessed in the same way: like regular Python objects. However, Hecuba intercepts all accesses to a Hecuba object and executes the suitable code to refer to the involved data. Notice that some accesses to persistent data may be solved without accessing the data store because Hecuba implements a cache to keep recently used persistent data and thus, save accesses to the data store.
o1=MySOClass()               # instantiation of an object without persistent data
o1.dict_attr[0]=1            # access to a regular Python object in memory
value1=o1.dict_attr[0]       # access to the data store to retrieve the data
value2=o1.dict_attr[0]       # access to Hecuba cache in memory
o2=MySOClass("Table")        # instantiation of persistent object
o2.dict_attr[0]=2            # saved to Hecuba cache in memory, to be stored in the database later
Hecuba allows to define StorageDicts with more than one value. This is implemented as a named tuple and, thus each component of the value can be referred with the name assigned in the class specification or with its positional value.
class MyClass(StorageDict):
    '''
    @TypeSpec dict<<mykey1:int, mykey2:str>, myvalue1:int, myvalue2:int, myvalue3:str>
    '''

d=MyClass("dictname")        # dictname represents an already existing persistent StorageDict
i=d[0,"value"].myvalue2      # access to the second attribute of the value corresponding with key (0,"value")
i=d[0,"value"][1] # access to the second attribute of the value corresponding with key (0,"value")All Hecuba volatile objects can become persistent at any point. The programmer only needs to use the make_persistent method passing as parameter which will be the identifier of the object in the data store. If the volatile object already contains data, all the data is eventually sent to the data store. And from this point on, all the modifications on the object will be considered to be persistent.
o1 = MyObj()
o1.a = 2
o1.b = "hello"
o1.make_persistent("myksp.mytable")
If the identifier is already used in the data store, then Hecuba checks if the schema of that existing object matches with the object that the programmer is trying to persist. If this is the case, then the persisting operation concludes successfully and the data is sent to the data store. If the schema does not match, then the code of the user fails with an exception.
Hecuba implements some optimizations in the interaction with the database as caching and prefetching. This means that, even an object is defined to be persistent, its contents may be in memory. More over, it implements asynchronous writes to allow overlapping a computing phase of the application with the access to the data store and to reduce the number of interactions with the data store. That is, it is possible that during some time the persistent content of an object may be only in memory. The programmer can force at any moment the actual sending of the data to the data store using the sync() method. Notice that when a persistent object is deallocated (by the garbage collector), the sync method is automatically called, so before the process ends the data is guarantee to be coherently stored in the database.
o1 = MyClass("myname")
o1.myattr = 4
o1.sync() # this method guarantees that data is stored in the database so if other process instantiates it will access the data up to dateIn order to support data partitioning, Hecuba classes implement the method split. This method returns an iterator of partitions, where each partition is a new object of the same class containing just a part of the base object. Using the split method no data loading from storage happens until the data in the partition is accessed.
Partitioning of a dataset was introduced to support the implementation of data-driven distributed applications: developers can define parallel tasks each of them working on one of these chunks of data. Hecuba supports an additional level of iteration that allows iterating over each of these partitions, using the python iteration methods.
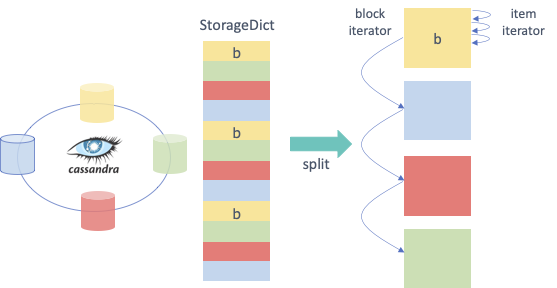
The current implementation of the split method does not supports partitioning on volatile objects.
The current criteria to create the partitions is oriented to favor the load balancing between processors and to enhance data locality. Thus, the partition is considered the unit of work and the split method creates enough partitions to facilitate a balanced work assignment between processors.
This method is only implemented for StorageDicts and StorageNumpys as they are the classes intended to have a big collection of data. Notice that if a StorageObject contains some attributes of these classes then it is possible to partition each of this collection using their own class method.
Following, we describe the specificities of this method for StorageDict and for StorageNumpy
- Iterating over a StorageDict: Hecuba takes into account the location of all data across the distributed storage system and assigns to each partition of a StorageDict only data that resides on the same node. This way the task scheduler has the opportunity to consider data location as a factor when taking task assignment decisions. Currently, the number of partitions is a parameter that the user can configure to tune the load balancing (see section Hecuba configuration parameters). As part of our future work, we plan to automate the calculation of this value.
# sd is the instance of a persistent *StorageDict*
for sd_partition in so.sd.split():          # Iterator on blocks
    # Here we'll have access to each partition of the StorageDict
    for key in sd_partition.keys():         # Iterator on elements of a block using the python method *keys*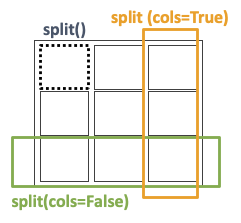
do_something(key)- Iterating over a StorageNumpy: by default, each partition of a StorageNumpy corresponds with a StorageNumpy block. In the current implementation, the size of the block is fixed but in future releases it will be a configurable parameter. The distribution of blocks in the storage follows the z-order algorithm, to enhance a uniform distribution. In the case of the 2-dimmensional StorageNumpys, the split method supports a parameter (which is ignored in the case of the StorageDicts and StorageNumpys with a different number of dimmensions). This parameter is intended to support the two typical pattern of accesses to matrices: by rows and by columns. Using this parameter, each partition is either composed of a column of blocks (parameter cols=False) or composed of a row of blocks (parameter cols=True).
# sn is the instance of a persistent StorageNumpy
for sn_block in sn.split():                 # Iterator on blocks
     for elt in sn_block:                   # Iterator on numpy ndarrays
          #do something with the numpy element

# if sn is the instance of a persistent 2D-StorageNumpy it is possible to use the cols parameter
for sn_block in sn.split(cols=True):        # Iterator on blocks. Each partition is a column of StorageNumpy blocks
     for elt in sn_block:                   # Iterator on numpy ndarrays
#do something with the numpy element In order to delete a persistent object from the data store, Hecuba provides the method del_persistent. This method deletes all data and meta-data associated to the specified object.
o1.o1dict.del_persistent()
o1.del_persistent()COMPS Superscalar is a framework which aims to ease the development and execution of applications for distributed infrastructures, such as Clusters, Grids and Clouds. This framework implements several bindings to support applications written in different languages. COMPSs runtime exports an interface to implement some optimizations regarding the data storage that for example can be used to enhance data locality. Here we only introduce the main features implemented by Hecuba to interact with COMPSs and, in particular, with the Python binding (from now on, PyCOMPSs); more Documentation about this can be found in the COMPSs Manual.
PyCOMPSs allow programmers to write sequential code and to indicate, through a decorator, which functions can be executed in parallel. The COMPSs runtime interprets this decorator and executes, transparent to the programmer, all the code necessary to schedule each task on a computing node, to manage dependencies between tasks and to send and to serialize the parameters and the returns of the tasks.
When input/output parameters of a tasks are persistent objects (i.e. their classes implement the Storage API defined to interact with PyCOMPSs), the runtime asks the storage system for the data locality information and uses this information to try to schedule the task on the node containing the data. This way no data sending or serialization is needed.
The following code shows an example of PyCOMPSs task. The input parameter of the task could be an object resulting from splitting a StorageDict. In this example the return of the task is a Python dictionary.
@task(returns = dict)
def wordcountTask(partition):
    partialResult = {}
    for word in partition.values():
        if word not in partialResult:
            partialResult[word] = 1
        else:
            partialResult[word] = partialResult[word] + 1
    return partialResult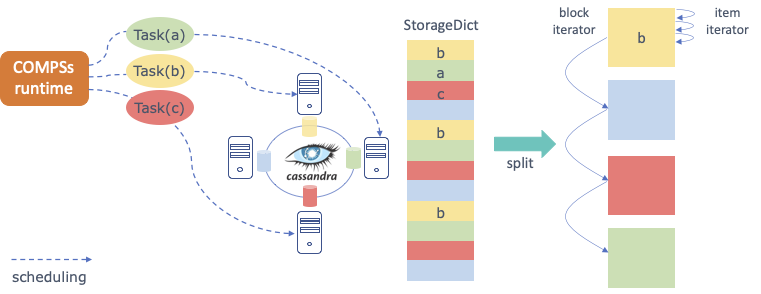
To run a sequential application using Hecuba is really simple after the requirements have been satisfied. We just need to execute the application with python, and it will use the configured data store:
python3 myApp.py
This command assumes that you have a running a local Cassandra instance. If you need to connect to a different instance of Cassandra you must set the variables CONTACT_NAMES and NODE_PORT with the suitable values (see Hecuba Configuration Parameters).
To run a parallel Hecuba application using PyCOMPSs you should execute the enqueue_compss command setting the options storage_props and storage_home. The storage_props option is mandatory and should contain the path of an existing file. This file can contain all the Hecuba configuration options that the user needs to set (can be an empty file). The storage_home option contains the path to the Hecuba implementation of the Storage API required by COMPSs. Following, we show an example of how to use PyCOMPSs and Hecuba to run the python application in the file myapp.py. In this example, we ask PyCOMPSs to allocate 4 nodes and to use the scheduler that enhances data locality for tasks using persistent objects. We assume that the variable HECUBA_ROOT contains the path to the installation directory of Hecuba.
    PATH_TO_COMPSS_INSTALLATION/enqueue_compss \
    --num_nodes = 4 \
    --storage_props = storage_props.cfg \
    --storage_home=$HECUBA_ROOT/compss/ \
    --scheduler=es.bsc.compss.scheduler.fifodatanew.FIFODataScheduler \
    --lang=python \
$(pwd)/myapp.pyThere are several parameters that can be defined when running our application. The basic parameters are the following
-
CONTACT_NAMES (default value: 'localhost'): list of the Storage System nodes separated by a comma (example: export CONTACT_NAMES=node1,node2,node3)
-
NODE_PORT (default value: 9042): Storage System listening port
-
EXECUTION_NAME (default value: ’my_app’): Default name for the upper level in the app namespace hierarchy
-
CREATE_SCHEMA (default value: True): if set to True, Hecuba will create its metadata structures into the storage system. Notice that these metadata structures are kept from one execution to another so it is only necessary to create them if you have deployed from scratch the storage system.
-
NUMBER_OF_BLOCKS (default value: 1024): Number of partitions in which the data will be divided for each node
-
CONCURRENT_CREATION (default value: False): you should set it to True if you need to support concurrent persistent object creation. Setting this variable slows-down the creation task so you should keep it to False if only sequential creation is used or if the concurrent creation involves disjoint objects
-
LOAD_ON_DEMAND (default value: True): if set to True data is retrieved only when it is accessed. If it is set to False data is loaded when an instance to the object is created. It is necessary to set to True if you code uses those functions of the numpy library that do not use the interface to access the elements of the numpy ndarray.
-
DEBUG (default value: False): if set to True Hecuba shows during the execution of the application some output messages describing the steps performed
-
SPLITS_PER_NODE (default value: 32): Number of partitions that generates the split method
-
MAX_CACHE_SIZE (default value: 1000): Size of the cache. You should set it to 0 (and thus deactivate the utilization of the cache) if the persistent objects are small enough to keep them in memory while they are in used
-
PREFETCH_SIZE (default value: 10000): Number of elements read in advance when iterating on a persistent object
-
WRITE_BUFFER_SIZE (default value: 1000): size of the internal buffer used to group insertions to reduce the number of interactions with the storage system
-
WRITE_CALLBACKS_NUMBER (default value: 16): number of concurrent on-the-fly insertions that Hecuba can support
-
REPLICATION_STRATEGY (default value: 'SimpleStrategy'): Strategy to follow in the Cassandra databas
-
REPLICA_FACTOR (default value: 1): The amount of replicas of each data available in the Cassandra cluster
-
CONTACT_NAMES (default value: empty): If this variable is set in the storage_props file, then COMPSs assumes that the variable contains the list of of an already running Cassandra cluster. If this variable is not set in the storage_props file, then the enqueue_compss command will use the Hecuba scripts to deploy and launch a new Cassandra cluster using all the nodes assigned to workers.
-
RECOVER (default value: empty): if this variable is set in the storage_props file, then the enqueue_compss command will use the Hecuba scripts to deploy and launch a new Cassandra cluster starting from the snapshot identified by the variable. Notice that in this case, the number of nodes used to generate the snapshot should match the number of workers requested by the enqueue_compss command.
-
MAKE_SNAPSHOT (default value: 0): the user should set this variable to 1 in the storage_props file if a snapshot of the database should be generated and stored once the application ends the execution (this feature is still under development, users can currently generate snapshots of the database using the c4s tool provided as part of Hecuba).
We have added a layer that allows the interaction with the Hecuba core layer, without using the Python interface. This C++ interface is work in progress and currently does not cover all the functionality implemented by Hecuba. In addition, we expect to improve the usability of the interface in the next releases.
The first step to use Hecuba objects is to load the data model and to stablish the connection with Hecuba. Once this step is completed, it is possible to create and instantiate Hecuba objects, to insert data and to read data, and to iterate on the keys of a StorageDict. Following sections describe how to perform each of these steps and the current scope of each of them.
The connection with Hecuba is performed when an object of class HecubaSession is instantiated:
Example:
HecubaSession s;Once the session is established, then it is necessary to load the data model using the loadDataModel method. This method receives as parameter the yaml file with the model specification and parsers the file to load in memory the data model. In addition, it generates the equivalent data model specification that can be used from a python code. This is useful if the same data classes will be used from C++ code and from python code. The method loadDatamodel has a second parameter which is optional and allows to specify a target directory for the generated python file (if this parameter is not specified, the file is stored in the same directory than the yaml file).
void HecubaSession::loadDataModel(const char * model_filename, const char *path=nullptr);Example:
s->loadDataModel("model_storageobj.yaml");The specification of a Hecuba class is composed of two main parts: the specification of the base class (keyword "TypeSpec") and the specification of the fields of the Hecuba class.
The keyword "TypeSpec" precedes a pair composed of the name of the class and its base class in Hecuba (StorageObject, StorageDict, StorageNumpy or other user defined Hecuba class). If the base class is a user defined class it is necessary to specify the fully qualified name in python style (name of the file dot name of the class).
The format of the specification of the fields of the class depends on the type of Hecuba class:
-
For StorageObjects, it is necessary to add the keyword "ClassField" followed by as many rows as attributes contain the StorageObject.
-
For StorageDicts, it is necessary to add the keywords "KeySpec" and "ValueSpec", each of them followed by as many rows as attributes contain the key and the value
-
For StorageNumpy do not need additional fields
Each attribute is described by a pair composed of the attribute name and the type. The type can be a basic type (int, float, str, bool) or a class type (a user defined Hecuba class or a StorageNumpy).
- "TypeSpec": [ "class_name", "StorageObject"]
  "ClassField":
            - [ "atribute_name", "type"]
            - ...

- "TypeSpec": [ "class_name", "StorageDict" ]
  "KeySpec":
            - [ "key_name", "type_name" ]
            - ...
  "ValueSpec":
            - [ "value_name", "StorageNumpy" ]
            - ...

- "TypeSpec": [ "myNpClass", "StorageNumpy" ]
Example ( model_storageobj.yaml ):
- "TypeSpec": [ "myclass", "StorageObject"]
  "ClassField":
            - [ "lat", "float"]
            - [ "ts", "int" ]
            - [ "mynp", "numpy.ndarray" ]
            - [ "onedict", "model_storageobj.mydict" ]

- "TypeSpec": [ "mydict", "StorageDict" ]
  "KeySpec":
            - [ "key", "int" ]
  "ValueSpec":
            - [ "val", "StorageNumpy" ]

- "TypeSpec": [ "myNpClass", "StorageNumpy" ]
The equivalent python file that describes this example of data model is the following.
Exemple ( model_storageobj.py ):
class myclass (StorageObj):
   '''
   @ClassField lat float
   @ClassField ts int
   @ClassField mynp hecuba.hnumpy.StorageNumpy
   @ClassField onedict model_storageobj.mydict
   '''

class mydict (StorageDict):
   '''
   @TypeSpec dict <<key:int>,val:numpy.ndarray>
   '''
class myNpClass (StorageNumpy):
   '''
   '''
Currently unsupported features
- This version of C++ interface still does not support StorageSets.
The method to create a new Hecuba object is part of the HecubaSession class and it is named createObject. It receives at least two parameters: the name of the Hecuba class and the identifier in disk (name) of the persistent object and returns a pointer to a new instantiated IStorage object. If the parameter obj_name is a nullptr then createObject generates a random name for the object.
IStorage* HecubaSession::createObject(char *class_name, char * obj_name,
  void* metadata=NULL, void* value=NULL );
Example:
IStorage* o = s.createObject("myclass", "myobj");This call to createObject instantiates an object of class "myclass" that is stored in disk with the name "myobj".
If the target persistent object is new, this method creates in the storage the data structures to hold the object data. If already exists a persistent object with the same name, Hecuba shows a warning message indicating that if the schema of the current instantiation does not match with the schema of the already existing object, then the following operations to insert or to read the object will fail. In any case, this method instantiates in memory an object of class IStorage that will link the content in memory with the content in storage.
The creation of a StorageNumpy have two additional parameters to specify the metadata of the numpy ndarray and the initial content of the numpy ndarray. The parameter "metadata" is a buffer containing the following integers: number of dimensions and, for each dimension, the number of elements.
The parameter "value" is a buffer containing the values of the numpy stored in consecutive rows (C format to store matrices).
The following code shows an example of how to generate the parameter "metas" and the parameter "values" for a StorageNumpy of 4 rows and 3 columns.
Example:
unsigned int * metas = (char *) malloc(sizeof(unsigned int) * 3);

metas[0] = 2; // number of dimmensions
metas[1] = 4; // number of elements in the first dimmension
metas[2] = 3; // number of elements in the second dimmension

double *values = (double*) malloc(sizeof(double) * 4 * 3);
double *tmp = values;
double num = 1;
for (int i=0; i<4; i++) {
   for (int j=0; j<3; j++) {
       *tmp = num++;
       tmp += 1;
   }
}

IStorage* o = s.createObject("Hecuba.hnumpy.StorageNumpy", "mynp", metas, values);
Currenty unsupported features
-
Notice that the current version of this interface only supports the instantiation of persistent Hecuba objects (new or existing). It is not currently possible to instantiate a volatile object to persist it later.
-
It is not possible to instantiate an empty StorageNumpy to fill it later.
Once the persistent object is instantiated it is possible to insert new data. The method to insert the data depends on the Hecuba base class of the object.
- StorageObject: the method to insert data into a StorageObject is setAttr. The setAttr method receives two parameters: the name of the attribute and the value of the attribute.
void IStorage:: setAttr(const char* attr_name, IStorage* value);- StorageDicts: the method to insert data into a StorageDict is setItem. The setItem method receives two parameters: the value of the key and the value of the attribute.
void IStorage:: setItem(void* key, IStorage* value);- StorageNumpys: the method to insert data into a StorageNumpy should be setItem but, at this point of the implementation, the C++ interface only supports the setting a whole numpy at instantiation time.
The method to specify the values for keys and attributes is the same. If the value is composed of a single element:
-
If this element is a string or a IStorage, the parameter should be the address of the variable containing the address of the string or the IStorage.
-
If this element is a basic type (other than a string), the parameter should be the address of the variable containing the value.
Example:
//oneobject is a StorageObject with 3 fields: lat, cheers and dictionary

int value = 4;
oneobject->setAttr("lat", &value);  		//sets an attribute of type int

char * s = malloc (strlen(“hi there”) + 1);
strcpy(s, “hi there”);
oneobject->setAttr(“cheers”, &s);		//sets an attribute of type string

oneobject->setAttr(“dictionary”, &d); 	//d is of type IStorage *

// dint is a dictionary with key of type integer and value of type IStorage
int key = 6;
dint->setItem(&key, &oneobject);

// dstr is a dictionary with key of type string and value of type int
dstr->setItem(&s, &value);
If the value is composed of more than one element the user needs to allocate a chunk of memory enough to hold all the elements. For each element, the user should add to the chunk of memory the following:
-
If the element is a String or a IStorage, add to the chunk of memory a copy of its address.
-
If the element is of basic type (other than a String), add to the chunk of memory a copy of the element itself.
Example:
//d is a StorageDict: the key is composed by a float and and an integer
//			the value is a StorageNumpy

char * key = (char*) malloc (sizeof(float) + sizeof(int));

float *lat_key = (float*) key;
*lat_key = lat;
int *ts_key = (int*) (key + sizeof(float));
*ts_key = ts;

IStorage *sn=s.createObject("hecuba.hnumpy.StorageNumpy","mynp",numpymeta,valueNP);

d->setitem(key, sn)The method to read data from a Hecuba object depends of the type of object: If the object is of type StorageDict, the method is getItem. If the object is of type StorageObject then the method is getAttr. In the case of getItem the parameter is the key of the value to retrieve and in the case of getAttr the parameter is the name of the attribute to read. For both methods, the second parameter is the address to store the data read from storage.
void IStorage::getAttr(const char* attr_name, void * valuetoreturn) const;
void IStorage::getItem(const void* key, void * valuetoreturn) const;
The chunk of memory contains the data following the same format that the insertion of data: for strings or istorage, a pointer to the actual data; and for basic types the value of the data.
Example:
//simpledict is a dictionary indexed with an integer with values of type integer

int key = 2;
int value;
simpledict->getItem(&keyInt, (void*) &value_retrieved);

//myobj is a StorageObject with an attribute named “sim_id” of type string

char* str_retrieved;
myobj->getAttr("sim_id", &str_retrieved);
In the case of StorageDicts with values composed of several attributes, the user needs to allocate a chunk big enough to contain all the values and pass the address of the chunk to the getItem method. After the getItem call, the memory chunk will contain all the values following the same format than in the setItem call.
We have implemented an iterator on the StorageDict objects that allows to iterate through all the keys of a StorageDict.
Example:
//mydict is a StorageDict with a composed key: string and integer

char *it_s;
int it_ts;
for(auto it = mydict->begin(); it != mydict->end(); it++) {
        buffer = (char *)(*it);		//contains one key
        it_s = *(char**)  buffer; 	//first attribute of the key
        it_ts = *(int *) (buffer + sizeof(char*));	//second attribute of the key
Currenty unsupported features
The Python interface of Hecuba also offers the possibility of iterating to get all the values of the StorageDict and to get both values and keys. This feature is not implemented in the C++ interface.
Hecuba facilitates the implementation of using both on-line and off-line processing by implementing a lambda architecture. With this architecture, the data is streamed concurrently with the data insertion in storage.
Currently we have implemented this feature for StorageDicts. The user has to define the class as a subclass of both StorageDict and StorageStream Hecuba classes. With this class definition, all the setitems will send asynchronously the data to the storage and synchronously through the stream.
Exemple: python specification (to be used from python code)
class mydict (StorageDict, StorageStream):
   '''
   @TypeSpec dict <<key:int>,val:numpy.ndarray>
   '''
Exemple: yaml specification (to be used from c++ code)
- "TypeSpec": [ "mydict", "StorageDict" ]
  "KeySpec":
            - [ "key", "int" ]
            - [ "val", “StorageNumpy”]

  "stream":
The consumer should use the function poll to receive the streamed data. At this point of the implementation, poll is only supported by the Python interface of Hecuba.
def poll() # returns the key and the value of the streamed dataExample: producer in Python
d=mydict(“dictname”)
d[42]=sn # sn is a StorageNumpy
Example: producer in C++
HeubaSession s;

d=s.createObject(“mydict”,”dictname”);
d.setItem(42,sn); // sn is a StorageNumpy
Example: consumer in Python
d=mydict(“dictname”)
k,v=d.poll() #k will value 42 and v will be sn
Currenty unsupported features
At this point we support the lambda architecture only for StorageDict. The values of the StorageDict can be of basic type or can be StorageNumpys. The C++ interface does not implement the poll method.