An A-frame component that allows you to add separate image/video textures to different sides of standard a-frame shapes.
New in version 0.2 -> Want to only have an image on the front and top of your cube? Now you can. Target specific sides with textures declaratively.
Version 0.3 - Video playback bug fixed
The multisrc component integrates with all existing components allowing you to define a different texture for each side of an shape while still controlling all other material properties with the standard material attributes (color, opacity etc.). It should work seamlessly with all other aframe components too (physics, animation etc. Please let me know of any issues).
As with the standard src attribute you can use multisrc with images/videos that have been preloaded in the assets tag (recommended for all the reasons described here). There are a few different ways to assign your textures with multisrc. Please see below
  <head>
    <script src="https://aframe.io/releases/0.8.2/aframe.min.js"></script>
    <script src="https://cdn.rawgit.com/elbobo/aframe-multisrc-component/b6d23310/dist/0.3/aframe-multisrc-component.js"></script>
  </head>
  <body>
    <a-scene>

      <a-assets>
        <img id="right" src="path/to/rightimage.png">
        <img id="left" src="path/to/leftimage.png">
        <img id="top" src="path/to/topimage.png">
        <img id="bottom" src="path/to/bottomimage.png">
        <img id="front" src="path/to/frontimage.png">
        <img id="back" src="path/to/backimage.png">
      </a-assets>

      <!-- METHOD 1 -->

      <!-- If you know you want to assign assets to ALL sides, using the `srcs` attribute is probably easiest -->

      <!-- you can assign the images as ids from assets -->

      <a-box
        position="0 1.5 -2"
        multisrc="srcs:#right,#left,#top,#bottom,#front,#back"
        color="blue"
        opacity="0.5"
        shadow>
      </a-box>

      <!-- OR add the images/videos inline -->

      <a-box
        position="0 1.5 -2"
        multisrc="srcs:path/to/rightimage.png,path/to/leftimage.png,path/to/topimage.png,path/to/bottomimage.png,path/to/frontimage.png,path/to/backimage.png"
        color="blue"
        opacity="0.5"
        shadow>
      </a-box>

  <!-- OR When defining assets inline, avoid rewriting lengthy paths (if assets in the same folder) using `srcspath` -->
  <!-- Use the `srcspath` attribute and then simply list the image/video names like so -->

      <a-box
       position="0 1.5 -2"
       multisrc="srcspath:path/to/;srcs:rightimage.png,leftimage.png,topimage.png,bottomimage.png,frontimage.png,backimage.png"
       color="blue"
       opacity="0.5"
       shadow>
      </a-box>

   <!-- METHOD 2 -->

   <!-- If you want to assign assets to only particular sides, the 'srcx' attribute can be more targeted -->

   <!-- The following example will only add textures to the left and right hand sides -->

      <a-box
       position="0 1.5 -2"
       multisrc="src0:#right;src1:#left"
       color="blue"
       opacity="0.5"
       shadow>
      </a-box>

    <!-- or this would add textures to the top and front -->

      <a-box
       position="0 1.5 -2"
       multisrc="src2:#top;src4:#front"
       color="blue"
       opacity="0.5"
       shadow>
      </a-box>

    <!-- etc. and you can assign images inline and with srcspath using this method as well -->

    </a-scene>
  </body>
Examples here are shown using images but as with the standard src attribute we can also use videos as a texture. The logic for playback on video textures (and how it differs between those defined inline or within assets) on multisrc is the same as that for video textures on standard src - see here for details. Basically, preloading is always the best way to do it.
| Property | Description | Default |
|---|---|---|
| srcs | Comma separated list of assets. Can either be a selector to an <img> or <video> defined in assets, or an inline URL. |
[] |
| srcspath | For use with inline assets, saves you having to write the full image path each time (see above for example) | '' |
| src0 | Name of asset. Can either be a selector to an <img> or <video> defined in assets, or an inline URL. As an alternative to srcs you can assign assets directly to specific sides. See below diagram of where numbered sides will end up on your shape. src0 could be used on any shape |
'' |
| src1 | Name of asset. Can either be a selector to an <img> or <video> defined in assets, or an inline URL. src1 can currently be set on cubes, cylinders and cones |
'' |
| src2 | Name of asset. Can either be a selector to an <img> or <video> defined in assets, or an inline URL. src2 can currently be set on cubes and cylinders |
'' |
| src3 | Name of asset. Can either be a selector to an <img> or <video> defined in assets, or an inline URL. src3 can currently be set on cubes |
'' |
| src4 | Name of asset. Can either be a selector to an <img> or <video> defined in assets, or an inline URL. src4 can currently be set on cubes |
'' |
| src5 | Name of asset. Can either be a selector to an <img> or <video> defined in assets, or an inline URL. src5 can currently be set on cubes |
'' |
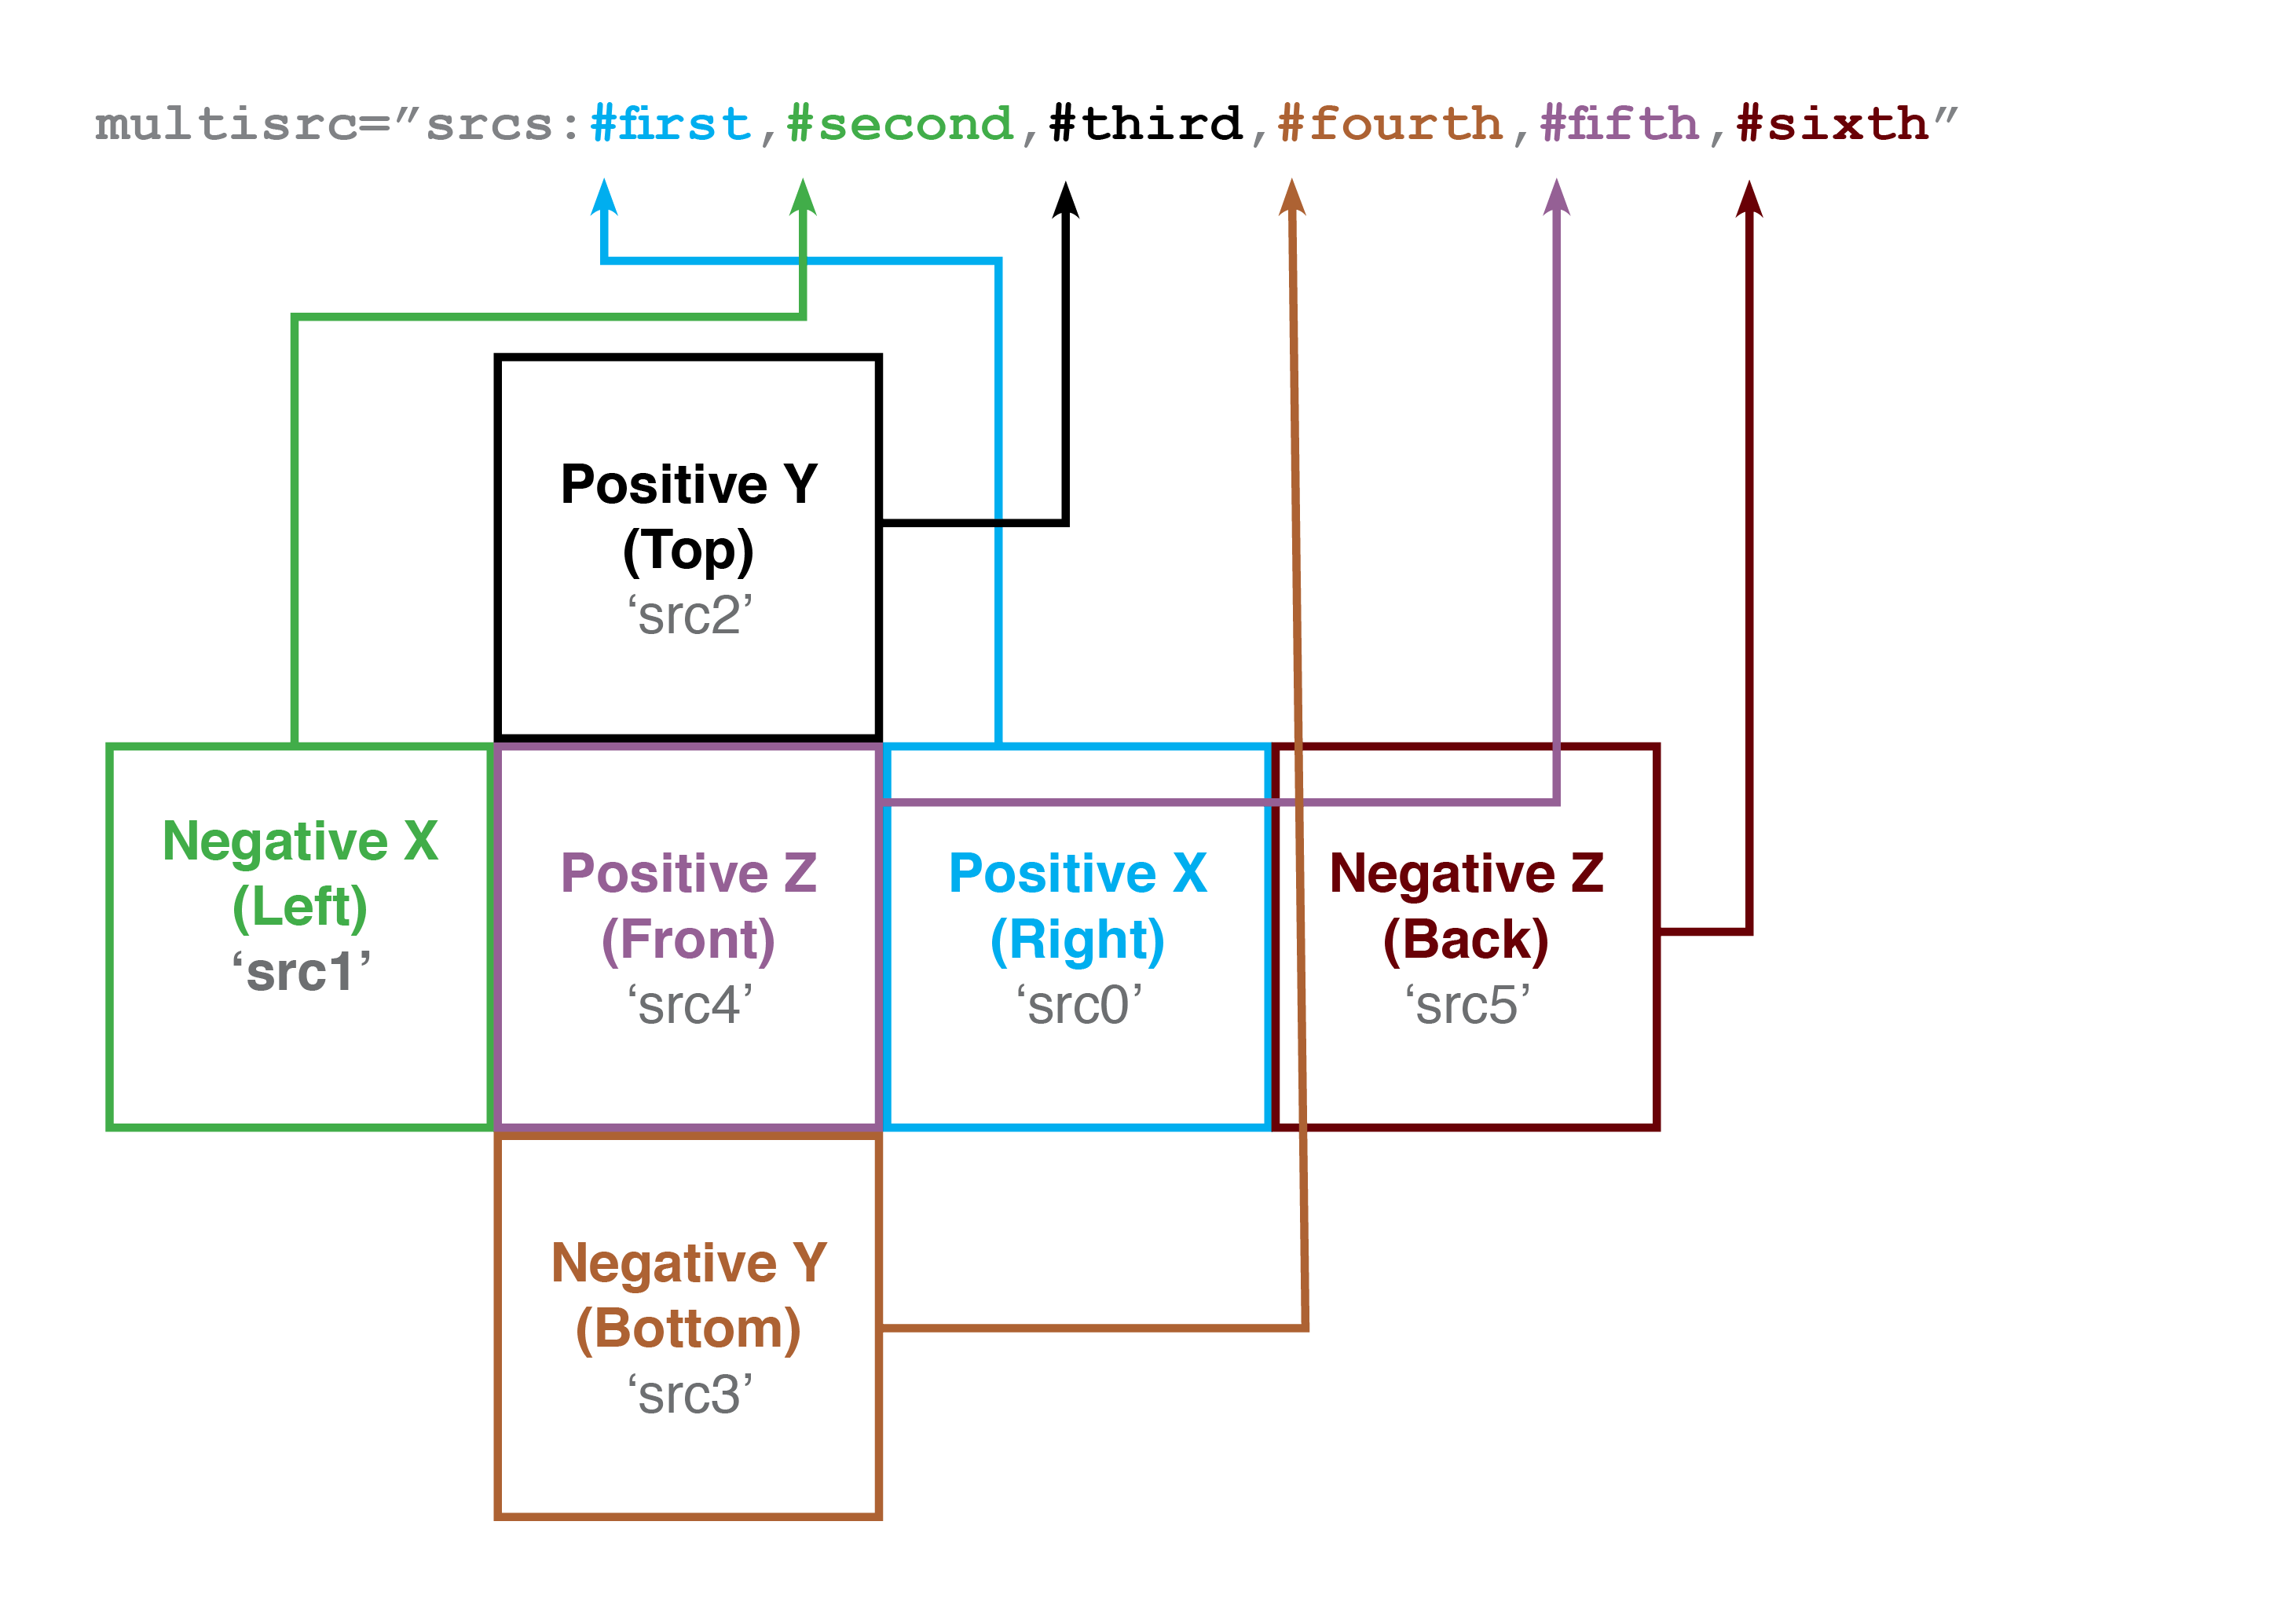
The srcs attribute assumes the following order of your textures - positive-x, negative-x, positive-y, negative-y, positive-z, negative-z so in the case of a cube, it will place your first asset on the positive-x side (right), the second on the negative-x side (left) and so on.
The src0, src1, etc. attributes follow the same order. See diagram below which hopefully makes this clearer.
Install and use directly with the link in the below example (below example uses the src0, src1 etc. approach, see above for alternative srcs method.
  <head>
    <script src="https://aframe.io/releases/0.8.2/aframe.min.js"></script>
    <script src="https://cdn.rawgit.com/elbobo/aframe-multisrc-component/b6d23310/dist/0.3/aframe-multisrc-component.js"></script>
  </head>
  <body>
    <a-scene>
      <a-assets>
        <img id="right" src="path/to/rightimage.png">
        <img id="left" src="path/to/leftimage.png">
        <img id="top" src="path/to/topimage.png">
        <img id="bottom" src="path/to/bottomimage.png">
        <img id="front" src="path/to/frontimage.png">
        <img id="back" src="path/to/backimage.png">
      </a-assets>
      <a-box
        position="0 1.5 -2"
        multisrc="src0:#right;src1#left;src2:#top;src3:#bottom;src4:#front;src5:#back"
        color="blue"
        opacity="0.5"
        shadow>
      </a-box>
    </a-scene>
</body>Under the hood multisrc is adding a different material to each 'side' of a shape. This is made from an array of materials that three.js now allows to be added to the mesh Please see here for SO answer and discussion that prompted this approach.
Aside from the src attribute, these materials inherit properties from the default material component added to the entity so as to make its usage familiar. I think the most common use case of this is to apply different textures so I have made manipulating this declarative so it is straightforward to use for the most common case. You can however target the individual materials and effect other properties programatically. I have included a function that allows you to make granular changes should you wish to.
Materials are kept in an array in the standard order for applying materials, so individual materials can be reached by their index i.e. 0 = positive-x, 1 = negative-x, 2 = positive-y etc.
So, assuming you have multisrc attached to an element with id 'foo' you could use the granularChange function to target the right hand side material on a cube and change its colour like so;
var foo = document.getElementById('foo').components.multisrc
foo.granularChange(0).color = {r:0,g:1,b:0}
Or get the back and change its metalness
foo.granularChange(5).metalness = 0.8Or get the right and make it a wireframe
foo.granularChange(1).wireframe = trueetc. Which would result in the following on an otherwise blue cube with 0 metalness.

NB if you change the default material's properties at any point with setAttribute or similar, these granular changes will be overwritten.
In terms of figuring out how many sides a shape has (and applying textures accordingly) this currently works as well as the standard src attribute would i.e. it gets it right on cubes, cylinders, cones, triangles, circles etc. but not on more complex shapes like dodecahedron etc. I'm not going to list them all here but assume if you get unexpected results with a texture using standard src it will do the same with multisrc maybe I could handle this better at some point.