
This is a standalone HTTP server created to simulate various responses as if they are returned by a third party web service APIs. For example, the simulator can be configured to act as api.twitter.com or graph.facebook.com without your application knowing the difference. Its primary use is for functional (manual and automated) testing. Its secondary uses are monitoring and performance/stress testing.
Here is a presentation about Nagual, that I gave at Agile Testing Days 2016 conference.

- Install node.js and npm
- Clone this repository:
git clone https://github.com/emanuil/nagual(or download the zip file) - Install the required npm packages:
cd nagual && npm install - Run the simulator:
sudo node proxy.js
You should see the following output
Starting the HTTP(S) protocol simulator...
Loaded stubs count per host:

c9555.r55.cf2.rackcdn.com: 1
api.instagram.com: 6
api.linkedin.com: 4
api.twitter.com: 12
blah.com: 0 Transparent mode only!
cdn2.clouddrive.com: 1
graph.facebook.com: 32
identity.api.rackspacecloud.com: 1
porto.zendesk.com: 4
storage101.ord1.clouddrive.com: 5
www.googleapis.com: 5

Listening on port 80
Listening on port 443
In order to start using the simualtor you need to peform the two steps in bold bellow.
After Nagual has started its time to route your application traffic through it. Depending on how your application is configured there are couple of ways to do this. The easiest is to add an entry to /etc/hosts file on your application server to redirect all traffic to the simulator.
For example if 192.168.8.21 is the IP address where Nagual is running and you want to simulate an external service host api.twitter.com, you should add the following line to /etc/hosts file on the server thats running your applications.
192.168.8.21 api.twitter.com
This will route all the traffic intended to the external service, first through the simulator. Depending on how you setup Nagual rules, the requests will either be simulated or forwarded to the real service.
If for some reason you can not edit /etc/hosts, your options would be (depending on the architecture of your application):
- to edit your application code
- to edit a config file
- to edit a configuration in your database
- to edit the DNS records
The main point is to ultimately redirect all the HTTP traffic that you need to simulate to Nagual.
Since all the traffic passes through Nagual, you can monitor it in real time. This traffic is usually encrypted and visible only to the client and to the server. Since Nagual acts are MiTM proxy, it can see and modify everything.
Most of the interesting external services run over HTTPS. Your code (or the code in the 3rd party libraries) used to connect to the external services has SSL server verification enabled. On every connection, your application checks if it talks to the real api.twitter.com, instead of any other server with self signed SSL certificate. This way your app is making sure that it is not susceptible to man-in-the-middle attack. Nagual uses the same technique to do good.
When Nagual starts, it auto generates fake SSL certificate issued to api.twitter.com. However, it is signed by root certificate that is itself self-signed (not signed by any of the built in root CAs in your OS). The server SSL verification would still fail at this point.
In order to enable HTTPS traffic simulation you need to do one thing. Install Nagual’s root certificate as trusted on your app OS. Then your app will not complain that the certificate issued to api.twitter.com is signed by unknown authority.
Nagual includes a default root certificate root_certificate/rootCA.crt, that you can use it to test with. However if you’re serious about security you should generate and use your own, just put it in root_certificate directory (there need to be two files rootCA.crt and rootCA.key).
Here is how to install the root certificate (root_certificate/rootCA.crt) as trusted in your OS.
If your application is Java based you need to install the root certificate in the Java keystore.
The simplest possible stub looks like this:
module.exports = function() {
    this.method = 'GET';
    this.url = '/twitter/:id';

    this.token = {
        string: 'test-token',
        location: 'url'
    };

    this.getResponse = function() {

        return {
            'body': JSON.stringify({"name":"John Doe"})
        };
    };
};
Assume that there is an API located here example.com/twitter/:id. When called with GET request it returns the name associated with the twitter id from the URL (:id can be random integer). The curl request to call this API might be:
curl https://example.com/twitter/71231348&token=test-token
Nagual will catch these request and will return {"name":"John Doe"} in the body.
Stubs should be located in the stubs directory. The next sub directory should be either http or https. The next sub directory is name of the server (exactly the same as in the request URL). Next comes the stub file name. It can be free style, as long as it ends with .js. However using a convention is really helpful - e.g. http_verb_request_url.js. For example, the simple stub declared above should be located here:
stubs/https/example.com/get_twitter_id.js
The stub follows the standard Node.js modules structure, and is executable JavaScript code that provides great flexibility. It has 4 mandatory properties that have to be defined:
-
this.methodThe HTTP verb used in the request. It's usually GET, POST, DELETE, HEAD or OPTIONS. Case insensitive. -
this.urlThis is the URL which is to be matched. It can be defined as string or as JavaScript regular expression. Important: The URL matches only the part after the host and before the arguments (separated by?). For example, if the request has this full URL:https://example.com/twitter/1234874?token=test-token-random-stuffthen
this.urlmatches this part only/twitter/1234874Three of the most used regular expressions to match RESTful stule APIs can be used:
:stringmatches a random sting, e.g. 'KKlkdjUjasd':numbermatches a random number, e.g. '98129830123':idmatched any combination of all printable characters, e.g. 'token-123-abc-456'
So if you want to match the above URL you can do it in two ways:
this.url = '/twitter/:number'this.url = '/twitter/:id'
If this does not suite you, you can always write a custom JavaScript Regex
-
this.tokenThis is the string that needs to be present in the specified location (url, headers or body). If you do not want to use it you can effective disable it, by matching all the URLS:
this.token = {
    string: '',
    location: 'url'
};
this.getResponse()If all of the above stub properties match, this function is called to generate the fake response. It returns an object with one or more of the following properties:bodythe response body, most of the time you'll only need to return only this propertystatusCodeif you don't set it, it's 200 by defaultstatusMessageif you don't set it, it's 'OK' by defaultheadersan object that defines one or more custom headers to be returned
When the method, url and the token properties defined in the stub all match to the incoming request, then instead of redirecting to the real service, Nagual generates the response by calling this.getResponse() function. If one or more of the method, url or token properties do not match, then the request is forwared to the real service. The real response is forwarded back unconditionally.
Monitoring is the second type of usage that Nagual was designed for. This can be totally separated activity than simulating responses. Nagual is completely transparent as far as your application is concerned.
Since all the HTTP traffic passes through Nagual it can easily be monitored. Nagual supports -s statsd_server command line switch in case you want to log the number of requests to your StatsD server and later to visualize them. Out of the box, Nagual provides four types of statistics for the passing HTTP traffic.
- Total HTTP requests passing through Nagual for one hour. Increased number of requests after code push might indicate a problem. It may even cause the external service to throttle you, or to increase your spending. The graph bellow show a peak around midnight, thats when a lot of off-hours jobs are scheduled for.

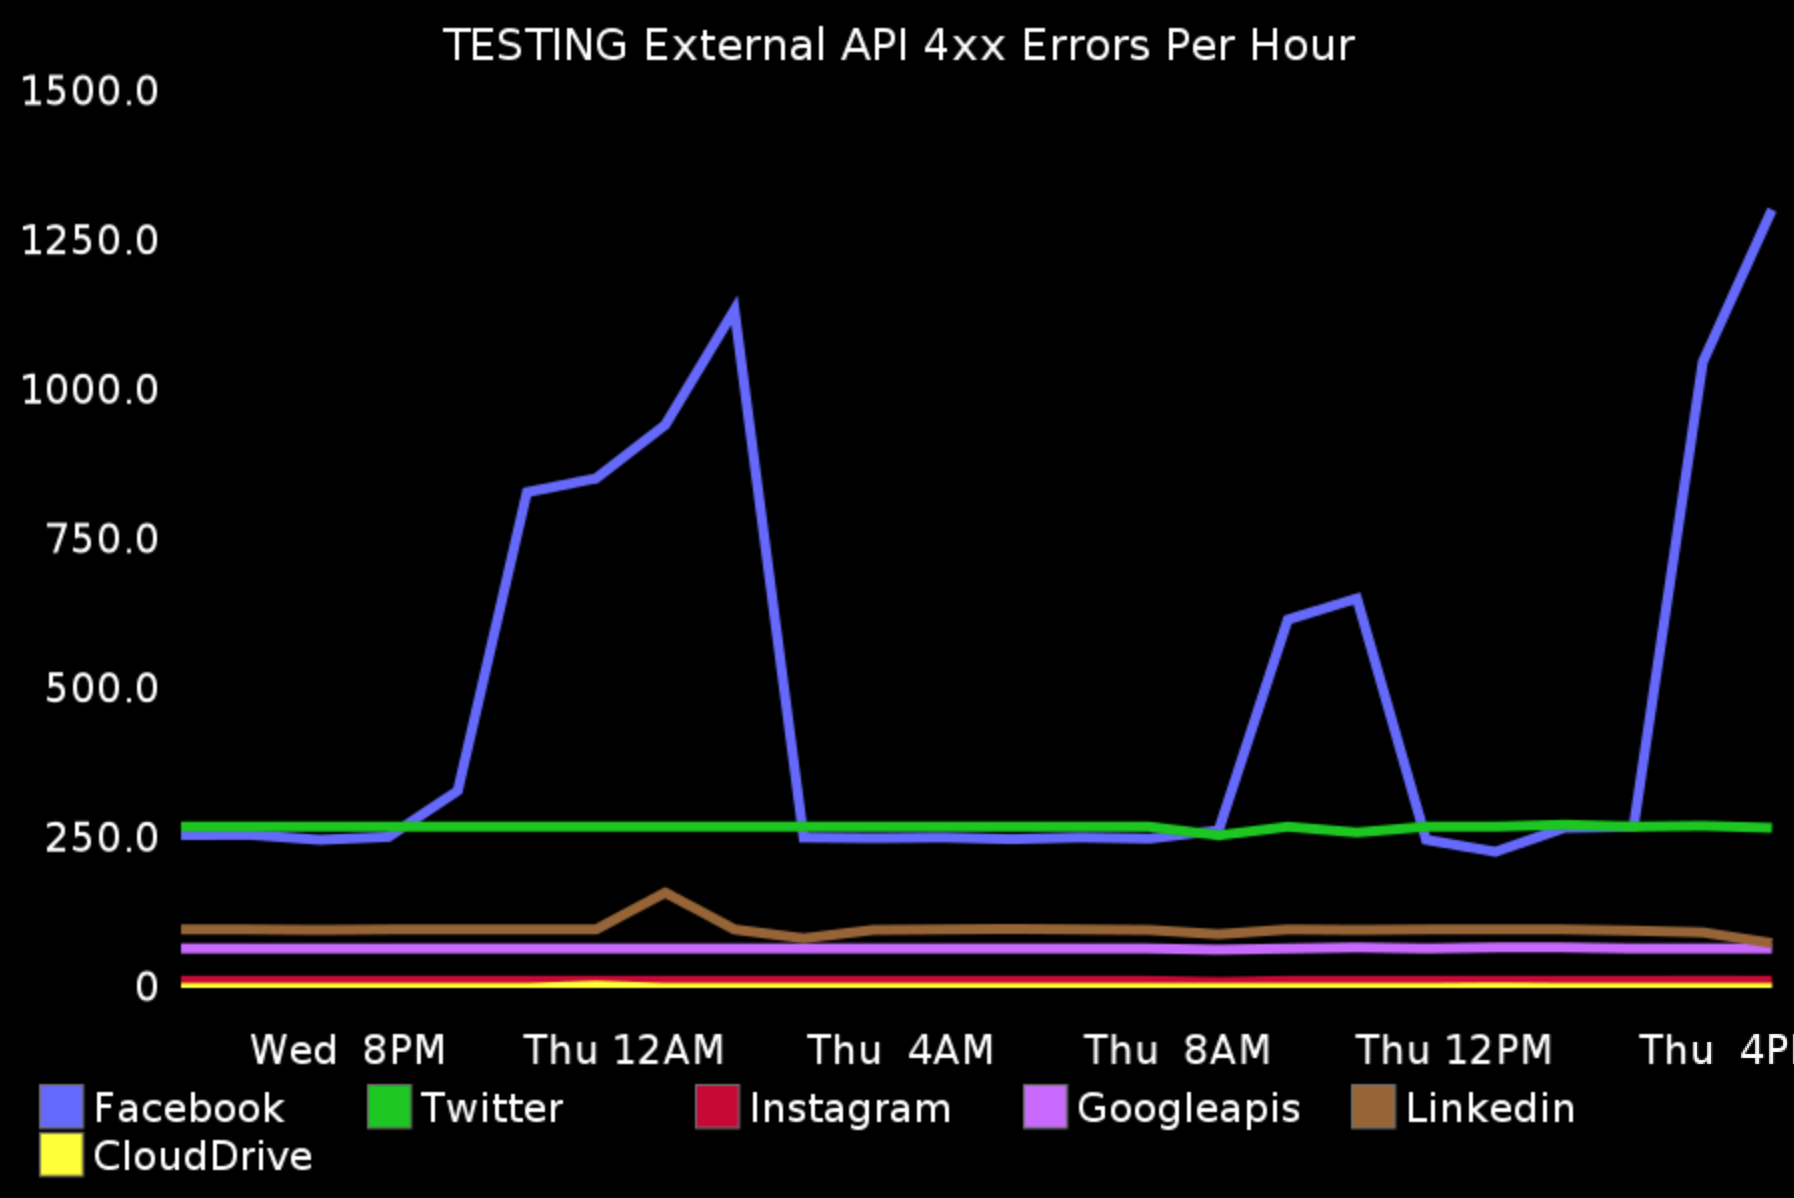
- The number of 4xx errors. This usually means that your application is not configured correctly when communicating to the external services. The graph bellow shows a moment when we calling a Facebook API with wrong parameters.
- The number of 500 errors. This indicates how stable is the external service that you're integrated with. Contrary to what you might think, we see more 500 errors coming from Google+ than any other major social network.

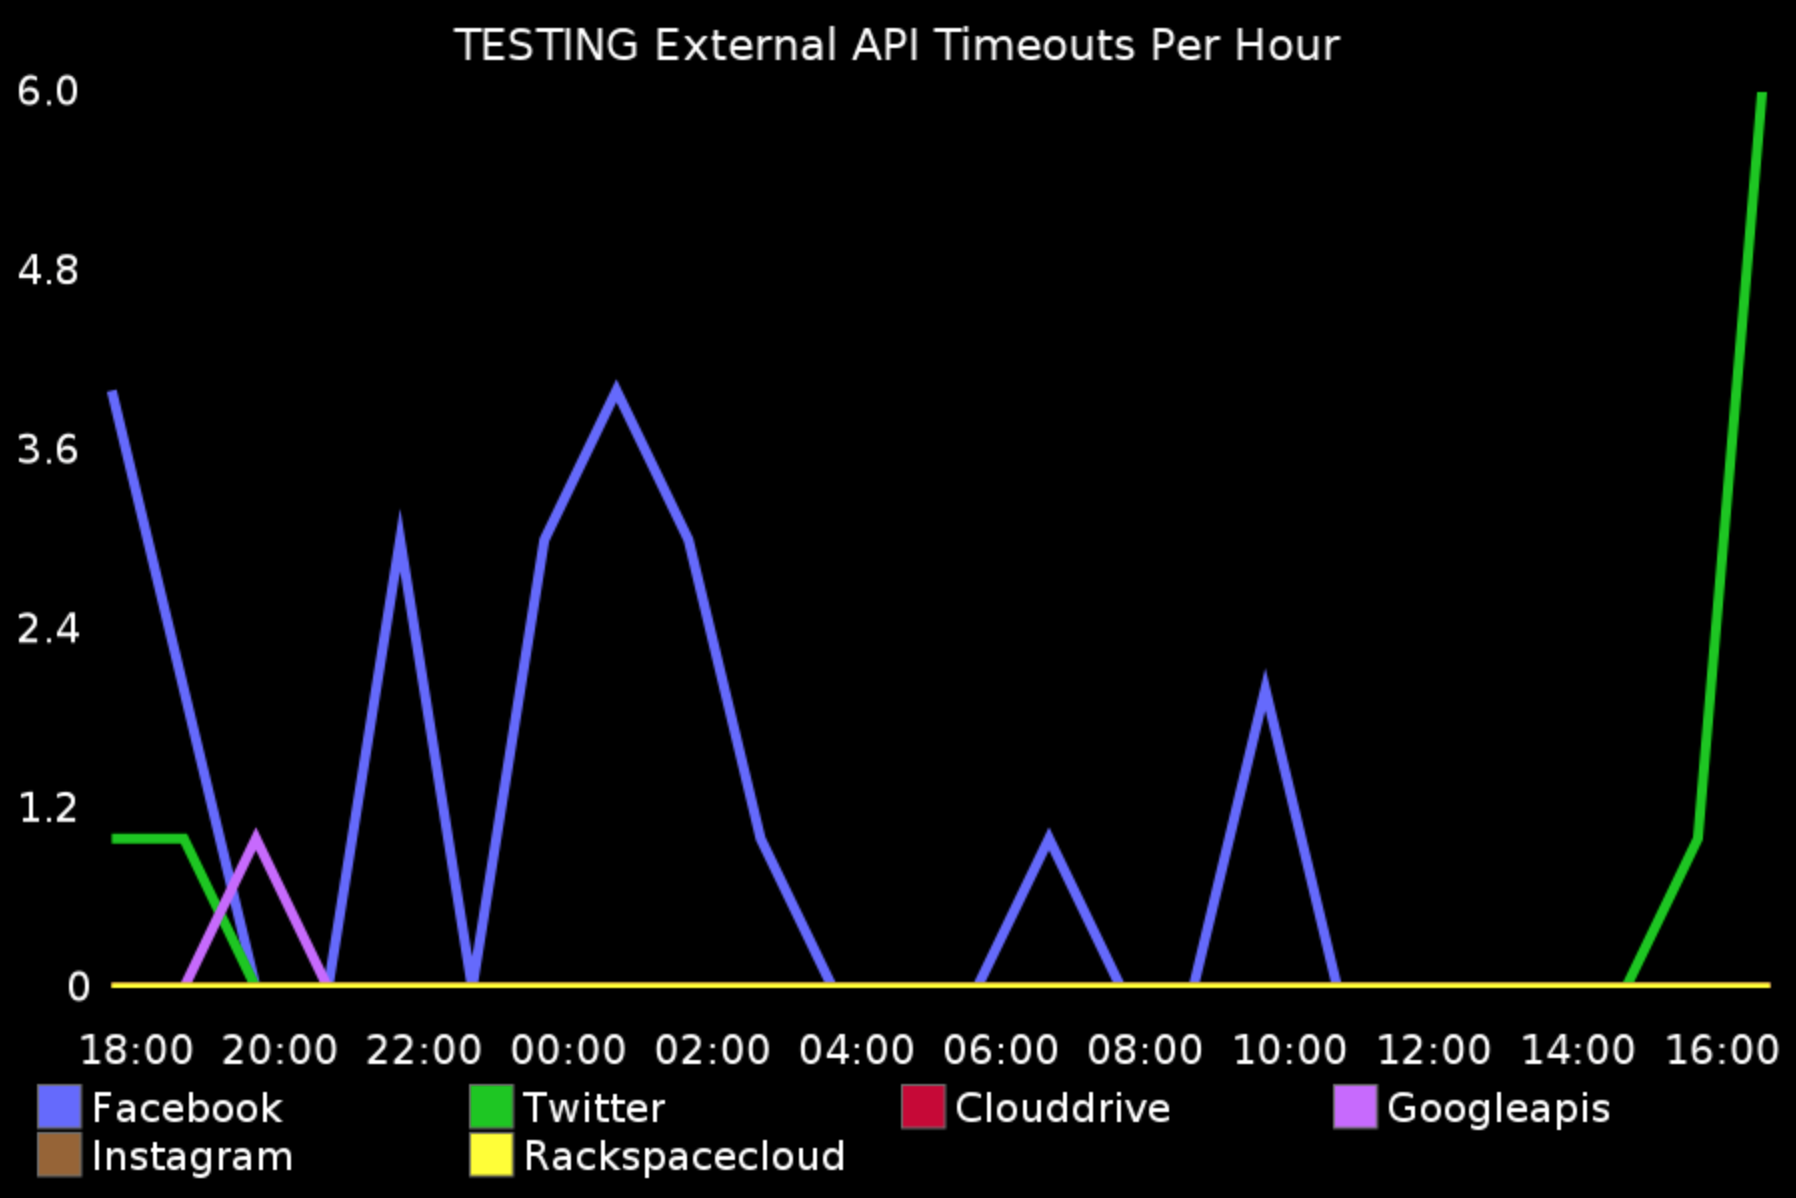
- The number of timeouts. A timeout means that your software sends a requests, but did not hear back from the external service for a given period of time. This might indicate failure on the external service side. Or it might be related to the internet connectivity. These days, we see more timeouts from Twitter than from any other major social network.
If your application uses any external resources, you’re relying on them constantly being online and responsive so that your tests are passing 100%. If the Internet is down, or slow, your tests will fail. If the external service throttles your requests, after you reach the daily limit, your tests will fail. If you have to manually renew expired credentials, your tests will fail. Also note that some of the responses coming from external services cannot be easily triggered. These include internal server errors, timeout even sending mangled data. In short, your high level tests (everything other than unit tests) have lots of reasons of moving parts and thus reasons to fail.
This simulator was created as a way to overcome the obstacles described above. You’ll have full control over your high level tests and they will become more stable and reliable.
To serve our purposes we had to fulfill 9 key requirements
- Standalone. The simulator must be able to run as an independent standalone service. It should not run as http proxy (think Squid proxy) because most of the applications are not designed to use a proxy to talk HTTP to the outside world.
- Fake SSL Certs. All of the external web services that we want to simulate are SSL enabled. Server certificate verification is turned on in the client libraries used to communicate with them. Nagual runs as man-in-the-middle transparent proxy, not triggering any SSL verification errors.
- Transparent. If a rule matches, then the response should be simulated. If not, then the request should be sent to the external service. The simulator should not require any changes to the source code of the application or the 3rd party libraries used. No internal triggers, feature flags, application file or database configurations. For purposes other than testing you should not be aware that the simulator is running.
- Dynamic Responses. The simulator should be able to generate a response programmatically, on the fly. When generating responses they should be able to use random values (integer, string encodings, timestamps) and create random response structure. The simulator should be able to extract data from the request and use parts of it to construct the response.
- Local Storage. The simulator should be able to locally store any generated response, so that it can later be retrieved and used for complex, multi-request sequence operations.
- Binary Data. The simulator should be able to return binary data in the HTTP body - e.g. images, PDF files.
- Regex URL Match. A request should be able to be flagged for simulation by regex matching.
- R&R Not Mandatory. The simulator should be able to be configured without the need to record and replay requests and responses.
- Start Configured. For fast tests (and also to enable parallel execution of tests) the simulator should be able to start fully configured via the command line. It should allow configuration in ways other than API only.
There are various tools today that can perform HTTP simulation (some of the commercial vendors are calling it “service virtualization”). At the time of the creation of Nagual, none of the available tools supported all of the 9 key requirement (as of May 2016). Bellow you can find a table comparing all the actively supported open source HTTP simulation tools. In case Nagual does not fit your needs, try one of the listed tools.
| Tools | Standalone | Fake SSL Certs | Transp. | Dynamic Resp. | Local Stor. | Bin. Data | Regex URL | R&R Not Mandatory | Start Conf. |
|---|---|---|---|---|---|---|---|---|---|
| Stubby4J | yes | yes | no | no | no | yes | yes | yes | yes |
| WireMock | yes | yes | yes | no | no | yes | yes | yes | yes |
| Wilma | yes | no | yes | no | yes | no | no | yes | yes |
| soapUI | yes | no | no | yes | no | yes | no | yes | yes |
| betamax | no | yes | yes | no | no | no | no | no | yes |
| MockServer | yes | yes | no | yes | no | yes | yes | yes | yes |
| VCR | no | yes | yes | yes | no | no | yes | no | yes |
| Mountebank | yes | no | no | yes | yes | yes | yes | yes | yes |
| Hoverfly | yes | yes | yes | yes | yes | yes | no | yes | yes |
| Mirage | yes | no | no | yes | no | yes | yes | yes | no |
