Examples
As PiDuino uses the same API as Arduino, just go to the Arduino reference, or any site that explains the functions of the Arduino language.
The examples folder contains examples from the Arduino world that are can be used directly with PiDuino. The only thing to add is the line:
#include <Piduino.h>Here is the source code of the example Blink that flashes a led:
#include <Piduino.h> // all the magic is here ;-)

const int ledPin = 0; // Header Pin 11: GPIO17 for RPi, GPIOA0 for NanoPi

void setup() {
  // initialize digital pin ledPin as an output.
  pinMode (ledPin, OUTPUT);
}

void loop () {
  // Press Ctrl+C to abort ...
  digitalWrite (ledPin, HIGH);  // turn the LED on (HIGH is the voltage level)
  delay (1000);                 // wait for a second
  digitalWrite (ledPin, LOW);   // turn the LED off by making the voltage LOW
  delay (1000);                 // wait for a second
}
Obviously, you need to know the pin number where you connected the LED !
This number depends on your model of Pi board, to know it quickly, we can type
the command pido readall 1, which gives us, for example, the following display
on a Raspberry Pi B:
                                    P1 (#1)
+-----+-----+----------+------+---+----++----+---+------+----------+-----+-----+
| sOc | iNo |   Name   | Mode | V | Ph || Ph | V | Mode |   Name   | iNo | sOc |
+-----+-----+----------+------+---+----++----+---+------+----------+-----+-----+
|     |     |     3.3V |      |   |  1 || 2  |   |      | 5V       |     |     |
|   2 |   8 |    GPIO2 |   IN | 1 |  3 || 4  |   |      | 5V       |     |     |
|   3 |   9 |    GPIO3 |   IN | 1 |  5 || 6  |   |      | GND      |     |     |
|   4 |   7 |    GPIO4 |   IN | 1 |  7 || 8  | 1 | ALT0 | TXD0     | 15  | 14  |
|     |     |      GND |      |   |  9 || 10 | 1 | ALT0 | RXD0     | 16  | 15  |
|  17 |   0 |   GPIO17 |   IN | 0 | 11 || 12 | 0 | IN   | GPIO18   | 1   | 18  |
|  27 |   2 |   GPIO27 |   IN | 0 | 13 || 14 |   |      | GND      |     |     |
|  22 |   3 |   GPIO22 |   IN | 0 | 15 || 16 | 0 | IN   | GPIO23   | 4   | 23  |
|     |     |     3.3V |      |   | 17 || 18 | 0 | IN   | GPIO24   | 5   | 24  |
|  10 |  12 |   GPIO10 |   IN | 0 | 19 || 20 |   |      | GND      |     |     |
|   9 |  13 |    GPIO9 |   IN | 0 | 21 || 22 | 0 | IN   | GPIO25   | 6   | 25  |
|  11 |  14 |   GPIO11 |   IN | 0 | 23 || 24 | 1 | IN   | GPIO8    | 10  | 8   |
|     |     |      GND |      |   | 25 || 26 | 1 | IN   | GPIO7    | 11  | 7   |
+-----+-----+----------+------+---+----++----+---+------+----------+-----+-----+
| sOc | iNo |   Name   | Mode | V | Ph || Ph | V | Mode |   Name   | iNo | sOc |
+-----+-----+----------+------+---+----++----+---+------+----------+-----+-----+
The iNo column corresponds to the 'Arduino' number, the number 0 pin corresponds therefore at pin 11 of the GPIO connector (GPIO17).
To compile the blink program on the command line, you must type the command:
$ g++ -o blink blink.cpp $(pkg-config --cflags --libs piduino)
The last part of the command uses pkg-config to add the build options to g++
in order to compile the program correctly.
You can then execute the program :
$ sudo ./blink
sudo is necessary for an access to the memory mapping of the GPIO.
You can enable the setuid bit to avoid sudo in the future :
$ sudo chmod u+s blink
$ ./blink
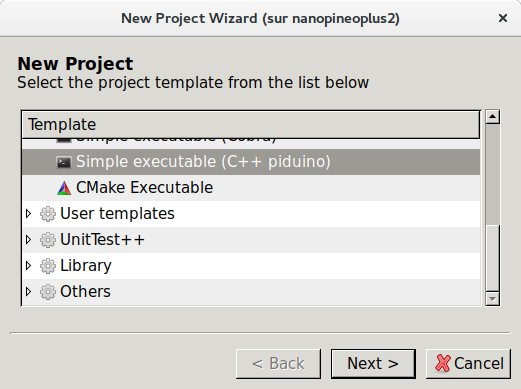
To have a more user-friendly development environment, it is advisable to use Codelite, the installation of PiDuino adds a program template for PiDuino:
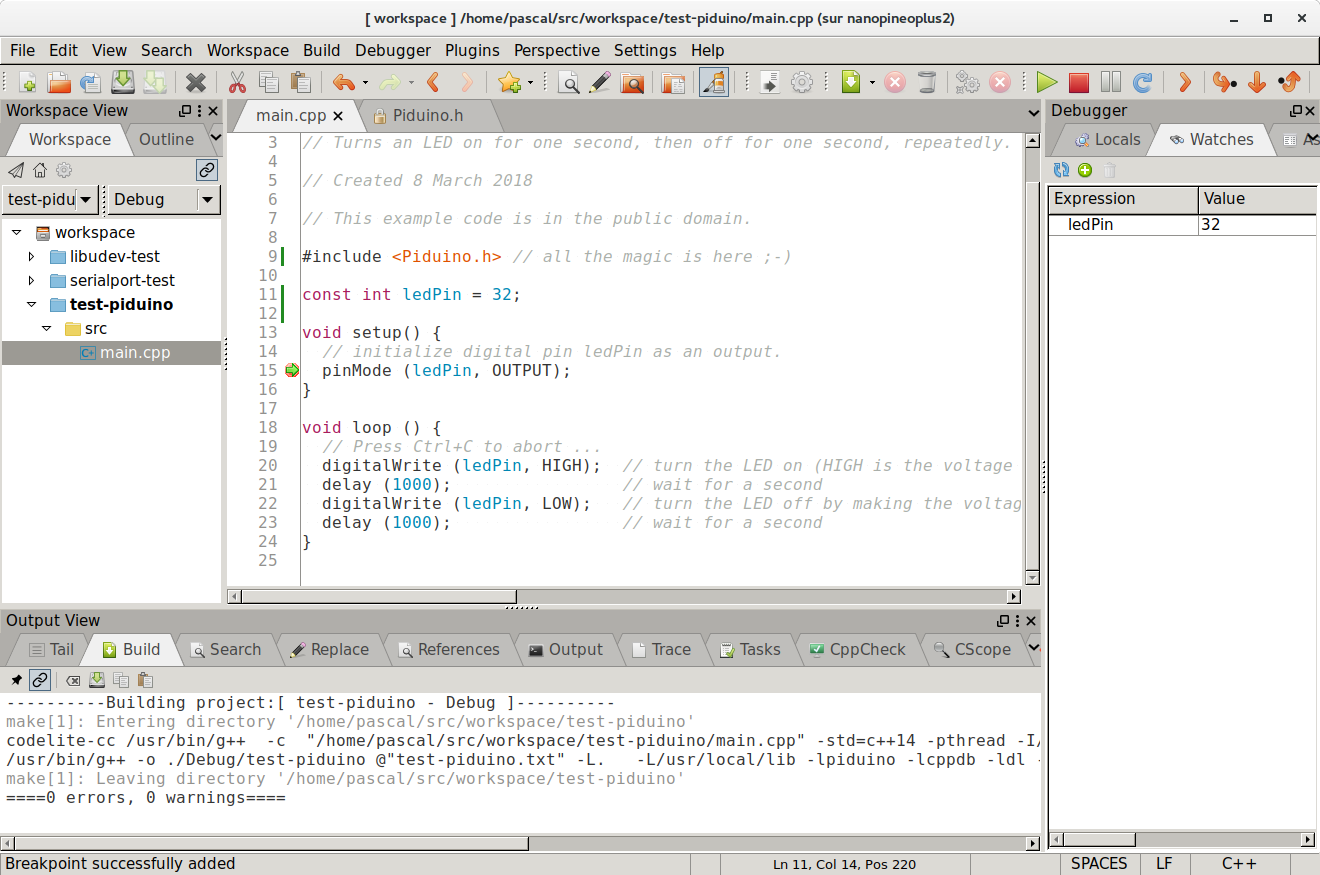
In Codelite, one can not only compile, but also edit and especially to debug the program:
the second example rtc_bq32k, uses the Wire library to read the time in a BQ32000 RTC circuit.
It allows to discover 2 important differences between an Arduino board and a Pi board:
- First, on a Pi board, the human-machine interface (screen and keyboard) is done on the command line (the console !). On Arduino, the serial port is used.
- On a Pi board, a program can finish to give the user a hand. On Arduino, the program never stops (in fact on a Linux system, the kernel program never stops either...)
To solve the first problem, PiDuino defines a Console object whose
the usage is identical to the Serial object (it is a class derived from Stream).
In order to allow compilation on both platforms without modifying the source code,
we can add at the beginning of the sketch a block that tests if the target platform is
a Unix/Linux system (PiDuino), if so, the inclusion of the file
Piduino.h is done, otherwise we define a Console alias which corresponds to
Serial, ie the human-machine interface is on the serial port.
#ifdef __unix__
#include <Piduino.h>  // All the magic is here ;-)
#else
// Defines the serial port as the console on the Arduino platform
#define Console Serial
#endif

#include <Wire.h>

void printBcdDigit (byte val, bool end = false) {
  val = (val / 16 * 10) + (val % 16); // BCD to DEC

  if (val < 10) {
    Console.write ('0'); // leading zero
  }
  if (end) {

    Console.println (val);
  }
  else {

    Console.print (val);
    Console.write (':');
  }
}

void setup() {

  Console.begin (115200);
  Wire.begin(); // Starting the i2c master
}

void loop() {

  Wire.beginTransmission (0x68); // start of the frame for the RTC at slave address 0x68
  Wire.write (0); // write the address of the register in the RTC, 0 first register
  Wire.endTransmission (false); // restart condition
  Wire.requestFrom (0x68, 3); // 3-byte read request

  if (Wire.available() == 3) { // if the 3 bytes have been read
    byte sec = Wire.read();
    byte min = Wire.read();
    byte hour = Wire.read() & 0x3F; // remove CENT_EN and CENT LSB bits

    // time display
    printBcdDigit (hour);
    printBcdDigit (min);
    printBcdDigit (sec, true);
  }
  exit (0); // exit the loop() function without ever coming back.
  // On Arduino, exit() performs an infinite loop as explained on
  // https://www.nongnu.org/avr-libc/user-manual/group__avr__stdlib.html
  // on a Pi board, exit () stops the program by returning the supplied value.
}
To solve the second problem, it is possible to use on the 2
platforms the exit () function (which is defined in the
standard library).
This function, compatible with both platforms, allows to stop the execution
the loop () function.
On a Unix / Linux system, it stops the program and returns to the command line, on Arduino, it performs an infinite loop (after calling the destructor of C ++ objects).