About Show field attributes when a text input field has focus
##Overview
One of the unique features of the Add URL to Title Add-on is the ability to add information about the active input field to the window title. This is an advanced, configurable option and is disabled by default.
When KeePass performs an auto-type, it makes decisions based on the active window's title. Since this add-on takes an approach of keeping KeePass and Firefox isolated from each other, this option allows KeePass to get additional detail needed for selecting auto-type rules using the existing capabilities of KeePass's auto-type functionality.
The add-on will monitor which fields are active, but the add-on does not send this data to any remote server (the add-on does not require any external resources outside of Firefox to function).
tl;dr Enabling this option and creating auto-type rules which use field attributes can improve your efficiency, prevent mistypes and dealing with error messages, and increases your security.
In many cases, knowing the current URL for a given website is sufficient to automatically trigger the correct auto-type rule. However, in some cases websites use AJAX technology instead of loading new pages or may use a multi-step logon form on one page which requires multiple separate auto-type entries for the same URL.
By default, if you have multiple auto-type rules that match a window's title, KeePass will display a pop-up with all possibilities and let you select. This is often the case if you have multiple accounts for the same website.
Imagine a site that has a multi-step logon (i.e., will not show the password field until the username is submitted). If you only have one account, you will need two separate auto-type rules to perform both steps of the logon process. By enabling this option, and creating rules based on the input field's attributes you can avoid the pop-up to select the correct rule and avoid the inconvenience (and possible security exposure) of entering the wrong data in the wrong field (See Security Note 1). If you have multiple accounts, you will likely have two auto-type rules per account, by setting your auto-type rule to include the field attributes you can reduce the difficulty of selecting the right rules, and in addition, avoid accidentally entering your password in a non-password field.
Even if you are using a website which has the traditional username and password fields on the same page, in the same form, you may wish to utilize the field attributes to prevent starting your auto-type when the username or password field does not have focus. When you first load a site, the username/e-mail field may not have focus, if you start your auto-type it may result in your username and password being entered into unexpected places like the site's search function. Some site's may also be running JavaScript which may unintentional remove the focus on your input field when you activate auto-type, again resulting in your username and password being typed in unexpected areas on the webpage.
Also, many sites now provide functionality where your username is remembered for you and is not editable. In this case, you will need a secondary rule that only types in your password. By utilizing the input field's attributes, you can avoid having to select the correct rule from the KeePass auto-type selection popup.
For some examples of this behavior, please see the tutorial videos
Many websites log and monitor the username provided to detect and prevent fraud. If you accidentally enter your password in the username or other fields, it may end up in a log file somewhere. If a malicious insider or hacker gets hold of such logs, they may be able to determine that this is your password when the match up other log entries with other common information such as your IP address, resulting in a hacker learning your username and password.
You should always be careful that you enter your password only in the appropriate password field on a given web page. By enabling the "Show field attributes when a text input field has focus?" you can configure your auto-type rules to only start when the appropriate field has focus, which helps you limit accidental exposure of your password. As a best practice, you should still change your passwords regularly, especially on important sites like your email or banking.
When this option is checked and enabled, you can eliminate this pop-up or at least reduce the number of options (in the case of multiple accounts).
If you enable this option in the add-on configuration, you must configure KeePass to allow auto-type to continue when the window title changes. This change must be applied globally to your KeePass configuration and cannot be enabled on a auto-type rule-by-rule basis.
The following KeePass configuration is needed is because the window title will change when the first input field loses focus. For example, on a typical login form there are two fields, one for the username/email address and another for your password. The auto-type rule generally looks something like this: {USERNAME}{TAB}{PASSWORD}{ENTER}, which in English means type in the username value, type the tab key, type in the password value, type the enter key. When you tab from the username field to the password field, the password field will gain focus and the window title will be update to show the id and name from the password field. If KeePass is configured to stop auto-type when the window title changes, the auto-type will stop and never enter the password for the enter key.
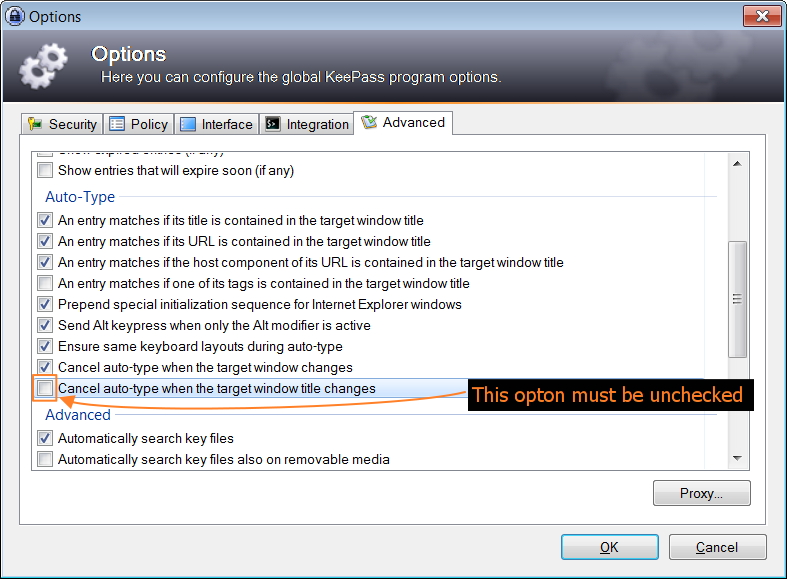
However, KeePass provides a standard configuration option to allow for auto-type to continue even if the window name changes during the auto-type. The name of this option is "Cancel auto-type when the target window title changes." and it is a checkbox option. By default, this option is checked - so you must manually disable this setting by unchecking the checkbox.
If you do not want to enable this option, alternatively you should be able to use multiple rules for one page. This can be accomplished by using multiple auto-type rules and manually activating each rule when the next input field gains focus.
To change the setting to enable compatibility with this add-on setting (tested on KeePass version 2.20.1):
- Go to the main KeePass interface, go to the "Tools" menu and select "Options" from the list.
- Select the last tab at the top, which is labelled "Advanced"
- Scroll down to the "Auto-Type" section, the last option in this section is "Cancel auto-type when the target window title changes"
- Ensure the proper setting is set a. If this checkbox is already unchecked, you are done. You can click the "Ok" button and continue on. b. If this checkbox is currently checked, you must uncheck it. You can click the "Ok" button.
The screencast is available on YouTube
If you ever run into problems where it seems like the auto-type stops in the middle, the most likely reason is that this setting has been re-enabled to the default. Follow the above instructions to ensure that the settings in KeePass are correct before trying anything else.
Now that you have configured the add-on and KeePass to make use of the <input /> field's attributes you can now create fine-grained auto-type rules that will help make you more secure and productive.
Below are some detailed explanations on how to configure the functionality. If you are already familiar with KeePass and auto-type you can experiment on your own. You may also find it easier to just scroll down to the screencasts.
Note: The following walkthrough assumes you are familiar with KeePass and with using auto-type. It will also assume you have created a global hotkey, which by default is Ctrl+Alt+A. If you are new to KeePass's [auto-type functionality documentation](http://keepass.info/help/base/autotype.html "KeePass Documentation on auto-type), review the documentation and ensure that your global auto-type hot key is configured and working properly.
First, we will cover the case of a traditional logon form with a username input field and a password input field on the same page. Through manual testing, we have confirmed that the way to successfully sign-in to the website is to:
a. Tab or click until the input field is selected b. Type in your username c. Type the tab key d. Type in your password e. Type the enter key
To configure the rule in KeePass, leave your browser open on the sign-in page with the username field selected. If you have the add-on installed, activated, and properly configured you should notice that the window title includes the name and id variables from the input field for the username (e.g., [Input Name: "username"] [Input ID: "username"], however, note that the name and id values are not always the same).
Now, in KeePass create a new entry with your username and password. Switch to the "Auto-Type" tab. You can leave the default sequence alone or see see Security Note 2 to be extra secure. The settings to be configured are on the bottom half of the tab under "Use custom sequences for specific windows:".
On the right side of the "Auto-Type" tab, click the "Add" button. A new screen will pop up titled "Edit Auto-Type Item". In the drop down next to "Target Window:" look for the item which matches your browser and includes the title, URL, and the input field attributes and select it. If you only use one browser, you can usually leave this as is, but if you use multiple version of Firefox such as CyberFox or IceDragon you should remove browser specific information if it is present and replace with wildcards per the auto-type filters documentation. Also note, that the URL may include some session specific information that is unique to each visit, this should also be removed and replaced with a wildcard. Some sites may require some back and forth tweaking and tuning of your auto-type rules.
Now that you have defined the pattern that will be used to match the window title, confirm that the keystroke sequence listed is the one you have manually verified earlier, if not modify to the correct keystroke sequence. You can then click the "OK" button to close the "Edit Auto-Type Item" screen.
If you have configured the add-on to use the full URL, you can now ensure that you only sign-in on secure pages (i.e.,
https://nothttp://) by ensuring the URL in your rule starts withhttps://.
On the screen for your entry, you can now click the "Ok" button. You should then save your KeePass database using the save button, file menu, or keyboard shortcut.
After you have saved, now you can test your Auto-Type rule: Return to your browser and ensure that the username field is selected. Type your global hot key sequence to initiate auto-type and you should confirm that the logon sequence was typed as expected. If not, double check you started in the username field and ensure that you did not create a typo or leave out a needed wildcard in your auto-type configuration as explained above.
If everything worked as planned, you should now test that the auto-type rule will not be activated at the wrong time. Logout from the web page and return to the sign-in page. Select the password field this time instead of the username field. The window title should be updated to reflect the name and id from the password field now. Type your global auto-type shortcut key - nothing should happen. Because the window title does not contain the id or name attributes expected from the username field the auto-type rule will not match. This prevents you from accidentally starting auto-type at the wrong time. You should confirm that the auto-type rule will not activate when no field has focus or when another input field, such as a search field, is selected. You can now avoid the inconvenience and security risk of accidentally typing your password in the wrong place, and therefore prevent accidentally exposing or leaking your password.
You can watch a video to see a walkthrough of how to setup KeePass and FireFox to create auto-type rules as described above by viewing Demo 1.
Setup Walkthrough - Real World Example for https://login.yahoo.com/
In your browser navigate to https://login.yahoo.com/. With the add-on configured to use the full URL, separator character set to - and the input field attributes enabled, the window title should be similar to: Yahoo - login - https://login.yahoo.com/ [Input Name: "username"] [Input ID: "login-username"] - Mozilla Firefox (if you are using an alternative build of Firefox the last part will likely be different). When you go to configure the your custom rule by clicking the "Add" button as explained above, you can type in the following sequence for the "Target Window" field within the "Edit Auto-Type Item" screen: *https://login.yahoo.com/ [Input Name: "username"] [Input ID: "login-username"]*. After configuring any other options, remember to save. Then you can test as above.
Let's say you also use "Yahoo! Mail" as well. When you type in https://mail.yahoo.com you will likely be redirected to a URL similar to: https://login.yahoo.com/?.src=ym&.intl=us&.lang=en-US&.done=https%3a//mail.yahoo.com. Some parts of the URL may be different such as lang=fr-FR if you locale is set to "French-France". You could now choose to create another auto-type rule specific to "Yahoo! Mail" or you can take advantage of the similarities between the mail logon and the general logon URLs. For example, you can change your "Target Window" matching pattern to the following *https://login.yahoo.com/* [Input Name: "username"] [Input ID: "login-username"]*. We have replaced ?.src=ym&.intl=us&.lang=en-US&.done=https%3a//mail.yahoo.com with a wildcard * which will match. Go ahead and give it a try.
*Note: The URL and <input /> field attributes are accurate as of the time of writing and may change by the time you read this.
When you create an auto-type rule to match a specific window, it has no impact on cases where KeePass is able to match the entry to another case. For example, if you have a KeePass database entry with the title set to "Google", if you go to any page that has Google in the title, the rule may match, even if it's not a real Google site and is in reality an evil phishing page. This may result in your inadvertently using auto-type on the wrong page, exposing your username and password to hackers.
Therefore, it is recommended that in the "Auto-Type" tab for your KeePass database entry, that you select the option "Override default sequence" and then edit the sequence to include a reminder message to use a URL specific rule instead of typing a username or password. By making this change, you will only enable auto-type for the specific scenarios you define in the "Use custom sequences for specific windows" rule set.
When you use this add-on, the URL/hostname and optionally the input field attributes are added to the title. If you are at a malicious website then the URL/hostname will be populated with that site's URL/hostname. You no longer need to depend upon the KeePass entry's title for matching, and instead can depend upon the URL and field attributes to reduce the likelihood of exposing your username and password combination.
Please note, you should still be cautious in your use of wildcards when defining custom rules because a malicious website might crafts its title to include a string which looks like a URL. You should always manually inspect the address bar to be sure you are at a real, legitimate site and avoid suspicious links in emails.
If you are using a website that uses traditional frames or operates the logon within an <iframe /> then this functionality will not work. This is because the frameset title and URL are not the same as the framed webpage. Luckily, most websites do not use frames anymore and if you find a logon form within an <iframe /> you should generally treat this as suspicious.