


Evidence is an open source toolkit for building data products with just SQL and markdown. Connect to your database, write SQL queries, and include charts, tables, and dynamic text - all from markdown. To get started, visit the docs.
This extension provides language support, Evidence project and dev server shortcut commands, and autocomplete for Evidence Markdown files.

- Syntax highlighting for:
- Markdown
- SQL Query Blocks
- Components (Svelte syntax highlighting)
- JavaScript expressions
- Autocomplete suggestions for inserting:
- Components (Charts, Tables, Text Components)
- SQL Query Blocks
- Templating (Loops, Conditionals)
- Evidence commands to:
- Create new project
- Start and stop dev server
- Update to the latest version
- View extension settings
- Clear app data and queries cache
- Build app for deployment to production
- Preview Evidence markdown documents
Evidence requires NodeJS between version 16.14 and version 20.9. You can download and install the latest long-term support (LTS) version from nodejs.org.
This extension also depends on Svelte for VS Code that provides syntax highlighting and rich intellisense for Svelte components in VS Code. Svelte for VS Code will be installed automatically when you install Evidence extension.
You can install the Evidence extension from the VS Code Marketplace, or by searching for Evidence in the VS Code Extensions tab.

To get started with Evidence using VS Code locally, follow these steps:
-
Open the command palette in VS Code (Cmd/Ctrl + Shift + P)
-
Search for and click
New Evidence Project -
Select an empty folder to create your Evidence project within

-
Click the
Start Evidencebutton to install all required dependencies and start the dev server, or use the commands detailed below in theCommandssection

Note: The initial installation and server start can take up to 2 minutes depending on your computer. If you have issues with the startup time, you can use Codespaces (see next section).
At the end of this step, your browser will automatically open to your app preview, which will appear atlocalhost:3000 -
We recommend putting VS Code and your browser side-by-side, like in the screenshot below. This will give you immediate development feedback on your app every time you save a markdown file.

-
Make changes to your markdown files and save the file to see the changes reflected in your app preview
-
Try the "slash commands" included with the extension by typing
/- you will see a list of available viz and UI components from our library. Select a component to insert by hittingTabor clicking on the component.
Once the component code has been inserted, you can hitTabagain to move through the inputs for a component and fill them in.


You can use the Evidence VS Code extension with GitHub Codespaces.
-
The Evidence extension will be installed automatically
-
Click the
Start Evidencebutton to install all required dependencies and start the dev server, or use the commands detailed below in theCommandssection -
You will get a popup saying
Your application running on port 3000 is available. Click to open in browser

-
Make changes to your markdown files and save the file to see the changes reflected in your app preview
-
After making changes to your project, click the
Source Controlicon in the left panel and commit your changes

-
Click
Publish Branch- this will prompt you to create a private or public repo for your Evidence project

-
From here, you can continue to develop your project in Codespaces, or you can choose to clone your repo locally and work from there


The Evidence extension provides a number of custom VS Code shortcut commands for Evidence projects. Most of these correspond to CLI commands which can be run from your terminal if you prefer.
You can access the VS Code shortcut commands from the command palette (Cmd/Ctrl+Shift+P) by typing Evidence in the command search box:

| VS Code Command | Title | Description | CLI Command |
|---|---|---|---|
newProject |
New Evidence Project | Create new Evidence project in the open workspace, or the selected folder in VS Code File Explorer. | npx degit evidence-dev/template my-projectcd my_project |
installDependencies |
Install Dependencies | Install Evidence app NodeJS modules. | npm install |
runSources |
Run Sources | Run all source queries | npm run sources |
startServer |
Start Dev Server | Start Evidence app dev server. | npm run dev |
stopServer |
Stop Dev Server | Stop Evidence app dev server. | Ctrl + C |
build |
Build | Build Evidence app for deployment to production. | npm run build |
buildStrict |
Build Strict | Build Evidence app for deployment to production in a strict mode. | npm run build:strict |
updateDependencies |
Update to Latest Version | Update all Evidence app NodeJS libraries to the latest version. | npm install @evidence-dev/evidence@latest @evidence-dev/core-components@latest |
clearCache |
Clear Cache | Clear Evidence application data and queries cache. | |
viewSettings |
VS Code Extension Settings | View Evidence extension settings in the built-in VS Code Settings editor. | |
copyProject |
Copy Existing Project | Provide a URL of a Github repo to pull from |
You can self-host or deploy on Evidence Cloud, with a public project or behind user authentication.
Evidence projects utlize a scheduled build process, which runs the queries in your project and builds all of your pages. The output of this process is a pre-built, self-contained static web application.
This results in near instant page loads for your users and means that they are not hitting your data warehouse by interacting with their reports.
Despite this static output, you can still deliver fully interactive and exporable data products through our most recent release for Universal SQL
Sign up for Evidence Cloud here
Learn more about deployment here
Create User or Workspace Settings to change default Evidence VS Code extension Settings.
Open Evidence extension Settings in VS Code by using the Evidence: VS Code Extension Settings command, or navigating to File -> Preferences -> Settings (cmd/ctrl+,) and searching for Evidence in the Settings search box.

Note that after editing some settings you may need to close and reopen VS Code for the new setting to take effect.
| Setting | Name | Type | Default Value | Description |
|---|---|---|---|---|
evidence.previewType |
Preview Type | string | external |
Where to show development app preview: web browser, in VS Code (side-by-side), in VS Code (full width) |
evidence.defaultPort |
Default Port | number | 3000 |
Default Evidence app dev server port. |
evidence.autoStart |
Auto Start | boolean | false |
Automatically start Evidence app dev server when opening a project. |
evidence.slashCommands |
Slash Commands | boolean | true |
Enabled slash commands - get component suggestions when typing / |
evidence.templateProjectUrl |
Template Project Url | Url string | /template |
Evidence template project GitHub Url or local file:// path to the project template folder to use when creating new Evidence projects. Defaults to the built-in Evidence extension /template project that ships with this extenstion for faster New Evidence Project scaffolding. |
You can request new Evidence extension settings to enhance this extension user experience in VS Code by submitting a feature request or pull request.
You can also reconfigure Evidence extension settings in vscode/settings.json workspace configuration file. The .vscode/settings.json file is a JSON file that stores your VS Code Settings. It contains settings that apply globally to all workspaces open in VS Code, or to a specific workspace.
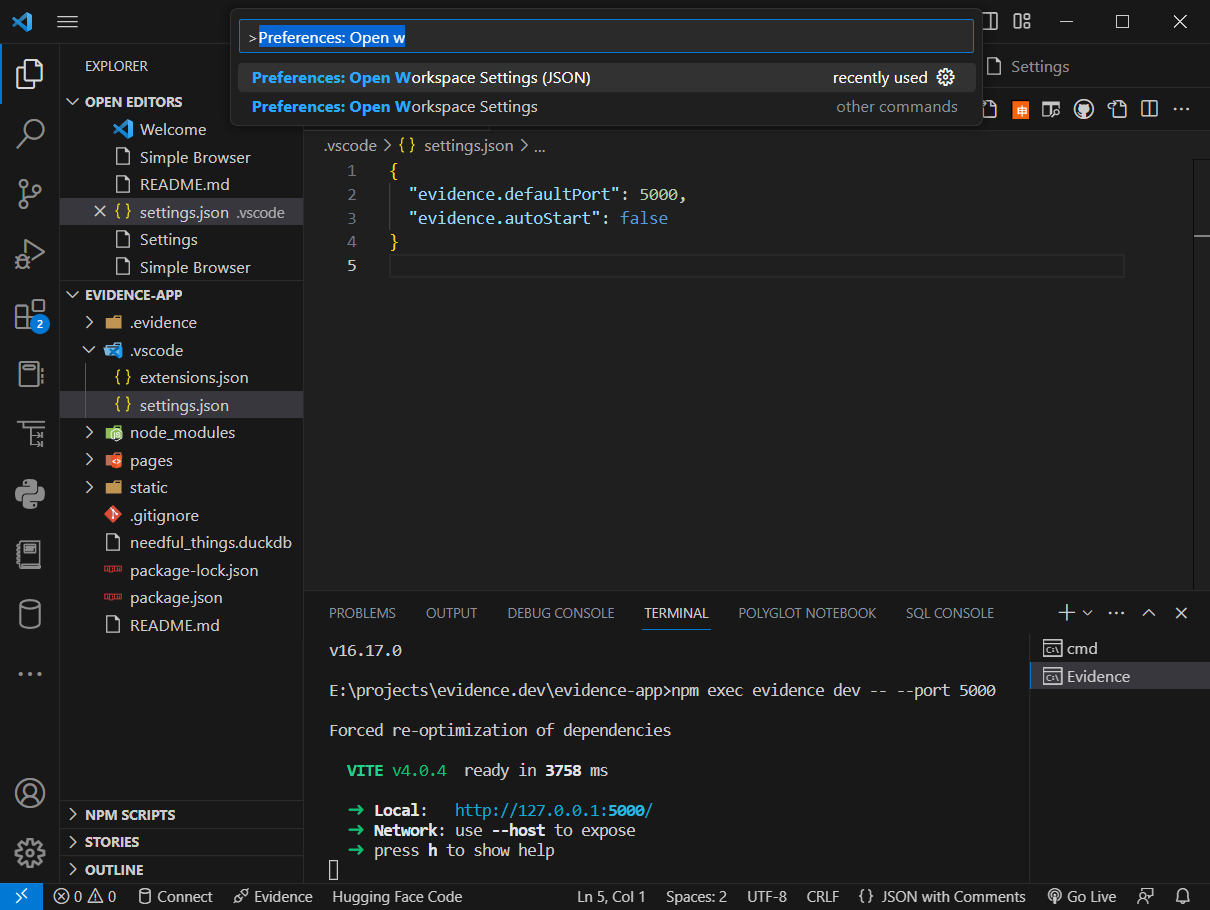
Edit your settings in ./vscode/settings.json by opening the Command Palette... with cmd/ctrl+shift+p, searching for and selecting Preferences: Open Workspace Settings (JSON) command.
All Evidence extension settings start with evidence. prefix. You can overwrite default Evidence extension settings in the open workspace directly by opening and changing /.vscode/settings.json in your project.
The following Evidence project workspace /.vscode/settings.json example sets different default Evidence dev server port, overwrites new dev server autoStart setting, and uses a modified local copy of the built-in Evidence /template project with file:// Uri to create new Evidence projects.
{
  "evidence.defaultPort": 5000,
  "evidence.autoStart": "false",
  "evidence.templateProjectUrl: "file://E:/projects/evidence.dev/template"
}
If you would like to contribute to this VS Code extension, we welcome PRs and issues in the Github repo.
You can start by building the extension locally and making changes from there.
To build the latest version of Evidence VS Code extension from source:
- Clone this github repository and run the following commands from the command line:
$ git clone https://github.com/evidence-dev/evidence-vscode
$ cd evidence-vscode
$ npm install
$ npm run compile
$ code .
- Press
F5to start debugging Evidence VS Code extension. - Open any Evidence project folder in the new
Extension Host Windowto try updated extension commands and features.
See the official Debugging extension documentation for more information about developing extensions in VS Code.
If you run into any issues setting up the extension, please reach out:
- Open an issue on GitHub
- Post in our Slack community
- Email support@evidence.dev