![]()
This plugin integrates Telegram Messenger with Octoprint. It sends messages (with photos if available) on print start, end and failure. Also it sends messages during the print at configurable intervals. That way you don't have to remember to regularly have a look at the printing process.
Also, you can control Octoprint via messages (settings, start a print and much more). Send /status to get the current printer status or /abort to abort the current print. Send /help for a list of all recognized commands. You may also use this bot in groups.
Latest release: 1.6.5
To set up Octoprint Telegram, you have to follow the following three steps.
To allow the plugin to send messages via telegram, you need to register a telegram bot.
If you already have a bot, you only need your bot token to proceed. GOTO 4. (optional) or go dirctly over to Plugin Setup.
-
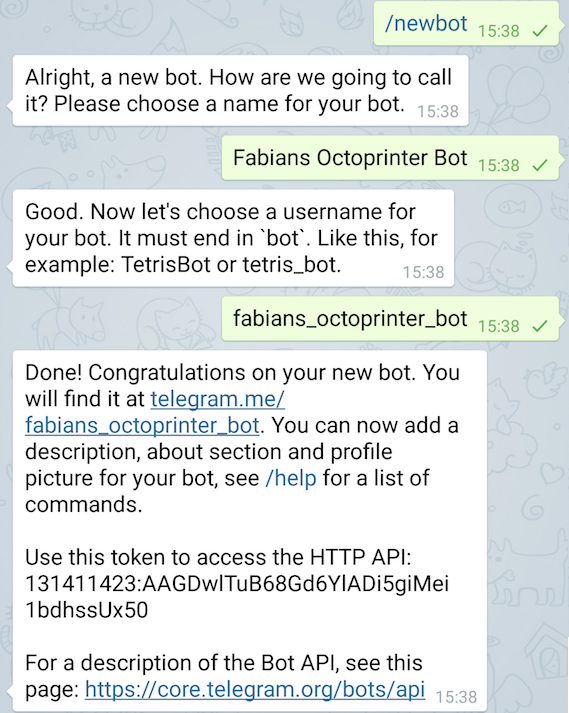
Contact @botfather in Telegram Messenger. Either click the link or use the "new chat" / "search" feature of your telegram client to search for "@botfather".
-
Send
/newbotto @botfather. Enter a name for the bot, e.g. "JoeDoe Octoprinter Bot". Then enter a username for the bot, e.g. "JoeDoeOctoprinterBot". This username has to end in "bot". -
The botfather hands you a token. You need this to use your bot. Keep this token secret!
While you're there, you could also do the following steps:
-
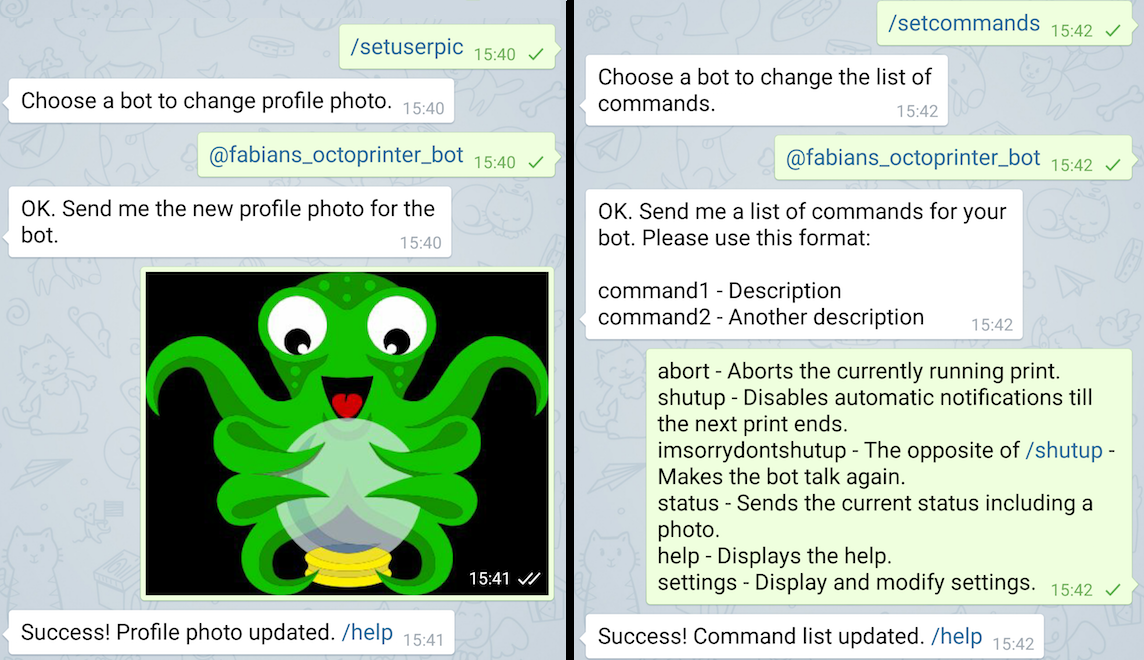
Give your bot a nice profile picture. Send
/setuserpicto @botfather, select the bot and send the Octoprint logo or any other image you like. -
Tell the botfather which commands are available. This enables Telegram to auto-complete commands to your bot. Send
/setcommandsto @botfather, select the bot and then send the lines in the box below (one message with multiple lines).abort - Aborts the currently running print. A confirmation is required. shutup - Disables automatic notifications till the next print ends. dontshutup - The opposite of /shutup - Makes the bot talk again. status - Sends the current status including a current photo. settings - Displays the current notification settings and allows you to change them. files - Lists all the files available for printing. filament - Shows you your filament spools or lets you change it. print - Lets you start a print. A confirmation is required. togglepause - Pause/Resume current Print. con - Connect/disconnect printer. upload - You can just send me a gcode file to save it to my library. Also accept zip file. sys - Execute Octoprint System Commands. ctrl - Use self defined controls from Octoprint. tune - Set feed- and flowrate. Control temperatures. user - get user info. help - show list of commands. gif - send a gif of 5 seconds supergif - send a gif of 10 seconds on - Turns on the printer power via the PSUControl plugin API. Requires PSU Control plugin installation. off - Turns off the printer power via the PSUControl plugin API. Requires PSU Control plugin. gcode_XXX - Send the gcode to the printer where XXX is the gcode command (/gcode_M117 HelloWorld for exemple)
-
Install the plugin via the bundled Plugin Manager or manually using this URL:
https://github.com/fabianonline/OctoPrint-Telegram/archive/stable.zip -
Now enter Octoprint settings and select Telegram on the left.
-
Enter the token you got from botfather into the field "Telegram Token".
-
Hit the "Test this token" button. It should report success.
-
Hit "Save" at the bottom of the settings dialog.
-
If you want to create gif and receive them as notification we use ffmpeg like timelapse (if problem please check timelapse is configured). you'll have to install CpuLimit to be able to create gif so please for raspberry connect to your raspberry with putty (for exemple) and execute sudo apt-get install cpulimit
Congratulations! Your printer is now connected to your Telegram bot.
-
Open your Octoprint settings and select Telegram on the left.
-
Send a start message (any message will do) to your new bot. You should receive a message from your bot which tells you something like "Now I know you".
-
Now hit the "reload" button under the known chats list. The chat should appear in the list.
-
Save settings to accept new user(s)/group(s) in list.
-
Now reopen octoprit settings and check/set the configurations for new users. (see below)
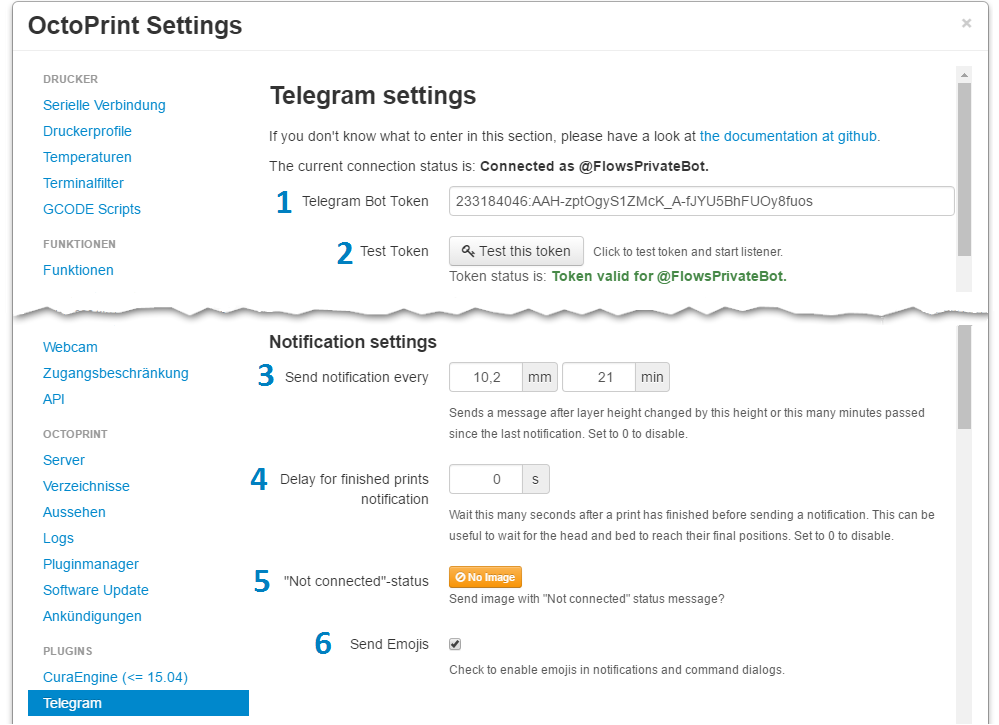
Configuration is done via the Octoprint settings dialog. Note that only admin users will be able to change user or token settings.
The paragraph numbers below correspond to the numbers in the picture!
-
Token: Enter your bot token here. You got this from @botfather, when you created your bot there. (admin users only)
-
After hitting 'Test this token', the current connection status will be shown and the bot is connected on success. (admin users only)
-
Send notification every: Whenever the current z value grows by this value (or more) or the given time has passed since the last notification, a message will be sent.
- Setting the height to 1.0mm would send messages at z=1.0, z=2.0, z=3.0 and so on.
- Having the height at 1.0mm with a layer height of 0.3 would send messages at z=1.2, z=2.4, z=3.6 and so on.
- Setting the time or height to
0disables those checks. Setting both values to0completely disables automatic notifications while printing.
-
Set a delay to wait for print head moving out of camera view on end of print.
-
Choose if you want to send an image along with the "Not connected to a printer" message. (green = send image, yellow=no image)
-
If send emojis is enabled, emojis will be send within messages. If disabled, all emojis in messages will be changed to empty strings.
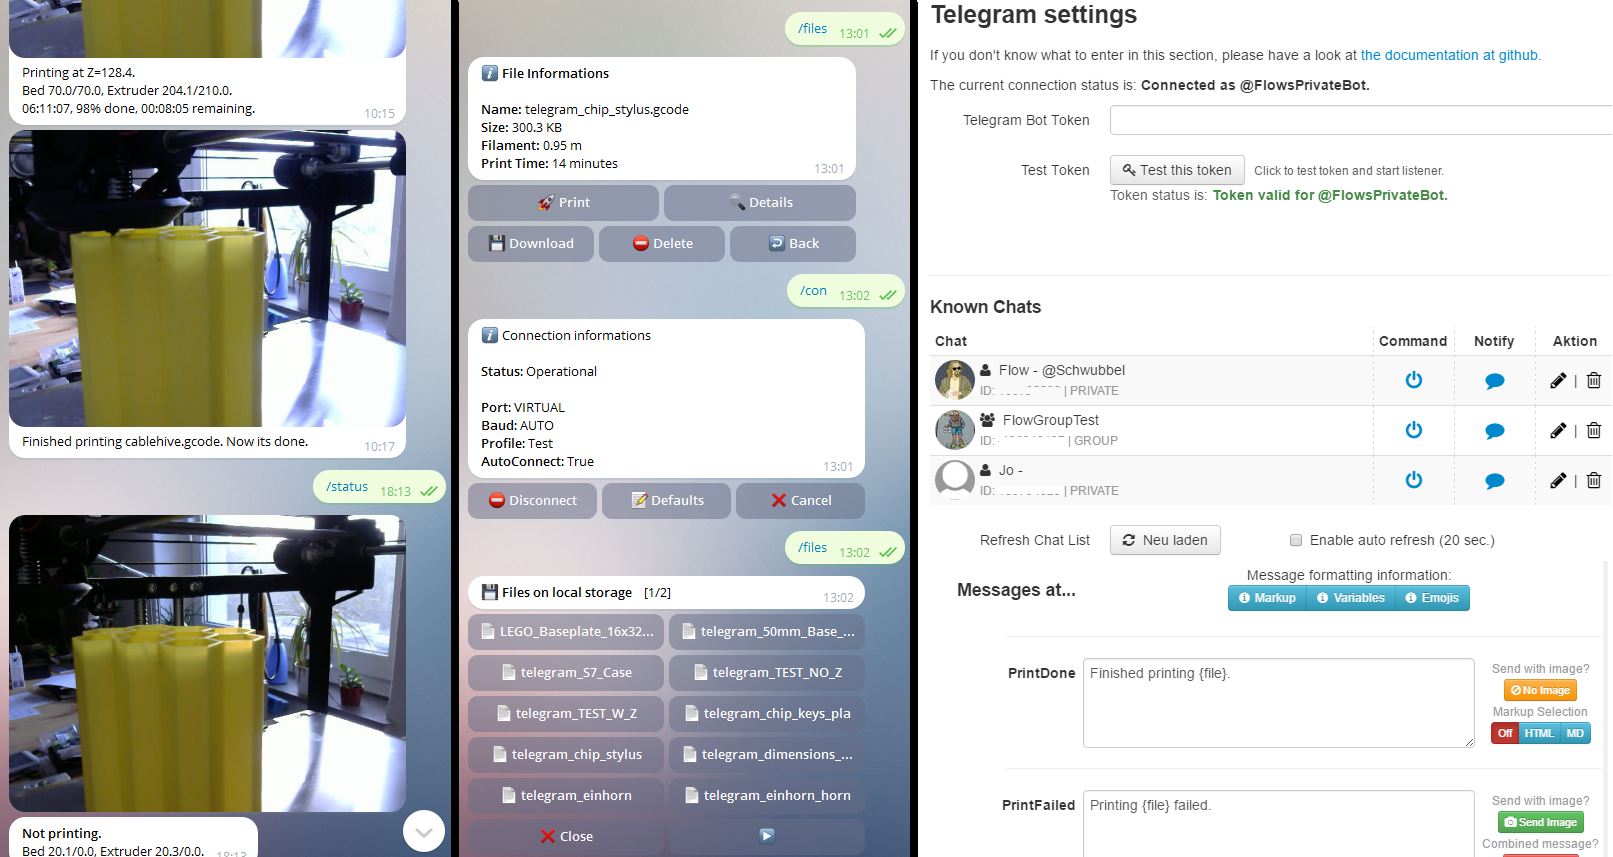
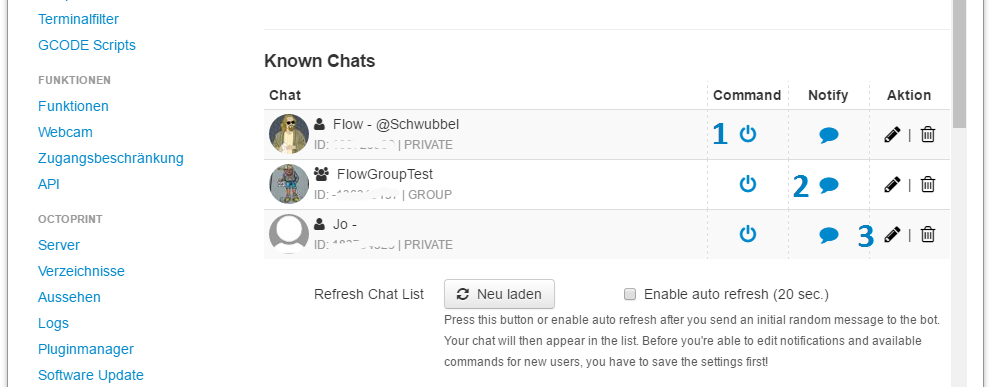
There are users (private chat with single user) or groups you will see in the list of known chats. These settings are only accessible by admin users.
The paragraph numbers below correspond to the numbers in the picture!
-
When clicking the command icon, a dialog with a list of checkboxes for every accepted command will open. Check a box to enable the user/group to use the command. When done, close the dialog. Don't forget to enable general command execution in
3. -
By clicking on the notification icon, a dialog with a list of checkboxes for every known notification event will open. Checked notifications will be send to the user/group. When done, close the dialog. Don't forget to activate general notification in
3. -
IMPORTANT
a) By clicking the pencil icon, you are able to enable/disable commands and notifications for the user/group in general. This will not affect the settings you made in1.and2.. It's an easy way to quickly activate/deactivate a user/group withot changing the settings. You will find the following options:- For users:
- Allow to send commands: This option will give the user the ability to send commands you defined in
1.
- Allow to send commands: This option will give the user the ability to send commands you defined in
- For groups:
-
Allow user commands: This will allow known users to send commands. Settings of the specific users will be used. No other users in the group are allowed to send commands.
Example: User A, B and C are in one group. Only user A and B are known by the bot. User A has /print enabled and user B has not. Both have /status enabled. So user A is allowed to send /print and /status while user B is only allowed to send /status. User C is not allowed to send any command. -
Allow to send commands: When this option is enabled, all users in the group are allowed to send commands. Choose the allowed commands by setting up
1.for the group. If Allow user commands is enabled, known users will have the ability to send commands activated for them but not for the group.Example: 'Allow user commands' is enabled for the group. User A and B are in the group. Only user A is known by the bot. User A has /print enabled and the group has not. The group has /status enabled but user A not. So user A is allowed to send /print (user rights) and /status (group rights) while user B is only allowed to send /status. If 'Allow user commands' is disabled, also A will only be able to send /status.
-
- For both:
- Send notifications: This will allow the bot to send the notifications you enabled in
2.to the user/group.
- Send notifications: This will allow the bot to send the notifications you enabled in
b) Click the trash bin, to delete the user. The user is only deleted if you hit 'Save' on settings dialog.
- For users:
In this section you can configure the content of the notification messages.
The paragraph numbers below correspond to the numbers in the picture!
-
These three buttons will open dialogs which provide you informations about using markup, variables and emojis in the messages.
-
Enter the text you want to send when the specific event happens.
-
Choose if you want to send an image along with the notification message. (green = send image, yellow=no image)
-
With this option you select if the image and the text are send in one message or in two separated messages. Only available if you choose to send an image.
-
This buttons sets the markup options for the message text. Only available when no image will be send or if image will be send in a separate message.
-
You can use variables in the messages :
{file},{path}(only usable while printing) - The currently printing file, with or without path information.{z}(only for height change events) - The current z value.{percent}(only useful for height change notifications) - The current percentage of the print progress.{time_done},{time_left},{time_finish}(only useful for height change events) - Time done / left in the print and ETA.{bed_temp},{e1_temp},{e2_temp}- Temperatures of bed, extruder 1 and extruder 2.{bed_target},{e1_target},{e2_target}- Target temperatures of bed, extruder 1 and extruder 2.{currentLayer},{totalLayer}- the current and total layers number (need the plugin DisplayLayerProgress)- You are also able to access the current printer state data. See here for datastructure of this data. The base variable is
{status}.
Example: {status[progress][filepos]} - will insert the actual position in the printed file.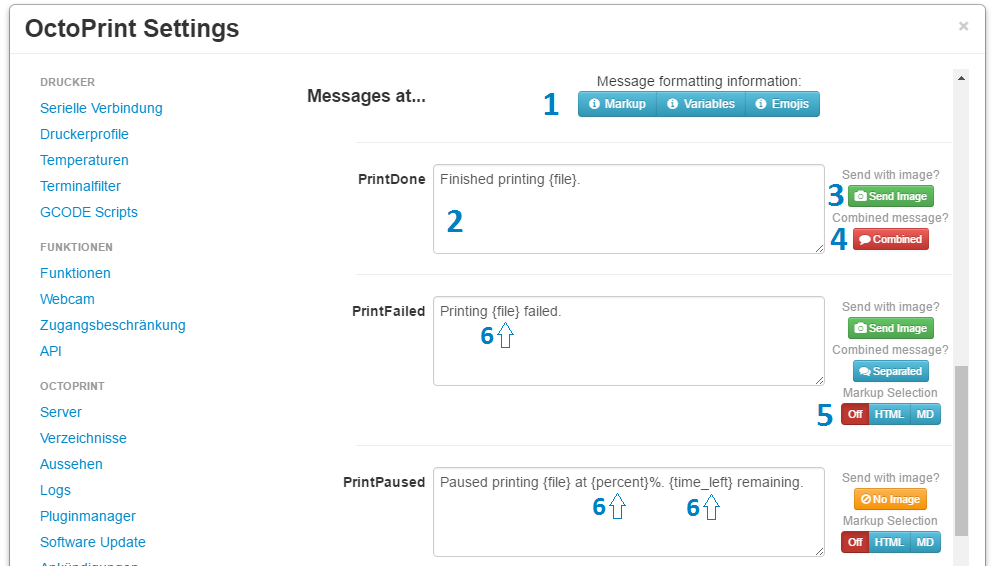
/abort - Aborts the currently running print. A confirmation is required.
/shutup - Disables automatic notifications till the print ends.
/dontshutup - The opposite of /shutup - Makes the bot talk again.
/status - Sends the current status. (printing/not printing/disconnected)
/settings - Displays the current notification settings (time and height) and allows you to change them.
/files - Lists all the files available for printing in upload folder and allows you download and delete them. You also can view detailed informations of the file like print history. If OctoPrint Version is >= 1.3.0, subdirectories are listed and you are able to move/copy files.
/filament - Shows your filament spools and the percentage of usage. In addition you can change the filament spool with this command. Requires the Filament Manager Plugin
/print - Will open a file dialog showing the files stored in octoprint. You can select a file to print it.
/togglepause - Pause/resume the current print.
/con - Connect/disconnect printer. Choose between auto connect, use defaults to connect or manual connect (select port/baudrate/printer profile). You are also able to change the connection defaults and turn auto connect on/off.
/upload - You can just send a gcode file or a zip file to the bot to save it in upload folder of Octoprint. If you send this command, the bot will tell you the same :) NOTE: This will NOT work in groups.
/sys - Execute Octoprint System Comamnds you defined in config.yaml. If a confirmation is defined for the system command, it will be displayed before execution. See Octoprint documentation for details on setting up system commands. There is also a plugin for doing this.
/ctrl - Use self defined controls from Octoprint. Only plain controls (without input or output) will be used. If a confirmation is defined for the control, it will be displayed before execution. See Octoprint documentation for details on setting up controls. There is also a plugin for doing this.
/tune - Set feed- and flowrate. Also set temperature of extruder(s) and bed or switch them off.
/user - Get user/group information. This will contain saved user/group data, allowed comamnds and the notifications send to the user/group.
/help - Displays a help message with all accepted commands and a short description.
/gif - Send a gif create from 20 images. You'll have to install CpuLimit to be able to create gif so please for raspberry connect to your raspberry with putty (for exemple) and execute
sudo apt-get install cpulimit
/supergif - Send a gif create from 60 images. You'll have to install CpuLimit to be able to create gif so please for raspberry connect to your raspberry with putty (for exemple) and execute
sudo apt-get install cpulimit
/on - Turns on the Printer power via - the PSUControl plugin API. Requires the PSU Control plugin
- the TuyaSmartplug plugin API. Requires the TuyaSmartplug plugin sadly for now wait on accept the push request to get the list of plug
/off - Turns off the Printer power via - the PSUControl plugin API. Requires the PSU Control plugin
- the TuyaSmartplug plugin API. Requires the TuyaSmartplug plugin
sadly for now wait on accept the push request to get the list of plug
/gcode - Send the gcode to the printer where XXX is the gcode command (/gcode_M117 HelloWorld for exemple)
-
the
/helpcommand is always allowed -
/filesand/printwill basically show the same file dialog. If/printis disabled, no print button will be shown. If/filesis disabled, no download and delete buttons will be shown. If both commands are enabled, all buttons will be shown regardles wether the user entered the dialog by/filesor/print.
If you have trouble with the image (get message like ***) please check the following step
The plugin can't resolve a simple "/webcam/[...]" URL. There has to be a full address. Set the snapshot URL to one of the following:
http://127.0.0.1:8080/?action=snapshot
http://127.0.0.1/webcam/?action=snapshot
If you want to talk to other users of this plugin and maybe have some influence in the development of this plugin, you can join the Octoprint-Telegram-Users-Group.
This software is licensed under AGPLv3