
Don't feel confident using GitHub in a team environment?
Practice the workflow, step by step with community support!
- Submit the Request New Issue Form
- Accept the invite GitHub emails you to join our The Fast Tracked Programmer organization
After you've accepted the invite, a mentor will open and assign you a practice issue to close in this project, which will appear under open issues assigned to you
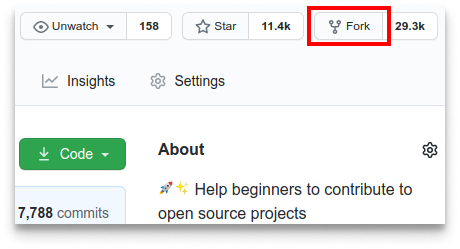
Fork this repository by clicking on the fork button on the top of this page.
This will create a copy of this repository in your GitHub account, that you can publish your local changes to.
Now clone the forked repository to your machine.
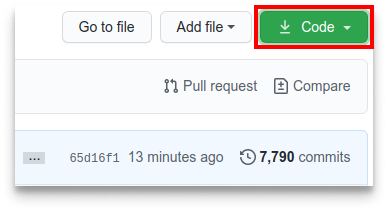
Go to your GitHub account, open the forked repository, click on the code button and then click the copy to clipboard icon.
Open a terminal and run the following git command:
git clone "url you just copied"
where "url you just copied" (without the quotation marks) is the url to this repository (your fork of this project). See the previous steps to obtain the url.

For example:
git clone https://github.com/<your-github-username>/close-my-first-issue.git
Here you're copying the contents of the close-my-first-issue repository on GitHub to your computer.
PS. If you don't have git on your machine, install it.
Change to the repository directory on your computer (if you are not already there):
cd close-my-first-issue
Now create a branch using the git checkout command:
git checkout -b new-branch-name
For example:
git checkout -b add-<your-github-username>
Now create profiles/<your-github-username>.md in your editor, add ## Hi, I'm <your-github-username> to the file and then save it.
Upon executing the command git status, you'll see there are changes.
Stage those changes with the git add command:
git add profiles/<your-github-username>.md
And commit those changes using the git commit command:
git commit -m "add <your-github-username>"
Push your changes using the command git push:
git push origin add-<your-github-username>

If you go to your repository on GitHub, you'll see a Compare & pull request button.
Click on that button to start creating a pull request.

Our mentors will then be notified of your pull request and either approve and merge your updates, or request changes.
You will get a notification in either case.
Special thanks to firstcontributions for inspiring us to build upon their incredible work. We both share a vision of wanting to help beginners to contribute to open source projects, and used their first-contribution repository as a base.
We have not forked their repository or preserved commit history because we wanted to keep things as simple as possible for our community of aspiring contributors. For reference, the original MIT licence can be found in our repository here.
Congratulations!
You've just completed the standard fork -> clone -> branch -> commit -> push -> open pull request workflow that is used to power up to 190 million GitHub repositories.
If you're wondering what to do next, come
