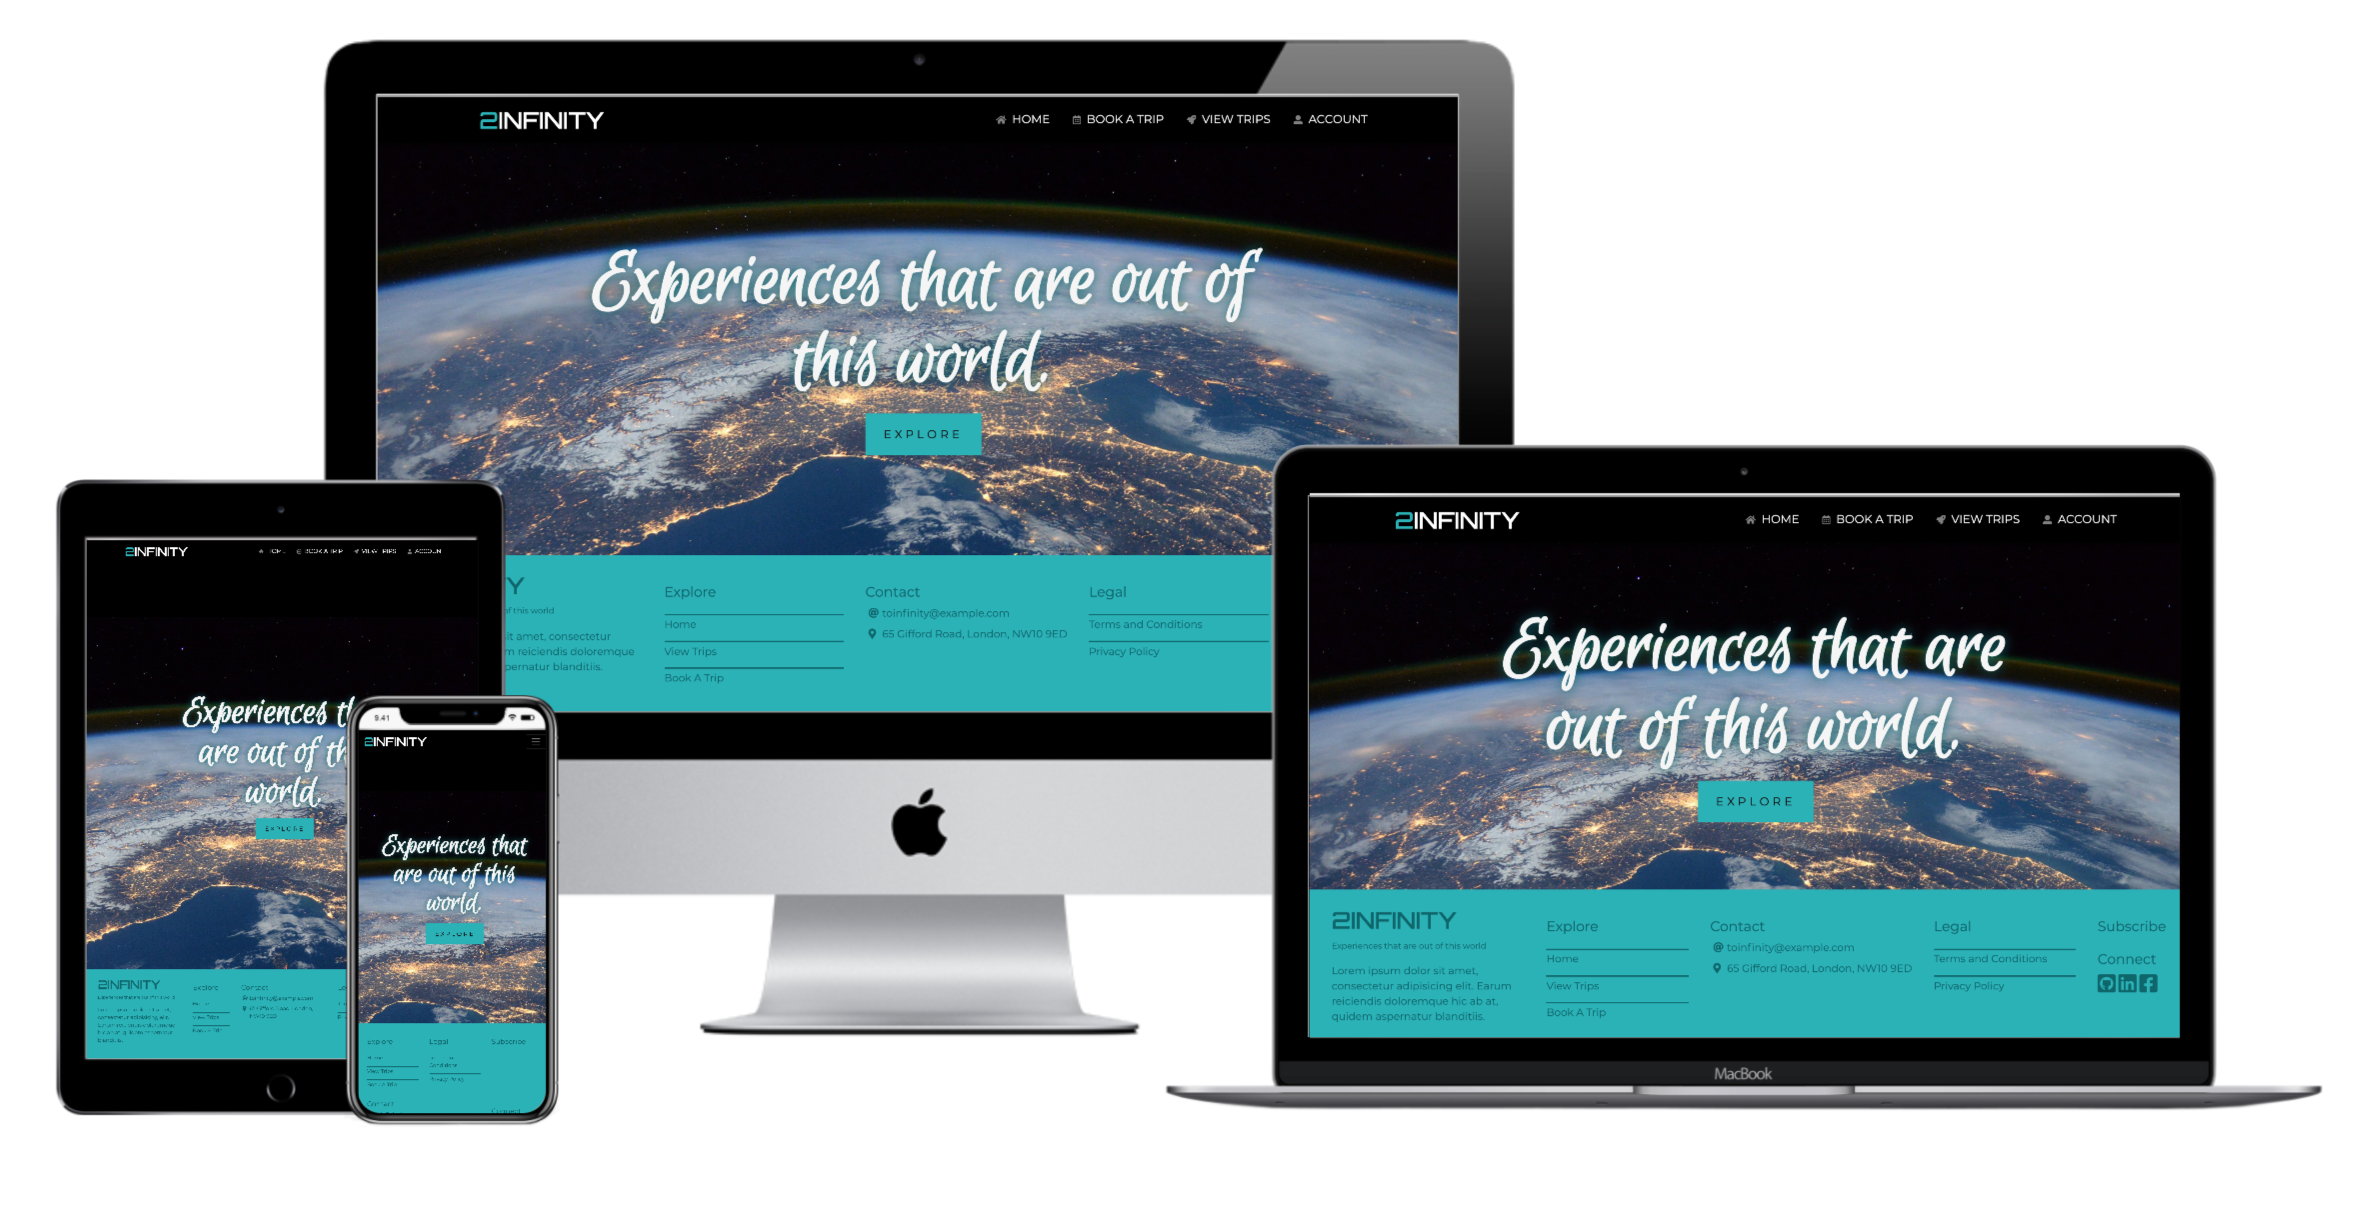
The 2infinity travel shop was created to fulfill the final project requirements to design and build an e-commerce web app. The idea of a space travel website was chosen as a something unusual and fun but within the coming decade, could occupy a real niche. The web app has been built using the Django framework and its extensions. Data is captured and stored in a relational database and payments are handled by Stripe.
The site can be enjoyed here
The purpose of the app is to provide a way for users to book and pay for trips to a range of space destinations for themselves and other passengers whom they nominate.
The site envisages a time in the near future when space travel will become safe for the casual traveller and space tourist. The site functions for this audience in the manner of air travel sites that we know today. The site would appeal to travellers looking for unique destinations, to space enthusiasts, and to those looking for unusual experiences.
- Simply and attractively displaying the available destinations
- Providing a straight forward booking process modelled on the familiar workflow of existing air travel sites (eg. Kenmore Air).
"As a user, I would like to ___________"
- As a user, I would like to view the different types of trips available
- As a user, I would like to view individual trips in more detail
- As a user, I would like to book my place on a trip
- As a user, I would like to provide details of the number of passengers and passenger information
- As a user, I would like to review my booking before placing it
- As a user, I would like to easily Enter Payment information
- As a user, I would like to feel my personal and payment information is secure
- As a user, I would like to view my order confirmation after checkout
- As a user, I would like to receive a confirmation email after the checokout is complete
- As a user, I would like to modifiy my booking details
- As a user, I would like to view my bookings
"As a business user, I would like to"
- As a business user, I would like to add new trips and experiences
- As a business user, I would like to view the number of seats available for each trip
- As a business user, I would like to view details of the passengers for each booking
The fonts for this project were sourced from Google Fonts
-
"Montserrat" is the main font used for the body text, links, buttons and subheadings. It was chosen because of its easy legibility and low contrast strokes that give it a clean, modern feel. The font comes in a good range weights which make it flexible for emphasising words in bold or adding subtle hover effect to links. Montserrat pairs well with the secondary font because of its smooth, circular curves that contrast with the square form of Orbitron's letters,
-
The secondary font used for this app is "Orbitron", a sans serif font reminiscent of futuristic sci-fi movies. The geometric typeface was designed for display purposes and as such, is used for 2infinity's main logo and headings. It was chosen for its strong futuristic character which supports the theme of the app.
-
The font used for the hero text on the landing page is "Euphoria Script". It was chosen to contrast the main display font (Orbitron) for added interest. It is set to a large font size for maximum impact and legibility and given a text shadow which matches the base cyan colour chosen for the site.
The majority of 2infinity's icons were provided by the Font Awesome icon library.
-
Icons are used as visual cues against each of the navigation links in the header.
-
Social Media Icons are included in the footer in lieu of written links as the icons are more immediately recognizable.
-
On the user profile page, the table headings are shortened by using icons to save space.
-
The booking progress bar uses icons to illustrate the process steps and intuitively communicate the stage reached and steps remaining.
-
The site uses a custom mouse cursor for fun, with a design that echoes the theme of the site and gives the impression of a space shuttle freely roaming through outer space. The vector icon was created in Adobe Illustrator.

Adobe Color was used to develop the colours for 2infinty.
The brand has a dark theme to reflect the darkness of outer space. Cyan, used for the base colour, is a bright, additive secondary colour created by mixing blue and green light. It captures the glow of Earth as viewed from space.
#2AB1B7: Used for h1 Headings, borders, underlines, the hero button and the footer.

#B88421: Warnings & form errors

#0E666B: Text in the page footer. The contrast from the base cyan is enough to be legible without grabbing too much attention

#0D3638: Bottom border colour for form inputs

#99B821: For links, highlighting selected options and progress bar icons.

-
The Bootstrap framework was used extensively throughout the app to achieve responsive layouts.
-
The pager header, containing the navigation links and company logo, is anchored to the top of the viewport window and has a high z-index so that the page content scrolls behind it.
-
When the entire body fits within the viewport height, the footer anchors to bottom of the screen while the main content 'grows' to fill the remaining space.
-
If the main content overflows the viewport height, the content becomes scrollable and the footer is positioned as per default, in the normal flow of the page.
-
The content is structured using Bootstrap's Grid System. On all screen sizes, the containing elements - header, main, and footer are given the class "container-fluid" so that the background extends across the full width of the screen.
-
The content within the header and main elements is contained within a content column. This is a full width column ("col-12") on small devices, but reduced to 83.33% width on viewports wider than 991px, to allow a margin on the left and right of content ("col-md-10")
-
On all devices, the content column within the footer is set to ("col-12") which gives the page a solid base.


-
The templates to sign in, sign up and sign out all conform to the base structure of the app; The header is anchored at the top and the main content is centered vertically and horizontally, filling the space between the header and the footer at the bottom of the screen.
-
The individual forms are the only features of their respective templates and are styled as per the form style.
-
On larger screen sizes the forms are contained by a 1px solid border in the base teal colour. On mobile devices, the border is removed as viewport comfortably takes over as the form's 'container'.


-
The layout of the landing page is minimalistic and draws the user directly to the hero button as starting point for their navigation.
-
The page is filled with a dynamic full screen background image of the Earth photographed from space. The image is fixed so that image appears to zoom in and out when the viewport is resized but keeps its position on the page.
-
The base cyan colour is used to catch the eye as it stands out againt the dark theme. In this template, it is used in the header section to underline the hovered navigation links, in the main section for the hero button and effect on the hero text, and for footer. This keeps the overall template nicely balanced.
-
The booking process relies on Django sessions to store the users input and uses the session data to model the forms. In normal workflow, the booking is not created in the database until the user has successfully completed the checkout and made payment. However they can choose to save the booking prior to checkout and come back to it later. In this case the booking is saved in a model with an 'OPEN' status.
-
Since many of the forms in the booking process rely on data from the session, checks are made early on in the logic before rendering the page to see that all of the required session data exists. If it doesn't, it redirects the user to a custom error template where they find a link back to the search form. This prevents a user who may have typed in a url without following the booking process from receiving a server error.

- The booking process is reserved for authenticated users and therefore if a user tries to search a trip without being logged in, they are directed to the sign in page.

- The templates in the booking process feature a progress bar just beneath the main navigation bar. This is positioned 'sticky' so that it retains its position if the page requires scrolling.
- The progress bar benefits the user experience as it informs them of where they are in the booking process.
-
The progress bar first appears in the 'Search Trips View'/ when the user clicks the 'Book A Trip' link in the page header.
-
Each icon in the progress bar is a hyperlink that takes the user back to the respective step in the booking process.
-
The active step, and the steps that preceed it are shown in colour and their links are enabled. The steps beyond the active step are greyed out and the links are disabled. The exceptions to this are the Checkout and Checkout Success templates where all the links preceeding the active step are disabled.
-
On smaller screen sizes, the size of the progress bar icons reduces slightly to keep in proportion with the space.

-
The form appears in the 'Search Trips' template but is also featured on the 'View Trips' page
-
The Passengers field is disabled until a Destination is selected from the dropdown list. This is so that the max attribute for the passengers input is dynamically set using jquery when it detects a change in the Destination field.
$('#selected-trip').change(function() {
    if ($('#selected-trip').val() == '') {
        $('#passengers-max').prop("disabled", true);
    }
    else {
        let maxNm = $('#selected-trip option:selected').data('maxNum');
        $('#passengers-max').attr("max", maxNm).prop("disabled", false);
    }
});
- For this to work, I created a custom widget, sublassing Django's Select widget and customising its 'create_option' method. The customised method allows the max_passengers value for the represented destination instance, to be be passed as a data attribute to the option element.
def create_option(
        self, name, value, label, selected, index, subindex=None, attrs=None
    ):
        if isinstance(label, dict):
            opt_attrs = label.copy()
            label = opt_attrs.pop("label")
        else:
            opt_attrs = {}
        option_dict = super(SelectOptionsWithAttributes, self).create_option(
            name, value, label, selected, index, subindex=subindex, attrs=attrs
        )
        for key, val in opt_attrs.items():
            option_dict["attrs"][key] = val
        return option_dict
- The form has validation setup on its
def_clean(self)method so that the data is cleaned even after it passes the intitial browser validation. This prevents any hacking from the developer tools. It checks that:- The Destination submitted is in fact an instance of the Destination Model. Returns error: "Please choose an option from the list"
- The date selected is not in the past. Returns error: ""Searched date should not be in the past"
- The value submitted for number of passengers does not exceed the number of seats that the Destination can accommodate. Returns error: "Sorry, this exceeds the maximum for the selected trip"
- The value submitted for number of passengers is not less than 1. Returns error: "Please choose at least one passenger".
-
The form contains a set of radio input options based on a filtered queryset. The Trips are initially filtered by 'destination' and then by 'seats available'. The set of options is further refined to the dates closest to the date that the user requested.
-
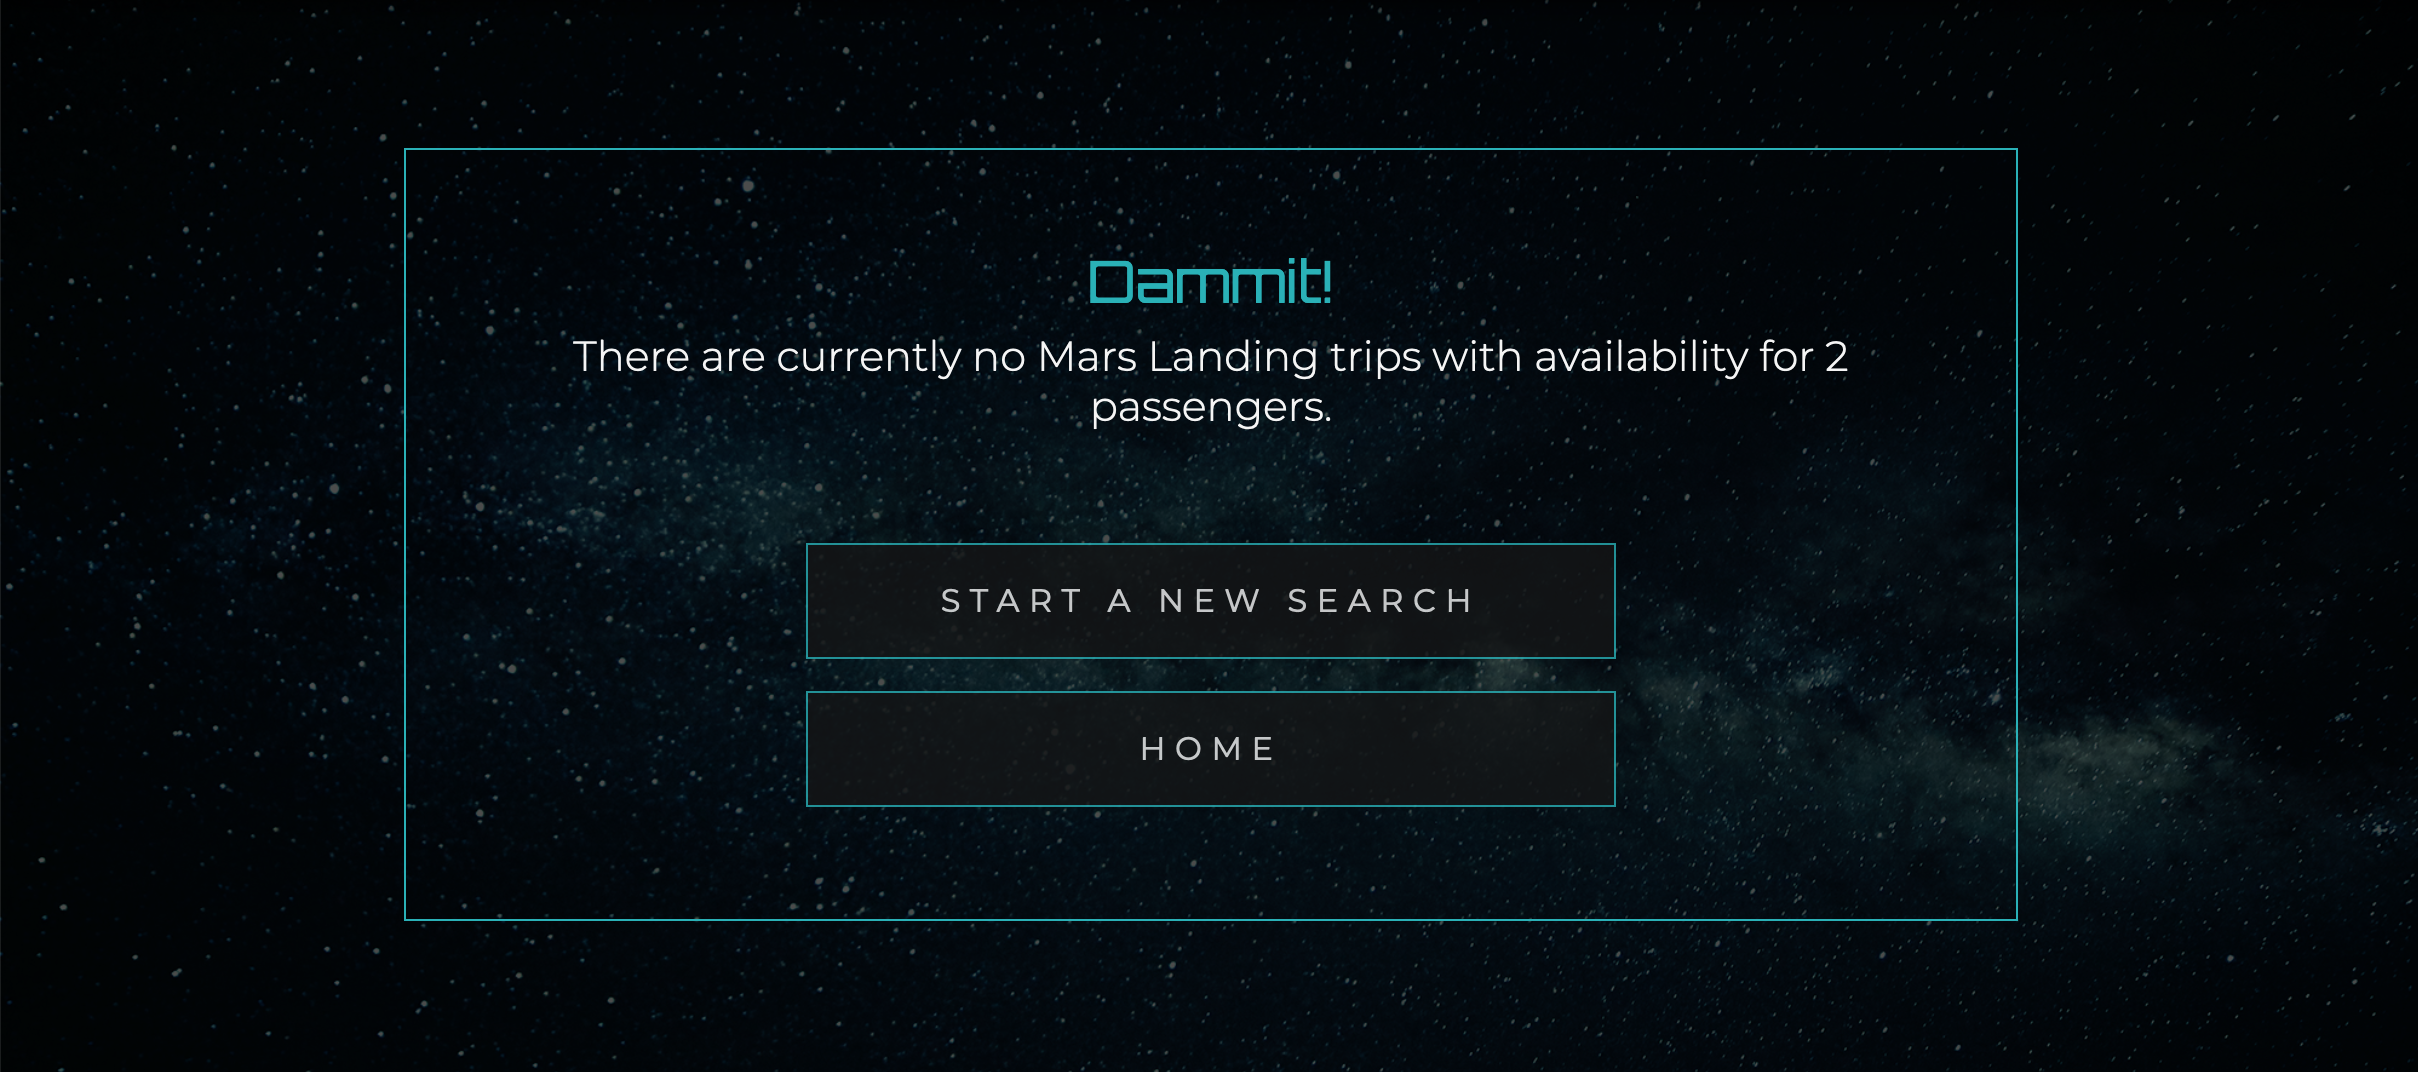
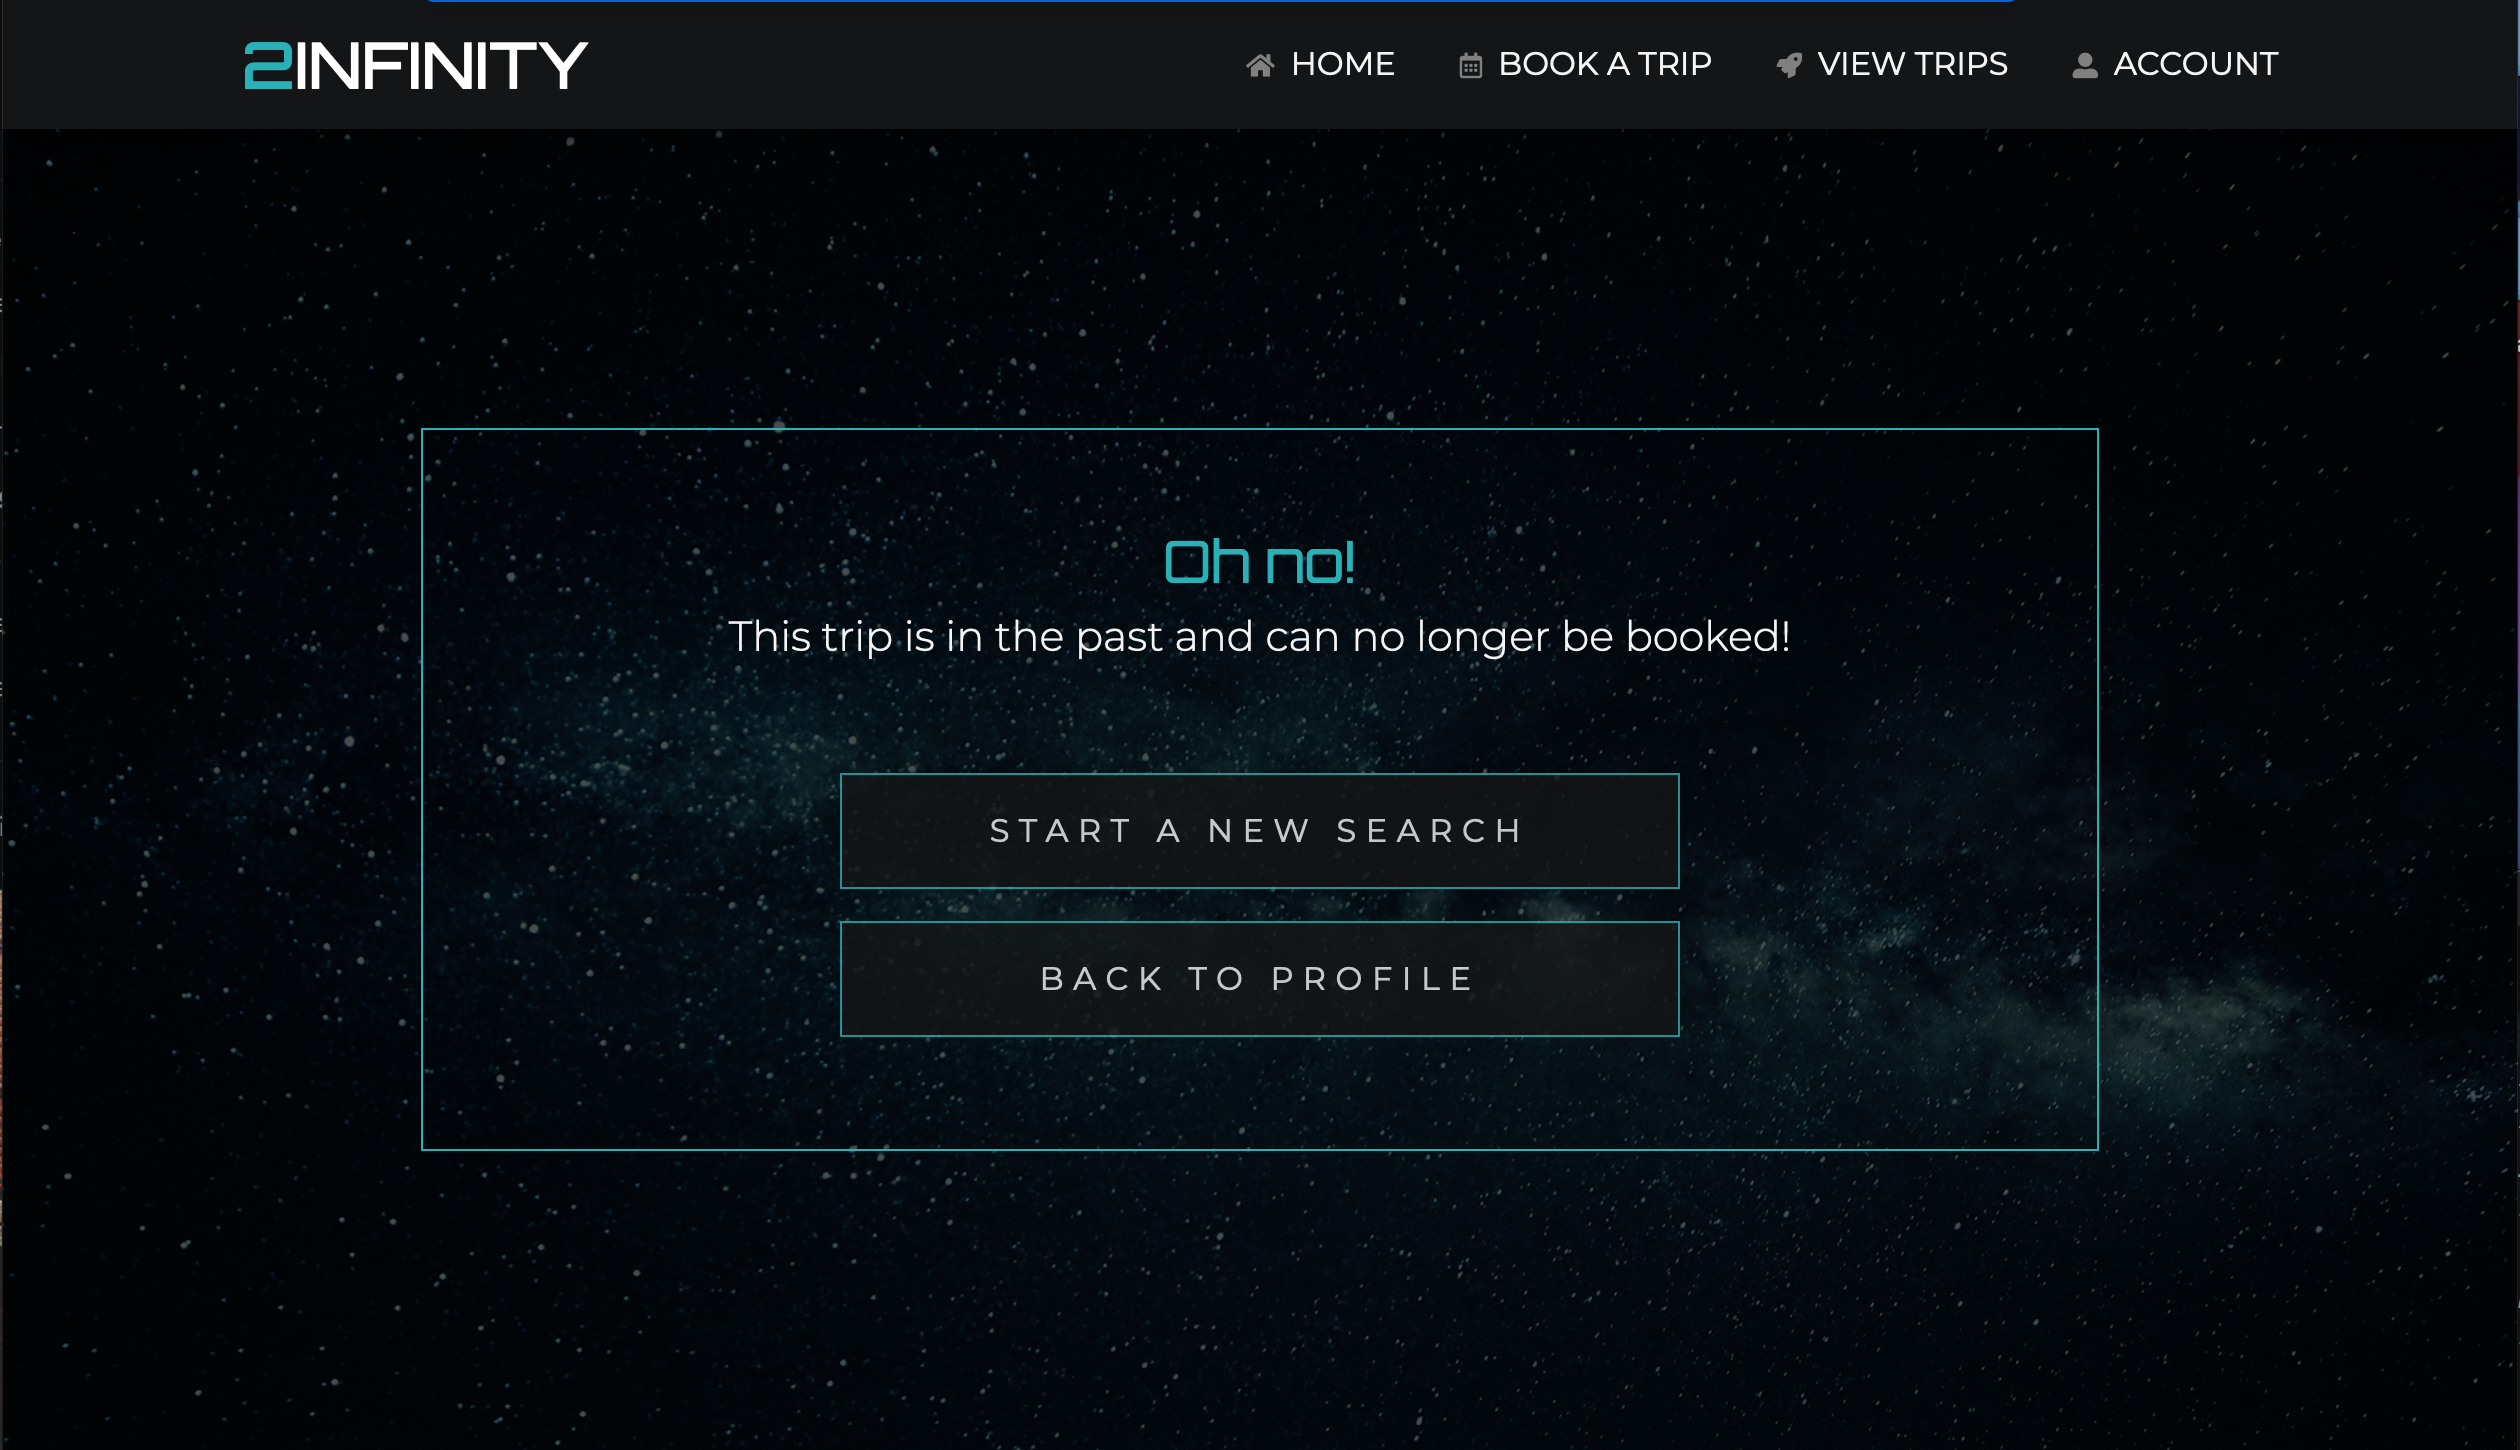
The Confirm Trip form is rendered using data from the session. Therefore checks are made to see that the required session objects exist. If they do not exist the user is redirected to a custom error page with the message "It seems the session has ended" and a button to take them back to the search form.
-
Before loading the template and attempting to return any results, a check occurs to see if there are any trips available at all for the destination and requested number of passengers. If all trips are fully booked, the user is redirected to an error page and presented a button link to go back and start a new search.
- The radio buttons are hidden in favor of custom styled input labels which display the date, and price per person.

- Customisation is applied to Django's 'label_from_instance' method so that the label represents both the price and date of the instance
    def label_from_instance(self, obj):
        # 'obj' will be a Destination
        date_string = (obj.date).strftime("%A %d %B %Y")
        return f"{date_string} £{obj.destination.price}"
-
The markup of the label is constructed using jquery. When the page loads, it takes the value of each label and slices it so that price and date can be returned as separate html elements within the parent label.
-
When the option is submitted, a modal is triggered to confirm the choices the passenger has made.
-
The Formset receives a value from the session for the the number of passengers in the booking and uses it to define the number of forms in the formset.
-
The Formset also receives the trip instance from the session and uses it to determine which 'addons' to present to the user
-
The Passenger Details form is rendered using data from the session. Therefore checks are made to see that the required session objects exist. If they do not exist the user is redirected to a custom error page with the message "It seems the session has ended" and a button to take them back to the search form.
-
The Addons for the trip are represented as a set of checkboxes but the checkboxes use a custom template for improved styling.
-
The form has custom validation defined in its
def_clean(self)method to verify the data that is submitted. It checks that:- The passport number has been provided for each passenger since it is a required field. Returns error: "This field is required."
- The passport number does not already exist within a booking for the same trip. Returns error: "Error, please check passport number or contact us"
- The passport number is not submitted twice within the same formset. Returns error: "".
- Details have been provided for all forms in the formset. Returns error: "Please provide details for all travellers."

- A summary of items that the user is due to purchase appears in both the Passenger Details template and the Checkout template. The itemised summary shows each item on a separate row with the individual item price and quantity (number of passengers it applies to). A booking total is calculated and shown beneath the listed items.
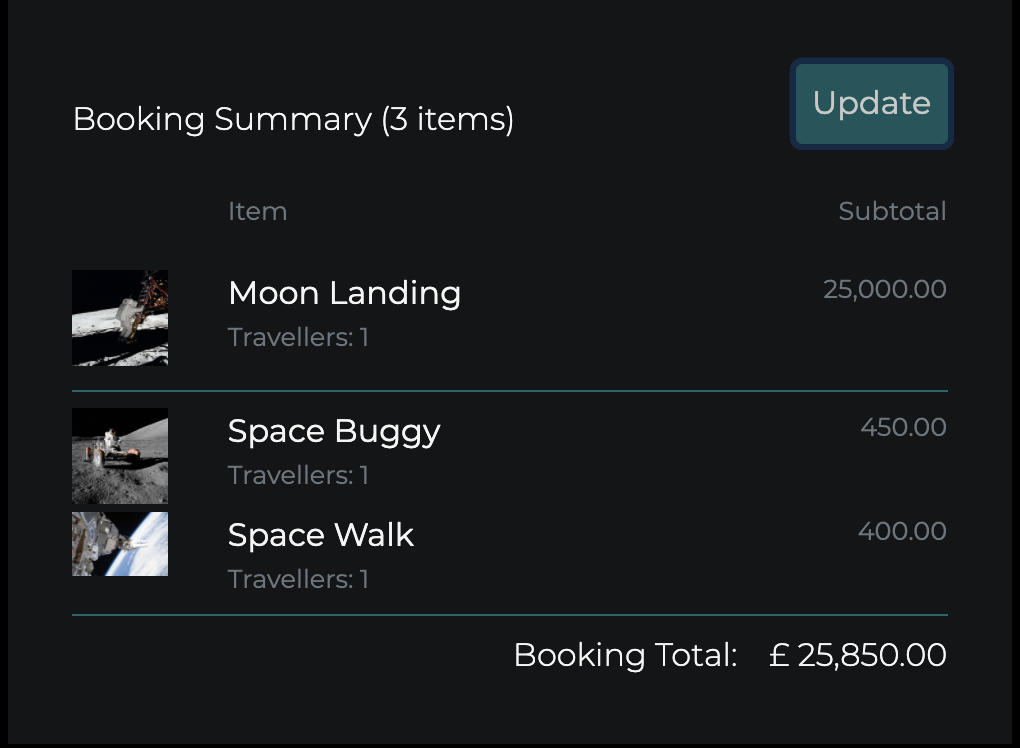
-
In the Passenger Details template, the booking summary initially displays the Trip which is being booked as the only 'product' item that has been selected at that step in the booking process. However, the summary features an 'Update' button which, when clicked, triggers the jquery to select all checked inputs from each passenger form and generate the html markup that appends the Addon products to the summary. The booking total is also updated.
-
The script first removes any markup beyond the listed trip in case it is in not the first time script has been triggered. This prevents the same Addon product being listed multiple times from previous click events.
-
Instead, the itemised list of Addon products is refreshed and any reoccurances (the same product selected by multiple passengers) is accounted for by incrementing the 'quantity' and subtotal.
- Just before the user proceeds to the checkout, they are presented with two alternative submit buttons. The 'Save for Later' button allows the user to save the booking to their profile if they are not ready to check out at that point.
- The booking instance is saved and given a status of OPEN. They can access this booking from their Profile page and return to complete it another day.
- If the user gets to Passenger Details template and then decides they don't want to proceed with the booking, they can choose to 'cancel'. Pressing this button deletes all session data and redirects them back to the home page.
-
The Checkout form is rendered using data from the session. Therefore checks are made to see that the required session objects exist. If they do not exist the user is redirected to a custom error page with the message "It seems the session has ended" and a button to take them back to the search form.
-
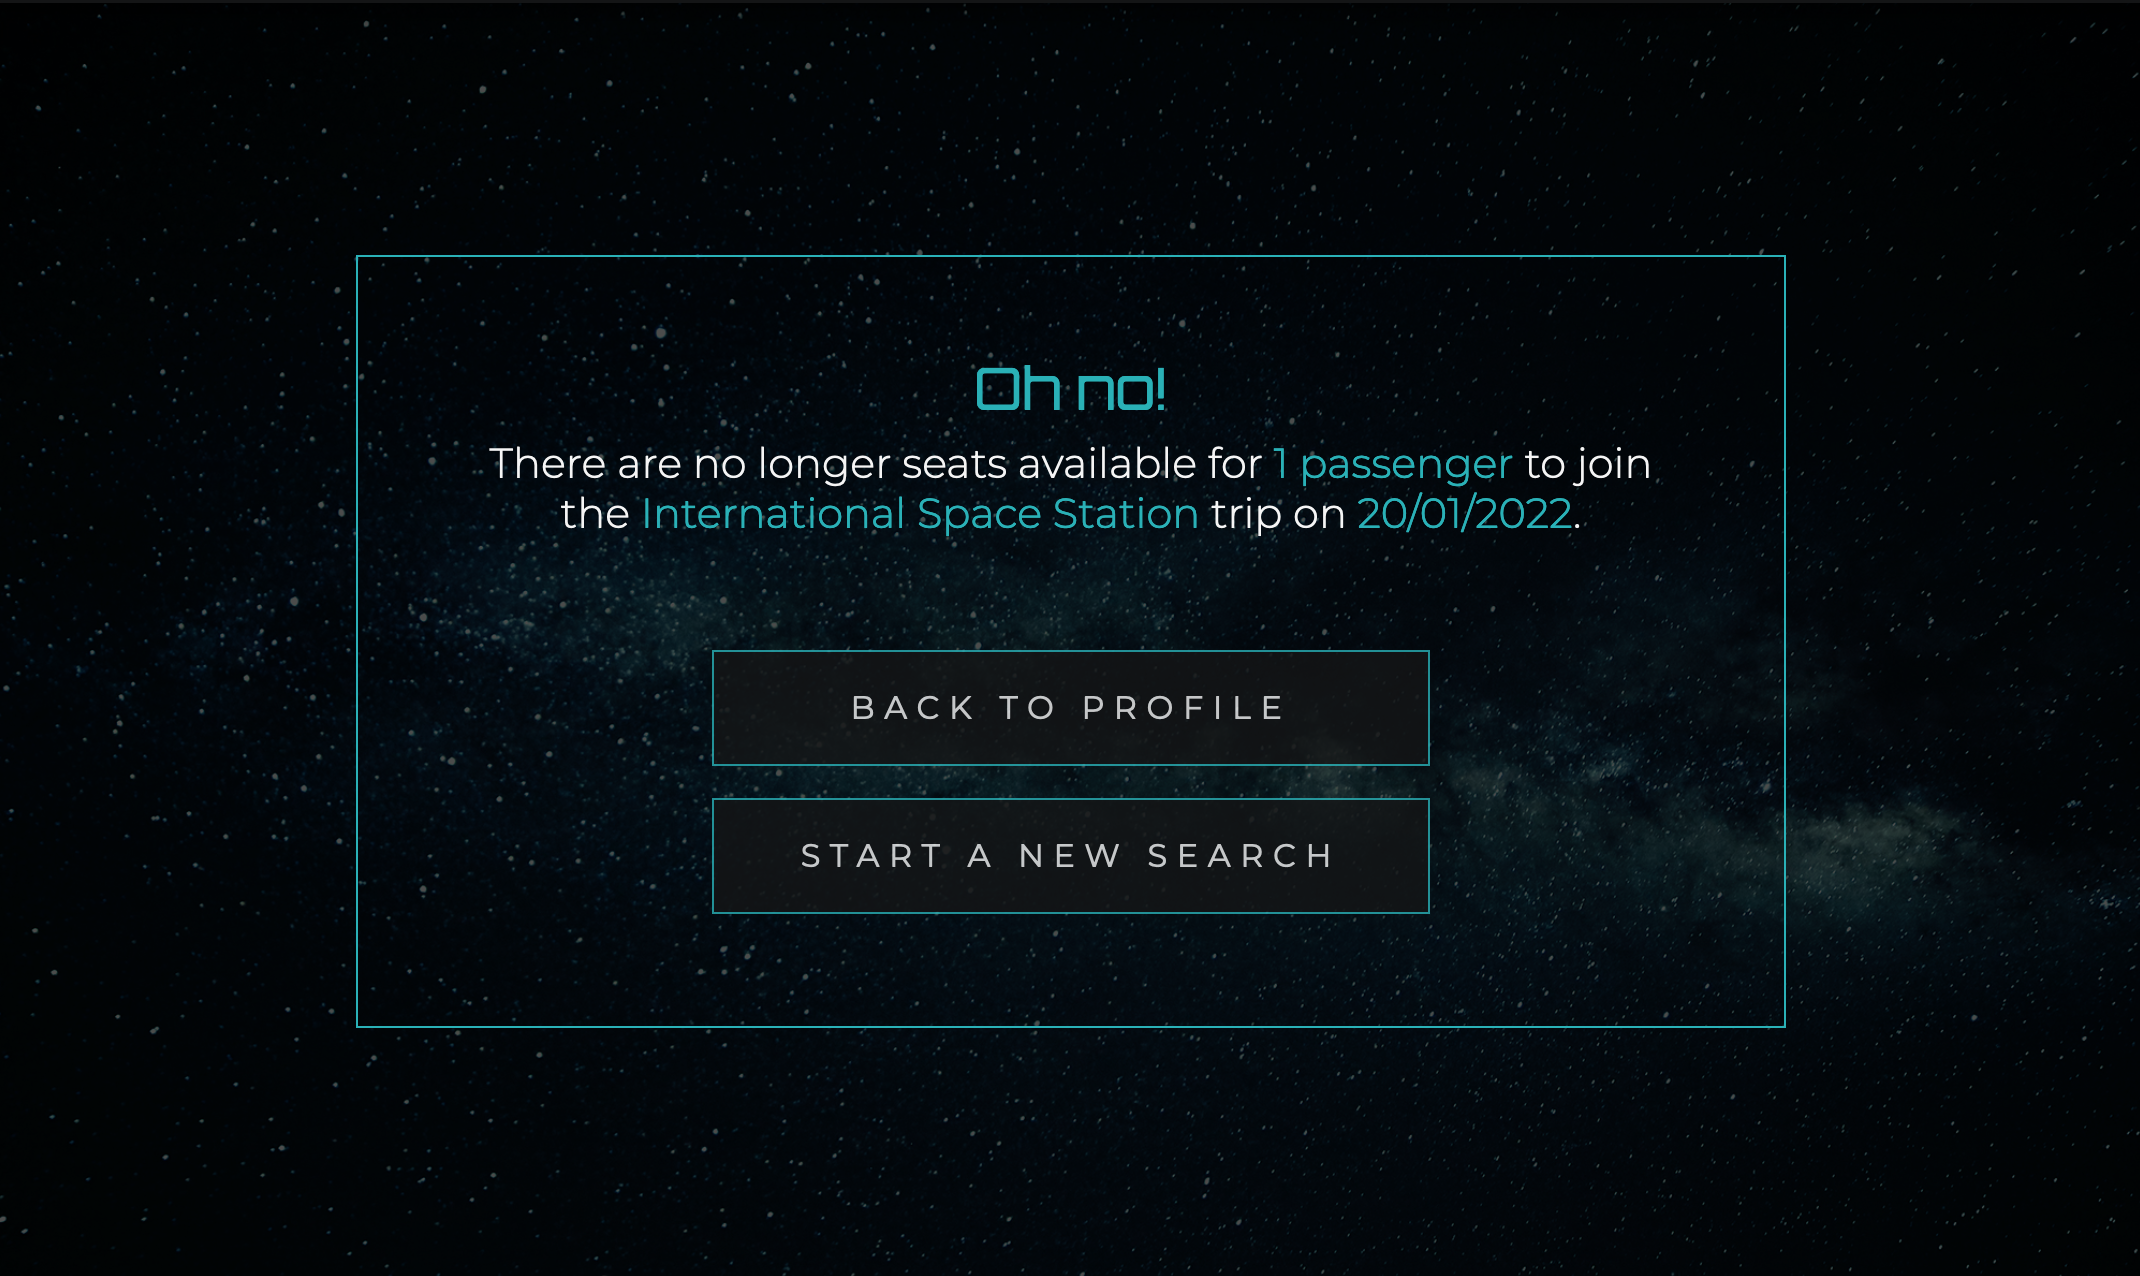
A check is also made to verify that there are still seats available on the trip for the number of passengers requested by the booking since it is possible that in the time since the initial search was made, the number available seats has changed.
if trip.seats_available < passenger_total:
            template_name = "checkout/seats-unavailable.html"
            context = {
                "destination": trip.destination,
                "date": trip.date,
                "passengers": passenger_total,
            }
            return render(request, template_name, context)
If the check finds that there are no longer seats available for this trip, it redirects the user to a custom error page.
-
A final check is made to see that the trip being 'purchased' is not in the past since the user may have saved their booking and returned to it many weeks later when the trip has already taken place. If this is the case, the user is prevented from reaching the checkout page and redirected to a custom error page instead where they can navigate back to their profile.
if datetime_naive < datetime.today(): if self.booking: self.booking.delete() template_name = "checkout/date-passed.html" context = { "date": trip.date, } return render(request, template_name, context) -
Within the checkout template, a clear message is shown just below the 'Proceed to Checkout' button, warns the user how much will they be charged.
-
The checkout system implements Stripe(devlopment version) for handling test payments
-
To test checkout, users can enter 4242 4242 4242 4242 for the credit card number
-
Webhooks are set up, so the order is created only after Stripe accepts the payment as valid.
-
Once the Webhook return a success status, the user receives an email to confirming their booking
-
A Toast message confirms that their order has been successful.
-
On success, the system renders a new template with a full summary of the booking and a thank you message.
-
After successfully checking out the booking instance is created in the database if not already. If the booking instance does already exist, the booking is updated to a status of "COMPLETE"
-
When the booking is saved, the
update_seats_available()method is called on the Trips model, prompting it to deduct the number of passengers created in the booking from the number of available seats.
reservations = self.bookings.filter(status="COMPLETE").aggregate(
            num_passengers=Count("passengers")
        )["num_passengers"]
        self.save(reservations=reservations)

    def save(self, *args, **kwargs):
        """
        Override the original save method to set the trip reference and
        seats_available if not set already
        """

        if not self.trip_ref:
            date = (self.date).strftime("%m%d-%y")
            self.trip_ref = self.destination.pk + "-" + date

        reservations = kwargs.pop("reservations", 0)
        self.seats_available = self.destination.max_passengers - reservations
        super().save(*args, **kwargs)
-
Product management within the App Currently administrators can login to the Django admin which has been set up with all models registered. In a future feature, the app will give administrator only access to templates where they can submit forms to update, create or delete products.
-
Users will be able to delete their accounts
-
Asynchronous Housekeeping
This enhancement would aim to implement structures that make it easy introduce asynchronous housekeeping as requirements are identified, the first example being removal from the database of expired open bookings--bookings created and saved, perhaps by one-time visitors to the site, but never completed. Any open bookings against expired trips would be targets for this housekeeping. There are two parts to the implementation of each asynchronous housekeeping requirement:-
A Python script that executes the specific housekeeping; in the case of expired open bookings, the sole objective of the script is to issue an database query along the lines of "BEGIN; DELETE BOOKING WHERE BOOKING.STATUS = 'Open' AND BOOKING.TRIP = TRIP.PK AND TRIP.DATE < CURRENT_DATE; END"
-
A means to schedule the periodic execution of the script which, in the case of open bookings, is the frequency with which open bookings may become expired. This would be explored using some combination of Django async views, the Django-Q addon, and Heroku Redis as a queue dispatching service.
-
Thereafter, each additional housekeeping requirement would be implemented by creating the appropriate housekeeping script, and the additional statements within the async view to invoke the script on the appropriate scheduling basis.
-
-
Passenger Medical Assessments
At the moment, 2Infinity bookings accept any Passengers named by the user. But flights to deep space, or addons such as space walks or space buggy rides, may not be suitable for certain Passengers based on age (too young or too old) or certain medical or physical conditions. The enhancement would introduce a model whereby each Passenger could be issued with a medical assessment questionnaire, the completion of which becomes a condition for accepting the Passenger for the Trip. Theoretically, the 2Infinity shop could communicate with a nominated GP for each Passenger to receive the GP's verdict on the Passenger's suitability for the Trip Booking and addon activities.
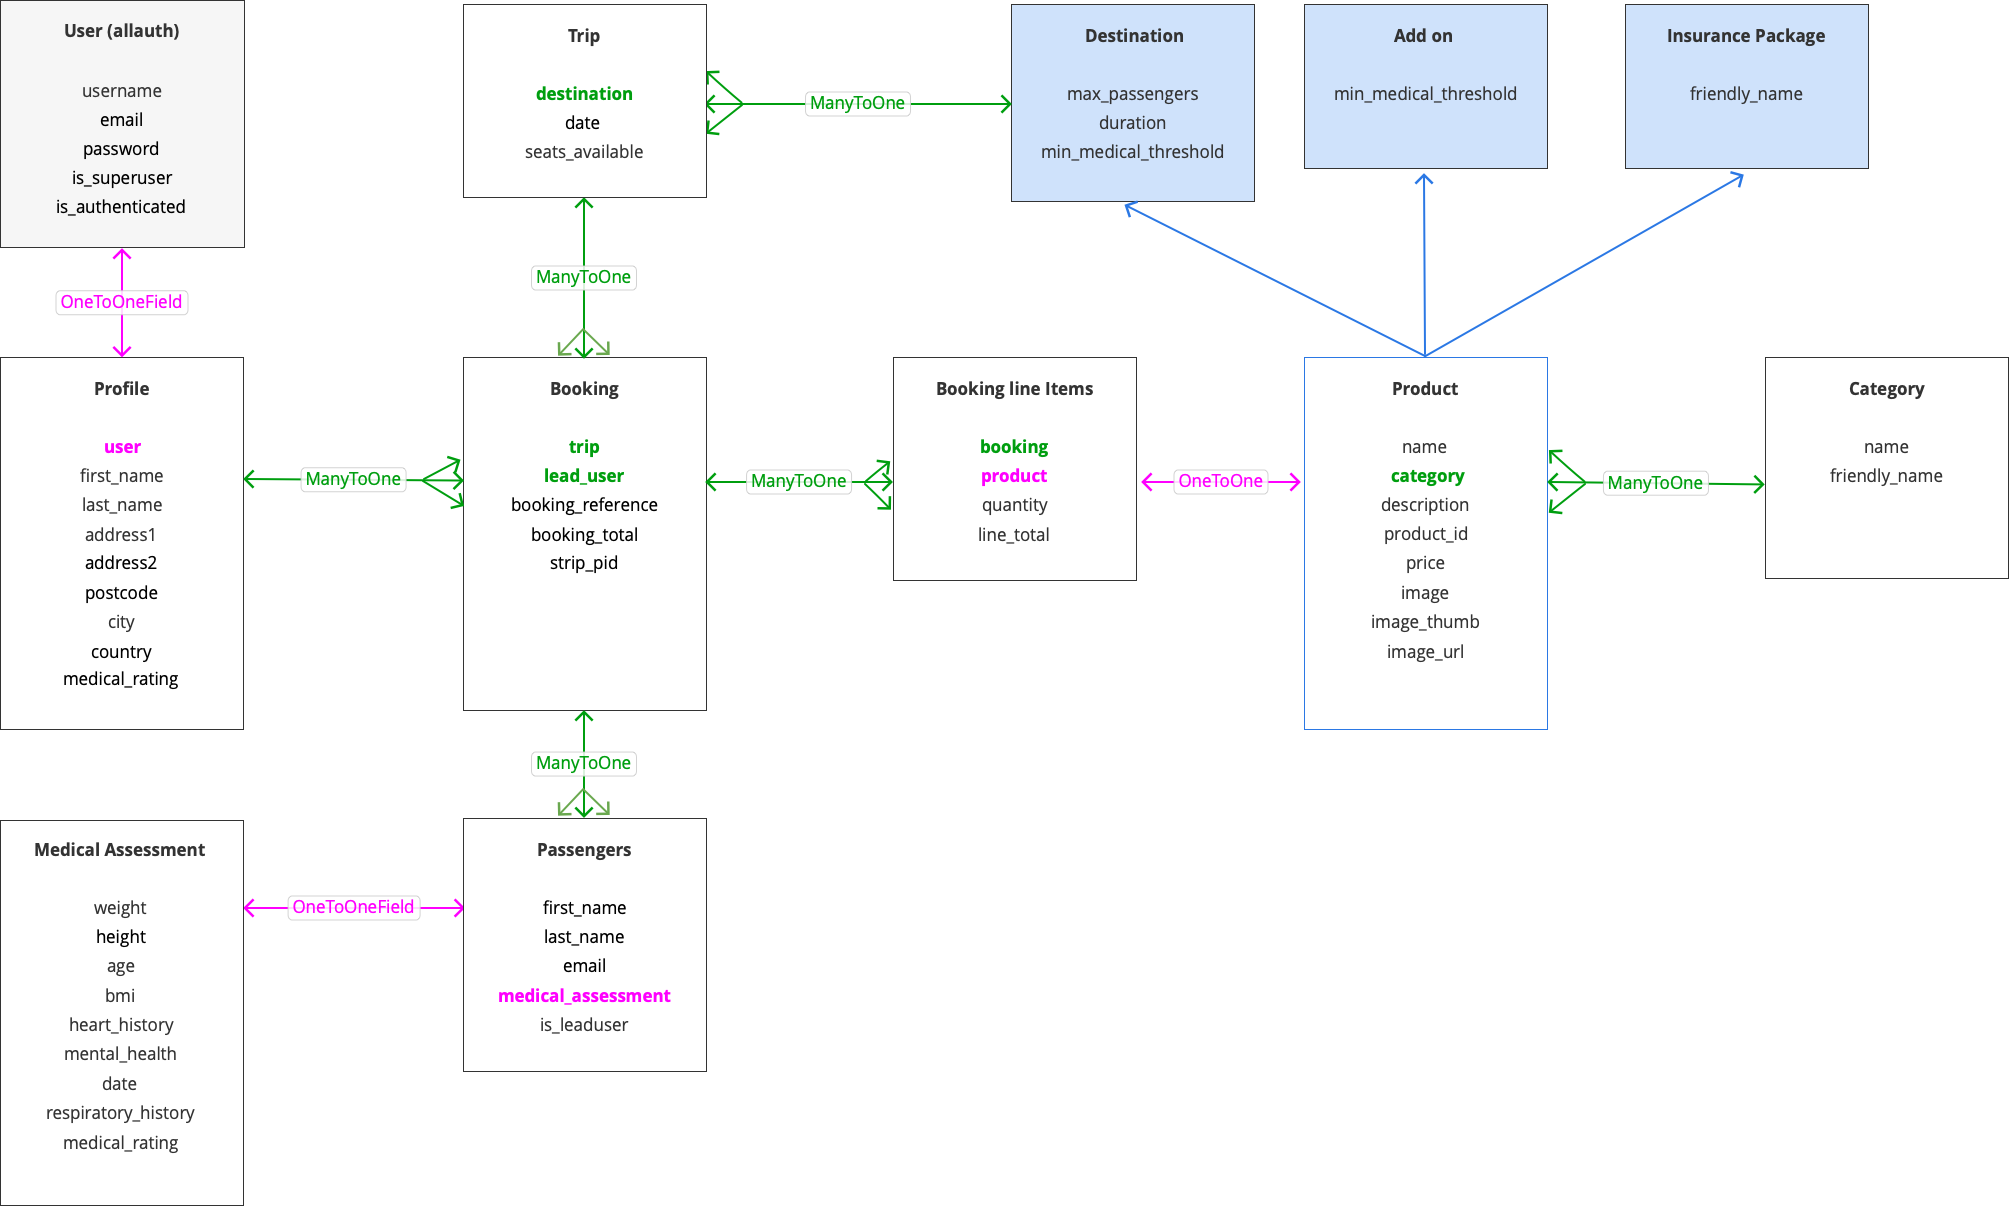
| Name | Key in db | Field Type | Options |
|---|---|---|---|
| User | user | OneToOneField(User) | on_delete=CASCADE |
| First Name | default_first_name | CharField | max_lenghth=80, null=False, blank=False |
| Last Name | default_last_name | CharField | max_length=80, null=False, blank=False |
| Phone Number | default_phone_num | CharField | max_length=20, null=True, blank=True |
| Passport Number | default_passport_num | CharField | max_length=9, min_length=9,null=False, blank=False |
| Medical Rating | default_medical_rating | IntegerField | null=true, blank=True |
Booking
| Name | Key in db | Field Type | Validation |
|---|---|---|---|
| Destination | destination | ForeignKey(Destination) | null=True, blank=False, on_delete=SET_NULL |
| Date | date | DateField | |
| Seats Available | seats_available | IntergerField | null=False, blank=False, editable=False |
| Name | Key in db | Field Type | Validation |
|---|---|---|---|
| Booking Reference | booking_ref | CharField | primary_key=True, max_length=20, null=False, editable=False |
| Trip | trip | ForeignKey(Trip) | on_delete=SET_NULL, null=False, blank=False |
| Lead User | lead_user | ForeignKey(UserProfile) | on_delete=SET_NULL, null=True, blank=True |
| Booking Total | booking_total | DecimalField | max_digits=10, decimal_places=2, null=False, default=0 |
| Stripe Payment ID | stripe_pid | CharField | max_length=254, null=False, blank=False default="" |
| Full Name | full_name | TextField | max_length=50, null=False, blank=False |
| Name | Key in db | Field Type | Validation |
|---|---|---|---|
| Booking | booking | ForeignKey(Booking) | on_delete=CASCADE, |
| First Name | first_name | CharField | on_delete=SET_NULL, null=False, blank=False |
| Last Name | last_name | CharField | on_delete=SET_NULL, null=True, blank=True |
| EmailField | max_length=254, null=False, blank=False | ||
| Passport Number | passport_no | CharField | max_length=9, min_length=9, null=False, blank=False |
| Lead Passenger | is_leadpassenger | BooleanField | null=False, blank=False |
| Trip Addons | trip_addons | ManyToMany(Addon) | null=True, blank=True |
| Trip Insurance | trip_insurance | ForeignKEy(Insurance) | on_delete=SET_NULL |
| Medical Assessment | medical_assessment | OneToOneField(Medical) | on_delete_CASCADE, null=True, blank=True |
| Medical Rating | medical_rating | IntegerField | max_digits=3, null=False, blank=False, default=0 |
| Name | Key in db | Field Type | Validation |
|---|---|---|---|
| Booking | booking | ForeignKey(Booking) | on_delete=SET_NULL, null=False, blank=False, on_delete=CASCADE |
| Product | product | OneToOneField(Product) | on_delete=SET_NULL, null=False, blank=False, on_delete=CASCADE |
| Quantity | quantity | IntegerField | null=False, blank=False, default=0 |
| Line Total | line_total | DecimalField | max_digits=7, decimal_places=2, null=False, blank=False, editable=False |
| Name | Key in db | Field Type | Validation |
|---|---|---|---|
| Category | category | ForeignKey(Category) | null=True, blank=True, on_delete=SET_NULL |
| Name | name | CharField | max_length=254 |
| Product ID | product_id | CharField | max_length=254 |
| Description | description | TextField | |
| Price | price | DecimalField | max_digits=6, decimal_places=2 |
| Image | image | ImageField | null=True, blank=True |
| Image URL | image_url | URLField | max_length=1024, null=True, blank=True |
| Image Thumbnail | image_thumb | ImageField | null=True, blank=True |
| Name | Key in db | Field Type | Validation |
|---|---|---|---|
| Name | name | CharField | max_length=75 |
| Friendly Name | friendly_name | CharField | max_length=75, blank=True |
| Name | Key in db | Field Type | Validation |
|---|---|---|---|
| Maximum Passengers | max_passengers | IntegerField | |
| Duration | duration | CharField | max_lenght=20 |
| Minimal Medical Threshold | min_medical_threshold | IntegerField | blank=True |
| Name | Key in db | Field Type | Validation |
|---|---|---|---|
| Minimal Medical Threshold | min_medical_threshold | IntegerField |
| Name | Key in db | Field Type | Validation |
|---|---|---|---|
| Friendly Name | friendly_name | CharField | max_length=75, blank=True |
- HTML5, CSS3, Javascript
- Frontend programming languages
- Sass
- CSS extension used to develop the style sheets used in this project
- JQuery 3.5.1
- Simplifies access and manipluation of the DOM
- Used to generate the markup of the radio input labels in the Confirm Trip view.
- Overrides the browser default styles applied to inputs when the 'invalid' event is detected
- JQuery UI 1.12.1
- Toggles the search form used in the View Trips template, on small devices with a smooth 1 second transition speed applied
- Bootstrap 4.5.3
- Provides the visual formatting of the website and it's responsiveness accross all devices
- Boostrap's Grid System and layout components were used extensively to keep consistency accross all templates
- Google Fonts
- Provides access to the web fonts used in this project
- Font Awesome
- Provides the icons used in this project to guide the users' navigation, offer visual cues and offer balance to areas of text.
- Python 3.8.5
- For processing all backend logic
- Django
- Python web framework for rapid development and clean design.
- Django Crispy Forms
- The Crisy Form Helper was used to provide Layout and styling to the many forms used in this app.
- Django Allauth
- For user authentication, registration and account management.
- Django Storages
- For management of static files and folders integral to the app.
- Stripe
- The payment platform used to validate payments and send webhook responses to the app.
- AWS
- Serves the static and media files that are provided to the database.
- SQLite3
- Local database provided as default by django
- Postgres
- The database used by Heroku (production)
- Visual Studio Code
- The IDE that facilitated the devlopment of this project.
- Pipenv
- Manages the virtualenv and automatically adds/removes packages to a Pipfile when they are un/installed.
- GitHub
- The platform where the project code is stored remotely and publicly available.
- Heroku
- For deployment of the app
- Balsamiq 4.1.8
- For the creation of the wireframes used in this project
- Cloudinary
- Hosts the images used in this README.md file
Features of 2Infinity were tested as they were developed, and re-tested in an ad hoc fashion as updates to the app continued.
Critical path functions of the app were identified, and testing focused on ensuring that these remained functional. Critical path functions include:
- To register an account
- To sign in with a registered account
- To search for a trip (2 forms)
- To book a trip and “Confirm”
- To add passengers (with add-ons) and “Proceed”
- To complete the “Checkout” process and “Complete Order”
- Functions necessary to meet project requirements (e.g., view and amend the profile for a registered account)
Formal and automated testing methods and assets were not developed.
A close family member was introduced to the website on its deployed location and briefed about its purpose and critical path functions. There subsequent use of the app helped to draw attention to defects and identify opportunities for enhancing usability.
- As a user, I would like to view the different types of trips available
Test
- Clicked on View Trips in the navbar and made sure it linked to the correct page (Passed)
- As a user, I would like to view individual trips in more detail
- Clicked on View Details button for each trip in View Trips template and was redirected to that individual trip's page (Passed)
- As a user, I would like to book my place on a trip
- Clicked on Book A Trip link in the navigation bar and was redirected to the Search Form
- Filled in the fields and submitted the form. Was redirected to confirm the Trip date.
- Chose a date from the available options and clicked confirm. Was redirected to fill in passenger details
- Filled out all inputs and clicked to submit form. Was redirected to the checkout page
- Completed Checkout form and clicked to confirm the payment.
- Received a success message and was taken to a booking summary to confirm the booking had been placed (Passed)
- As a user, I would like to provide details of the number of passengers and passenger information
- Provided Destination in the select field and the passengers field was enabled
- Input a value for the number of passengers and clicked submit
- Chose a trip from the options that were returned
- The search details were presented on the screen to remind me of the seach data I had provided
- Redirected to input the passenger details
- Was able to submit the form (Passed)
- As a user, I would like to review my booking before placing it
- Started a booking and reached the Passenger Details Form
- Added some addons to the order and clicked the Update button
- The booking total updated and the addons were appended to the list
- Continued to the Checkout Page and the booking summary contained all Addons and the Trip (Passed)
- As a user, I would like to easily Enter Payment information
- As a user, I would like to feel my personal and payment information is secure
- As a user, I would like to view my order confirmation after checkout
- As a user, I would like to receive a confirmation email after the checokout is complete
- Made a new booking and went through to the Checkout page.
- Completed the order and was redirected to the success page
- Received a notification email confirm that the booking had been place (Passed)
- As a user, I would like to modifiy my booking details
- Clicked on Progress bar icons to go back steps in the booking process
- Was able to resubmit the forms (Passed)
- As a user, I would like to view my bookings
- Completed a booking and was redirected to the success page
- Clicked on button to view profile
- The booking was listed in the Completed bookings table
- Started a booking and followed the booking process to the Passenger Details page
- Clicked SAVE and was redirected to my profile page (Passed)
In order to run the project locally, you will need an IDE, PIP, Python (version 3) and Git installed. You will need to set up a free account with Stripe and with AWS for a S3 bucket.
- Visit the 2infinity repository on Github; https://github.com/fdeboo/to-infinity and click on
to clone or download it.
- Either:

-
Click to Download Zip and save the folder somewhere on your local system
- File > Open the project from within your IDE
- Copy the web url. In the terminal of your IDE, change directory /
cdto where you want the project saved on your system.
-
or:
- Type
git cloneand paste in the copied web url to complete the command *(as below)
git clone https://github.com/fdeboo/to-infinity.git - Type
- Activate a virtual environment. For this, I recommend using the pipenv package which manages the virtualenv and automatically adds/removes packages to a Pipfile when they are un/installed.
NOTE: The Pipfile created by pipenv supersedes the requirements.txt
- Once pipenv insalled, activate it with the following command:
pipenv shell- On MacOS, pipenv is installed simply by typing
brew install pipenvin the Mac Terminal. You can read more about pipenv and its installation using other software here.
- On MacOS, pipenv is installed simply by typing
- Install the project dependencies detailed in the Pipfile by typing
pipenv install
- Set up a .env file in the project root and provide the folllowing environment variables:
Important! Make sure you set up a .gitignore file and list .env in it so that it is ignored in commits to GitHub
```
SECRET_KEY=your_secret_key
STRIPE_PUBLIC_KEY=your_stripe_public_key
STRIPE_SECRET_KEY=your_stripe_secret_key
STRIPE_WH_SECRET=your_stripe_wh_secret
DEVELOPMENT=True
```
for guidance on where to obtain these values click here 6. If using VSCode, or else if necessary, restart the IDE and reactivate the virtual environment (as per step 3) 7. Migrate the admin panel models to create the database template:
python3 manage.py migrate
- Create a 'superuser' account for access to the django admin panel:
python3 manage.py createsuperuser
- Finally, run the app locally with the following command:
python3 manage.py runserver
NOTE: The Pipfile created by pipenv supersedes the requirements.txt and contains all information for the dependencies of the project. Therefore a requirements.txt is not necessary in this project.
- Type the following command into the Terminal to create a Procfile:
echo web: python app.py > Procfile
- Change the contents of the Procfile to:
web: gunicorn to_infinity.wsgi:application
-
Login to Heroku and click New from your Personal dashboard to Create a New App.
-
Give the app a unique name and choose the relevant region.
-
In the dashboard for the newly created app, set the Deployment Method (found under Deploy tab) to Connect to Github.
-
Fill out your Github details and search for your repository. Click to connect.
-
Choose whether you want to deploy Automatically or Manually.
-
Navigate to Resources and search for postgres in the Add-ons search bar. Choose Heroku Postgres from the dropdown.
-
Make sure the 'Plan name' is set to Hobby Dev - Free
-
Navigate to Settings and click on Reveal Config Vars.
-
Ensure the following are set:
*for guidance on where to obtain these values click here
AWS_ACCESS_KEY_ID:
- Create an account / Sign in to AWS and navigate to the AWS Management Console
- Search for S3 in AWS Services and Create a bucket. Follow the AWS documentation.
- Create a User via the IAM service provided by aws
AWS_SECRET_ACCESS_KEY:
- As above
- copy the Secret Access Key
DATABASE_URL (for production)
- This value is pre-populated by Heroku in the Config Vars. Alternatively, you can type
Heroku configin the CLI
EMAIL_HOST_USER:
- Your gmail account address
EMAIL_HOST_PASS (steps are based on gmail server):
- Sign in to gmail and go to Settings > See all settings.
- Navigate to Accounts & Import > Other Google Account Settings.
- From the side menu, click on Security and follow the steps to turn on 2-Step Verification.
- Click on App Passwords, choose 'Mail' from the first dropdown and 'other' from the second, giving it a reference i.e 'Django'
SECRET_KEY:
- Type
python3in the terminal and then typeimport secretsand hit enter. Typesecrets.token_urlsafe(48)to generate a secure randomized byte string containing 48 bytes.
STRIPE_PUBLIC_KEY:
- Create an account / Sign in to Stripe
- From the side menu, click on Developers > API Keys
- Copy the Publishable Key token
STRIPE_SECRET_KEY:
- As above
- Copy the Secret Key token
STRIPE_WH_SECRET:
-
As above
-
From the side menu, click on Developers > Webhooks
-
Click on button to '+ Add endpoint'.
-
Provide your endpoint url. If you are working locally, you may need to take these extra steps for a temporary url:
- Install ngrok. (On MacOs,
brew install ngrok) - Type
ngrok http 8000in the terminal - Add the temporary server address to ALLOWED_HOSTS in the app settings eg.
[“9e96e1506ea8.ngrok.io”, “127.0.0.1”]
Remember to append the path for the checkout to the end of the url, including the trailing '/':
/checkout/wh/ - Install ngrok. (On MacOs,
-
Click the link alternative to 'receive all events' in the 'Events to send' section and then 'Add endpoint'
-
Copy the Signing secret provided.
USE_AWS:
- Set this to True
-
Migrate changes to the database models
-
Commit any changes to GitHub (master branch) and deploy to Heroku. If this is not set to happen automatically, click Deploy from Heroku dashboard and navigate to Manual Deploy at the bottom of the page. Select the master branch and click Deploy Branch.
-
Once the build is complete, click on Open app to view the site.

- Circular import issue.
Cause: I initially listed the 'Trip' model within the products app. I imported the 'Booking' model from the bookings app so that I could place an aggregate Query on the Booking objects and use the data returned to update the trip object. In the bookings app, I required the Trip model to be imported and used as a positional argument in a ForeignKey within the Booking model. This resulted in a circular import and caused an Import Error.
Solution: There were a couple of solutions to this issue. One option was to use lazy evaluation and pass products.Trip as a string in the ForeignKey, instead of just defining the model name. This would the alleviate the need to create an import. However, I did not want to use a lazy lookup so as to protect the app's performance. Instead, I reconsidered the arrangement of the models within the app and was able to solve the issue quite easily by moving the Trip model to the booking app and updating the imports as necessary. - 'NoneType' object has no attribute 'model'
Cause: When the DateChoiceForm is initialised, the queryset attribute on the ModelChoiceField is overidden with a dynamically generated queryset passed in the **kwargs. If no key is found in the **kwargs, the default value returned is None. The DateChoiceForm is instantiated again with request.POST when it comes to retrieving the form's POST data. The problem was that the paramater required to initialise the form was not provided. Therefore the kwarg was taking the fallback value of None and subsequently setting the value of the queryset to None.
Solution: I refactored the code so that a view that renders a form in it's get method also handles the form's POST data in it's post method. Since the DateChoiceForm is dynamically rendered using data from the SearchTripsForm, I passed the SearchTripForm's input values to the session so that it could be accessed from the view associated with the DateChoiceForm. Within this view, I created a series of custom class methods to retrieve the data from the session and generate a queryset with it. The class methods were available to view's default get and post method which meant that the DateChoiceForm could be inititalised with the same queryset in both the post and get methods. - User model imported from django.contrib.auth.models This error has been reported See here
The flow of the form was inspired by Kenmore Air
The majority of images used in this project were sourced from Pexels. Thanks to Pixabay
- I was inspired by the Boutique Ado Walkthrough prject provided by Code Institute. Much of the code for the Checkout and Webhooks was based on the project code.
- The Django Documentation provides a very comprehensive guide to it's features and was my main point of reference and source of all my learning about Django models, Model Relationships, Class Based Views, Forms, and queries.
-
The Try DJANGO Tutorial youtube series (Episode 23-28), by Coding Entrepreneurs helped me understand the advantages of Django Forms
-
HTML5 Date Input With Django Forms by Pretty Printed
-
Advanced Form Rendering with Django Crispy Forms by Vitor Freitas was a clear and concise explanation of how to use and customise crispy forms. It inspired me to provide my own templates for the checkboxes in the Passenger Details formset.
- Vitor Freitas' answer in his AskVitor feature helped me grasp how to channel the search results from form to form, particulary in rendering the Confirm trips View which was based on a filtered queryset using the input data from the Search Form.
-
I greatly valued the Django inline formsets with Class-based views and crispy forms post, by Xenia from the Dev Community, as it provided a very simple yet comprehensive example of how to implement inline formsets within the same conditions I was working with.
-
I based my booking form, which used inline_formsets to create the nested "passenger" forms, on Working with nested forms with Django walkthrough tutorial from Swapps.
-
Stack Overflow
The community on Stack Overflow helped me on many occasions, both in the answers to my own questions and in the answers to other users' questions. Notable posts that inspired my code are as follows:
-
BIG thanks to Paul DeBoo for his generous time given to support this project in research, developing ideas and general consultation.
-
Simen Daehlin for fitting in many extra mentor sessions with me and sharing his expertise, valued tips on working more efficiently, feedback and advice.
-
Guillermo Brachetta has played a huge part in my development journey overall and has introduced me to many tools and extensions that have greatly improved my workflow. I am particularly grateful to him for introducing me to Sass while I worked on this project.
-
Danielle Tait for her positive outlook and witty banter that I valued throughout my Code Institute journey.