Repository for Contao CMS as Docker Container.

- Based on Ubuntu 18.04 Bionic Beaver
- Nginx Webserver
- PHP 7.4
- Preinstalled Contao 4.4 LTS Managed Edition
- Preinstalled Contao-Manager
- Preinstalled composer (global)
- Ready-to-use configured xDebug php module to debug your php
- adjusted DocumentRoot for Contao 4
- Configured for Contao CMS
- Includes some useful tools and presets like git, curl, vim and rsync
- Preinstalled Visual Studio Code Editor inside the docker container, ready to use from browser
-
4.4, latest
-
4.4-demo
-
4.5
-
4.5-demo
-
4.6
-
4.6-demo
-
4.8
-
4.8-demo
create a file called .env in your project folder with the following content:
# The PROJECT variable will be used to name the containers
PROJECT=project

MYSQL_DATABASE=contao
MYSQL_USER=contao
MYSQL_PASSWORD=GeHeIm
MYSQL_ROOT_PASSWORD=SuPaGeHeIm
You can use the example file provided with this repository by simply renaming .env.example to .env
Afterwards, you can export all of these environment variables so they are available for shell commands
$ export $(cat .env | xargs)copy the docker-compose.yml to your project folder (the same folder holding the .env file) and run
$ docker-compose up -d--or--
run the following commands from the shell
# start the mysql container first
$ docker run -d --name mysql_${PROJECT} -e MYSQL_ROOT_PASSWORD=SuPaGeHeIm -e MYSQL_DATABASE=contao mysql

# start the contao container and link it to the mysql container
$ docker run -d --name contao_${PROJECT} -p 80:80 --link mysql:mysql fkasy/contao

# create a phpmyadmin container and link it to the mysql container
$ docker run -d --name phpmyadmin_${PROJECT} -p 8080:80 --link mysql:mysql phpmyadmin/phpmyadmin
Point your browser to http://localhost/
Point your browser to http://localhost:8080/ for phpmyadmin
Point your browser to http://localhost/contao/install to complete Contao-Installation
Once you're up and running, you'll arrive at the configuration wizard page. At the Database connection step, please enter the variables from the .env following:
- Host:
mysql - Login:
root - Password:
SuPaGeHeIm - Database Name:
contao
This setup also provides the Contao Manager. You can access it via calling http://localhost/contao-manager.php
If you want to switch into the docker container via the command line, depending on the user execute one of the following.
- root:
$ docker exec -i -t contao bash- www-data
$ docker exec -it --user www-data contao bashTo build the image yourself simply execute
docker build -t contao --build-arg VERSION=<your-version-here> --build-arg DEMO_VERSION=<version-of-demo-bundle-here> .So in case for the default LTS without the official demo installed, run:
docker build -t contao --build-arg VERSION="4.4" --build-arg DEMO_VERSION="4.0" .That is also actually the default if you just run without the build arguments, so:
docker build -t contao .If you wish to install the contao demo search the correct version for the contao demo bundle and find the correct version for your desired contao version. You can see it in the requires section on packagist.
In case for the latest LTS, that would be:
docker build -t contao --build-arg VERSION="4.4" --build-arg DEMO_VERSION="4.0" .If you want to perform any composer commands, e.g. composer update, always use the user www-data as you don't want to run composer as root !
See here for further details.
To get the database BackUp, when you are operating from the shell within your contao container, execute
$ mysqldump -h mysql -u root -p${MYSQL_ROOT_PASSWORD} ${MYSQL_DATABASE} > db.sqlThis will get you the database backup in the root directory of your contao installation inside the docker container.
To restore the database from a file inside the contao container, when you are operating from the shell within your contao container, execute:
$ mysql -h mysql -u root -p${MYSQL_ROOT_PASSWORD} ${MYSQL_DATABASE} < db.sqlAgain refer to the commands mentioned above to switch to the console inside you docker container. The mysql service will be accessible from the within the contao docker container via the host mysql.
If you prefer to backup/restore the mysql database to a local file, simply refer to the commands:
$ mysqldump -h mysql_${PROJECT} -u root -p${MYSQL_ROOT_PASSWORD} ${MYSQL_DATABASE} > db.sqland
$ mysql -h mysql_${PROJECT} -u root -p${MYSQL_ROOT_PASSWORD} ${MYSQL_DATABASE} < db.sqlBy using the host mysql_${PROJECT} you will be targeting the docker container holding your mysql database.
If you wish, you can also copy files or whole directories, e.g. database files from a local folder into docker container. Simply refer to the commad:
$ docker cp ${path_on_your_local_machine} contao_${PROJECT}:${path_inside_docker_container}Simply switch around the last two arguments to copy in the opposite direction.
This docker image includes xDebug to easily debug your code, while e.g. extension development, inside your prefered IDE. Everything is pre-installed and works 'out of the box'. The configuration file xdebug.ini``will get mapped into /etc/php/7.3/mods-available/xdebug.ini inside the container. You will just have to adjust the two variablesxdebug.idekeyandxdebug.remote_hostinside the filexdebug.ini` the following way:
Depending on your operating system and prefered IDE, here is how you should you should edit those values:
-
xdebug.remote_host:
-
Windows: If you are using Docker-for-Windows 18.03 or above just use
host.docker.internal -
Mac: If you are using Docker-for-mac 18.03 or above just use
host.docker.internal -
Linux: Currently (as of Docker 18.09.3) the above mentioned DNS name host.docker.internal does not resolve on linux (see here). Thus you will either have to:
-
Use your host ip.
You can print it to the terminal by simply executing
$ ip -4 route list match 0/0 | cut -d' ' -f3
Alternatively you can set the above mentioned DNS name yourself by running
$ ip -4 route list match 0/0 | awk '{print $3 " host.docker.internal"}' >> /etc/hostsThis will enable you to use
host.docker.internal -
Use your localhost within visual studio code remote container.
Visual Studio Code allows you to "switch" into the container and open any folder inside the container just as a regular folder inside the Editor. This will allow you to run VSCode and edit the content directly from within the docker container. See here.
Then you can just easily uselocalhost!
-
-
-
xdebug.idekey:
-
Visual Studio Code: use
VSCODE.
Also istall the PHP Debug Extension -
Jetbrains PHPStorm: use
PHPSTORM -
Other IDE's or Editors have not been tested but should work in the same way. Have a look at the official documentation to find out.
-
For example:
If you are using a mac with PHPStorm just use
xdebug.idekey=PHPSTORM
xdebug.remote_host=host.docker.internal
If your using Linux and Visual Studio Code inside a remote container, use
xdebug.idekey=VSCODE
xdebug.remote_host=localhostTo debug using Visual Studio Code, istall the PHP Debug Extension.
This repository then provides a sample debugging configuration in the file launch.json in the .vscode directory. Just copy the whole .vcode directory to your project.
You can also create your own debug configuration by going to Debug [1] > Add Configuration... [2] > PHP.
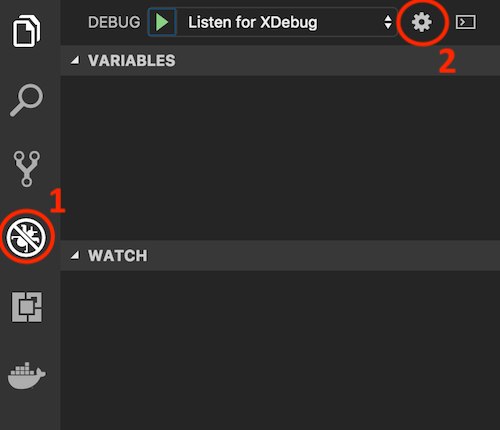
Add a breakpoint, and click on "Listen for XDebug" in the top left hand corner. Load your page, and you should get debugging information:
For PHPStorm simply navigate to the Start Listen PHP Debug Connections button in the upper right corner of the window.
After that PhpStorm starts listening to the port of the debugging engine used in the current project.
Debugging ports are set at the PhpStorm level on the Languages & Frameworks | PHP | Debug page of the Settings/Preferences dialog (Ctrl+Alt+S).

Set a breakpoint in your code by doing any of the following:
- Click the left gutter area at a line where you want to toggle a breakpoint.
- On the main menu, choose Run | Toggle Line Breakpoint.
- Press Ctrl+F8.

After Reloading your page, you will be prompted with dialog called Incoming Connection from Xdebug
in PhpStorm. Set it to the following:
Server name: localhost
Server port: 80
Request url: /
File path on server: var/www/html/web/app.php
The Visual Studio Code Editor allows you to operate from within a docker container. Just install the extension Remote Containers from Microsoft. All necessary config is provided in the json file .devcontainer.json. Visual Studio Code will recognise it automatically and prompt a simple message.

Otherwise you can always run this manually.
Just open the command palette with Ctrl+Shift+P. Enter Remote-Containers: Reopen in Container and hit ENTER. The Visual Studio Code Editor Window will reload and install all necessary scripts. You will end up with an open editor inside the docker container! You are now operating from within the container. No need for volume bindings. That's Awesome !
If you want to switch back to your local folder on your host just reverse in the same manner by opening the command palette with Ctrl+Shift+P and enter Remote-Containers: Reopen Locally.
This .devcontainer.json also includes some default extensions used automatically within the container:
You can always disable these from the extensions tap inside vscode or delete their keys from the .devcontainer.json file.
If you are using Visual Studio Code Remote Container like mentioned you will also want to copy the debug launch script from the .vscode folder inside the docker container.
Either use the command
$ docker cp .vscode/launch.json contao_${PROJECT}:/var/www/html/.vscode/launch.jsonor mount the file directly by adding the file to the volumes key inside the docker-compose.yml
volumes:
- .vscode/launch.json:/var/www/html/.vscode/launch.jsonIf (for some reason) you don't have visual studio code installed locally on your machine, you can still use this great editor and operate from within the docker container.
Point your browser to http://localhost:5000 to use the Visual Studio Code Editor.
It is preinstalled and executed upon server start. This great feature is achieved through
Code-Server.
If you already use Visual Studio Code on your local machine and wish to get all your installed extensions also to this remote service instace, simply execute:
- Linux and MacOS:
$ code --list-extensions | xargs -L 1 echo code --install-extension- Windows (PowerShell, e. g. using VSCode's integrated Terminal):
$ code --list-extensions | % { "code --install-extension $_" }- Copy the produced output from the command line.
- Open
http://localhost:5000in your browser of choice. - Click on the
terminaltab and the selectnew terminal. - Paste the commands and hit enter ! All your Extension are installed.