


![]()
![]()
![]()
The MudBlazor.Extensions is a convenient package that extends the capabilities of the MudBlazor component library. This guide will demonstrate the setup process for your project, along with detailed explanations of the components, extensions, and functionalities provided. It's important to note that this package requires a MudBlazor project and the referenced MudBlazor package. For further information and assistance, please visit the official MudBlazor documentation at MudBlazor and MudBlazor/Templates.

The installation process is straightforward. All you need to do is add the MudBlazor.Extensions NuGet package to your Blazor project. You can do this using the following code:
<PackageReference Include="MudBlazor.Extensions" Version="*" />
Setting up MudBlazor.Extensions involves three steps:
- Update the
_Imports.razorwith the following lines:
@using MudBlazor.Extensions
@using MudBlazor.Extensions.Components
@using MudBlazor.Extensions.Components.ObjectEdit
- Register MudBlazor.Extensions in your
Startup.csin theConfigureServicesmethod.
// use this to add MudServices and the MudBlazor.Extensions
builder.Services.AddMudServicesWithExtensions();

// or this to add only the MudBlazor.Extensions but please ensure that this is added after mud servicdes are added. That means after `AddMudServices`
builder.Services.AddMudExtensions();
- (Optional) Define default dialogOptions.
builder.Services.AddMudServicesWithExtensions(c =>
{
    c.WithDefaultDialogOptions(ex =>
    {
        ex.Position = DialogPosition.BottomRight;
    });
});
if your are running on Blazor Server side, you should also use the MudBlazorExtensionMiddleware you can do this in your startup or program.cs by adding the following line on your WebApplication:
app.UseMudExtensions();
(Optional) if you have problems with automatic loaded styles you can also load the styles manually by adding the following line to your index.html or _Host.cshtml
<link id="mudex-styles" href="_content/MudBlazor.Extensions/mudBlazorExtensions.min.css" rel="stylesheet">
If you have loaded styles manually you should disable the automatic loading of the styles in the AddMudExtensions or AddMudServicesWithExtensions method. You can do this by adding the following line to your Startup.cs in the ConfigureServices method.
builder.Services.AddMudServicesWithExtensions(c => c.WithoutAutomaticCssLoading());Expand videos
ComponentInDialog.mp4
DialogAppearance.mp4
MudExCardList.mp4
MudExColorBubble.mp4
MudExColorPicker.mp4
MudExFileDisplay.mp4
MudExGradientText.mp4
MudExObjectEdit.mp4
MudExPopover.mp4
MudExSlideBar.mp4
MudExSplitPanel.mp4
MudExTaskBar.mp4
SimpleDialogs.mp4
MudExThemeEdit.mp4
This section introduces you to the various components provided by the MudBlazor.Extensions.
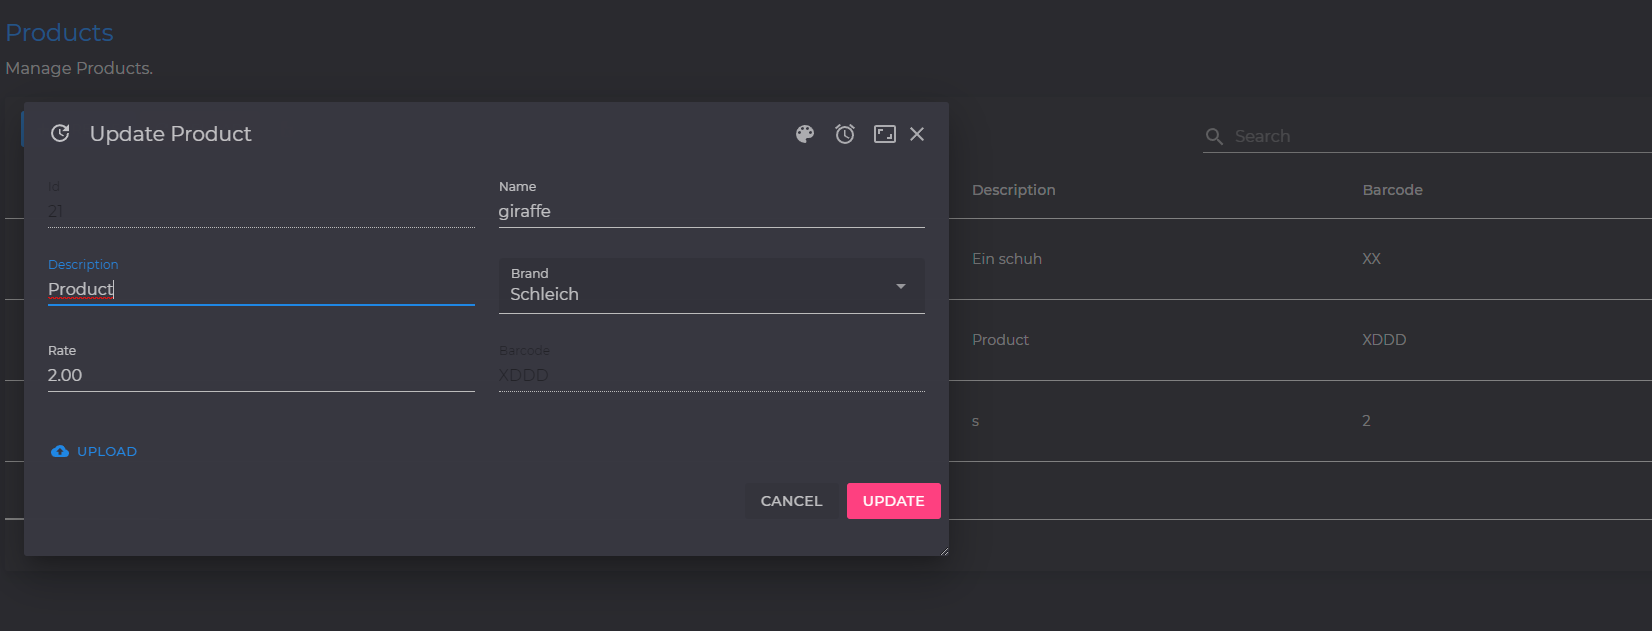
The MudExObjectEdit is a robust component that allows for object editing and automatically generates the corresponding UI. This component supports automatic validation for DataAnnotation Validations or fluent registered validations for your model.
To use MudExObjectEdit, you can simply use the MudExObjectEditForm and pass your model to it as shown below:
<MudExObjectEditForm OnValidSubmit="@OnSubmit" Value="@MyModel"></MudExObjectEditForm>
You can also utilize the MudExObjectEditDialog to edit your model in a dialog. The easiest way to do this is by using the extension method EditObject on the IDialogService.
dialogService.EditObject(User, "Dialog Title", dialogOptionsEx);
The MudExStructuredDataEditor is a component that allows object editing and automatically generates the corresponding UI based on structured data like json, xml or yaml.
This component supports all the same as MudExObjectEditForm.
To use MudExStructuredDataEditor, you can simply bind your data string shown as bellow:
<MudExStructuredDataEditor @bind-Data="_dataString"></MudExStructuredDataEditor>
You can also utilize the MudExStructuredDataEditor to edit your data in a dialog. The easiest way to do this is by using the extension method EditStructuredDataString on the IDialogService.
dialogService.EditStructuredDataString(_dataType, _dataString, $"Auto Generated Editor for {_dataType}", ((_,_) => Task.FromResult("")));
You can find a running Sample here
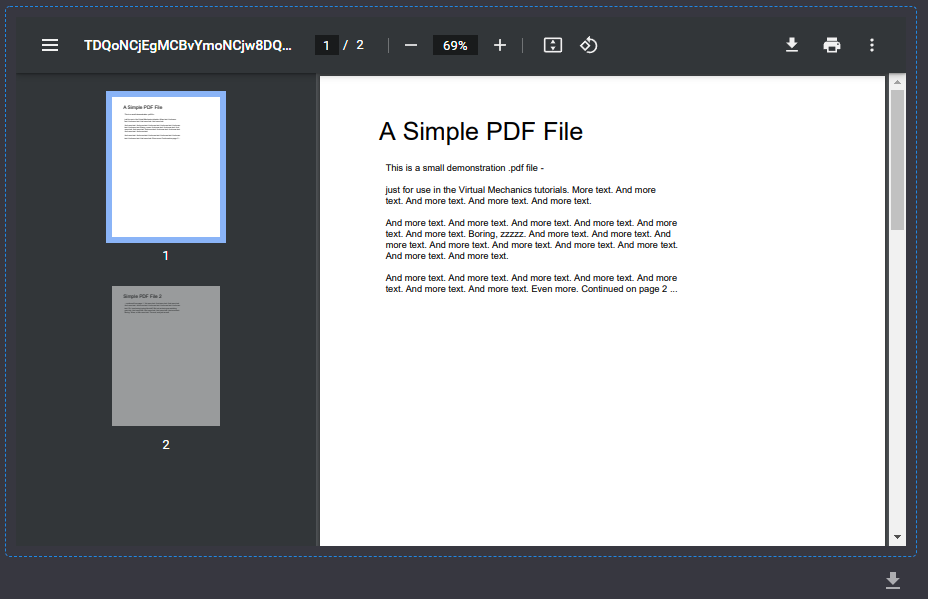
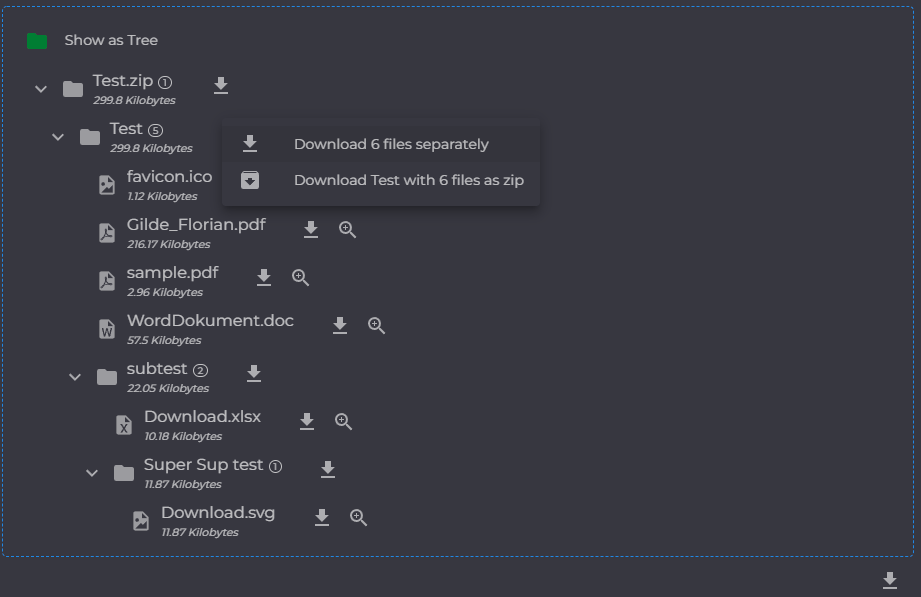
The MudExFileDisplay component is designed to display file contents, such as a preview before uploading or for referenced files.
This component can automatically handle URLs or streams and deliver the best possible display.
Additionally, you can implement IMudExFileDisplay in your own component to register a custom file display.
This is excacly what MudExFileDisplayZip does, which is used by MudExFileDisplay to display zip files or what MudExFileDisplayMarkdown does to display markdown files.
Example of using MudExFileDisplay:
<MudExFileDisplay FileName="NameOfYourFile.pdf" ContentType="application/pdf" Url="@Url"></MudExFileDisplay>
This component can be automatically utilized by MudExFileDisplay, but can also be used manually if necessary.
Note: If you're using the ContentStream it should not be closed or disposed.
<MudExFileDisplayZip AllowDownload="@AllowDownload" RootFolderName="@FileName" ContentStream="@ContentStream" Url="@Url"></MudExFileDisplayZip>
A small dialog for the MudExFileDisplay Component. It can be used with static helpers as shown below:
await MudExFileDisplayDialog.Show(_dialogService, dataUrl, request.FileName, request.ContentType, ex => ex.JsRuntime = _jsRuntime);
It can be used directly with an IBrowserFile:
 IBrowserFile file = File;
 await MudExFileDisplayDialog.Show(_dialogService, file, ex => ex.JsRuntime = _jsRuntime);
Or it can be used manually with the MudBlazor dialogService:
var parameters = new DialogParameters
{
    {nameof(Icon), BrowserFileExtensions.IconForFile(contentType)},
    {nameof(Url), url},
    {nameof(ContentType), contentType}
};
await dialogService.ShowEx<MudExFileDisplayDialog>(title, parameters, optionsEx);
MudExUploadEdit is a versatile file upload component with a wide range of features such as MIME and extension whitelisting/blacklisting, folder upload, drag and drop, copy and paste, renaming, and integration with Dropbox, Google Drive, and OneDrive.
You can make your dialogs resizable or draggable using the following code snippet:
var options = new DialogOptionsEx { Resizeable = true, DragMode = MudDialogDragMode.Simple, CloseButton = true, FullWidth = true };
var dialog = await _dialogService.ShowEx<YourMudDialog>("Your Dialog Title", parameters, options);
You can add a maximize button to your dialogs with the following code:
var options = new DialogOptionsEx { MaximizeButton = true, CloseButton = true };
var dialog = await _dialogService.ShowEx<YourMudDialog>("Your Dialog Title", parameters, options);
To add custom buttons to your dialog, first define the callback methods as JSInvokable in your component code:
[JSInvokable]
public void AlarmClick()
{
   // OnAlarmButton Click
}

[JSInvokable]
public void ColorLensClick()
{
   // OnColorLensButton Click
}
Next, define your custom buttons:
var buttons = new[]
{
    new MudDialogButton( DotNetObjectReference.Create(this as object), nameof(AlarmClick)) {Icon = Icons.Material.Filled.Alarm},
    new MudDialogButton( DotNetObjectReference.Create(this as object), nameof(ColorLensClick)) {Icon = Icons.Material.Filled.ColorLens},
};
Finally, add your custom buttons to the dialog:
var options = new DialogOptionsEx { MaximizeButton = true, CloseButton = true, Buttons = buttons };
var dialog = await _dialogService.ShowEx<YourMudDialog>("Your Dialog Title", parameters, options);
Your dialog can now look like this:
You can use animation to display your dialog. This is done by setting the Animation property of DialogOptionsEx.
var options = new DialogOptionsEx {
    MaximizeButton = true,
    CloseButton = true,
    Buttons = buttons,
    Position = DialogPosition.CenterRight,
    Animation = AnimationType.SlideIn,
    AnimationDuration = TimeSpan.FromMilliseconds(500),
    FullHeight = true
};
var dialog = await _dialogService.ShowEx<YourMudDialog>("Your Dialog Title", parameters, options);
When you animate a dialog with dialogServiceEx, it's recommended to add the class mud-ex-dialog-initial to your dialog to ensure no visibility before animation.
<MudDialog Class="mud-ex-dialog-initial">
NOTE: All animations can be used on other components as well. Currently, the following animations are supported:
SlideIn,FadeIn,Scale,Slide,Fade,Zoom,Roll,JackInTheBox,Hinge,Rotate,Bounce,Back,Jello,Wobble,Tada,Swing,HeadShake,Shake,RubberBand,Pulse,Flip,FlipX,FlipY.
Instead of using DialogParameters, you can call the extension method with an Action<YourDialog>
await dialogService.ShowEx<SampleDialog>("Simple Dialog", dialog => { dialog.ContentMessage = "Hello"; },options);
This README file provides an overview of the MudBlazor.Extensions library, which is designed to simplify and enhance the development process in Blazor using MudBlazor. The library contains a variety of components, extensions, and features that aim to reduce the time and effort required to build intricate UIs. For additional information or help, visit the official MudBlazor website or MudBlazor GitHub repository.
We hope you find this library helpful and encourage you to provide any feedback or contribute to its development.
MudBlazor.Extensions is released under the MIT License. See the bundled LICENSE file for details.
Latest Changes:
- 2.0.0 > Update MudBlazor to 7.0.0
- 2.0.0 > Breaking: Rename: Many properties and behavoirs as MudBlazor does. Se migration gide from MudBlazor 6 to 7 here
- 1.7.89 > Fix bug that uploadable file is not updated in MudExObjectEditDialog
- 1.7.88 > Dialogs now supporting a can close event to allow canceling the close event see sample
- 1.7.88 > Add new Components MudExTreeView.
- 1.7.88 > Update MudBlazor to 6.20.0
- 1.7.88 > New Component
MudExFileDisplayExcelto support preview of Excel files in MudExFileDisplay and MudExUploadEdit . - 1.7.88 > MudExUploadEdit now supports recording audio.
- 1.7.88 > New Component MudExGravatar.
- 1.7.88 > Dialogs now supporting CustomSize and CustomPostion to allow more flexibility.
- 1.7.88 > New service IDialogEventService to allow handling of dialog events
- 1.7.88 > Dialog supports now a CloseAnimation
- 1.7.88 > New Service ISpeechRecognitionService to allow easy speech to text conversion or audio recording without any UI
- 1.7.88 > New Component MudExSpeechToTextButton to allow easy speech to text conversion or audio recording
- 1.7.87 > Small minor BugFixes
- 1.7.87 > Improve key navigation in MudExSelect and MudExList
- 1.7.87 > Update MudBlazor to 6.19.1
- 1.7.86 > Update MudBlazor to 6.18.0
Full change log can be found here
Notice this is just a first preview version. There are some features planned like
- Dragging with snap behaviour
If you like this package, please star it on GitHub and share it with your friends If not, you can give a star anyway and let me know what I can improve to make it better for you.