My bedside clock got pushed to the floor and I kept losing track of time.

So I decided to build one and hang it on the headboard. This repo captures the main steps I took.

You can see more pictures related to this project using this link 🎨
This README has been ported to Adafruit's learn page. If you prefer that format, here is the link for it: https://learn.adafruit.com/motion-controlled-matrix-bed-clock
- Raspberry Pi Zero W
- 8GB MicroSD Card
- Adafruit RGB Matrix Bonnet for Raspberry Pi
- 64x64 RGB LED Matrix - 2.5mm Pitch
- Adafruit APDS9960 Proximity, Light, RGB, and Gesture Sensor
- 5V 10A switching power supply
- Optional: Console Cable for Raspberry Pi
All of the parts can be purchased at my favorite DIY store (aka Adafruit)
For building the frame that holds the clock, I took the 3D printing route.
The first generation was done using Autodesk Tinkercad.
That is posted in thingiverse.com. While shopping for places to print it,
I was shocked with the price estimates and ended up abandoning that idea. ![]() The high
cost was mostly associated with my naiveness with the design. Thankfully, I got help from a CAD guru,
who split the harness into 2 parts for better rendering. Brian was also kind enough to print it for me.
To say that this dude is freaking amazingly awesome is an understatement. 🙇
The high
cost was mostly associated with my naiveness with the design. Thankfully, I got help from a CAD guru,
who split the harness into 2 parts for better rendering. Brian was also kind enough to print it for me.
To say that this dude is freaking amazingly awesome is an understatement. 🙇
The frame we ended up using for the clock was done using OnShape and you can get there using this link. The .STL file is also available on thingiverse.com.
There are lots of info on how to do that already, so you should be able to google for that and use your favorite. Try this link if you are feeling lucky. 😏
Instead of hooking up the RPI to a screen and keyboard, I used its serial port to connect to the console. In order to do that, make sure to add this line to the file /boot/config.txt
enable_uart=1
Connect using the 115200.8.N.1 parameters. You can read more about how to do that here. I use the Prolific USB serial adapter but there are many choices out there. There is a nice article on doing this at learn.adafruit.com. Just know that once you configure an IP address and SSH access to your RPI, you will not need this connection.
As part of my Raspbian installation, I did the following:
sudo raspi-config
- Network Options -> Wi-fi
- Localisation Options -> change timezone
- Interfacing Options -> enable ssh
- Interfacing Options -> enable I2C (needed for motion sensor)
Simply read and take all the steps mentioned in the awesome page that Ladyada wrote on this.
Once you get the hardware part done, this is what you need to run:
cd && \
curl https://raw.githubusercontent.com/adafruit/Raspberry-Pi-Installer-Scripts/master/rgb-matrix.sh >rgb-matrix.sh
sudo bash rgb-matrix.sh  ; # wait a while and reboot
At this point, you should be able to run the demos that are added as part of the hzeller/rpi-rgb-led-matrix install. For example:
cd ~/rpi-rgb-led-matrix/examples-api-use

ROTATE=180
TIMEOUT='-t 10'
for X in 0 {3..11} ; do \
     PARAMS='--led-rows=64 --led-cols=64 --led-brightness=88'
     sudo ./demo ${PARAMS} ${TIMEOUT} --led-pixel-mapper="Rotate:${ROTATE}" -D${X}
     sleep 0.3
done
RPI Zero W handles the display just fine but it does not hurt to help it out by disabling unused things that compete for cycles. These were the ones I did on my setup, based on Henner's advice:
sudo systemctl disable avahi-daemon && \
sudo systemctl stop avahi-daemon && \
sudo apt-get remove -y bluez bluez-firmware pi-bluetooth triggerhappy && \
echo ok
Follow the steps documented here to install CircuitPython on Raspberry Pi.
The commands I used were:
sudo apt-get install -y python-smbus i2c-tools

# Ensure i2c device is present
ls /dev/i2c*  && echo ok || echo bad error cannot see i2c
You are almost there! At this point, we just need to grab the packages listed in the requirements.txt file.
sudo apt-get install -y python3-pip git

BRANCH=adafruit
cd && \
git clone -b ${BRANCH} https://github.com/flavio-fernandes/bedclock.git  bedclock.git

cd ~/bedclock.git && sudo -H pip3 install --upgrade -r ./requirements.txt
Install and enable systemd service, which will start bedclock application automatically upon reboot:
sudo cp -v ~/bedclock.git/bedclock/bin/bedclock.service /lib/systemd/system/
sudo systemctl enable bedclock.service

# start the application
sudo systemctl start bedclock.service
You can monitor what is happening with the app by looking at the log or systemd status:
sudo systemctl status bedclock.service

tail -F ~/bedclock.git/syslog.log | grep bedclock
There are lots of knobs that can be tweaked to make the clock behave as you want. Most of these settings are located in the file called const.py. After making the changes, make sure to restart the application by typing the following command:
sudo systemctl restart bedclock.service
If you want to start it manually, use start_bedclock.sh:
sudo systemctl stop bedclock.service
~/bedclock.git/bedclock/bin/start_bedclock.sh
If you have an MQTT broker that your
bedclock can talk to, you can enable it via the mqtt_enabled knob in
the const.py file. Here are the commands I use to see these events:
# Install mqtt client to poke bedclock via mqtt broker
$ sudo apt-get install -y mosquitto-clients

$ mosquitto_sub -v -h ${MQTT_BROKER} -t "/bedclock/motion" -t "/bedclock/light"
/bedclock/motion on
/bedclock/motion off
/bedclock/light 365If you don't want the clock to go blank when the room is dark, you can change its default
behavior in const.py by
setting scr_stayOnInDarkRoomDefault = True. Or via MQTT, as shown below:
$ mosquitto_pub -h ${MQTT_BROKER} -t /bedclock/stay -r -m "on"
$ mosquitto_pub -h ${MQTT_BROKER} -t /bedclock/stay -r -m "off"

# to clear topic from broker and use const.scr_stayOnInDarkRoomDefault
$ mosquitto_pub -h ${MQTT_BROKER} -t /bedclock/stay -r -n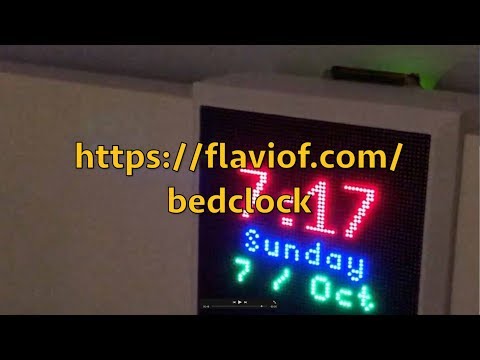

- Expose knobs to make MQTT use SSL
- Display weather ⛅
- Add alarm ⏰
- Add monitoring 💥 ❗
- Add fun animations
- Make a cover for RPI on the backside