Mega-gRPC is a training project developed to learn how to interact with gRPC technology and integrate it into FastAPI infrastructure as a backend-backend communication method.
- 🐍 Python — Main programming language for developing microservices;
- 🐘 PostgreSQL — Modern and reliable database;
- 🟥 Redis — Blazing fast in-memory key-value storage;
- 🔁 gRPC — Google implementation of RPC protocol, being used as main microservice-to-microservice communication method;
- 🟢 Nginx — Fast and convenient reverse-proxy & HTTP webserver;
- 🐳 Docker — The most popular containerization technology.
Backend (Python):
- ⚡ FastAPI — Framework for developing ASGI web servers;
- 🧪 SQLAlchemy — ORM for working with DB models;
- ⚗️ Alembic — DB Migration tool;
- 📐 Pydantic — Library for validating data and convenient config storage;
- 🔒 Argon2 — Password hashing algorithm;
- 🦄 Uvicorn & Gunicorn — HTTP web-server & process manager for microservices;
- ⚙️ grpcio & grpcio-tools — Library and a toolkit for working with gRPC and generate Python code out of proto-files;
- 🔍 PyTest — Testing framework.
Frontend (JavaScript):
- ⚛️ React — Library for building modern UIs;
- 🛠️ React-Hook-Form — React addon for managing complex forms;
- ⚡ Vite — Local development server for React;
- 🧶 Yarn — Package manager and build system.
- Microservice architecture;
- FastAPI Onion architecture;
- Custom authentication & authorization;
- Protobufs (and Python code generation);
- API Gateway pattern;
- gRPC Service & Stub;
- gRPC FieldMask attribute to create GraphQL-like request-response models;
- Containerization with Docker & Docker compose;
- Smart automatic build & run system for GNU Make;
- Asynchronous Unit & Integration tests.
We needed a target for the project to get a list of functionality to implement, so we decided to create a basic blog engine. We called it "PostHub".
It's a very simple blog website, where visitors can view someone's posts or log in to user account to create their own posts.
There are also some features available for visitors and users, such as getting more information about post author (phone number, address, etc.) and deleting the post (only if the user is author of the post).
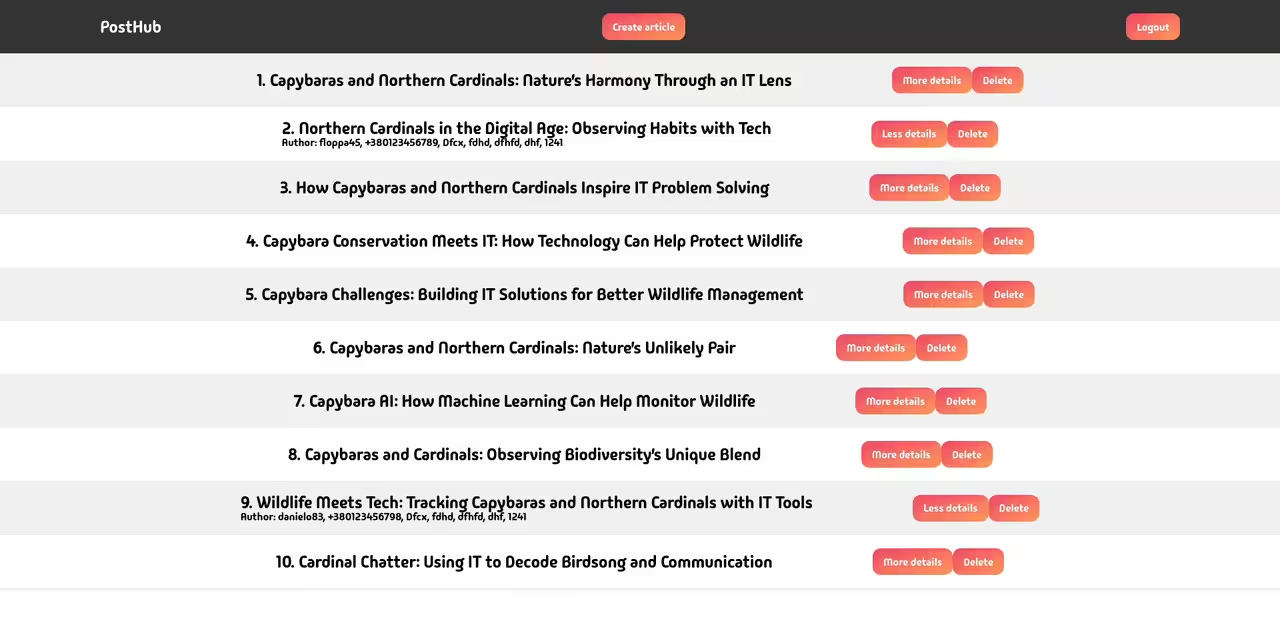
Frontend Screenshot
We do not pretend to have a wide and useful functionality, the task of this project is to hone the above-mentioned technologies and architectural solutions in practice.
There are 2 microservices running in separate containers, each of them has its own dependencies such as DB and Redis.
User Service is a microservice that is responsible for managing user-related data, such as storing information about users in DB, managing session tokens in Redis, handle login/logout/get_user requests from client and also handle requests from Post Service via gRPC.
Post Service is a microservice that is responsible for managing posts.
Nginx acts like both API-Gateway (to "glue" together two microservices and provide a single entry point for the API) and a static web server (to provide frontend to the client).
For instance, when a user wants to delete someone's post, we need to check whether he is the author of it.
In this project, we've implemented an auth system with session tokens. Each of those unique tokens is stored in the user's cookies and User Service's Redis so that we can compare the session token to the user ID, and perform some actions.
When you do some post operation, Post Service doesn't really know who you are. To get this information, it needs to send that session token from your cookies to User Service so that it can compare it to the one, it has in Redis, and return a list of required information to the Post Service.
                                             +--------------+    +----+
                                     HTTP -->| Post Service |<-->| DB |
                    +-----------+   -----/   +--------------+    +----+
  +--------+  HTTP  |           |<-/                 ^
  | Client |<------>|   Nginx   |                    | gRPC
  +--------+        |           |<-\                 v
                    +-----------+   -----\   +--------------+    +----+
                                     HTTP -->| User Service |<-->| DB |
                                             +--------------+    +----+
                                                     ^
                                                     |          +-------+
                                                     +--------->| Redis |
                                                                +-------+
Also, as written above, Post Service can provide a list of required fields, that User Service should provide in the response. It means that Post Service can use the same request, but with different kinds of fields to get exactly what it needs.
It's realized using the FieldMask (gRPC "well-known type") attribute in the requests schema (check out proto-file).
This project uses Docker to run app, tests and create the following environment,
so it should be installed on your system, and available with the docker command in shell.
If you are using it for the first time, you need to build docker images and generate Python code out of proto-files (the generated files themselves are not stored in this repo):
First of all, it's recommended to create a Python virtual environment using any tool you are familiar with.
After that, you should install Python packages called grpcio and grpcio-tools.
Those 2 packages are required to generate Python code out of proto-files.
You can do it by using pip:
pip install grpcio grpcio-toolsAlso, to build frontend you need to have Node.js installed,
and run the following commands inside src/frontend directory:
npm i yarn
yarn
All project configuration (ports, hostnames, etc.) is stored in .env files, they shouldn't be in the repo,
but there are some templates, that contain basic configuration to run the project locally.
To generate .env files from templates, you can go to src/backend directory, and run the following command:
make copy_env_filesNow you can build and run the entire project by just running GNU Make
(which is typically pre-installed in UNIX systems) inside the src directory:
makeOur build system will automatically build and run the entire project including backend, frontend, and nginx images.
After that, you can access the frontend on http://localhost:8080.
To stop the project, just use make with down target:
make downImportant
Our build system is tested and designed for UNIX systems only (such as macOS and Linux).
Because of using specific UNIX commands in Makefiles, the build system will only work on UNIX systems.
If you want to use it on Windows, you may consider using WSL2.
make command without any target specified builds the whole project before running.
After the first build, you don't need to rebuild it again before each run (if you don't modify the docker-files).
To run the entire project without building, use make with the up target specified:
make upAnd stop it with the same down target:
make downAlso, you can run, stop, or build parts of the project separately.
To get the full list of targets available for make, check out the src/Makefile
You don't need to rebuild the project each time you change the source code (if you don't change any of docker-files).
Each Docker image contains volume, pointing to your local codebase, so if you update the code, you just need to restart the project.
You can do it by specifying down and up targets one after another:
make down upBut it will stop and run again the entire project.
While developing this, we realized that we needed a more flexible build system specifically for the backend.
That's why we also have Makefile in src/backend, which has more options for managing the backend running environment.
Full list of them you can find inside src/backend/Makefile.
As written above, our backend code is covered with unit & integration tests.
to run them, just go to src/backend and run the test target:
make testIf you run it, you will notice that it doesn't print test results on the screen.
We decided that it's better to put them in separate files for easier reading,
so after you run the tests, the directory src/backend/test_results will appear, in which
you can find two files with test results.
The main idea of this project is to learn and show the potential of modern technologies.

