

This is a proof of concept shipment fulfillment app that shows how to tightly integrate a 3rd party app like this one into Salesforce using Force.com Canvas.
On its own it performs 2 tasks:
- Displays list of
Open Invoiceitems. - Allows a Salesforce user to 'Ship' an invoice. i.e. Marks the invoice as
Closedand also posts a message to that invoice's sccount Chatter feed which indicates that the Invoice has been shipped.
While the app is fine, the user still has to:
- Log in to Salesforce
- Create a Connected App in Salesforce with this apps URL (on Heroku or elsewhere) and add APP_SECRET (Consumer Secret) and RUNNING_ON_HEROKU (true or false) as env vars
- Create 'Open' (picklist field) invoice records
- Add Canvas into a global publisher action to Ship Invoices
Force.com Canvas allows us to pass Salesforce user information and access_token in an encrypted string called: signed_request. Further, Canvas also allows embedding third party apps as 'tabs', 'links', 'buttons' etc at various location inside Salesforce.
(click to enlarge)

(click to enlarge)
To take advantage of Canvas, we need to do the following:
- Create a new
HTTP POSTendpoint likehttps://www.myshipmentapp.com/signed-requeston our 3rd party app.
//Processes signed-request and displays index.ejs
app.post('/signedrequest', processSignedRequest);

function processSignedRequest(req, res) {
  console.log('in http post');
  try {
    var json = shipment.processSignedRequest(req.body.signed_request, APP_SECRET);
    res.render("index", json);
  } catch (e) {
    res.render("error", {
      "error": errors.SIGNED_REQUEST_PARSING_ERROR
    });
  }
}
2.Ask (or login as) Salesforce Administrator and register this app as a Canvas app [Admin Name] > Setup > Create > apps > Connected Apps > New.
3.Provide the end point from #1 as the Canvas app URL. The configuration might look like this.
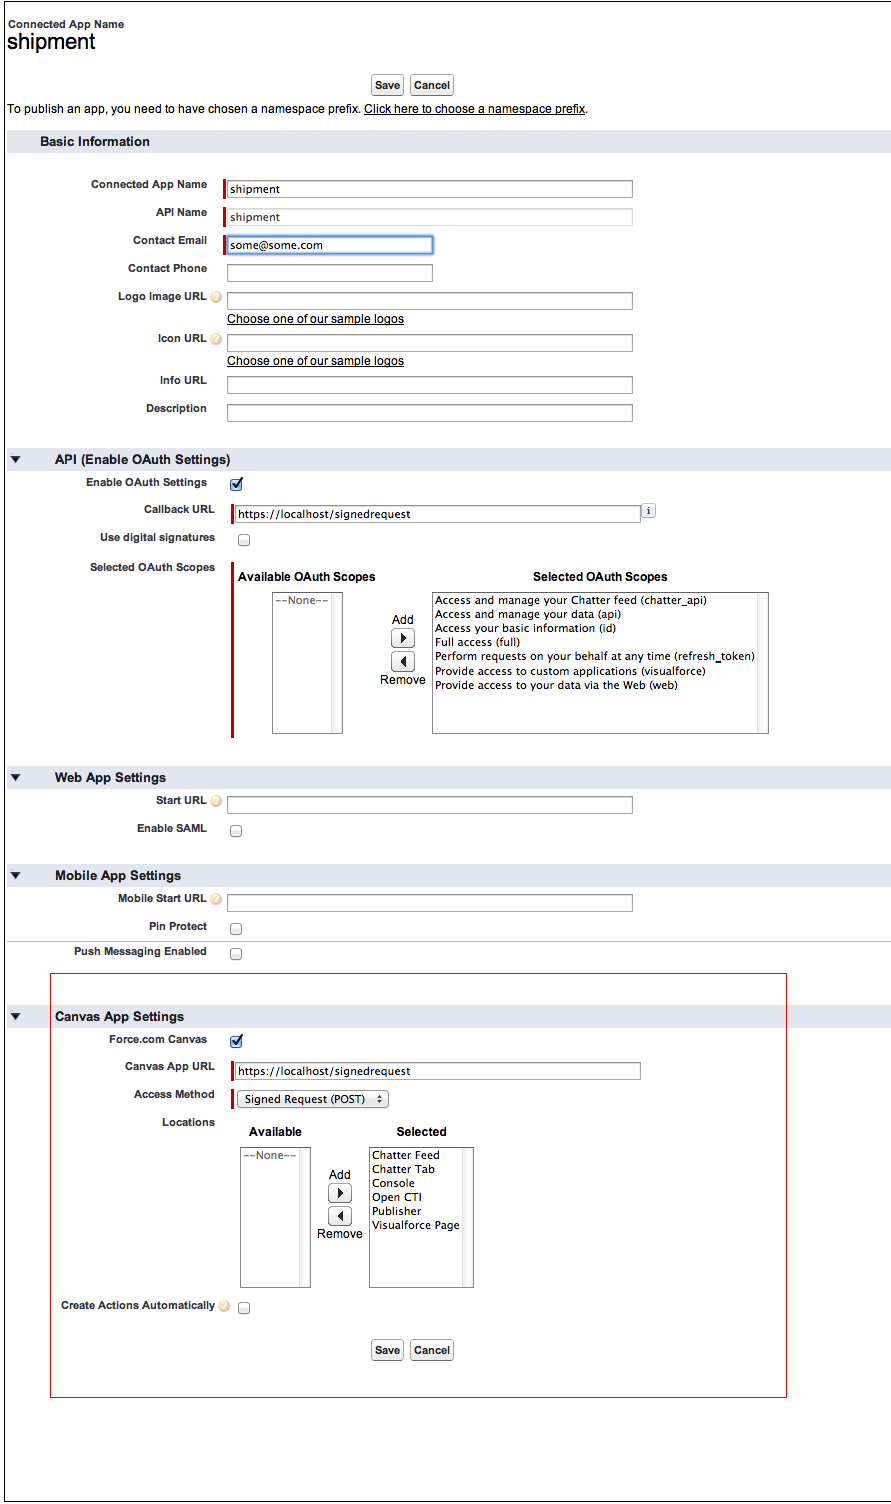
(click to enlarge)
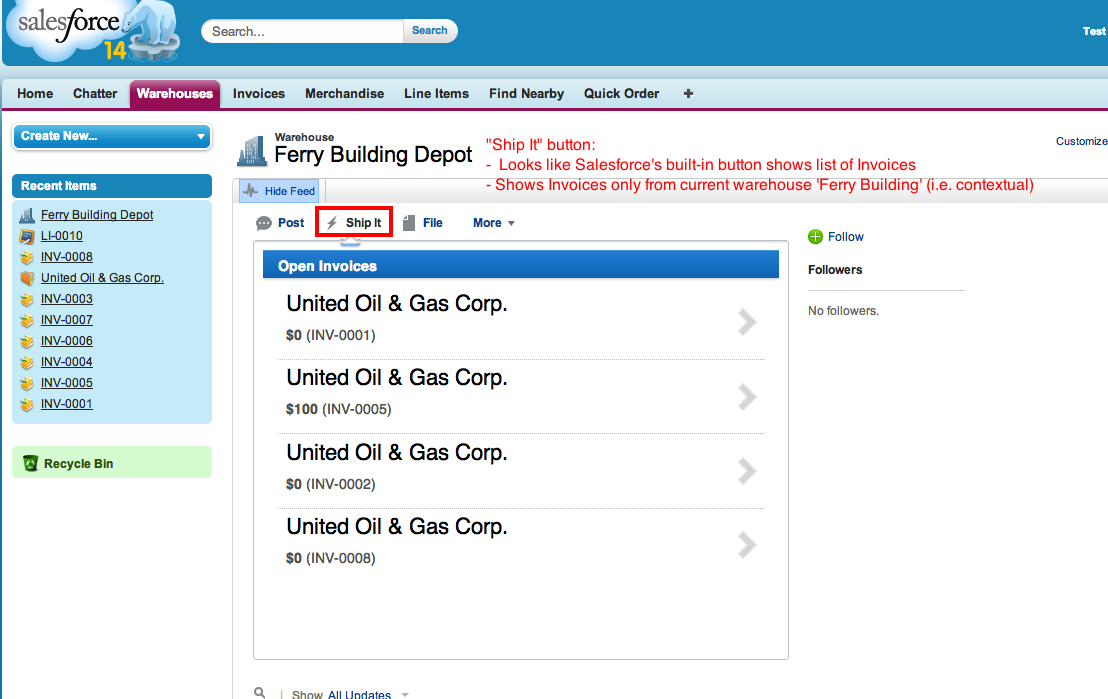
To go one step further, let's contextually embed this app as a button (say 'Ship It' button) inside custom object (say: Warehouse) that look like this.
- Open
[Admin Name] > Setup > Develop > Pagesand create a Visualforce page to wrap around the canvas app. This allows us to pass current page's context likeWarehouse__c.Idto the 3rd party app.
<apex:page standardController="Warehouse__c" sidebar="false" showheader="false">
    <apex:canvasApp developerName="shipment" width="100%" parameters="{'id':'{!Warehouse__c.Id}'}"    />
</apex:page>

2.Open `[Admin Name] > Setup > Create > Objects` and open up the custom object. In our case, `Warehouse` object.
3.Then under "Buttons, Links, and Actions" > New, create an action button called Ship It that opens up the Visualforce page we had created earlier in Step 1.

4.That's it. We have now converted our 3rd party app to become a Salesforce Canvas app. Our app will now show up at various places with in Salesforce making it seamless for users to use its functionalities.
#The Server The server has the following HTTP end points.
//Processes signed-request and displays index.ejs
app.post('/signedrequest', processSignedRequest);

//Returns list of invoices based on warehouse context. It first gets list of invoice_ids from
//line_items and then later gets invoice details of each of those invoice_ids that are not //closed.
app.get('/invoices', getInvoices);

//Posts to Account Chatter feed and also updates Invoices' status to 'Closed'
app.post('/ship/:invoiceId/?', shipInvoice);

//Dont allow direct HTTP requests to "/"
app.all('/', dontAllowDirectRequestsToIndex);

//Dont allow direct HTTP GET (POST is allowed) requests to "/signedrequest"
app.get('/signedrequest', dontAllowDirectRequestsToIndex);
Pre-requisites:
- Have the Warehouse app fully built and running in your organization. You can find the tutorial in our workbook. In addition, you need to create a lookup field on Merchandise to a new custom object Warehouse__c. Finally, create a lookup relationship on Invoice__c to the standard Account object.
- If you are testing on local host, have Self-signed certificate installed and have allowed your browser to accept it. In this case set the RUNNING_ON_HEROKU env var to false.
#####Steps for self-signed certificate and running it locally:
Canvas app needs this server to be using https.
- First create a self-signed certificate and key by following instructions here or from anywhere on the internet.
- Make sure the .key file's name is
host.keyand is located in/etc/apache2/ssl/host.keyfolder. - Make sure the .crt file's name is
server.crtand is located in/etc/apache2/ssl/server.crtfolder. - Run the server using
sudo APP_SECRET="<Your APP Secret>" app.js - Open browser and go to
https://localhost. - Browsers will say that the certificate is not trusted, do you want to continue. Press Continue.
- Now that you have allowed browser to accept self-signed certificate, you can login to Salesforce and access the app.
Note: Step 6 is a BIG Gotcha. Without forcing browser to accept self-signed certificate, Canvas app simply wont work
####Test
- Install Mocha, expect, chai & should by running npm install
- You may want to install Mocha globally by running npm install -g mocha
- Simply run mocha in the command line.