TensorFlow implementation of SqueezeDet (https://arxiv.org/pdf/1612.01051.pdf) based on the official implementation (https://github.com/BichenWuUCB/squeezeDet), trained on the KITTI dataset (http://www.cvlibs.net/datasets/kitti/).
-
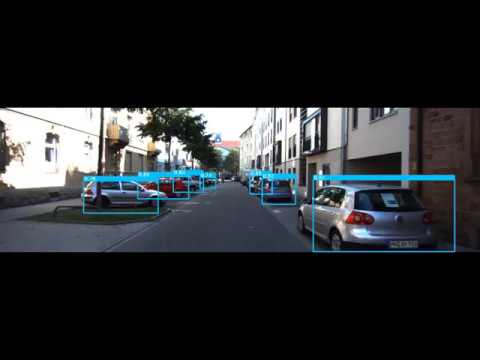
Youtube video of results (https://youtu.be/5BBwjvlUULI):
-
-
The results in the video can obviously be improved, but because of limited computing resources (personally funded Azure VM) I did not perform any further hyperparameter tuning.
preprocess_data.py:
- ASSUMES: that all KITTI training images have been placed in data_dir/KITTI/data_object/training/image_2, that all corresponding labels have been placed in data_dir/KITTI/data_object/training/label_2 and that data_dir/KITTI/data_tracking/testing/image_02 contains the 0000, 0001, 0004 and 0012 sequence directories.
- DOES: script for performing all necessary preprocessing of images and labels.
model.py:
- ASSUMES: that caffemodel_weights.pkl has been placed in 2D_detection/data.
- DOES: contains the SqueezeDet_model class.
utilities.py:
- ASSUMES: -
- DOES: contains a number of functions used in different parts of the project.
train.py:
- ASSUMES: that preprocess_data.py has already been run.
- DOES: script for training the model.
run_on_KITTI_sequence.py:
- ASSUMES: that preprocess_data.py has already been run.
- DOES: runs a model checkpoint (set in line 45) on all frames in a KITTI test sequence (set in line 28) and creates a video of the result.
-
The SqueezeNet network was initialized with the pretrained model in https://github.com/DeepScale/SqueezeNet/tree/master/SqueezeNet_v1.0 (squeezenet_v1.0.caffemodel and deploy.prototxt). To load these weights into TensorFlow, one needs to have pycaffe installed (must be able to run "import caffe"). Run get_caffemodel_weights in utilities.py and save the output as caffemodel_weights.pkl in 2D_detection/data using cPickle. These files (caffemodel_weights.pkl, squeezenet_v1.0.caffemodel and deploy.prototxt) are also included in 2D_detection/data in the repo.
-
Batch size: 32.
-
For all other hyperparameters I used the same values as in the paper.
-
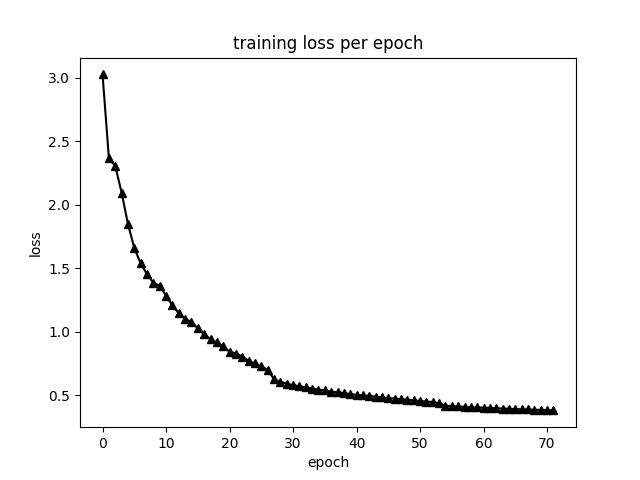
Training loss:
-
-
Validation loss:
-

-
The results in the video above was obtained with the model at epoch 58, for which a checkpoint is included in 2D_detection/training_logs/best_model in the repo.
To train the model, I used an NC6 virtual machine on Microsoft Azure. Below I have listed what I needed to do in order to get started, and some things I found useful. For reference, my username was 'fregu856':
-
Download KITTI (data_object_image_2.zip and data_object_label_2.zip).
-
Install docker-ce:
-
- $ curl -fsSL https://download.docker.com/linux/ubuntu/gpg | sudo apt-key add -
-
- $ sudo add-apt-repository "deb [arch=amd64] https://download.docker.com/linux/ubuntu $(lsb_release -cs) stable"
-
- $ sudo apt-get update
-
- $ sudo apt-get install -y docker-ce
-
Install CUDA drivers (see "Install CUDA drivers for NC VMs" in https://docs.microsoft.com/en-us/azure/virtual-machines/linux/n-series-driver-setup):
-
- $ CUDA_REPO_PKG=cuda-repo-ubuntu1604_8.0.61-1_amd64.deb
-
- $ wget -O /tmp/${CUDA_REPO_PKG} http://developer.download.nvidia.com/compute/cuda/repos/ubuntu1604/x86_64/${CUDA_REPO_PKG}
-
- $ sudo dpkg -i /tmp/${CUDA_REPO_PKG}
-
- $ rm -f /tmp/${CUDA_REPO_PKG}
-
- $ sudo apt-get update
-
- $ sudo apt-get install cuda-drivers
-
- Reboot the VM
-
Install nvidia-docker:
-
- $ sudo dpkg -i /tmp/nvidia-docker*.deb && rm /tmp/nvidia-docker*.deb
-
- $ sudo nvidia-docker run --rm nvidia/cuda nvidia-smi
-
Download the latest TensorFlow docker image with GPU support (tensorflow 1.3):
-
- $ sudo docker pull tensorflow/tensorflow:latest-gpu
-
Create start_docker_image.sh containing:
#!/bin/bash

# DEFAULT VALUES
GPUIDS="0"
NAME="fregu856_GPU"


NV_GPU="$GPUIDS" nvidia-docker run -it --rm \
        -p 5584:5584 \
        --name "$NAME""$GPUIDS" \
        -v /home/fregu856:/root/ \
        tensorflow/tensorflow:latest-gpu bash
-
/root/ will now be mapped to /home/fregu856 (i.e., $ cd -- takes you to the regular home folder).
-
To start the image:
-
- $ sudo sh start_docker_image.sh
-
To commit changes to the image:
-
- Open a new terminal window.
-
- $ sudo docker commit fregu856_GPU0 tensorflow/tensorflow:latest-gpu
-
To stop the image when it’s running:
-
- $ sudo docker stop fregu856_GPU0
-
To exit the image without killing running code:
-
- Ctrl-P + Q
-
To get back into a running image:
-
- $ sudo docker attach fregu856_GPU0
-
To open more than one terminal window at the same time:
-
- $ sudo docker exec -it fregu856_GPU0 bash
-
To install the needed software inside the docker image:
-
- $ apt-get update
-
- $ apt-get install nano
-
- $ apt-get install sudo
-
- $ apt-get install wget
-
- $ sudo apt-get install libopencv-dev python-opencv
-
- Commit changes to the image (otherwise, the installed packages will be removed at exit!)