Gander is an inspector and logger for restful Laravel apis. Gander allows logging of request/responses, as well as optional logging of events in your source code. Gander reports are viewed with an exported javascript client which can be hosted anywhere. Gander was developed as an internal-use tool for fruitbat studios/cloverhitch technologies/kludgetastic implementations.
Gander is installed via composer:
composer require gbhorwood/gander
php artisan vendor:publish --provider="Gbhorwood\Gander\GanderServiceProvider" --tag="config"
php artisan migrate
Installing Gander will add a middleware to your api middleware group, create tables to store Gander events and access keys, expose the gbhorwood:gander artisan command, and write the gander config file to your config directory.
The shortest path to getting Gander working after install is to create a client in your api's root directory with:
php artisan gbhorwood:gander --create-clientThen load the html file in a browser, either by hosting it on any http server or by opening it as a file in your browser.
Gander has four configuration values that can be added to your .env file:
GANDER_ENABLE=true
GANDER_ENABLE_STACK_TIMERS=true
GANDER_PASSWORD_KEYS=password,repeat_password,password_repeat,again_password,password_again
GANDER_HEADERS_TO_LOG=x-authorization,user-agent
GANDER_ENABLE: Setting GANDER_ENABLE to false will turn off Gander completely. Gander is on by default.
GANDER_ENABLE_STACK_TIMERS: Setting GANDER_ENABLE_STACK_TIMERS to false will disable the elapsed time value on all log writes you have added to your code using Gander::track(). Stack timers are on by default.
GANDER_PASSWORD_KEYS: Gander attempts to sanitize password data from request bodies before writing to the database by removing a value if its key matches one of the keys listed in GANDER_PASSWORD_KEYS. If you accept password data keyed with something not in the GANDER_PASSWORD_KEYS list, add it.
GANDER_HEADERS_TO_LOG: Gander can log a subset of request headers. Header names to log are listed here as a comma-separated list. If no headers are listed, only X-Authorization and User-Agent are stored.
Timing of the elapsed seconds of a request is done internally using php's hrtime() for performance reasons. However, hrtime() is unreliable when called across function calls. For this reason, calculating the elapsed time when writing log calls made by Gander::track() is done using microtime(). However, microtime() may be slow in some virtual environments who's vDSO does not allow access to the clock. For this reason, Gander allows you to turn off the use of microtime() by setting GANDER_ENABLE_STACK_TIMERS to false.
Gander logs requests and responses automatically. In addition, you can also add log writes for a given request in your endpoint's source code with:
\Gbhorwood\Gander\Gander::track()This method takes a message as an optional string argument.
The track method can be called anywhere in your executed code, for example:
<?php
namespace App\Http\Controllers\api;

use Gbhorwood\Gander\Gander;

class MyController extends BaseController
{
    public function getNumber(Request $request, Int $max):JsonResponse
    {
        $number = $this->generateNumber($max);

        Gander::track("number is $number");

        return response()->json($number, 200);
    }

    private function generateNumber(Int $max):Int
    {
        Gander::track("max is $max");

        return rand(1, $max);
    }
}
Here, the call to Gander::track() in both getNumber() and generateNumber() is logged. The client will display them in the order they were written.
If GANDER_ENABLE_STACK_TIMERS is set to true, each call to Gander::track() will log the elapsed time, in seconds, since the last call to track.
Since logs written using track() are tied to the current request, extra steps are needed to write logs after the request has completed, ie. when using queued jobs. See 'Writing logs from a queued job' below.
Data logged by Gander can be viewed with a javascript client that runs in your browser. A client can be created by calling the gander artisan command in the root directory of your api.
php artisan gbhorwood:gander --create-clientThe client file will be saved in your api's root directory and will be named using the format:
gander_<domain of api>_<name of access key>.html
This client will work only for the api in which it was generated and can be hosted anywhere that has network access to your api.
The client file will access your api using a unique access key. If you wish to revoke access to a client, you can do so by removing its api key (see 'Managing client keys').
If you wish to specify the file name and location of the the client at creation, you can do so with the --outfile= option:
php artisan gbhorwood:gander --create-client --outfile=/path/to/my/outfileGander will not overwrite client files that already exist.
If you want to specify the name of your access key, you can use the --key-name= option:
php artisan gbhorwood:gander --create-client --key-name=myKeyA Gander client can be hosted on any http server or opened in a web browser as a file.
The client will only work for the api where it was generated. Each client uses a unique api key to get reports on the api (see 'Managing client keys').
Gander reports on activity that ocurred during a time frame defined as a certain point in the past, ie. '2 hours ago', until now.
There are two types of reports:
- Stats: Aggregate statistics on all the activity in the time period
- Logs: A list of all the api requests during the time period
The Stats tab will show all of the routes called during the time period, along with the total number of requests for each route and their success rate. Clicking on a stats line will show a breakdown of the number of requests to that route by returned status code.
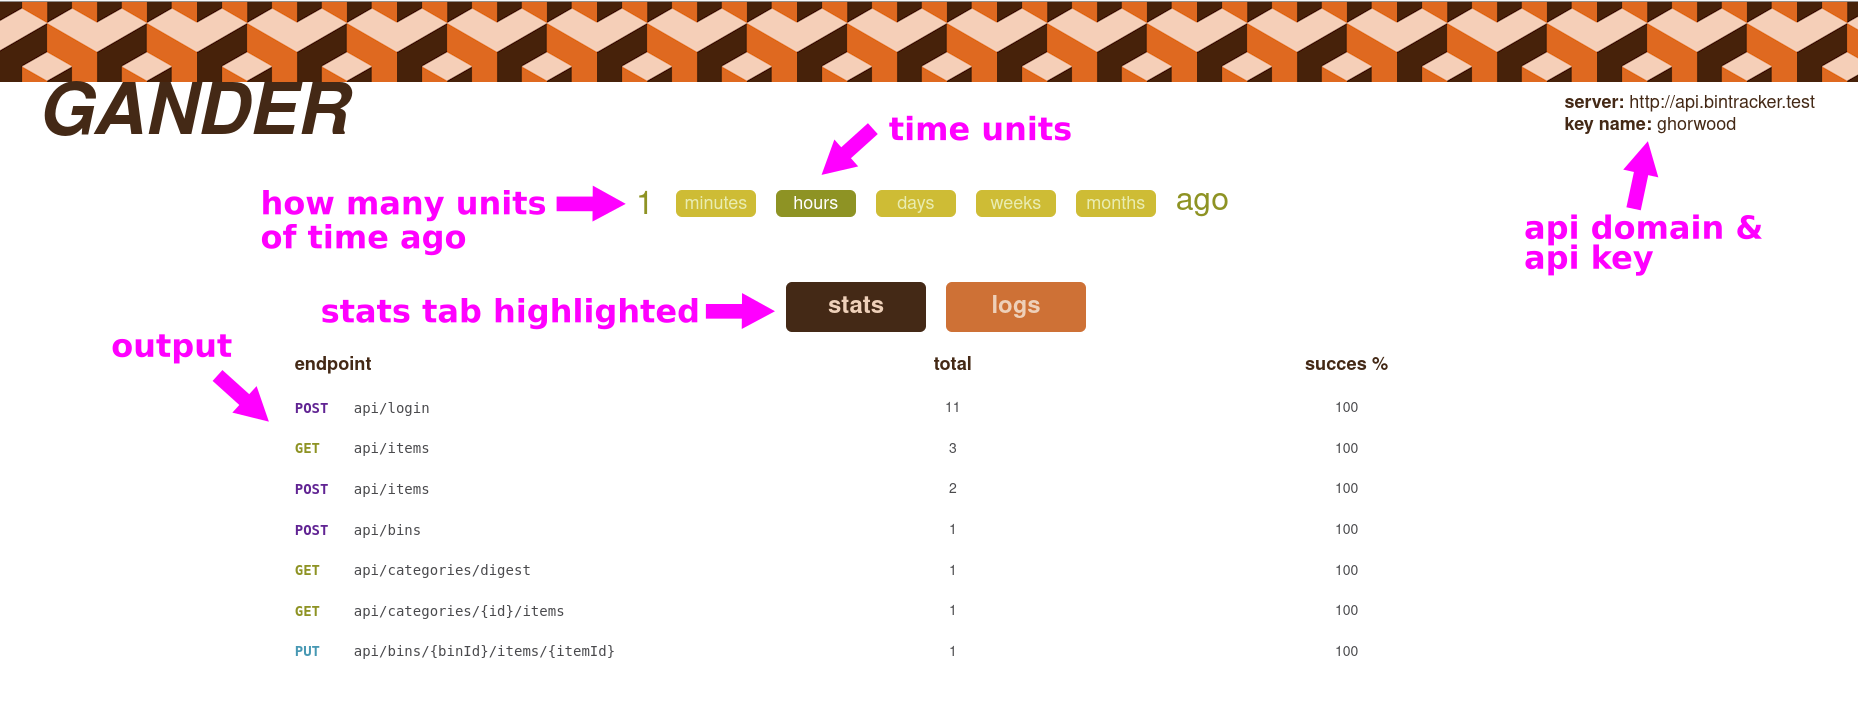
Note that the number of time units is an editable input box.
The domain of the api being reported on and the name of the api key are shown in the top-right corner.
The logs tab shows all request activity during the time period. The logs are shown from most recent to least recent.
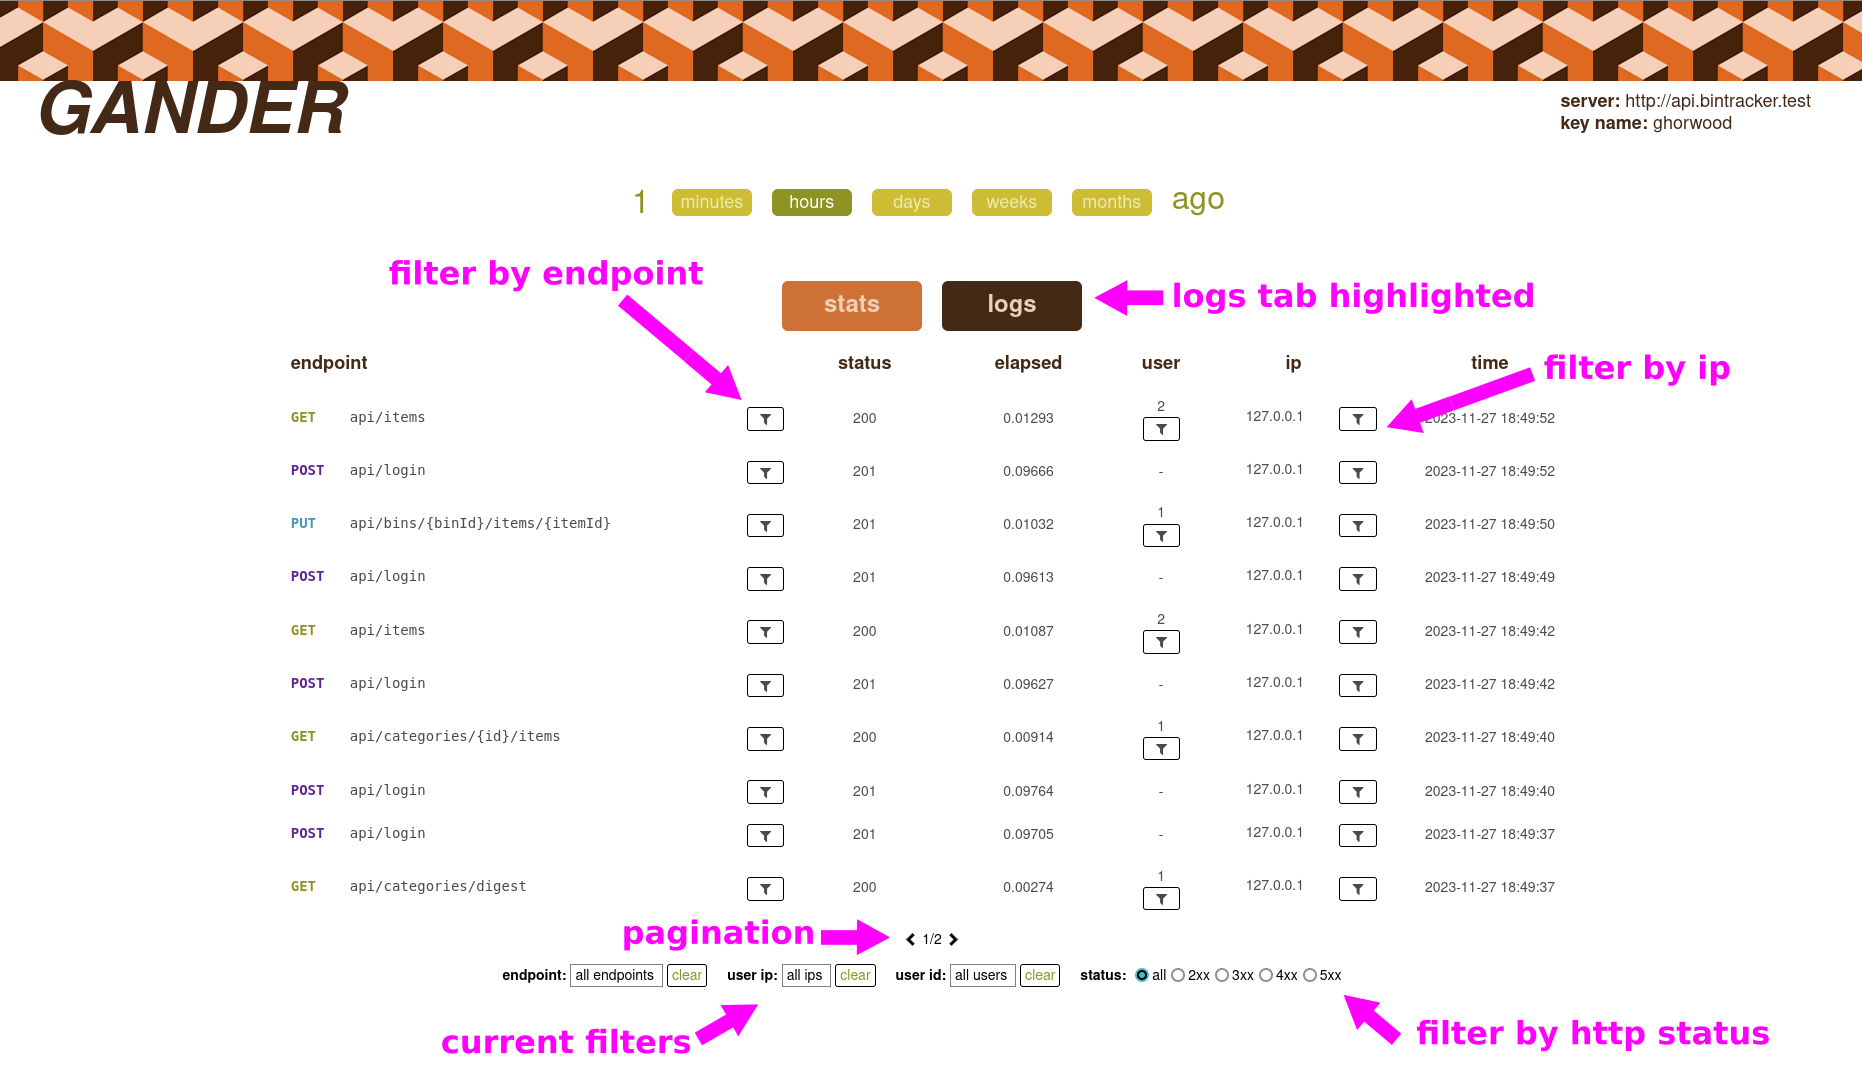
Clicking on one log entry will display details about that request.
Log details are shown by clicking on a log line. Basic information about the request and response is displayed:
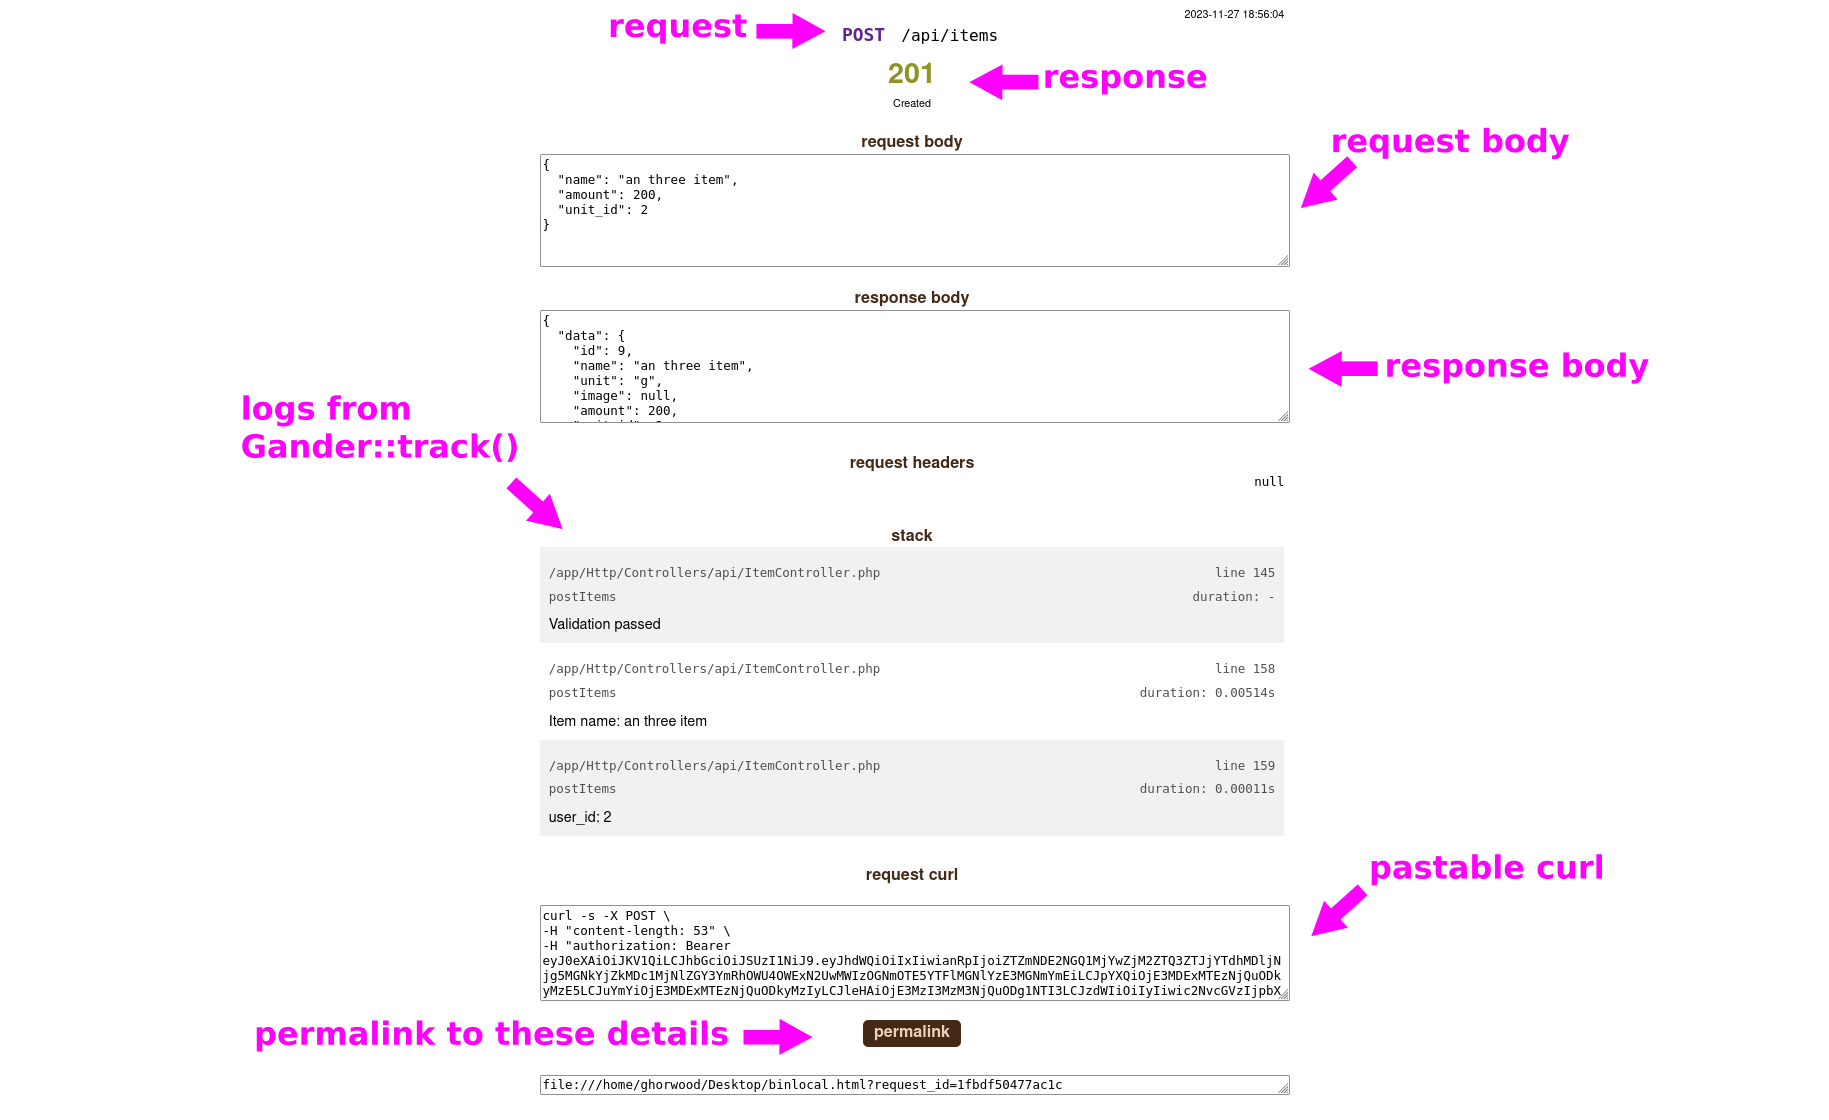
The 'permalink' button and url at the bottom can be used to refer back to the log details at any time.
The Gander client gets statistics and logs about your api by calling it's own api endoints. These endpoints require api keys to access.
Gander api keys are identified by their name; a unique, somewhat-readable string.
To get a list of the Gander api keys your api has, run
php artisan gbhorwood:gander --list-keysThis will display names and creation times of all keys.
To delete a given key
php artisan gbhorwood:gander --delete-key=<key name>When creating a client, you can assign it a custom key name to make key management easier:
php artisan gbhorwood:gander --create-client --key-name=<custom key name>Gander logs are tied to requests. However, logs can still be written to a request after the request terminates, ie. in a queued job, by passing the request id to track().
The request id can be retrieved using the method:
$requestId = \Gbhorwood\Gander\Gander::requestId()The call to track() can accept the request id as an optional argument:
\Gbhorwood\Gander\Gander::track("message", $requestId)To use this method to write logs in queued jobs, the request id must be retrieved in the controller and passed to the job. For instance:
In the controller, harvest the request id and pass as a constructor argument to the job class.
<?php
namespace App\Http\Controllers\api;

use Gbhorwood\Gander\Gander;
use App\Jobs\MyJob;

/**
 * The controller
 */
public function myController(Request $request): JsonResponse
{
    // get the id of this request
    $requestId = Gander::requestId();

    // pass the request id to the job
    dispatch(new MyJob($requestId));
}
In the job, accept the request id as an argument and use it when calling Gander::track().
<?php

namespace App\Jobs;

use Illuminate\Bus\Queueable;
use Illuminate\Contracts\Queue\ShouldBeUnique;
use Illuminate\Contracts\Queue\ShouldQueue;
use Illuminate\Foundation\Bus\Dispatchable;
use Illuminate\Queue\InteractsWithQueue;
use Illuminate\Queue\SerializesModels;

use Gbhorwood\Gander\Gander;

/**
 * The job
 */
class MyJob implements ShouldQueue
{
    use Dispatchable, InteractsWithQueue, Queueable, SerializesModels;

    public function __construct(String $requestId)
    {
        Gander::track("a message", $requestId);
    }
}If you wish to create your own client, OpenApi documentation on the Gander api is located in the swagger/ directory of the package.