This repository contains the full source code for Trendingtopics.org, built by Data Wrangling to demonstrate how Hadoop & EC2 can power a data driven website. The trend statistics and time series data that run the site are updated periodically by launching a temporary EC2 cluster running the Cloudera Hadoop Distribution. Our initial seed data consists of the raw Wikipedia database content dump along with hourly traffic logs for all articles collected from the Wikipedia squid proxy (curated by Domas Mituzas). We made the first 7 months of this hourly data for all articles available as an Amazon Public Dataset.
The current trend calculations are run with Hadoop Streaming and Hive. The output produced by these Hadoop jobs is loaded into MySQL and indexed to power the live site. The demo data included with the Rails app on Github was generated from a sample of 100 trending articles on June 6th 2009. A much larger snapshot is available on Amazon Public Datasets (snap-753dfc1c). The Rails app and MySQL database are deployed on Amazon EC2 using Paul Dowman’s EC2onRails.

- Ranked list of the most significant trends over the last 30 days along with total pageviews
- Ranked list of “Rising” articles trending in the last 24 hours
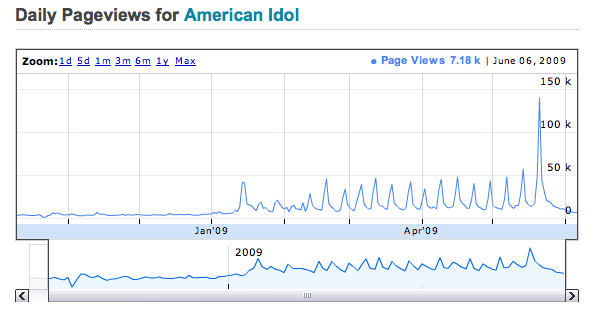
- Daily time series charts and sparklines for over 2.5 Million Wikipedia articles
- Autocomplete functionality and search results ranked by article trend score
- Cleaning raw log data and joining title strings with Wikipedia page ids
- Aggregating hourly time series data for daily pageview charts and sparklines
- Generating Statistics that power search autocomplete and the ranking of search results
- Running periodic trend estimation jobs / regressions
The rest of this document will walk through the code which powers the site and describe some basic approaches for extracting trends from log data with Hadoop and Hive. The individual steps are run manually for the code walkthrough, but would but likely be automated with some combination of Rake, Cron, Puppet, or Chef in a real production environment.
- Get an Amazon EC2 Account
- Complete the Amazon EC2 Getting Started Guide
- Download Cloudera EC2 Hadoop scripts
- Clone the trendingtopics code on github
The Wikipedia Traffic Statistics Amazon Public Dataset we will process covers a 7 month period from October, 01 2008 to April, 30 2009. This data is regularly logged from the Wikipedia squid proxy by Domas Mituzas and was compiled by Data Wrangling for this demo.
Each log file is named with the date and time of collection: pagecounts-20090430-230000.gz. The individual hourly files are around 55 MB when compressed, so 8 months of compressed data takes up about 300 GB of space.
Each line has 4 fields: projectcode, pagename, pageviews, bytes
      $ grep '^en Barack' pagecounts-20090521-100001
      en Barack 8 1240112
      en Barack%20Obama 1 1167
      en Barack_H._Obama 1 142802
      en Barack_H_Obama 3 428946
      en Barack_H_Obama_Jr. 2 285780
      en Barack_Hussein_Obama,_Junior 2 285606
      en Barack_O%27Bama 1 142796
      en Barack_Obama 701 139248439
      en Barack_Obama%27s_first_100_days 2 143181
      en Barack_Obama,_Jr 2 285755
Many of the raw wiki log page titles are percent-encoded. To match these with the page titles in the Wikipedia database, you can transform them as follows in Python:
      $ python
     >>> import urllib
     >>> escaped_title = '%22Klondike_Kate%22_Rockwell'
     >>> print urllib.unquote_plus(escaped_title)
     "Klondike_Kate"_Rockwell
To further complicate the raw data processing, many page titles are actually Wikipedia redirects which do not match to the primary key of the Wikipedia “Pages” table. The non-redirect articles are referred to as belonging to “namespace-0”. As part of our Hadoop pre-processing, we can perform a join against a redirect lookup table to find the true Wikipedia pageid for a given article title.
   mysql> select * from page_lookups where page_id = 534366;
   +---------+------------------------------------------------+--------------+---------+-------------+
   | id      | redirect_title                                 | true_title   | page_id | page_latest |
   +---------+------------------------------------------------+--------------+---------+-------------+
   |  219291 | Barack_Obama                                   | Barack Obama |  534366 |   276223690 |
   | 3151538 | Barak_Obama                                    | Barack Obama |  534366 |   276223690 |
   | 3151543 | 44th_President_of_the_United_States            | Barack Obama |  534366 |   276223690 |
   | 3151544 | Barach_Obama                                   | Barack Obama |  534366 |   276223690 |
   | 3151545 | Senator_Barack_Obama                           | Barack Obama |  534366 |   276223690 |
      ....                                                                                   ....

   | 3151644 | Rocco_Bama                                     | Barack Obama |  534366 |   276223690 |
   | 3151645 | Barack_Obama's                                 | Barack Obama |  534366 |   276223690 |
   | 3151646 | B._Obama                                       | Barack Obama |  534366 |   276223690 |
   +---------+------------------------------------------------+--------------+---------+-------------+
   110 rows in set (11.15 sec)
Processing large log datasets like this is a typical use case for Hadoop. By using MapReduce and EC2 we can run millions of regressions on a distributed cluster to quickly answer analytical questions or generate real time analytics on metrics of interest.
Our first task is to calculate daily page views for all 2.5 million english Wikipedia articles, so we can display dynamic Google finance style timelines on the site.
First, we need to access the Amazon public dataset. From your local machine, launch a small EC2 Ubuntu instance:
skom:~ pskomoroch$ ec2-run-instances ami-5394733a -k gsg-keypair -z us-east-1a
Once it is running and you have the instance id, create and attach an EBS Volume using the Wikipedia Traffic Statistics public snapshot (make sure the volume is created in the same availability zone as the ec2 instance)
	skom:~ pskomoroch$ ec2-create-volume --snapshot snap-753dfc1c -z us-east-1a
	skom:~ pskomoroch$ ec2-attach-volume vol-ec06ea85 -i i-df396cb6 -d /dev/sdf
Next, ssh into the instance and mount the volume
	skom:~ pskomoroch$ ssh root@ec2-12-xx-xx-xx.z-1.compute-1.amazonaws.com
	root@domU-12-xx-xx-xx-75-81:/mnt# mkdir /mnt/wikidata
	root@domU-12-xx-xx-xx-75-81:/mnt# mount /dev/sdf /mnt/wikidata
Hadoop can use Amazon S3 as a distributed file system out of the box, so it will be easier for later EC2 jobs if we store a full copy of the EBS data on S3. You could eliminate the need for this step by using the Beta of Cloudera Hadoop with EBS Integration (persistent temporary clusters on AWS). We will copy the raw pagecount data up to S3 from the EBS volume using S3cmd. This install and configuration can be automated later on, but for now you will need your AWS access keys handy for the configuration.
	root@domU-12-xx-xx-xx-75-81:/mnt# apt-get update
	root@domU-12-xx-xx-xx-75-81:/mnt# apt-get install -y s3cmd
	root@domU-12-xx-xx-xx-75-81:/mnt# s3cmd --configure
Set an environment variable MYBUCKET to a bucket you own on Amazon S3
root@domU-12-xx-xx-xx-75-81:/mnt# MYBUCKET=mytrendingtopics
You can upload all the files with a single command, or select a subset based on the file name in case an upload fails:
	/mnt# time s3cmd put --force wikidata/wikistats/pagecounts/pagecounts-200904* s3://$MYBUCKET/wikistats/
	/mnt# time s3cmd put --force wikidata/wikistats/pagecounts/pagecounts-200903* s3://$MYBUCKET/wikistats/
	/mnt# time s3cmd put --force wikidata/wikistats/pagecounts/pagecounts-200902* s3://$MYBUCKET/wikistats/
	/mnt# time s3cmd put --force wikidata/wikistats/pagecounts/pagecounts-200901* s3://$MYBUCKET/wikistats/
	/mnt# time s3cmd put --force wikidata/wikistats/pagecounts/pagecounts-200812* s3://$MYBUCKET/wikistats/
	/mnt# time s3cmd put --force wikidata/wikistats/pagecounts/pagecounts-200811* s3://$MYBUCKET/wikistats/
	/mnt# time s3cmd put --force wikidata/wikistats/pagecounts/pagecounts-200810* s3://$MYBUCKET/wikistats/
	....
Each month has approximately 40GB of compressed data and takes around 30 minutes to upload from a small EC2 instance. Data transfer between EC2 and S3 is free, so it will cost 50 cents for the entire one time upload.
One of the advantages of the Cloudera Hadoop distribution is that it allows you to customize your Hadoop cluster and operating system environment on EC2 to meet the specific needs of your MapReduce jobs. We will customize our cluster by making several additional edits to the files bin/hadoop-ec2-env.sh and bin/hadoop-ec2-init-remote-cloudera-ubuntu.sh.
By default, the scripts launch a Fedora instance. We can see which images are available by typing “ec2-describe-images -a | grep cloudera” at the command line. For this tutorial we will be using Ubuntu instances, so comment out the fedora version
# HADOOP_VERSION=fedora-20090602
HADOOP_VERSION=ubuntu-20090602
Also change USER_DATA_FILE to point to the Ubuntu script (hadoop-ec2-init-remote-cloudera-ubuntu.sh).
# The script to run on instance boot.
#USER_DATA_FILE=hadoop-ec2-init-remote-cloudera-fedora.sh
USER_DATA_FILE=hadoop-ec2-init-remote-cloudera-ubuntu.sh
We can optionally select a larger EC2 instance type to use in the cluster. Using one of the high CPU instances (c1.medium or c1.xlarge) is recommended:
# The EC2 instance type: m1.small, m1.large, m1.xlarge
#INSTANCE_TYPE="m1.small"
#INSTANCE_TYPE="m1.large"
#INSTANCE_TYPE="m1.xlarge"
INSTANCE_TYPE="c1.medium"
#INSTANCE_TYPE="c1.xlarge"
We will install several extra packages on the Ubuntu instances by editing the USER_PACKAGES setting at the top of the bin/hadoop-ec2-init-remote-cloudera-ubuntu.sh file:
# Specify user packages to install here, separated by whitespace (e.g. 'r-base' for R)
USER_PACKAGES='r-base r-base-core r-base-dev r-base-html r-base-latex r-cran-date python-rpy python-setuptools python-docutils python-support python-distutils-extra python-simplejson git-core s3cmd'
We also add our AWS keys so that our Hadoop cluster will be configured to use S3 as a file system. To configure Hadoop with our keys we need to add properties for fs.s3n.awsAccessKeyId and fs.s3n.awsSecretAccessKey to the hadoop-site.xml section of bin/hadoop-ec2-init-remote-cloudera-ubuntu.sh
cat > /etc/hadoop/conf.dist/hadoop-site.xml <<EOF
<?xml version="1.0"?>
<?xml-stylesheet type="text/xsl" href="configuration.xsl"?>
<configuration>
<property>
 <name>fs.s3n.awsAccessKeyId</name>
 <value>YOUR_ACCESS_KEY_HERE</value>
</property>
<property>
 <name>fs.s3n.awsSecretAccessKey</name>
 <value>YOUR_SECRET_ACCESS_KEY_HERE</value>
</property>
<property>
  <name>dfs.block.size</name>
  <value>134217728</value>
  <final>true</final>
</property>
We can also change the default maximums for map and reduce tasks based on the EC2 instance type and the nature of the Hadoop jobs we will be running. I found the following settings to work well for c1.medium instances on EC2 for the jobs we ran. This will likely vary based on the nature of your MapReduce code and data.
	MAX_MAP_TASKS=2
	MAX_REDUCE_TASKS=1

	real	22m41.951s
	user	0m1.924s
	sys	0m0.276s


	MAX_MAP_TASKS=4
	MAX_REDUCE_TASKS=2

	real	15m47.388s
	user	0m2.948s
	sys	0m0.324s
For c1.xlarge instances, we used MAX_MAP_TASKS=8 and MAX_REDUCE_TASKS=4.
For running daily timeline aggregations across 8 months of data, we will start a 10 node c1.xlarge Hadoop cluster
	skom:cloudera-for-hadoop-on-ec2-0.3.1 pskomoroch$ bin/hadoop-ec2 launch-cluster my-hadoop-cluster 10
	skom:cloudera-for-hadoop-on-ec2-0.3.1 pskomoroch$ ssh root@ec2-174-129-165-138.compute-1.amazonaws.com
	$ cd /mnt
Once logged into the master node, you need to wait for the file system setup to complete before running the Hadoop & Hive Jobs. A “hadoop” directory will appear in /mnt on the master node when the cluster is ready. While you are waiting, configure S3cmd on the master node as we did previously when uploading the raw data to S3:
$ s3cmd --configure
As we did earlier, set an environment variable MYBUCKET on the master node to a bucket you own on Amazon S3
	root@domU-12-xx-xx-xx-75-81:/mnt# MYBUCKET=mytrendingtopics

	root@domU-12-xx-xx-xx-75-81:/mnt# MYSERVER=trendingtopics.org

    root@domU-12-xx-xx-xx-75-81:/mnt# MAILTO=pete@datawrangling.com
When the file system is ready, fetch the trendingtopics code from github and then kick off the daily timeline job:
	$ git clone git://github.com/datawrangling/trendingtopics.git
	$ bash trendingtopics/lib/scripts/run_daily_timelines.sh $MYBUCKET $MYSERVER $MAILTO
The bash script run_daily_timelines.sh executes a series of streaming hadoop jobs and Hive queries before emitting tab delimited output files ready for loading to MySQL. These files are loaded into our Rails app MySQL database on MYSERVER and job start/stop emails are sent to the MAILTO address. See the article Appendix for details on the configuration of the Rails server, or edit the bash script to omit the database load & email steps.
For the initial log file text normalization and filtering we used a simple Hadoop Streaming job with Python. You can plug any language into Hadoop Streaming jobs, but I prefer Python for text munging. I didn’t use it here, but the latest Cloudera Distribution of Hadoop also supports Dumbo for Python Streaming.
A quick look at lib/python_streaming/daily_timelines.py shows the filtering we apply to page urls in the logs
	# Exclude pages outside of english wikipedia
	wikistats_regex = re.compile('en (.*) ([0-9].*) ([0-9].*)')

	# Excludes pages outside of namespace 0 (ns0)
	namespace_titles_regex = re.compile('(Media|Special' +
	'|Talk|User|User_talk|Project|Project_talk|File' +
	'|File_talk|MediaWiki|MediaWiki_talk|Template' +
	'|Template_talk|Help|Help_talk|Category' +
	'|Category_talk|Portal|Wikipedia|Wikipedia_talk)\:(.*)')

	# More exclusions
	first_letter_is_lower_regex = re.compile('([a-z])(.*)')
	image_file_regex = re.compile('(.*).(jpg|gif|png|JPG|GIF|PNG|txt|ico)')

	# Exclude Mediawiki boilerplate
	blacklist = [
	'404_error/',
	'Main_Page',
	'Hypertext_Transfer_Protocol',
	'Favicon.ico',
	'Search'
	]
The first Python Streaming job restricts pageviews to a subset of english Wikipedia pages, filters out bad records, then sums hourly pageviews keyed by Article-Date. It emits output something like this:
	Barack_Obama}20090422  129
	Barack_Obama}20090419  143
	Barack_Obama}20090421  163
	Barack_Obama}20090420  152
You can inspect the hdfs output when the streaming job completes:
	# hadoop fs -cat stage1-output/part-00032 | head -350000 | tail
	Arlene_Rousseau}20090415	1
	Arlene_Sanders}20090429	1
	Arlene_Saunders}20090415	5
	Arlene_Tolibas}20090412	1
	Arlene_Vaughan}20090427	7
	Arlene_Williams}20090414	8
	Arlene_davis}20090422	1
	Arlene_desousa}20090414	1
	Arlene_donohue}20090412	1
	Arlene_hunt}20090420	1
As a side note, there is a little known Hadoop Streaming trick buried in this Python script. You will notice that the date is not actually in the raw log data itself, but is part of the filename. It turns out that Hadoop makes job parameters you would fetch in Java with something like job.get("mapred.input.file") available as environment variables for streaming jobs, with periods replaced with underscores:
	filepath = os.environ["map_input_file"]
	filename = os.path.split(filepath)[-1]
Thanks to Todd Lipcon for directing me to that hack. A second MapReduce pass then maps the records by article name:
	Barack_Obama  20090422 129
	Barack_Obama  20090419 143
	Barack_Obama  20090421 163
	Barack_Obama  20090420 152
These records are merged at the reducers to generate a daily time series for each article in serialized JSON format (for easy manipulation in R & Python, or quick loading for the Web UI).
Format:
article\tdates\tpagecounts\ttotal_pageviews
Example:
‘Barack_Obama\t[20090419,20090420,20090421,20090422]\t[143,152,163,129]\t587’
While the daily article pageviews are in hand, we also calculate the most recent “monthly trend” for each article using a simple difference over the last 30 days. You can easily drop in a more complicated trend detection model here as well
def calc_trend(dates, pageviews):
  dts,counts = zip( *sorted( zip (dates,pageviews)))
  trend_2 = sum(counts[-15:])
  trend_1 = sum(counts[-30:-15])
  monthly_trend = trend_2 - trend_1
  date_str = '[%s]' % ','.join(dts)
  pageview_str = '[%s]' % ','.join(map(str,counts))
  return monthly_trend, date_str, pageview_str
Doing Joins in MapReduce can be a bit of a pain, Hive hides a lot of tedious details behind a simple SQL like syntax most developers are familiar with. Behind the scenes this compiles down to optimized MapReduce code executed by Hive. Import and export of data is also very natural and will be familar to MySQL users.
We are only using Hive in this trend batch job for some simple joins and selects, but it has much more powerful features for analytics including partitions, bucketing, and random sampling.
Here is an example from lib/hive/hive_daily_timelines.sql which solves the redirect matching problem we mentioned above:
Create a raw_daily_stats_table and load it with the output of our Python streaming job directy from HDFS.
	CREATE TABLE raw_daily_stats_table (
		redirect_title STRING,
		dates STRING,
		pageviews STRING,
	 	total_pageviews BIGINT,
		monthly_trend DOUBLE)
	ROW FORMAT DELIMITED
	FIELDS TERMINATED BY '\t'
	STORED AS TEXTFILE;

	LOAD DATA INPATH 'finaloutput' INTO TABLE raw_daily_stats_table;
Create a redirect_table for holding the large Wikipedia pageid lookup table we mentioned in the introduction, the file is loaded directly from the local filesystem, but could be pulled from MySQL using Sqoop instead.
	CREATE TABLE redirect_table (
		redirect_title STRING,
		true_title STRING,
		page_id BIGINT,
		page_latest BIGINT)
	ROW FORMAT DELIMITED
	FIELDS TERMINATED BY '\t'
	STORED AS TEXTFILE;

	LOAD DATA LOCAL INPATH '/mnt/page_lookup_nonredirects.txt' OVERWRITE INTO TABLE redirect_table;
Create an output table to hold the result of the join. This table mirrors the structure of the daily_timelines table in our MySQL database:
	CREATE TABLE daily_timelines (
		page_id BIGINT,
		dates STRING,
		pageviews STRING,
		total_pageviews BIGINT)
	ROW FORMAT DELIMITED FIELDS
	TERMINATED BY '\t' STORED
	AS TEXTFILE;
Now we can use a familar join syntax to quickly normalize the page titles with the correct Wikipedia page ids:
	INSERT OVERWRITE TABLE daily_timelines
	SELECT redirect_table.page_id,
		raw_daily_stats_table.dates,
		raw_daily_stats_table.pageviews,
		raw_daily_stats_table.total_pageviews
	FROM redirect_table
	JOIN raw_daily_stats_table ON (redirect_table.redirect_title = raw_daily_stats_table.redirect_title);
You can monitor your job progress from the broswer by using Foxy Proxy to view the Cloudera Hadoop Web UI (see the Cloudera EC2 documentation for more details). The following command sets up a tunnel for the Web UI.
    $ bin/hadoop-ec2 proxy my-hadoop-cluster
    Proxying to host ec2-75-101-238-25.compute-1.amazonaws.com via local port 6666
    Gangia:     http://ec2-75-101-238-25.compute-1.amazonaws.com/ganglia
    JobTracker: http://ec2-75-101-238-25.compute-1.amazonaws.com:50030/
    NameNode:   http://ec2-75-101-238-25.compute-1.amazonaws.com:50070/
When the Hive job completes, we can inspect the results:
	hive> SELECT COUNT(1) FROM pages;
	2823525
	Time taken: 33.199 seconds
We can run a few more quick queries to show how similar HiveQL is to SQL. Here we find article with the most pageviews over this time period had 33M views:
	hive> SELECT MAX(total_pageviews) FROM pages;
	33993049
	hive> SELECT title, total_pageviews from pages SORT BY total_pageviews DESC LIMIT 10;

	Wiki	33993049

	The Beatles	22153442

	Barack Obama	19065629

	YouTube	18935233

	Wikipedia	12867511

	United States	11574288

	Facebook	11428940

	Deaths in 2009	7540889

	Eminem	7303015

	World War II	7134040
Time taken: 45.36 seconds
Not surprisingly, the article was “Wiki”. Overall this list of popular pages doesn’t change much over time and provides little insight. We can look at titles ranked by monthly trend instead:
	hive> SELECT title, monthly_trend from pages SORT BY monthly_trend DESC LIMIT 10;
	David Carradine	1814665.0
	Tiananmen Square protests of 1989	444343.0
	Roger Federer	413170.0
	Bermuda Triangle	354996.0
	Up (2009 film)	333122.0
	Normandy Landings	315228.0
	North Korea	291515.0
	Sacha Baron Cohen	288334.0
	Father's Day	266678.0
	Kristen Stewart	261492.0

    Time taken: 43.328 seconds
These results seem much more interesting and timely. This list looked strange to me at first, but apparently these are all really trending news items for the beginning of June. I guess I need to stop coding once in a while and keep up with the news…
In addition to serving as the ranked list of “Biggest Mover” articles on the main page of the site, these trends are used to power the site search engine and order autocomplete suggestions:

Once we are confident in the results of the Hadoop jobs, we can send the results over to the trendingtopics database server:
$ scp /mnt/trendsdb.tar.gz root@www.trendingtopics.org:/mnt/
We also send a copy of the full data up to S3 for safe keeping along with the sample data for development use
	$ s3cmd put trendsdb.tar.gz s3://$MYBUCKET/archive/`date --date "now -1 day" +"%Y%m%d"`/trendsdb.tar.gz
	$ s3cmd put trendsdb.tar.gz s3://$MYBUCKET/archive/trendsdb.tar.gz
	$ s3cmd put --force /mnt/sample* s3://$MYBUCKET/sampledata/
Jump over to the database server and execute the load_history.sql script against trendingtopics_production. You will want to automate these logins and use proper authentication for your own app instead of manually loading the production database like this.
	$ ssh root@www.trendingtopics.org
	$ cd /mnt
	$ tar -xzvf trendsdb.tar.gz
	$ mysql -u root trendingtopics_production < app/current/lib/sql/load_history.sql
After the initial historical timeline aggregation is complete, we can begin daily runs to detect trending articles over the last 24 hours using new hourly log data. This job still needs to access some historical data to for baseline comparisons or regressions, but it will be much faster than processing the full timeline.

To run the daily job, we repeat the initial cluster launch and configuration steps used in the last job using daily_trend.sh:
	$ cd /mnt
	$ bash trendingtopics/lib/scripts/run_daily_trends.sh $MYBUCKET
The job steps in the bash script are fairly similar to the first historical aggregation and monthly trend estimation, except that we pass the hourly data directly to the trend estimation script, we need to be sure to pass at least 10 days of data by using wildcards on the s3 path.
One trick worth noting in this script is that we use wildcards in the input paths to select a subset of the s3 files. At this point we have thousands of hourly files sitting in an S3 bucket. For the large historical aggregation this was fine, but if we only want to load a subset, then being careful with naming conventions can make your life easier. You can also pass multiple input buckets by adding more -input lines to the hadoop command. Note that in operational mode these simple bash scripts would be parameterized by date, and probably replaced entirely with something more robust.
	D0=`date --date "now -1 day" +"%Y%m%d"`
	D1=`date --date "now -2 day" +"%Y%m%d"`


	hadoop jar /usr/lib/hadoop/contrib/streaming/hadoop-*-streaming.jar \
  	-input s3n://$1/wikistats/pagecounts-$D0* \
      -input s3n://$1/wikistats/pagecounts-$D1* \
	  -output finaltrendoutput \
	  -mapper "daily_trends.py mapper" \
	  -reducer "daily_trends.py reducer 10" \
	  -file '/mnt/trendingtopics/lib/python_streaming/daily_trends.py' \
	  -jobconf mapred.reduce.tasks=40 \
	  -jobconf mapred.job.name=daily_trends
We can inspect a sample of the results in Hive before loading them into MySQL:
	hive> SELECT redirect_table.redirect_title,
		raw_daily_trends_table.trend,
		raw_daily_trends_table.error
	FROM redirect_table JOIN raw_daily_trends_table
	ON (redirect_table.redirect_title = raw_daily_trends_table.redirect_title)
	SORT BY trend DESC LIMIT 10;

	Ōkami	674362.991555	0.00381640473354
	Andorra	672710.139829	0.00341032861088
	Mark-Paul_Gosselaar	554550.009002	0.00358059732282
	Suzanne_Tamim	538495.576198	0.00453404013445
	Palau	533451.793424	0.00404540144991
	Saved_by_the_Bell	532321.913729	0.00309499641774
	Eminem	526161.377383	0.00135526240753
	XML-RPC	516934.816633	0.004634399986
	June_10	454289.947019	0.00428588922354
	Ken_Saro-Wiwa	440262.986557	0.0049713113148
Next we send copies of the trend file & sample data up to Amazon S3 for development use
	s3cmd put /mnt/daily_trends.txt s3://$MYBUCKET/archive/`date --date "now -1 day" +"%Y%m%d"`/daily_trends.txt
	s3cmd put --force /mnt/sample_daily_trends.txt s3://$MYBUCKET/sampledata/sample_daily_trends.txt
	s3cmd put /mnt/daily_trends.txt s3://$MYBUCKET/archive/daily_trends.txt
Copy the output file over to the trendingtopics server:
scp /mnt/daily_trends.txt root@www.trendingtopics.org:/mnt/
Load the daily trend data into MySQL on the prod server and build the trend indices:
	ssh root@www.trendingtopics.org
	cd /mnt
	mysql -u root trendingtopics_production < app/current/lib/sql/load_trends.sql
Shut down the Hadoop cluster
	$ bin/hadoop-ec2 terminate-cluster my-hadoop-cluster
	Terminate all instances? [yes or no]: yes
	INSTANCE	i-2d7b2c44	running	shutting-down
	INSTANCE	i-eb7b2c82	running	shutting-down
	INSTANCE	i-ed7b2c84	running	shutting-down
	INSTANCE	i-ef7b2c86	running	shutting-down
	INSTANCE	i-e17b2c88	running	shutting-down
	INSTANCE	i-e37b2c8a	running	shutting-down
	INSTANCE	i-e57b2c8c	running	shutting-down
	INSTANCE	i-e77b2c8e	running	shutting-down
	INSTANCE	i-f97b2c90	running	shutting-down
	INSTANCE	i-fb7b2c92	running	shutting-down
	INSTANCE	i-fd7b2c94	running	shutting-down
- Create a new daily job which pulls in recent log data from S3 into Hive and imports the Rails app MySQL tables with Sqoop. Aggregate and merge the last 24 hour of log data with the daily_timelines table, then estimate and replace the daily and monthly trends before exporting the new tables to MySQL
- Cron / Rake tasks to automate the daily job
- Plug in better trend algorithms
- Explore Paritions/Buckets with Hive for fast analytics queries
- Generate smaller representative sample datasets for R&D with Hive
- Merge the trends with text content from the raw Wikipedia dumps using Hive to get trends for words/phrases/concepts
- Combine data with Wikipedia link graph dataset on the EBS volume, show related articles for each trend
- Find correlated trends and topics, look for predictive value
- Ruby (1.8.7)
- Ruby Gems (1.3.1)
- Capistrano (v2.5.5)
- Rails (2.3.2)
- Amazon EC2 Account
- Steps from EC2 Getting Started Guide
- EC2onRails
- Cloudera EC2 Hadoop scripts
- 1 TB of Wikipedia Article Traffic Logs
- Trendingtopics code on github
Fetch the trendingtopics source code:
$ git clone git://github.com/datawrangling/trendingtopics.git
Navigate to the root of the source code directory and create the needed configuration files from the provided examples:
	$ cd trendingtopics
	$ cp config/config.yml.example config/config.yml
	$ cp config/database.yml.example config/database.yml
Do the normal rails gem install dance for any missing dependencies.
$ rake gems:install
We also used the following plugins (already included in /vendor):
- autocomplete
- annotated-timeline
- gc4r (modified a bit)
Create the database:
    $ rake db:create
    $ rake db:migrate
Populate the app with demo data from 100 wiki articles:
$ rake db:develop
Launch the rails app itself
	$ script/server
	=> Booting Mongrel
	=> Rails 2.3.2 application starting on http://0.0.0.0:3000
	=> Call with -d to detach
	=> Ctrl-C to shutdown server
Navigate to http://localhost:3000/ to access the application
Fetch the source code as shown above, then install the ec2onrails gem as described at http://ec2onrails.rubyforge.org/:
$ sudo gem install ec2onrails
Find AMI id of the latest 32 bit ec2onrails image (in our case this was ami-5394733a):
$ cap ec2onrails:ami_ids
Launch an instance of the latest ec2onrails ami and note the returned instance address from ec2-describe-instances, it will be something like ec2-12-xx-xx-xx.z-1.compute-1.amazonaws.com
	$ ec2-run-instances ami-5394733a -k gsg-keypair
	$ ec2-describe-instances
Create the needed configuration files from the provided examples and edit them, filling in your instance address information, keypairs, and other configuration information as indicated in the comments of each file. See the ec2onrails documentation or source code for more details on each setting.
	$ cp config/deploy.rb.example config/deploy.rb
	$ cp config/s3.yml.example config/s3.yml
	$ cp config/config.yml.example config/config.yml
	$ cp config/database.yml.example config/database.yml
Be sure to substitute in your own AWS key and secret key in both config.yml and s3.yml (You can leave these out and ec2onrails will still work, it just won’t back up MySQL or the log files)
	aws_secret_access_key: YYVUYVIUBIBI
	aws_access_key_id: BBKBBOUjbkj/BBOUBOBJKBjbjbboubuBUB
If you uncomment the the auth filter in the main page controller, also replace the admin user name and password in config.yml:
	admin_user: REPLACE_ME
	admin_password: REPLACE_ME
Deploy the app to your launched EC2 instance with Capistrano (this wil take several minutes)
    $ cap ec2onrails:setup
    $ cap deploy:cold
You should now be able to access your app from a web browser or as web service at the url of the instance you provided in deploy.rb: http://ec2-12-xx-xx-xx.z-1.compute-1.amazonaws.com. You can also ssh into your running EC2 instance as usual with your keypairs to debug any issues. See the ec2onrails forums for more help with debugging.
To redeploy the app after making changes to the base trendingtopics code, just do the usual cap deploy:
$ cap deploy
To manually restart the apache service or mongrels:
    $ cap ec2onrails:server:restart_services
    $ cap deploy:restart
No data will be populated in the production deployed app until you run the included Hadoop Jobs and import the resulting data to MySQL. To test the deployment, you can use Capistrano to run the db:develop task on the EC2 server, just wipe the dev data before loading real production data.
To put the site in maintenance mode, we use the standard cap tasks:
$ cap deploy:web:disable
To renable the site:
$ cap deploy:web:enable
To load daily updates, we do a periodic swap of the data tables in MySQL, replacing them entirely with the staging tables which are loaded from Hive dumps.
	RENAME TABLE pages TO backup_pages, new_pages TO pages;
	RENAME TABLE daily_timelines TO backup_daily_timelines, new_daily_timelines TO daily_timelines;
	RENAME TABLE daily_trends TO backup_daily_trends, new_daily_trends TO daily_trends;
Before the next daily load, we swap the “backup” tables back to “new”, then they will be truncated before the bulk load starts.
	RENAME TABLE backup_pages TO new_pages;
	RENAME TABLE backup_daily_timelines TO new_daily_timelines;
	RENAME TABLE backup_daily_trends TO new_daily_trends;