
- Introduction
- How to import the project?
- Project structure
- What is Control Center?
- What is test mode?
- What is trial mode?
- How to add a device to compatibility list?
- How to add MD5 to its list?
- How to set which UI to use?
- How to add Fragments?
- How to enable Home Fragment?
- How to add a download button?
- How to download files?
- How to flash recoveries?
- How to read preferences from updater-script?
- How to change App colors?
- How to add your own changelog or agreement?
- How to add your own info in Settings?
- How to publish the App?
- Project changelog
ROM Installer is a source code project. This means that you have to download the project and to import it into your Android Studio. This project requires at least a basic knowledge of Android Studio. Although the project is made in Java, a high knowledge of the language is not required. ROM Installer is the new revolutionary way to flash Custom ROM on every Android device (5.0+). What makes ROM Installer unique is its characteristic of being easily reprogrammable by the developer who adopts it. The App has two user interfaces (ButtonUI and SwipeUI), offers the possibility to add a splash and a disclaimer screen, to verify the integrity of the ROM before installing, to download any type of file in many different modes, to download and install a recovery. This project is distributed under GNU General Public License. This means that you must respect the freedom of Open Source. I'm giving you this revolutionary project for free and I expect that you keep this public and Open Source. Moreover you must upload your custom version of this project on GitHub because your work could act as an example for other developers interested in this project and also because I can help you in case you need my help. The most important benefit for users is that they can choose what features to install on their devices. Instead, the most important benefit for developers is that they don't have to edit their updater-script in order to remove mods or features due to users requests. The developer has just to configure the App with a preference for each feature he wants to include in his ROM. Then is on the own of each user to choose whether to install that feature or not.
Get the latest sample APK on Google Play:
Make sure that your Android Studio and your SDK are updated to the latest version available.
- Head over the root directory of the ROM Installer repository and fork it.
- Now ROM Installer repository has been imported into your GitHub profile.
- Head over the root directory of your ROM Installer repository, click on "Clone or download" and copy the URI.
- Launch Android Studio, click on "Check out project from Version Control" and then on "Git".
- In the "Git repository URL" field paste the repository URI that you have previously copied.
- Once the project is successfully imported, you can commit your changes to your GitHub repository by using the green arrow high in the centre.
- From the side panel on the left, select the "Android" view.
- Expand the "app" menu and then the "java" one. The package name should now be visible. (com.peppe130.rominstaller).

-
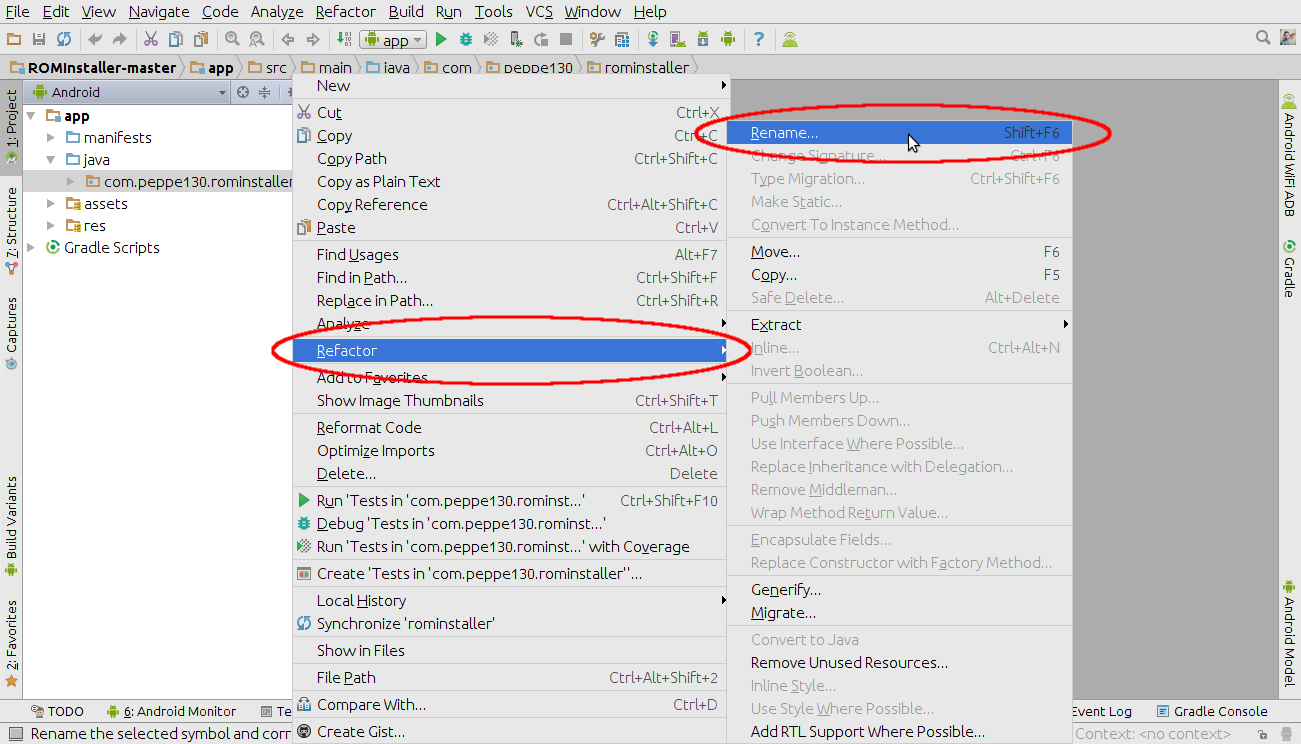
9. Right click on the package name > "Refactor" > "Rename".
-
If you are experiencing rendering problems, from the toolbar, open the "Build" menu, click on "Clean Project" and then on "Rebuild Project".
-
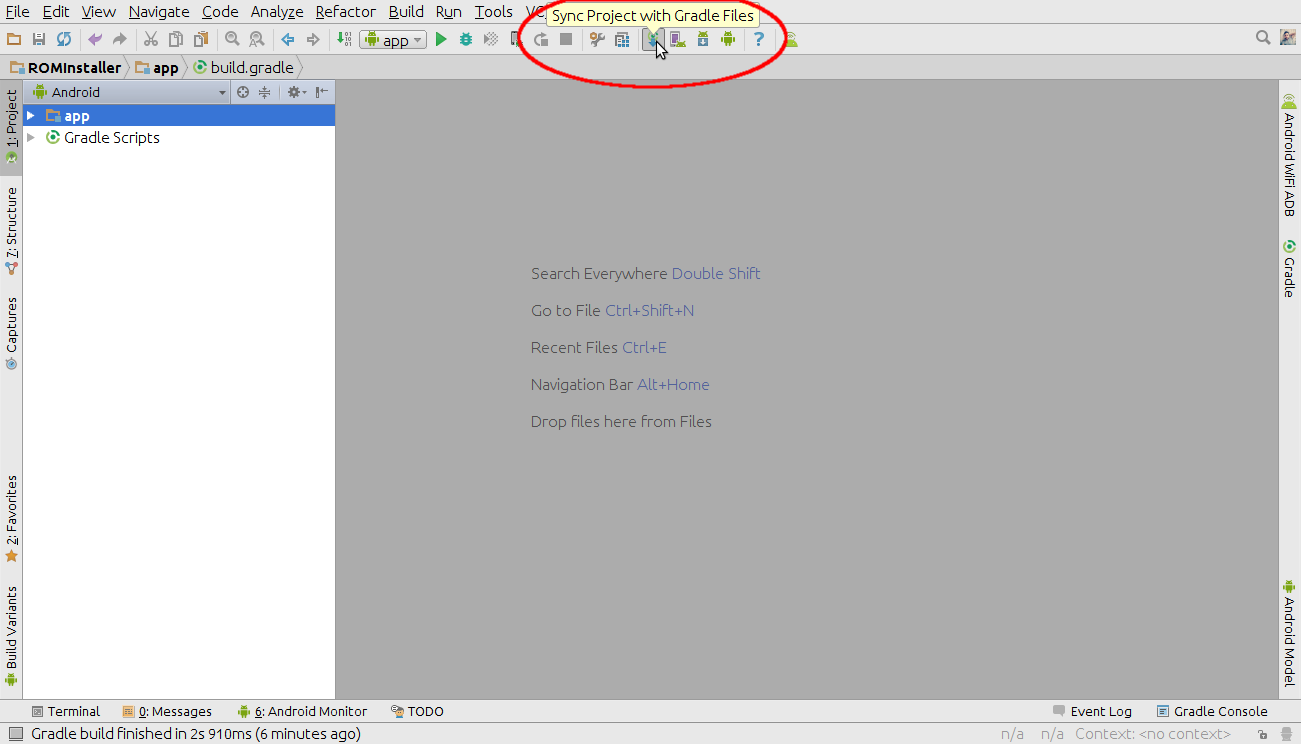
If the "Activity class {…} does not exist" error occurs while the App is being compiled by Android Studio, just sync again the project. Look at the picture below:
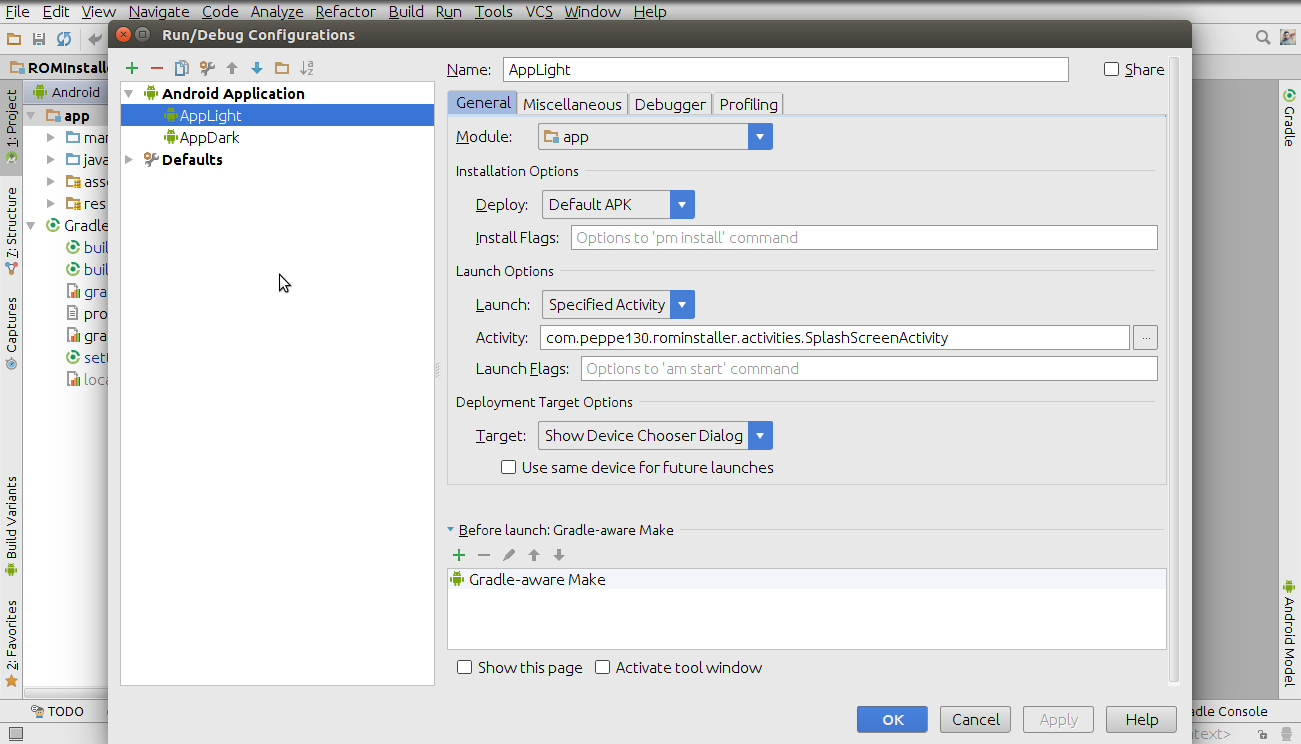
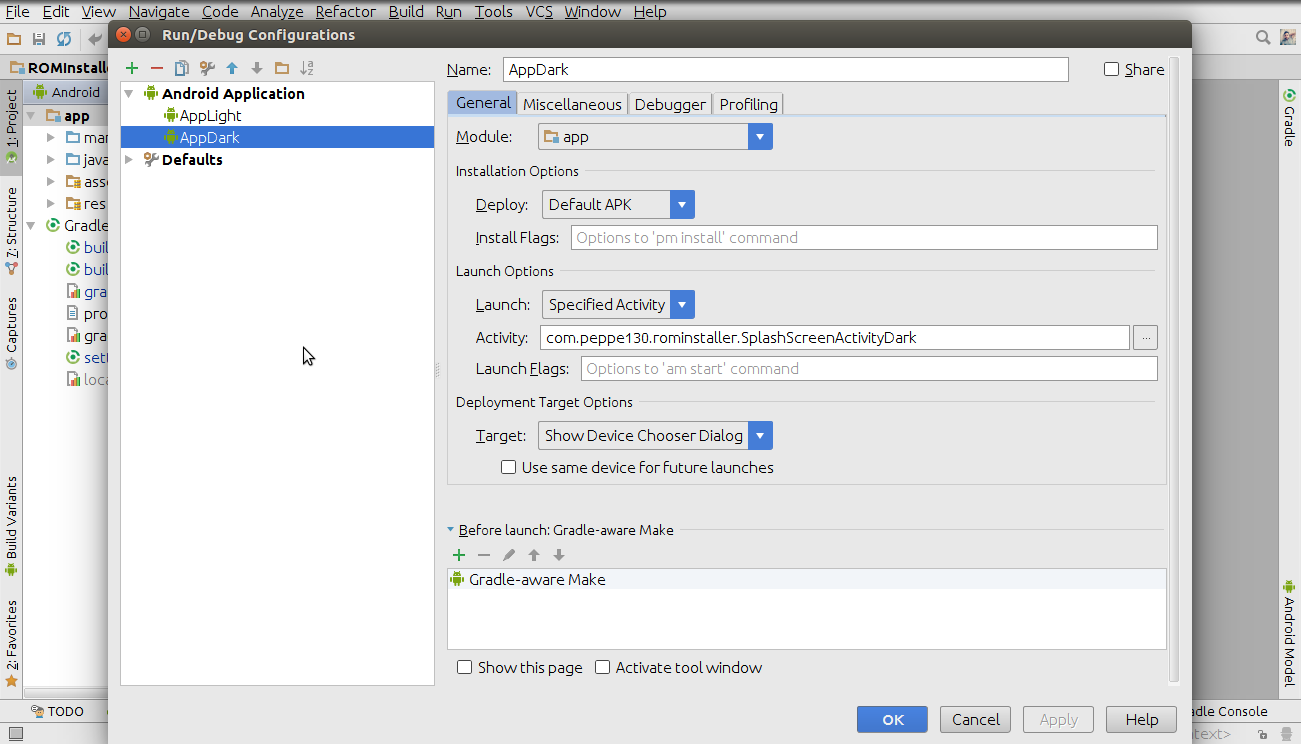
- You may run into "Activity class {…} does not exist" error also due to the internal complex theme chooser code.
The App is provided with a theme chooser which allows users to change both the App theme and the App launcher icon.
When you debug your App, Android Studio automatically installs it on your device and launches the activity that has
the
<category android:name="android.intent.category.LAUNCHER" />category in the Manifest. Each activity has its own name that distinguishes it from the others. In order to change the App launcher icon, the App has to disable the activity that has that category in its properties and has to enable an activity alias which has the same properties of its parent activity but has a different icon and a different name. Android Studio can not know whether the activity alias is enabled or not and so it will always try to launch the alias parent activity. To solve this problem, you have to create two different debug configuration, one for each theme (Light and Dark). From the toolbar, open the "Run" menu and click on "Edit Configurations...". Highlight the "Android Application" menu and click on the green + in the upper left and again click on "Android Application". Give a new name to the configuration. Click on the "Module" field and choose "app." Click on the "Launch" field and choose "Specified Activity". A new field called "Activity" will appear and you will have to write there the complete name of the activity that Android Studio should launch when debugging. Once you have filled up the fields, click the OK button to save the configuration. See the below screenshots: - activities: it contains all the App's activities.
- core: it contains the "heart" of the App.
- Control Center: it is the control center of the App (Look HERE).
- I will not provide any support for changes made to the core package.
- DEVICE_COMPATIBILITY_LIST = List of devices compatible with the ROM.
- ROM_MD5_LIST = List of ROM MD5 and any of its add-ons.
- RECOVERY_MD5_LIST = List of recoveries MD5s.
- TEST_MODE = If set to true, it enables the test mode.
- TRIAL_MODE = If set to true, it enables the trial mode.
- BUTTON_UI = If set to true, it enables the user interface with buttons.
- SHOULD_SHOW_SPLASH_SCREEN = If set to true, it enables the splash screen.
- SHOULD_SHOW_DISCLAIMER_SCREEN = If set to true, it enables the disclaimer screen.
- SHOULD_SHOW_HOME_FRAGMENT = If set to true, it enables the home fragment.
- AVAILABLE_DOWNLOADS_NUMBER = Number of download buttons.
- SPLASH_SCREEN_DELAY = Duration time of splash screen (value in milliseconds).
- SPLASH_SCREEN_IMAGE_LIGHT = Image to display in the splash screen when light theme is enabled.
- SPLASH_SCREEN_IMAGE_DARK = Image to display in the splash screen when dark theme is enabled.
- SETTINGS_ICON = Toolbar Settings icon.
- CHANGELOG_ICON = Toolbar Changelog icon.
- DEFAULT_OPTIONS_ICON = Toolbar "Default options" icon.
- CLEAR_DOWNLOADS_ICON = Toolbar "Clear downloads" icon.
- TRUE: Enables the UI with "Next" and "Back" buttons.
- FALSE: It enables the sensitive UI to the sliding of the finger on the screen.
- Expand "res" menu, right click on "xml" menu and create a new XML file.
- Expand "xml" menu and open the newly created file. Inside it you have to add the preference:
-
To CheckBoxes just add the preference:
    <PreferenceCategory
      android:title="CheckBox">
      <CheckBoxPreference
          android:key="testCheckBox"
          android:defaultValue="false"
          android:title="CheckBox Title"
          android:summary="CheckBox Summary" />
    </PreferenceCategory>

    <!--

    android:key = Preference ID.
    android:defaultValue = If set to true, the CheckBox is automatically checked.

    -->
-
To Lists, you need first to define the number of items that will make up the list and their respective values. To do this, we will use the "arrays.xml" file which is located in "values" menu:
    <string-array name="your_list">
        <item>Item 1</item>
        <item>Item 2</item>
        <item>Item 3</item>
        <item>Item 4</item>
    </string-array>
    <string-array name="your_list_values">
        <item>1</item>
        <item>2</item>
        <item>3</item>
        <item>4</item>
    </string-array>

    <!--

      Each item has its own value:
      "Item 1" has value 1.
      "Item 2" has value 2.
      "Item 3" has value 3.
      "Item 4" has value 4.

    -->
-
After defining the items, you will have to create the preference:
    <PreferenceCategory
      android:title="List">
      <ListPreference
          android:title="List title"
          android:summary="List summary"
          android:key="testList"
          android:defaultValue="1"
          android:entries="@array/your_list"
          android:entryValues="@array/your_list_values" />
    </PreferenceCategory>

    <!--

      android:key = Preference ID.
      android:defaultValue = Set which item should be selected by default.
      android:entries = Declare the group of items that should be set in the List.
      android:entryValues = Declare the items values.

      P.s. If you don't want to set a default value for a certain List,
           just leave its default value empty.

           For example: android:defaultValue=""

    -->
-
-
You should use hosting services which provide you direct download links such as Mediafire or Dropbox (on Dropbox, to download a file rather than display it, you can use "dl=1" as a query parameter in your URL).
-
The environment is already placed in the internal storage. So, in "mDownloadDirectory", you will have to store only the path from the internal storage to your destination folder and not the full path from root directory.
-
If you don't have a direct link, you can redirect users to a website in order to let them download the ROM via their browser using the following syntax:
startActivity(new Intent(Intent.ACTION_VIEW, Uri.parse("WebsiteDownloadLink")));
- Simple download without MD5 check
- Simple download with MD5 check
-
Download ROM
NB:
-
In Control Center there is a method called
DownloadROM(). You can configure it to download the ROM and you can call it by typingControlCenter.DownloadROM();wherever you want. -
Remember to add ROM MD5 to ROM_MD5_LIST.
-
-
Multiple downloads without MD5 check
- Multiple downloads with MD5 check
- Multiple downloads mixed
-
You must use hosting services which provide you direct download links such as Mediafire or Dropbox (on Dropbox, to download a file rather than display it, you can use "dl=1" as a query parameter in your URL).
-
The environment is already placed in the internal storage. So, in "mDownloadDirectory", you will have to store only the path from the internal storage to your destination folder and not the full path from root directory.
-
Remember to add Recovery MD5 to RECOVERY_MD5_LIST.
- Download Recovery
- Download Recovery with Add-Ons
-
In the META-INF folder you have to include only the original updater-binary for your device and the updater-script.
-
If you are using Aroma Installer, just remove all stuff in the META-INF folder except for update-binary-installer and updater-script files. Then rename the update-binary-installer into update-binary.
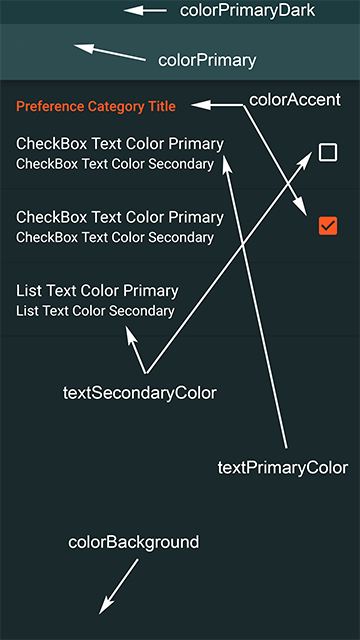
- colorPrimary
- colorPrimaryDark
- colorAccent
- colorBackground
- textPrimaryColor
- textSecondaryColor
- downloadCenterButtonBorderColor
- settingsPreferenceIconColor
- "agreement.html" which belongs to Agreement.
- "changelog.html" which belongs to Changelog.
- rom_build_number = write here the build number of your ROM.
- rom_developer_summary = write here the developer's name.
- rom_themer_summary = write here the themer's name.
- Sure, you can. You will have to register for a Google Play publisher account if you don't have already one.
-
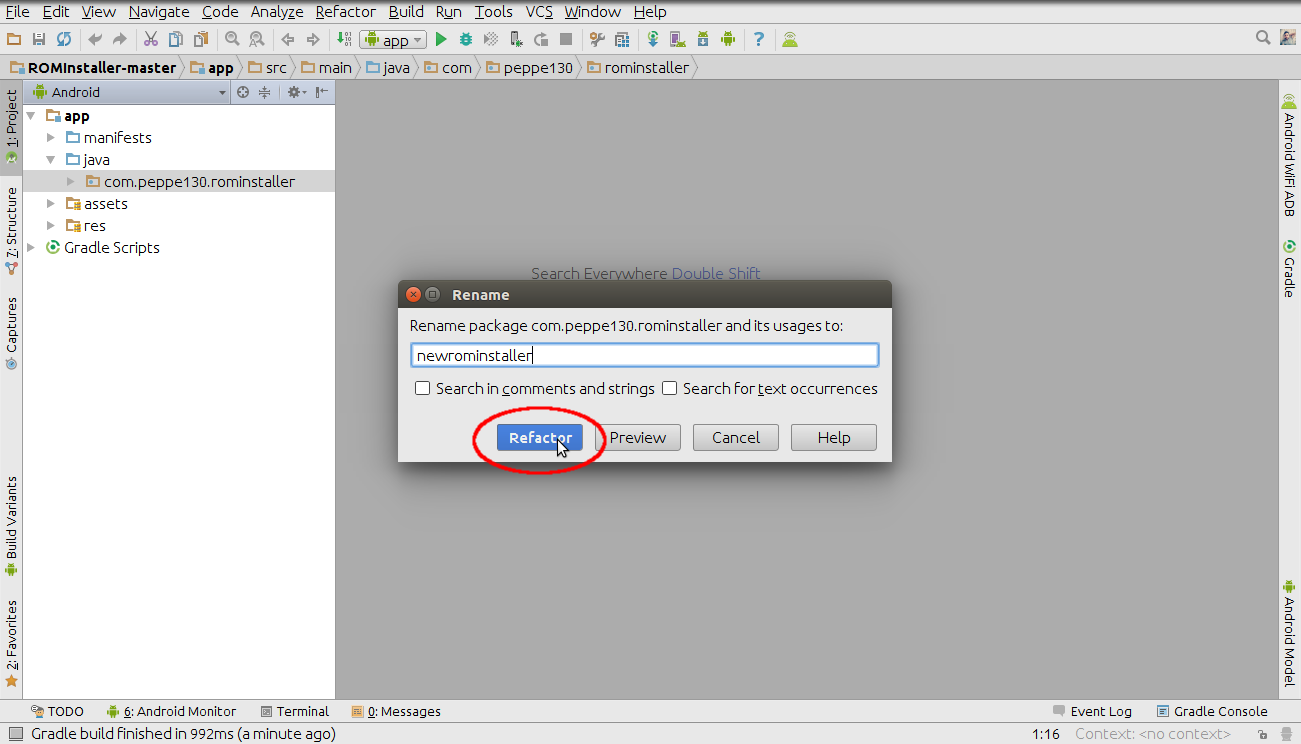
10. From the new window that opens, click on "Rename Package", enter a new name in lowercase
- (for example: **_newrominstaller_**) and click on **_"Refactor"._**
-
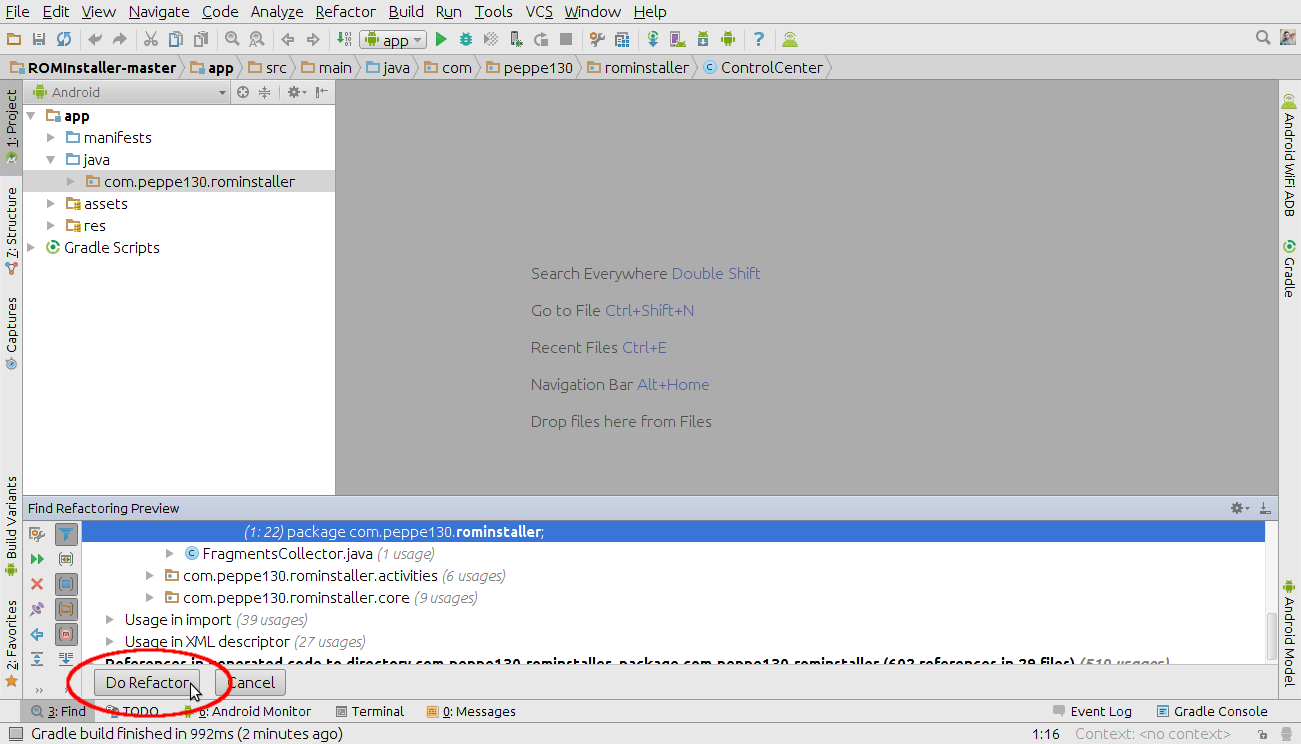
11. From the new window that appears at the bottom, click on "Do Refactor" and wait until the process is completed.
-
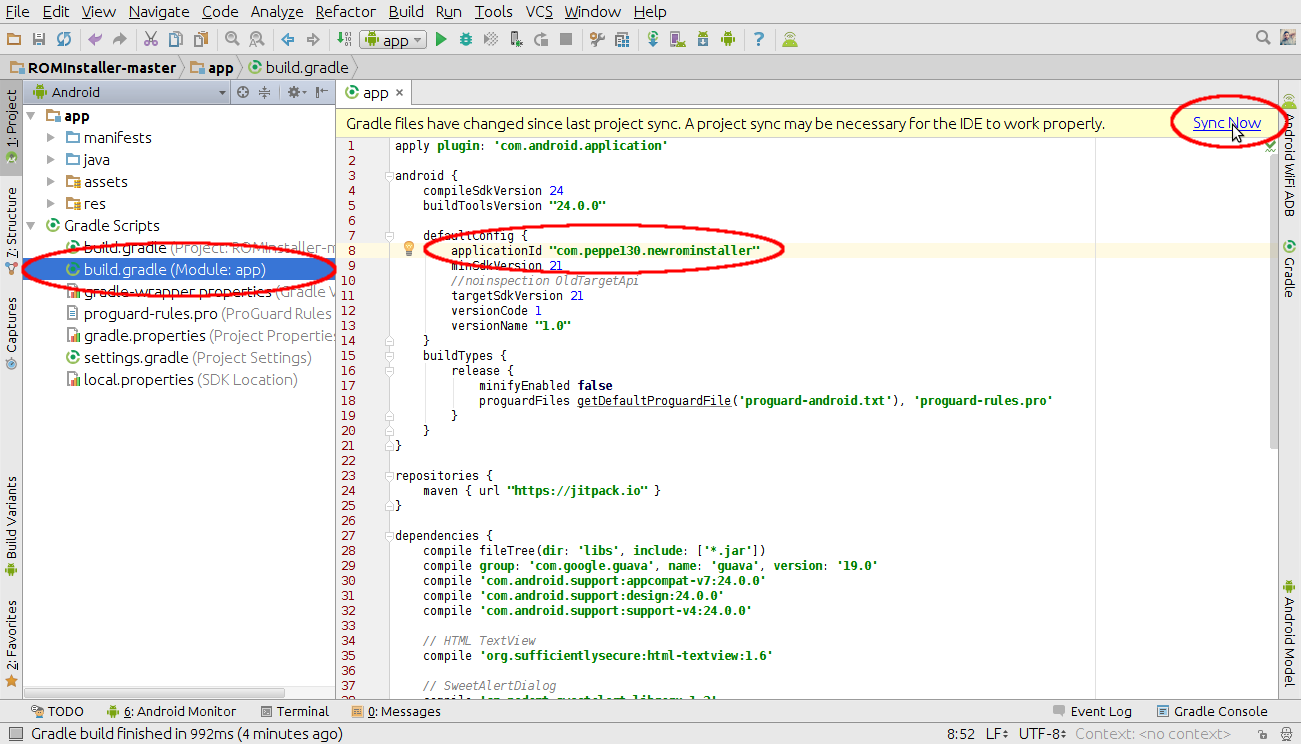
12. Expand the "Gradle Scripts" menu and open "build.gradle(Module: app)". Replace the old package name defined in "applicationId" with the new one. For example: applicationId "com.peppe130.newrominstaller".
NB:
Project is composed of two packages and two classes:
NB:
As written in the Introduction, the main feature of ROM Installer is its characteristic of being easily reprogrammable by the developer who adopts it. Control Center allows the developer to adjust the App behavior by changing a few lines of code.
The following items belong to Control Center:
Test mode is a special mode of the App that disables each control that would normally be required. It was created to allow the developer to quickly test the new compiled code. Remember to disable it in your release version.
Trial mode is another special mode that allows the developer to safely test the App on every device, no matter if it is compatible or not. It was created to allow the developer to test the App on multiple devices without the need to update the compatibility list. Remember to disable it in your release version.
To add a device to the compatibility list, open the Control Center class, enter the device model in quotation marks on the list and separate each other with a comma.
Example:
public static String[] DEVICE_COMPATIBILITY_LIST = new String[] {"Device", "Device2", "Device3"};As for the compatibility list, even for the MD5 just open the Control Center class, enter the alphanumeric code in quotation marks on the list and separate each other with a comma.
Example:
public static String[] ROM_MD5_LIST = new String[] {"YourFirstMD5", "YourSecondMD5", "YourThirdMD5"};or
public static String[] RECOVERY_MD5_LIST = new String[] {"YourFirstMD5", "YourSecondMD5", "YourThirdMD5"};To change UI, you have to open the Control Center class and change the value to the boolean "BUTTON_UI":
Once you have set up your XML file, you have to declare it in Java. Open the Control Center class, look for "FRAGMENTS_RESOURCES" Array and add your XML file name. Remember to separate each other with a comma.
For example:
public static Integer[] FRAGMENTS_RESOURCES = new Integer[] {
    R.xml.first_fragment, R.xml.second_fragment, R.xml.third_fragment
};Firstly open Control Center and look for "SHOULD_SHOW_HOME_FRAGMENT" variable and set its value to true.
Open the home_fragment_layout.xml file under "res/layout" and create a new layout for your Home Fragment.
Then open the Control Center class, look for the HomeFragment() method and inside it write the code in order to make
your layout views work.
Open Control Center class, look for "AVAILABLE_DOWNLOADS_NUMBER" variable and write the number of buttons you want to
set up in the Download Center. To set the text of each button, look for DownloadNameGetter method.
For each button you have to add a new case and, next to it, you have to write the button's ID.
For example:
@Nullable
@Contract(pure = true)
public static String DownloadNameGetter(Integer ID) {

    switch (ID) {

        case 0: // ID = 0;

            return "Text of the first button";

        case 1: // ID = 1;

            return "Text of the second button";

    }

    return null;

}The App is provided with an internal code that lets you download any type of file in different modes in order to satisfy every need.
After setting up the buttons, you will have to set up the action to run when they are clicked.
Look for DownloadActionGetter method in Control Center class. As for the button's text, for each case,
you will have to write your own download code.
For example:
public static void DownloadActionGetter(Integer ID) {

    String mDownloadLink, mDownloadDirectory, mDownloadedFileFinalName, mDownloadedFileMD5, mRecoveryPartition;

    switch (ID) {

        case 0: // Single download without MD5 check

            mDownloadLink = "YourDownloadLink";
            mDownloadDirectory = getString(R.string.rom_folder);
            mDownloadedFileFinalName = "File.zip";
            mDownloadedFileMD5 = null;

            Utils.StartSingleDownload(mDownloadLink, mDownloadDirectory, mDownloadedFileFinalName, mDownloadedFileMD5);

            break;

        case 1: // Single download with MD5 check

            mDownloadLink = "YourDownloadLink";
            mDownloadDirectory = getString(R.string.rom_folder);
            mDownloadedFileFinalName = "File.zip";
            mDownloadedFileMD5 = "3a416cafb312cb15ce6b3b09249fe6e6";

            Utils.StartSingleDownload(mDownloadLink, mDownloadDirectory, mDownloadedFileFinalName, mDownloadedFileMD5);

            break;

    }

}
String mDownloadLink = It's the download link of your file.
String mDownloadDirectory = It's the destination folder.
String mDownloadedFileFinalName = It's the name that the downloaded file should assume.
String mDownloadedFileMD5 = It's the correct MD5 of the file.
NB:
String mDownloadLink = "YourDownloadLink";
String mDownloadDirectory = getString(R.string.rom_folder);
String mDownloadedFileFinalName = "File.zip";
String mDownloadedFileMD5 = null;

Utils.StartSingleDownload(mDownloadLink, mDownloadDirectory, mDownloadedFileFinalName, mDownloadedFileMD5);String mDownloadLink = "YourDownloadLink";
String mDownloadDirectory = getString(R.string.rom_folder);
String mDownloadedFileFinalName = "File.zip";
String mDownloadedFileMD5 = "YourMD5";
Utils.StartSingleDownload(mDownloadLink, mDownloadDirectory, mDownloadedFileFinalName, mDownloadedFileMD5);// Download N°1
Utils.EnqueueDownload(
"YourDownloadLink",
getString(R.string.rom_folder),
"File.zip", null);
// Download N°2
Utils.EnqueueDownload(
"YourDownloadLink",
getString(R.string.rom_folder),
"File2.zip", null);
// Download N°3
Utils.EnqueueDownload(
"YourDownloadLink",
getString(R.string.rom_folder),
"File3.zip", null);
Utils.StartMultipleDownloads();// Download N°1
Utils.EnqueueDownload(
"YourDownloadLink",
getString(R.string.rom_folder),
"File.zip",
"YourMD5");
// Download N°2
Utils.EnqueueDownload(
"YourDownloadLink",
getString(R.string.rom_folder),
"File2.zip",
"YourMD5");
// Download N°3
Utils.EnqueueDownload(
"YourDownloadLink",
getString(R.string.rom_folder),
"File3.zip",
"YourMD5");
Utils.StartMultipleDownloads();In case you want to disable the MD5 check for a particular file, simply set "null" value as MD5 of that file.
// Download N°1 - MD5 check enabled
  Utils.EnqueueDownload(
  	"YourDownloadLink",
  	getString(R.string.rom_folder),
  	"File.zip",
  	"YourMD5");

// Download N°2 - MD5 check disabled
  Utils.EnqueueDownload(
  	"YourDownloadLink",
  	getString(R.string.rom_folder),
  	"File2.zip", null);

// Download N°3 - MD5 check enabled
  Utils.EnqueueDownload(
  	"YourDownloadLink",
  	getString(R.string.rom_folder),
  	"File3.zip",
  	"YourMD5");

Utils.StartMultipleDownloads();After setting up the buttons, you will have to set up the action to run when they are clicked.
Look for DownloadActionGetter method in Control Center class. As for the button's text, for each case,
you will have to write your own download code.
For example:
public static void DownloadActionGetter(Integer ID) {

    String mDownloadLink, mDownloadDirectory, mDownloadedFileFinalName, mDownloadedFileMD5, mRecoveryPartition;

    switch (ID) {

        case 0: // Download Recovery

            mDownloadLink = "YourDownloadLink";
            mDownloadDirectory = Utils.ACTIVITY.getString(R.string.rom_folder);
            mDownloadedFileFinalName = "Recovery.zip";
            mRecoveryPartition = "YourDeviceRecoveryPartition";

            Utils.StartFlashRecovery(mDownloadLink, mDownloadDirectory, mDownloadedFileFinalName, mRecoveryPartition);

            break;

        case 1: // Download Recovery with Add-Ons

            // Download Recovery
            mDownloadLink = "YourDownloadLink";
            mDownloadDirectory = Utils.ACTIVITY.getString(R.string.rom_folder);
            mDownloadedFileFinalName = "Recovery.zip";
            mRecoveryPartition = "YourDeviceRecoveryPartition";

            // Download Add-On N°1
            Utils.EnqueueDownload(
            	"YourDownloadLink",
            	Utils.ACTIVITY.getString(R.string.rom_folder),
            	"Add-On.zip",
            	"YourMD5");

            Utils.StartFlashRecoveryWithAddons(mDownloadLink, mDownloadDirectory, mDownloadedFileFinalName, mRecoveryPartition);

            break;

    }

}
String mDownloadLink = It's the download link of your file.
String mDownloadDirectory = It's the destination folder.
String mDownloadedFileFinalName = It's the name that the downloaded file should assume.
String mRecoveryPartition = It's the recovery partition of your device.
NB:
String mDownloadLink = "YourDownloadLink";
String mDownloadDirectory = getString(R.string.rom_folder);
String mDownloadedFileFinalName = "Recovery.zip";
String mRecoveryPartition = "YourDeviceRecoveryPartition";

Utils.StartFlashRecovery(mDownloadLink, mDownloadDirectory, mDownloadedFileFinalName, mRecoveryPartition);// Download Recovery
String mDownloadLink = "YourDownloadLink";
String mDownloadDirectory = getString(R.string.rom_folder);
String mDownloadedFileFinalName = "Recovery.zip";
String mRecoveryPartition = "YourDeviceRecoveryPartition";
// Download Add-On N°1
Utils.EnqueueDownload(
"YourDownloadLink",
getString(R.string.rom_folder),
"Add-On.zip",
"YourMD5");
// Download Add-On N°2
Utils.EnqueueDownload(
"YourDownloadLink",
getString(R.string.rom_folder),
"Add-On2.zip",
"YourMD5");
// Download Add-On N°3
Utils.EnqueueDownload(
"YourDownloadLink",
getString(R.string.rom_folder),
"Add-On3.zip",
"YourMD5");
Utils.StartFlashRecoveryWithAddons(mDownloadLink, mDownloadDirectory, mDownloadedFileFinalName, mRecoveryPartition);NB:
Firstly you need to mount /data partition. Once the /data partition is mounted, you will have access to the internal
memory and therefore to the preferences. To read the preferences, just use the standard syntax to retrieve files with .prop
extension:
if file_getprop("/sdcard/YourROMFolder/preferences.prop", "YourPreferenceID") == "PreferenceValue" then
	# Do something
endif;
Example:
# Mount /data partition
run_program("/sbin/mount", "-t", "auto", "/data");

# Read from preferences
if file_getprop("/sdcard/ROMFolder/preferences.prop", "wipe_data") == "true" then
	ui_print("- Wiping data");
else
	ui_print("- Skipping wipe data");
endif;

# Unmount /data partition
unmount("/data");To wipe the /data partition you can run the following Bash script from your updater-script:
#!/sbin/sh

# This command mounts all partitions.
/sbin/mount -a

# Write here the path to your /data partition.
DATA_PARTITION_PATH=/data

# Write here the path to your internal storage.
INTERNAL_STORAGE_PATH=/data/media/0

# Write here the name of the Android System "Download" folder.
ANDROID_SYSTEM_DOWNLOAD_FOLDER_NAME=Download

# Write here the name of your ROM Installer folder in the internal storage.
ROM_FOLDER_NAME=ROMInstaller

# Moving to /data partition.
cd $DATA_PARTITION_PATH

FILES=(*)

# Deleting everything in the /data partition except for the "media" folder.
for item in *; do
	if [ "$item" != "media" ]
		then rm -R "$item"
	fi
done

# Moving to internal storage.
cd $INTERNAL_STORAGE_PATH

FILES=(*)

# Deleting everything in the internal storage except for the "Download" and your ROM Installer folders.
for item in *; do
	if [ "$item" != "$ANDROID_SYSTEM_DOWNLOAD_FOLDER_NAME" ] && [ "$item" != "$ROM_FOLDER_NAME" ]
		then rm -R "$item"
	fi
done
The App has two themes: "AppTheme.Light" and "AppTheme.Dark". To change the default theme, open the
"AndroidManifest.xml" and edit the value of android:theme="".
To change the colors of the App, you have to open "colors.xml" file located in "res/values" menu.
The basic parameters are 8 for both Light and Dark themes:
To change the colors of the Dialogs, you have to open "styles.xml" file located in "res/values" menu. For each theme
there are <!-- Material Dialog Theme --> and <!-- Bouncing Dialog Theme --> sections. Below each section name
there are the parameters to edit the Dialog relating to the section.
To edit both changelog and agreement you will have to use HTML Text Formatting. In the "res/raw" menu there are two files:
Open "strings.xml" file located in "res/values" menu. At the bottom there is a "ROM Info" section composed of three strings:
To show a "Follow me" Dialog, open Control Center, look for the ROMDeveloperInfoAction() method and add
inside it the following code:
String[] mSocial = new String[] {"Google+", "Twitter"};

String[] mLinks = new String[] {"YourGoogle+Link", "YourTwitterLink"};

Utils.FollowMeDialog(mSocial, mLinks);
You can add as many social networks as you want. Just separate each other with a comma.
Example:
public static void ROMDeveloperInfoAction() {

  String[] mSocial = new String[] {"Google+", "Twitter"};

  String[] mLinks = new String[] {"YourGoogle+Link", "YourTwitterLink"};

  Utils.FollowMeDialog(mSocial, mLinks);

}You MUST distribute the App for FREE, you can not earn money by selling it. By the way you can sell your ROM via
your website and then, after the payment was successful, you can provide a link to download the App. You can not even use
the App to redirect users to your website in order to buy your ROM because the App is not a seller. Before publishing
remember to edit the App "versionCode" and "versionName" from Gradle in order to avoid conflicts with the
other already published versions of your App. If you are going to release your first version of ROM Installer, you can set the
following values in the Gradle: versionCode 1 and versionName "1.0".