เรียนรู้การใช้งาน stubby4j สำหรับ stub web service (เช่น REST)
คือ Stub HTTP(s) Server สำหรับจำลองหรือทดสอบระบบงานที่ต้องการใช้งาน Web service เช่น REST, WSDL และ SOAP หรือประเภทอื่น ๆ รวมทั้ง service ภายนอกอื่นๆ อีกด้วย
เราจะทดสอบใช้งานอย่างง่าย ๆ ด้วย "Hello world" ก่อนที่จะเริ่มทดสอบ เราต้องเตรียมระบบให้พร้อมก่อน โดยติดตั้ง java ให้ตรงกับเวอร์ชันของ stubby4j ที่เราจะใช้งาน
- version >= 4.0.0: Oracle JRE v1.8.0_60
- version >= 3.0.0: Oracle JRE v1.7.0_76
- version = 2.0.22: Oracle JRE v1.7.0_04
- version < 2.0.22: Oracle JRE 1.6.0_65-b14-462
- ดาวน์โหลด stubby4j เวอร์ชันล่าสุดที่นี่
- สร้างไฟล์ YAML ตามนี้ (ตั้งชื่อว่า
hello.yaml)
-  request:
      method: GET
      url: /hello-world

   response:
      status: 200
      headers:
         content-type: application/json
body: '{"text": "Hello World!"}'- จากนั้นรันด้วยคำสั่ง
java -jar stubby4j-x.x.xx.jar -d hello.yaml
รันแล้วจะได้ผลลัพธ์ประมาณนี้
SLF4J: Failed to load class "org.slf4j.impl.StaticLoggerBinder".
SLF4J: Defaulting to no-operation (NOP) logger implementation
SLF4J: See http://www.slf4j.org/codes.html#StaticLoggerBinder for further details.
Loaded: [GET] /hello-world

stubby4j successfully started after 1317 milliseconds at 2018-08-09 23:03:44+0700

Admin portal configured at http://localhost:8889
Admin portal status enabled at http://localhost:8889/status
Stubs portal configured at http://localhost:8882
Stubs portal configured with TLS at https://localhost:7443 using internal keystore

Quit: ctrl-c
- ลองทดสอบด้วย Postman
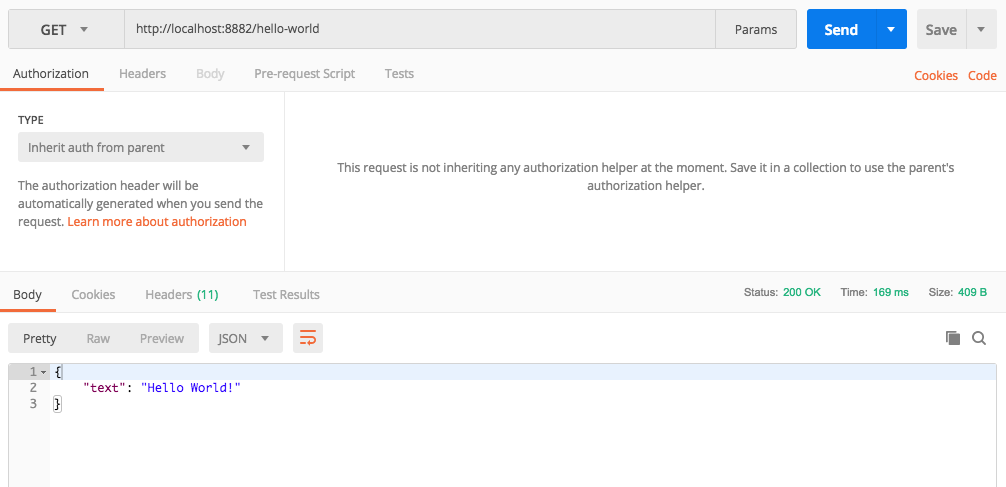
จากตัวอย่าง Hello world เป็นเพียงการทดลอง response ข้อมูล JSON แบบง่าย ๆ
แต่ถ้าเราต้องการ response ที่ซับซ้อนหน่อย หรือต้องการทดสอบ request ไปที่หลาย ๆ URI เราสามารถทำตามตัวอย่างถัดไปได้เลย
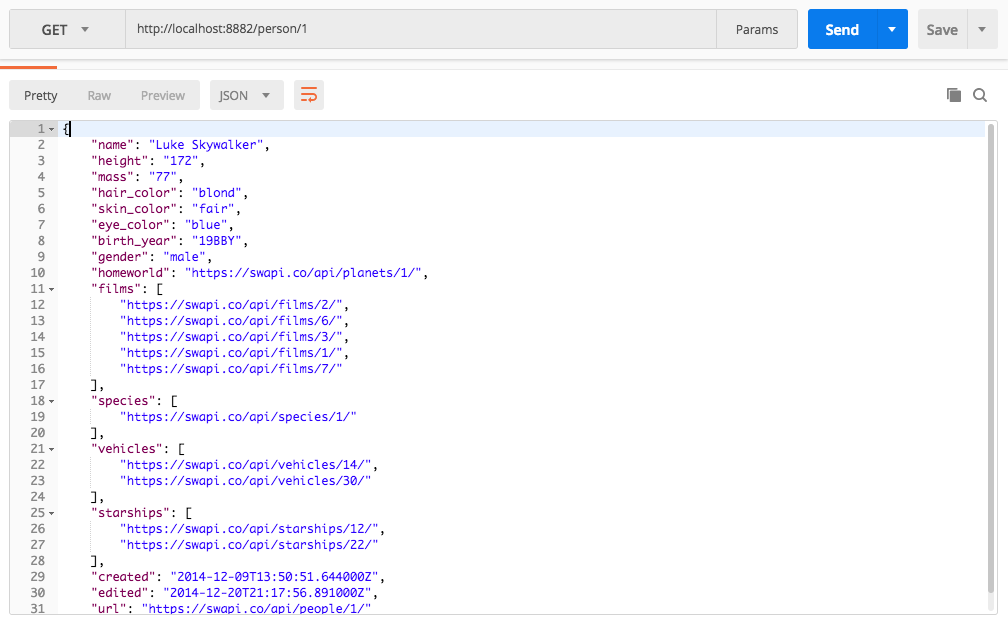
ในตัวอย่างนี้จะลองทำเหมือนเว็บ https://swapi.co ถ้าส่ง request ไปที่ /person/1 จะได้รับ
{
"name": "Luke Skywalker",
"height": "172",
"mass": "77",
"hair_color": "blond",
"skin_color": "fair",
"eye_color": "blue",
"birth_year": "19BBY",
"gender": "male",
"homeworld": "https://swapi.co/api/planets/1/",
"films": [
"https://swapi.co/api/films/2/",
"https://swapi.co/api/films/6/",
"https://swapi.co/api/films/3/",
"https://swapi.co/api/films/1/",
"https://swapi.co/api/films/7/"
],
"species": [
"https://swapi.co/api/species/1/"
],
"vehicles": [
"https://swapi.co/api/vehicles/14/",
"https://swapi.co/api/vehicles/30/"
],
"starships": [
"https://swapi.co/api/starships/12/",
"https://swapi.co/api/starships/22/"
],
"created": "2014-12-09T13:50:51.644000Z",
"edited": "2014-12-20T21:17:56.891000Z",
"url": "https://swapi.co/api/people/1/"
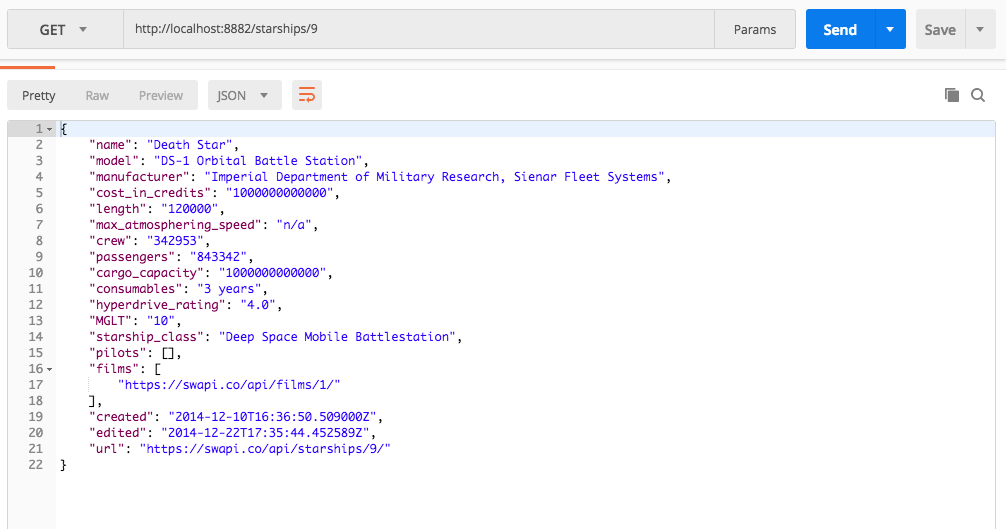
}หรือถ้าส่ง request ไปที่ /starships/9 จะได้รับ
{
	"name": "Death Star",
	"model": "DS-1 Orbital Battle Station",
	"manufacturer": "Imperial Department of Military Research, Sienar Fleet Systems",
	"cost_in_credits": "1000000000000",
	"length": "120000",
	"max_atmosphering_speed": "n/a",
	"crew": "342953",
	"passengers": "843342",
	"cargo_capacity": "1000000000000",
	"consumables": "3 years",
	"hyperdrive_rating": "4.0",
	"MGLT": "10",
	"starship_class": "Deep Space Mobile Battlestation",
	"pilots": [],
	"films": [
		"https://swapi.co/api/films/1/"
	],
	"created": "2014-12-10T16:36:50.509000Z",
	"edited": "2014-12-22T17:35:44.452589Z",
	"url": "https://swapi.co/api/starships/9/"
}
ขั้นแรก เราจะนำข้อมูล JSON ดังกล่าว ไปสร้างไฟล์ .json ตามลำดับ คือ person-1.json และ starship-9.json
-  request:
      method: [GET]
      url: /person/1

   response:
      -  status: 200
         headers:
            content-type: application/json
         file: person-1.json

-  request:
      method: [GET]
      url: /starships/9

   response:
      -  status: 200
         headers:
            content-type: application/json
file: starship-9.jsonjava -jar stubby4j-x.x.xx.jar -d starwar.yaml
/person/1
/starships/9
เพียงเท่านี้เราก็น่าจะนำ stubby4j ไปประยุกต์ใช้ในงานของเราได้แล้ว