| description |
|---|
This article walks through how to configure alerts and notifications for your APIs. |
Gravitee allows you to set up alerts and notifications based on events recognized by the Gateway. You can set up notifications that appear in the Gravitee API Management Console or that are sent to Gravitee users via email. You can also create custom alerts based on user-defined rules and conditions. Keep reading to learn how to configure alerts and notifications.
{% @arcade/embed flowId="vLOPiPtuGAbHWNJj6LRN" url="https://app.arcade.software/share/vLOPiPtuGAbHWNJj6LRN" %}
APIM includes 3 categories of notifications and 3 types of notifiers. Their purpose and configuration are described below, along with customization via templates.
{% tabs %} {% tab title="Portal" %} Portal notifications relate to the platform and include the following:
| Name | What triggers it? |
|---|---|
| First Login | User logs in for the first time |
| Group invitation | User is invited in a group |
| Message | Custom message is sent to an Environment Role via notification |
| New Support Ticket | New support ticket is created |
| Password Reset | Password is reset |
| User Created | New user is created |
| User Registered | User is registered |
| User Registration Request | New user is created and automatic validation is disabled |
To subscribe to Portal notifications, go to APIM Console > Settings > Notifications:

{% tab title="API" %} API notifications relate to a specific API and include the following:
| Name | What triggers it? |
|---|---|
| Accept API review | API review is accepted |
| API Deprecated | API is deprecated |
| API key Expired | API key is expired |
| API key Renewed | API key is renewed |
| API key Revoked | API key is revoked |
| API Started | API is started |
| API Stopped | API is stopped |
| Ask for API review | API is ready for review |
| Message | Custom message is sent to an Application Role via notification |
| New Rating | New rating is submitted |
| New Rating Answer | New answer is submitted |
| New Subscription | Subscription is created |
| New Support Ticket | New support ticket is created |
| Reject API review | API review is rejected |
| Subscription Accepted | Subscription is accepted |
| Subscription Closed | Subscription is closed |
| Subscription Paused | Subscription is paused |
| Subscription Rejected | Subscription is rejected |
| Subscription Resumed | Subscription is resumed |
| Subscription Transferred | Subscription is transferred |
To subscribe to notifications related to a specific API, go to APIM Console > APIs, select the API, and click Notifications:

{% tab title="Application" %} Application notifications relate to a specific application and include the following:
| Name | What triggers it? |
|---|---|
| New Subscription | Subscription is created |
| New Support Ticket | New support ticket is created |
| Subscription Accepted | Subscription is accepted |
| Subscription Closed | Subscription is closed |
| Subscription Paused | Subscription is paused |
| Subscription Rejected | Subscription is rejected |
| Subscription Resumed | Subscription is resumed |
| Subscription Transferred | Subscription is transferred |
To subscribe to notifications related to a specific application, go to APIM Console > Applications, select the application, and click Notifications:

{% tabs %} {% tab title="Portal" %} The Portal notifier is the default notifier and sends messages to users logged in to the Developer Portal. Notifications appear in the Portal or Management Console.
They can be displayed by clicking the bell icon in the header menu of APIM Console:

In the Developer Portal, notifications are displayed in a page accessible from the user menu:

The templates of Portal notifications can be customized in Settings. For more information, see Templates. {% endtab %}
{% tab title="Email" %} Email notifiers send an email to a specific list of email addresses. To create a new email notifier:
- Define the email notifier (who the email notification will come from).
- Define the email list (who the email notification will be sent to). Multiple emails can be added as long as they are separated by a
,or a;. - Subscribe to the desired notifications.
{% hint style="info" %} A default email notifier is created for every API. All notifications are preselected and email is sent to the primary owner. {% endhint %}

The templates of email notifications can be customized in Settings. {% endtab %}
{% tab title="Webhook" %} Webhook notifiers send an HTTP POST request to a configured URL. The request contains two headers and a JSON body representing the message. The headers are:
X-Gravitee-Event: Contains the event ID (e.g.,API_KEY_REVOKED)X-Gravitee-Event-Scope: Contains the type of notification (e.g.,API)
The JSON body is similar to the following (depending on the notification type, some fields may not be present in the body):
{
  "event": "",
  "scope": "",
  "api": {
    "id": "",
    "name": "",
    "version": ""
  },
  "application": {
    "id": "",
    "name": ""
  },
  "owner": {
    "id": "",
    "username": "",
    "owner": ""
  },
  "plan": {
    "id": "",
    "name": "",
    "security": "",
    "plan": ""
  },
  "subscription": {
    "id": "",
    "status": "",
    "subscription": ""
  }
}
To create a Webhook notifier:
- Click the plus icon
.
- Choose the Default Webhook Notifier type and give the notifier a name.
- Add the URL which APIM will call to send notifications.
- Subscribe to the desired notifications. {% endtab %} {% endtabs %}
Email and Portal notification templates are based on HTML and YML files, located here:
templates:
  path: ${gravitee.home}/templates
These templates can be overridden in APIM Console > Organization > Notifications > Templates:

Email templates that are sent for specific actions and not related to a notification can be customized. Typically, these emails are intended for specific users.
The header.html file that is included by default in all email templates can also be customized.

Portal and email notifiers can be configured for most notifications. To customize a template, toggle the switch Override default template and update the title and/or content.


The available attributes are summarized below. Use the Apache Freemarker template engine to add specific information to templates, e.g., ${user.name} or ${api.metadata['foo-bar']}.
| API | Application | Group | Plan | Owner/User | Subscription |
|---|---|---|---|---|---|
| name | name | name | name | username | status |
| description | description | - | description | firstname | request |
| version | type | - | order | lastname | reason |
| role | status | - | publishedAt (Date) | displayName | processedAt |
| metadata (Map) | role | - | closedAt (Date) | startingAt | |
| deployedAt (Date) | - | - | - | - | endingAt |
| createdAt (Date) | createdAt (Date) | createdAt (Date) | createdAt (Date) | - | closedAt |
| updatedAt (Date) | updatedAt (Date) | updatedAt (Date) | updatedAt (Date) | - | subscribedAt |
<html>
	<body style="text-align: center;">
		<header>
			<#include "header.html" />
		</header>
		<div style="margin-top: 50px; color: #424e5a;">
			<h3>Hi ${owner.username},</h3>
			<p>The API Key <code>${apiKey}</code> has been expired.
		</p>
	</body>
</html>{% hint style="info" %} The following documentation is only relevant if you have Gravitee Alert Engine enabled, which is an Enterprise-only capability. To enable the following alerting capabilities, please contact us or reach out to your CSM. {% endhint %}
When configuring an API's settings, you can also set up alerting conditions for the Gateway. To configure alerts for an API, select the API from the APIs menu. Then, under Notifications, select Alerts.
If you already have alerts configured, you'll see the configured alerts. If not, you'll see a blank alerts menu and a + icon.

Blank alerts page
Select the + icon to create your first alert. On the Create a new alert page, you can configure the following:
- General settings: Name, Rule (Gravitee includes several pre-built rules), Severity, Description
- Timeframe: Create a timeline for this alerting mechanism
- Condition: Set conditions for when your rule should operate and trigger alerts
- Filters: Define a subset of events to which your conditions and rules are applied
By default, alerts will show up in your Dashboard under the Alerts tab and on the Alerts page.

You can see alerts in the Alerts tab and the Alerts page.
In addition to viewing alerts in these locations, you can configure notifications that are attached to these alerts. This is done on the Create a new alert page under the Notifications tab**.** On this page, you can:
- Define a dampening rule: Limit the number of notifications if the trigger is fired multiple times for the same condition
- Add a notification: Add a notification type to your alerts to trigger notifications when alerts are processed. The available notification channels are email, Slack, system email, and Webhook.
Depending on the notification channel you choose, you will need to configure multiple settings. Please see the tabs below for more information.
{% tabs %} {% tab title="Email" %} For email notifications, you can define the following:
- SMTP Host
- SMTP Port:
- SMTP Username:
- SMTP Password:
- Allowed authentication methods
- The "sender" email addresses
- Recipients
- The subject of the email
- The email body content
- Whether or not to enable TLS
- Whether or not to enable SSL trust all
- SSL key store
- SSL key store password

Email notifications for email alerting
{% endtab %}{% tab title="Slack" %} If you choose Slack as your notification channel, you can define the following:
- The Slack channel where you want the alert sent
- The Slack token of the app or the Slackbot
- Whether or not to use the system proxy
- The content of the Slack message

Slack notifications for API alerting
{% endtab %}{% tab title="System email" %} If you choose System email, you will need to define:
- The "From" email address
- The recipients of the email
- The subject of the email
- The body content of the email

System email notifications
{% endtab %}{% tab title="Webhook" %} If you want to choose Webhook as your notification channel, you will need to define the following:
- HTTP Method: this defines the HTTP method used to invoke the Webhook
- URL: this defines the url to invoke the webhook
- Request headers: add request headers
- Request body: the content in the request body
- Whether or not to use the system proxy to call the webhook

Webhook notifications
{% endtab %} {% endtabs %}To assist with alert configuration, sample alert templates useful to many teams are shown below.
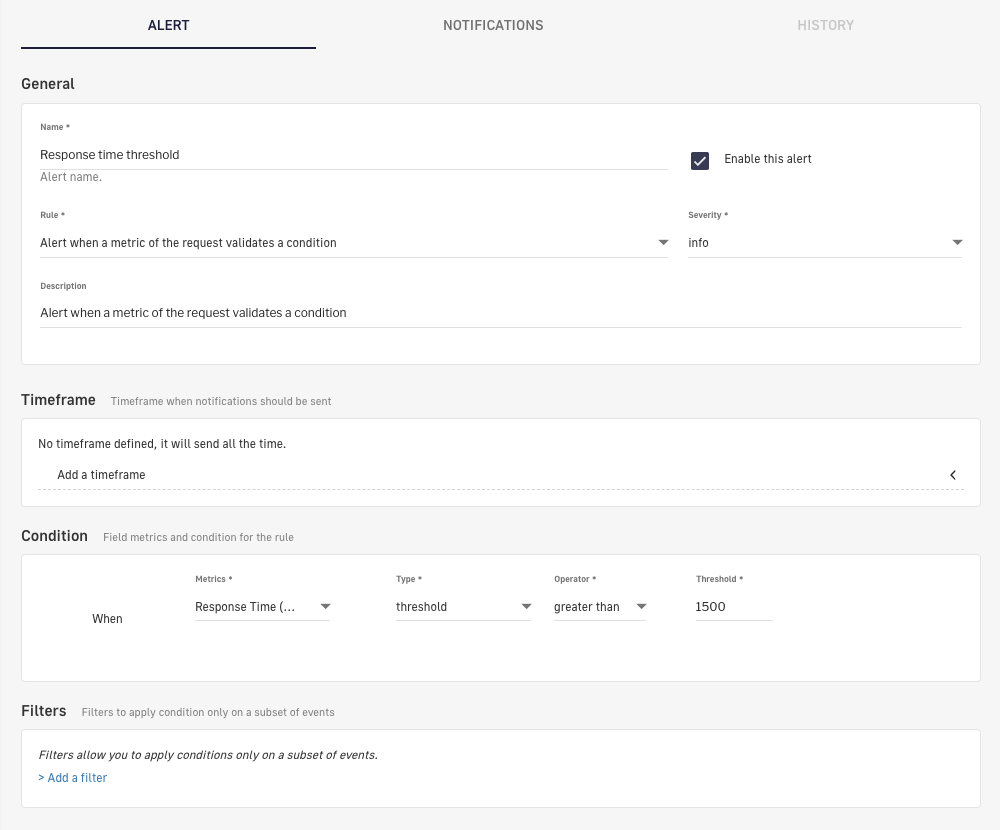
{% tabs %} {% tab title="Response time limit" %} To configure an alert for response times exceeding a threshold of 1500ms:
{% tab title="50th percentile reached" %} To configure an alert for the 50th percentile of response times exceeding 200 ms in the last 5 minutes:
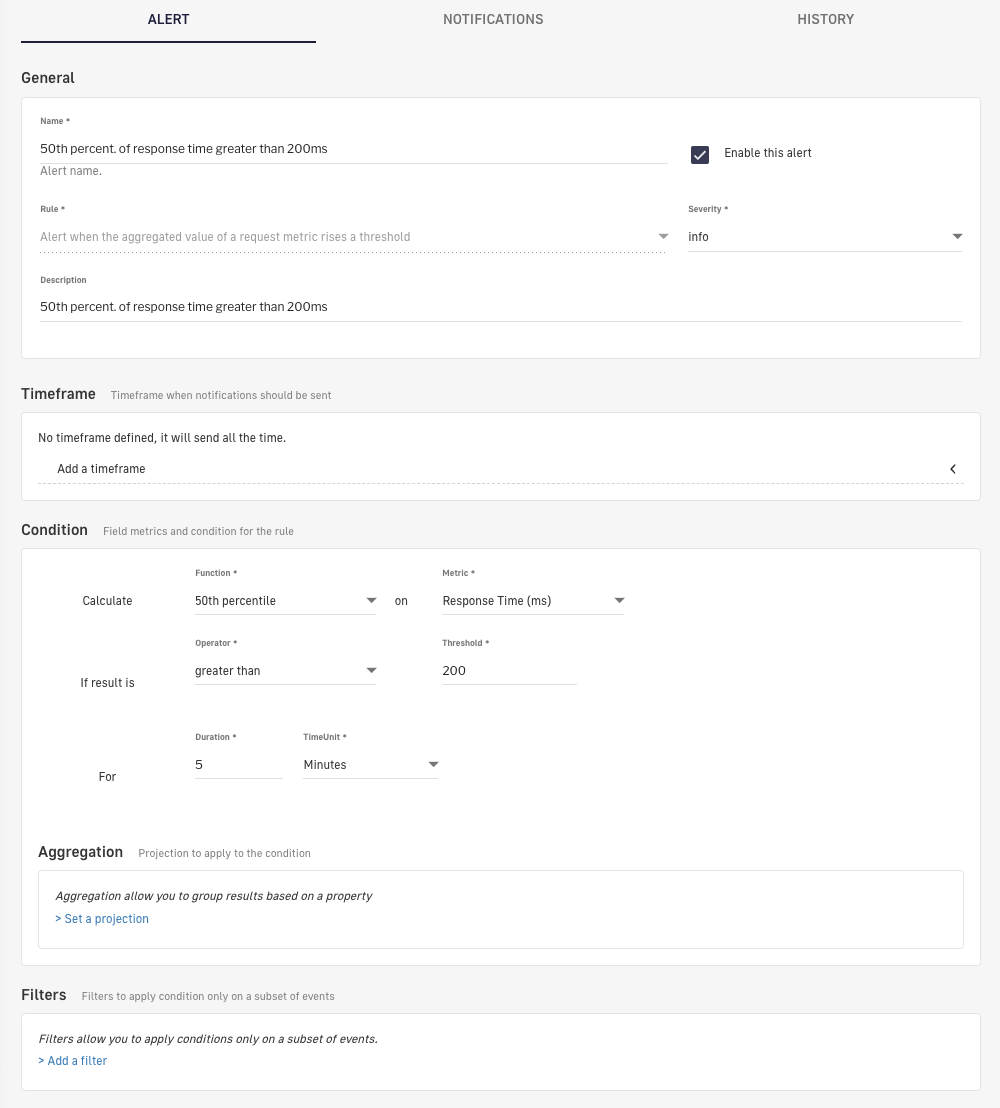
Alert for 50th percentile of response time greater than X ms
{% endtab %}{% tab title="Quota reached" %} To configure an alert for reaching the quota limit on requests:

Alert for reaching the quota limit on requests
{% endtab %} {% endtabs %}{% tabs %} {% tab title="Invalid API key" %} To trigger an alert when an invalid API key is passed to the Gateway:
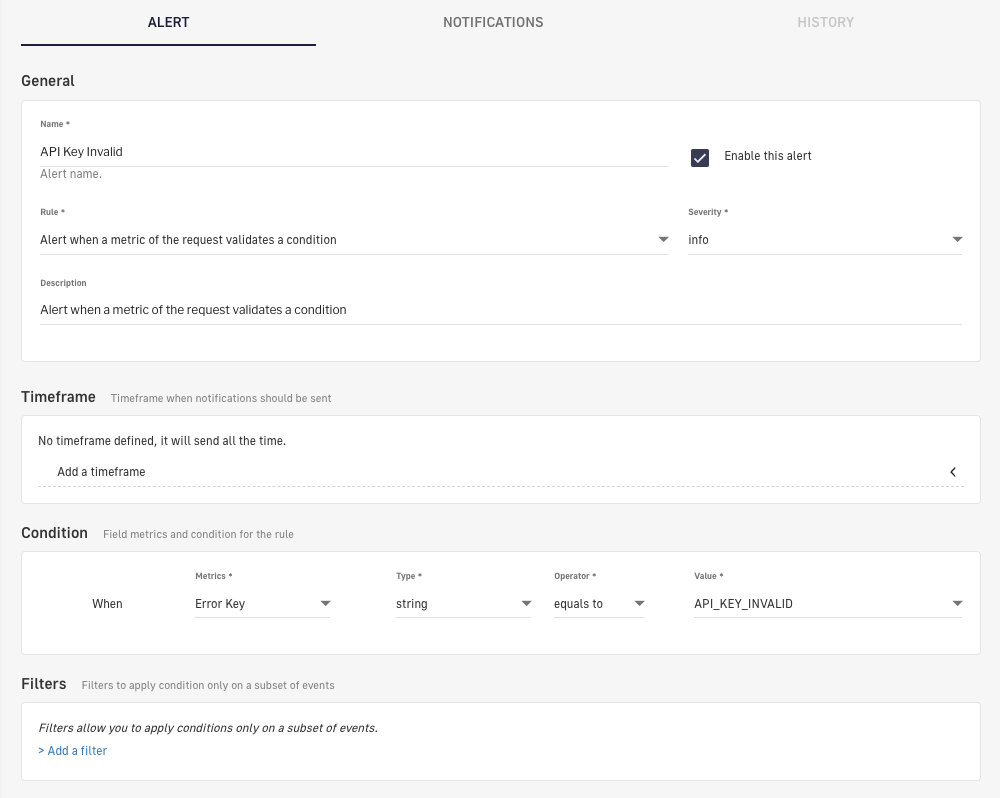
Invalid API key alert
{% endtab %}{% tab title="Errors per interval" %} To configure an alert for the number of 5xx errors reaching a threshold of 10 in the last 5 minutes:

Alert for too many errors in the last five minutes
{% endtab %}{% tab title="No requests in X min" %} To configure an alert for no requests made to the API during the last minute:
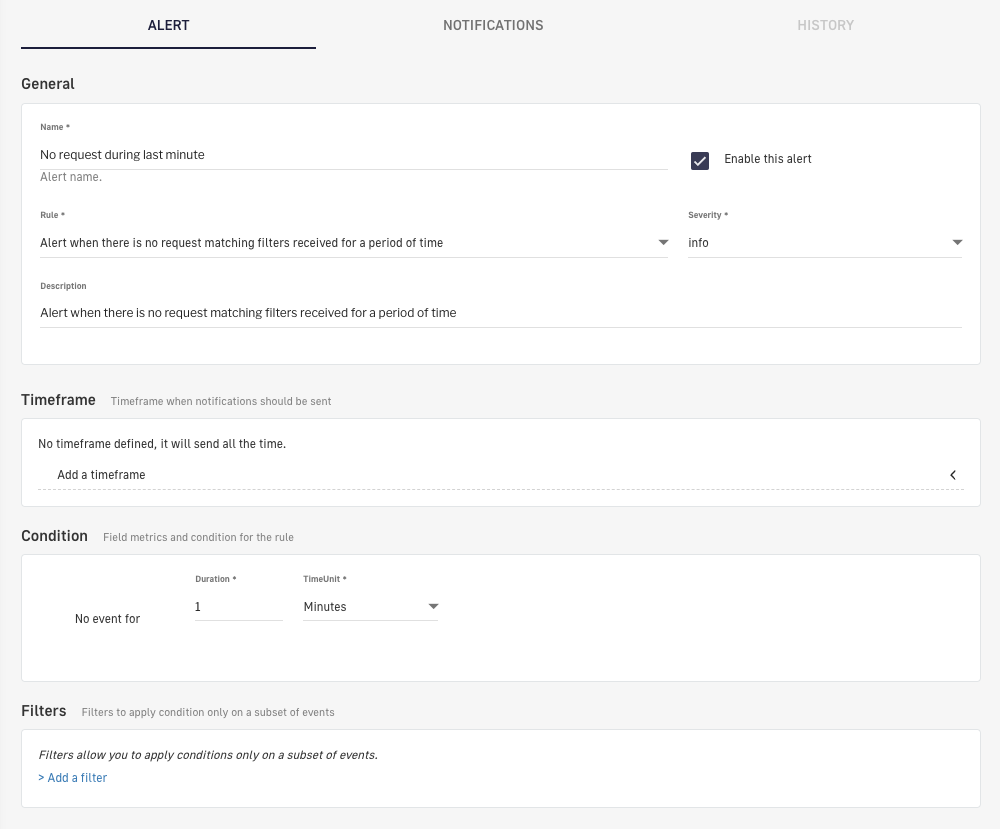
Alert for no API requests in the last minute
{% endtab %}{% tab title="Filtered no requests in X min" %}
The following example is the same as above, but filters on my-application:

Alert for no API requests from my application in the last minute
{% endtab %} {% endtabs %}