09. How to make various DACs work
sudo nano /etc/modprobe.d/alsa-blacklist.conf
Enter the following text:
blacklist snd_bcm2835
Ctrl-X, Enter
You can buy this DAC here:
Source: HifiBerry installation instructions
sudo nano /etc/modprobe.d/raspi-blacklist.conf
Remove or comment (#) the following lines:
blacklist i2c-bcm2708
blacklist snd-soc-pcm512x
blacklist snd-soc-wm8804
Edit modules:
sudo nano /etc/modules
Remove or comment (#) the line:
snd_bcm2835
Edit /boot/config.txt
sudo nano /boot/config.txt
Add the following line:
dtoverlay=hifiberry-dacplus
Some alsa configuration:
sudo nano /etc/asound.conf
Paste the text below:
pcm.!default  {
 type hw card 0
}
ctl.!default {
 type hw card 0
}
Reboot
sudo reboot
Test if everything is OK:
aplay -l
You should see this:
pi@raspberrypi ~ $ aplay -l
**** List of PLAYBACK Hardware Devices ****
card 0: sndrpihifiberry [snd_rpi_hifiberry_dac], device 0: HifiBerry DAC HiFi pcm5102a-hifi-0 []
Subdevices: 1/1
Subdevice #0: subdevice #0
Note the HifiBerry DAC+ uses GPIO 18-21, so don't use these pins for anything else, such as LIRC.
Make all changes to /etc/mpd.conf as described in "Build the software".
Install mediaplayer as described in "Build the software".
##GPIO pin usage:
###HiFiBerry DAC
Only the pins on the P5 header are used for the HiFiBerry DAC
###HiFiBerry Digi and Amp
GPIO2-3 are used by our products for configuration. If you are experienced with I2C, you might add other slave devices, if you a a novice, we don’t recommend this at all. GPIOs 28-31 are used for the sound interface. You can’t use them for any other purpose.
###HiFiBerry DAC+, Digi+ and Amp+
GPIO2-3 are used by our products for configuration. If you are experienced with I2C, you might add other slave devices, if you a a novice, we don’t recommend this at all. GPIOs 18-21 are used for the sound interface. You can’t use them for any other purpose.
Before you decide to buy this DAC, think about it twice. This board has very extensive sound related capabilities but is very difficult to work with. It is likely that it will not cooperate well with other functionality you may want to build into your system. The sound quality of this DAC is very good, but if you only need sound output, I strongly suggest you use another DAC board.
You can buy this DAC here:
Cirrus-Wolfson DAC at Element 14
Start with the latest installation of wheezy as described in "Build the software".
Source: https://blog.georgmill.de/2015/02/18/update-for-wolfson-audio-card-on-raspberry-pi/
wget https://blog.georgmill.de/wp-content/uploads/2015/02/linux-image-3.12.33-rt47-georg_3.12.33-rt47-georg-1_armhf.deb
dpkg -i linux-image-3.12.33-rt47-georg_3.12.33-rt47-georg-1_armhf.deb
sudo mv /boot/vmlinuz-3.12.33-rt47-georg /boot/kernel-rt-georg.img
sudo nano /boot/config.txt
Change or add this line:
kernel=kernel-rt-georg.img
Edit modules:
sudo nano /etc/modules
and change OR add these lines:
spi-bcm2708
i2c-bcm2708
arizona-spi
snd-soc-wm5102
snd-soc-pcm5102a
snd-soc-wm8804
snd-soc-rpi-wsp
snd-soc-rpi-wsp

bcm2708-rng
snd-bcm2835
gpio_arizona
arizona_micsupp
snd_soc_bcm2708_i2s
snd-soc-arizona
snd-soc-wm-adsp
snd-soc-wm5102
snd-soc-rpi-wsp
Edit blacklist:
sudo nano /etc/modprobe.d/raspi-blacklist.conf
and change OR add these lines:
#blacklist spi-bcm2708
#blacklist i2c-bcm2708
blacklist snd-soc-pcm512x
#blacklist snd-soc-wm8804
softdep arizona-spi pre: arizona-ld
Edit cmdline.txt:
sudo nano /boot/cmdline.txt
and change OR add this line to the other boot params
sdhci_bcm2708.enable_llm=0
Reboot
sudo shutdown -r now
If everything runs o.k.
uname -r
should show
3.12.33-rt47-georg
Now you have to create a script that will tell the Raspberry Pi to output sound to the Wolfson DAC:
mkdir use_case_scripts
cd use_case_scripts
sudo nano Playback_to_Lineout.sh
Paste the text below:
#!/bin/bash

#Playback from AP to Headset
amixer -Dhw:0 cset name='HPOUT2 Digital Switch' on
amixer -Dhw:0 cset name='HPOUT2L Input 1' AIF1RX1
amixer -Dhw:0 cset name='HPOUT2L Input 1 Volume' 32
amixer -Dhw:0 cset name='HPOUT2R Input 1' AIF1RX2
amixer -Dhw:0 cset name='HPOUT2R Input 1 Volume' 32

# The following command can be used to test
# aplay -Dhw:0 -r 44100 -c 2 -f S32_LE <file>
Ctrl-X-Enter
Make the file executable:
sudo chmod +x Playback_to_Lineout.sh
Run the script:
./Playback_to_Lineout.sh
Make the changes permanent:
sudo alsactl store
Reboot:
sudo reboot
Test if everything is OK:
aplay -l
You should see this:
**** List of PLAYBACK Hardware Devices ****
card 0: sndrpiwsp [snd_rpi_wsp], device 0: WM5102 AiFi wm5102-aif1-0 []
  Subdevices: 1/1
  Subdevice #0: subdevice #0
Make all changes to /etc/mpd.conf as described in "Build the software".
Install mediaplayer as described in "Build the software".
In case you want to add functionality through the GPIO pins, you can use the Extension Header on the Cirrus-Logic Audio Card.

The available expansion header pins are:
| EXP pin | RPi Pin | GPIO |
|---|---|---|
| 1 | 2 | 5V |
| 2 | - | 3.3V |
| 7 | 6 | GND |
| 8 | 6 | GND |
| 13 | 6 | GND |
| 14 | 29 | 5 |
| 16 | 22 | 25 |
| 17 | 31 | 6 |
| 18 | 32 | 12 |
| 19 | 36 | 16 |
| 20 | 37 | 26 |
It is possible to use the on-board volume control. However, at any volume setting above 70 there is very noticeable and horrible distortion.
In order to activate the on-board volume control:
sudo nano /etc/mpd.conf
Change the appropriate settings as below:
audio_output {

  type           "alsa"
  name           "Output"
  device         "hw:0,0"
  mixer_control  "HPOUT2 Digital"
  mixer_device   "hw:0"
  mixer_index    "0"
  dop    "no"
}
Ctrl-X-Y-Enter.
If you want to undo the volume control (for instance to avoid the terrible distortion), change the appropriate settings as below:
 	audio_output {

  type           "alsa"
  name           "Output"
 #	  device         "hw:0,0"
 #	  mixer_control  "HPOUT2 Digital"
 #	  mixer_device   "hw:0"
 #	  mixer_index    "0"
 #	  dop    "no"
}
Ctrl-X-Y-Enter.
Source: [https://www.bostonenginerd.com/posts/getting-the-wolfson-audio-card-working-with-volumio/](on-board volume control for Wolfson/Cirrus card)
Sources:
Raspberry Pi Forum Raspberry Pi documentation
This was tested with a Sabre ESS9023 DAC board from www.hifimediy.com that can be found here: Sabre ESS9023 DAC Board), in combination with a Raspberry Pi Model B.

This instruction may also work for other DAC chips such as the PCM5102A. We tested the predecessor of this one: PCM5102A DAC

The Raspberry Pi is running the 3.18 kernel, which deals with peripherals in a different way than previous kernels. This kernel uses the Device Tree mechanism.
The Raspberry Pi Model B uses the P5 header. use the image below to connect your DAC to the P5 header. Notice that there is no connection for the master clock as the DAC contains a crystal that creates the master clock on the DAC board. The Raspberry Pi does not provide a master clock.

sudo nano /etc/modules
Comment out (#) the following line:
snd_bcm2835
Now we need to load the correct device tree file by editing /boot/config.txt:
sudo nano /boot/config.txt
Add the following lines at the end of the file:
dtparam=i2c_arm=on
dtparam=i2s=on
dtoverlay=hifiberry-dac
Save the file (Ctrl-X, Y, Enter)
Create the sound.conf file as follows:
sudo nano /etc/asound.conf

pcm.!default  {
 type hw card 0
}
ctl.!default {
 type hw card 0
}
Save the file (Ctrl-X, Y, Enter) and reboot
sudo reboot
After reboot, check if the DAC is selected as your sound card:
aplay -l
Make all changes to /etc/mpd.conf as described in "Build the software".
Install mediaplayer as described in "Build the software".

Note that this card has an IR receiver built in. The IR receiver is connected to GPIO26. Remove JP2 to disable the IR receiver.
sudo nano /etc/modules
Comment out (#) the following line:
snd_bcm2835
Add the following lines:
bcm2708_dmaengine
snd_soc_pcm512x
snd_soc_hifiberry_dacplus
snd_soc_bcm2708_i2s
Now we need to load the correct device tree file by editing /boot/config.txt:
sudo nano /boot/config.txt
Add the following lines at the end of the file:
dtparam=i2c_arm=on
dtparam=i2s=on
dtoverlay=hifiberry-dacplus
Save the file (Ctrl-X, Y, Enter)
Create the sound.conf file as follows:
sudo nano /etc/asound.conf

pcm.!default  {
 type hw card 0
}
ctl.!default {
 type hw card 0
}
Save the file (Ctrl-X, Y, Enter) and reboot
sudo reboot
After reboot, check if the DAC is selected as your sound card:
aplay -l
You should see this:
card 0: sndrpihifiberry [snd_rpi_hifiberry_dacplus], device 0: HiFiBerry DAC+ HiFi pcm512x-hifi-0
Subdevices: 0/1
Subdevice #0: subdevice #0
Make all changes to /etc/mpd.conf as described in "Build the software".
Install mediaplayer as described in "Build the software".
GPIO Pin Usage:
GPIO2-3 are used for configuration. GPIOs 18-21 are used for the sound interface. You can’t use them for any other purpose.

Sources:
http://www.runeaudio.com/forum/generic-i-s-es9018k2m-dac-board-t6177.html http://archphile.org/howto/i2s-dacs-and-the-raspberry-pi/
Hardware connections:
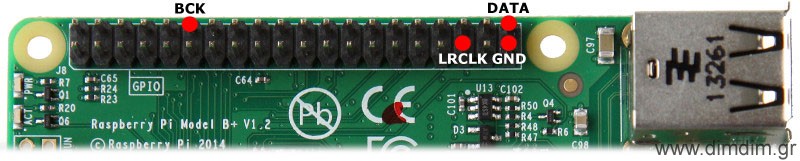

 #1 < RPi #40 (BCM #21) - DATA
 #2 < RPi #12 (BCM #18) - BCK (bit clock)
 #3 < RPi #35 (BCM #19) - LRCK (left-right clock)
 #4 -
 #5 < RPi #39 ...................... - GND ground
We need to load the correct device tree file by editing /boot/config.txt:
sudo nano /boot/config.txt
Add the following lines at the end of the file:
dtparam=i2c_arm=on
dtparam=i2s=on
dtoverlay=rpi-dac
Save the file (Ctrl-X, Y, Enter)
Create the sound.conf file as follows:
sudo nano /etc/asound.conf

pcm.!default  {
 type hw card 0
}
ctl.!default {
 type hw card 0
}
Save the file (Ctrl-X, Y, Enter) and reboot
sudo reboot
After reboot, check if the DAC is selected as your sound card:
aplay -l
You should see this:
 **** List of PLAYBACK Hardware Devices ****
 card 0: sndrpirpidac [snd_rpi_rpi_dac], device 0: RPi-DAC HiFi pcm1794a-hifi-0 []
 Subdevices: 0/1
 Subdevice #0: subdevice #0
Make all changes to /etc/mpd.conf as described in "Build the software".
Install mediaplayer as described in "Build the software".