//app.scss
.main {
	background: white;
    ...
}

// app.tsx
import "./app.scss"
...
    <div className="main">
 		...
   	</div>
...
由于 react 中的 css 没有域的概念,会造成全局污染,为了解决这个问题,我们可以为每个 scss 文件创建一个 namespace,如下
//app.scss
$namespace: "app";

.#{$namespace} {
    &--main {
        background: white;
    }
}

//app.tsx
import "./app.scss"
const namespace = () => `app`
...
	<div className={`${namespace}--main`}>
    	...
    </div>
...参考了 react-scripts 中的 webpack.config.js 配置,使能/.module.(css|scss)/模块化
// webpack.config.js
...
module: {
	rules: [
    ...
    {
			test: /\.scss$/,
			exclude: [
				/node_modules/,
			],
			oneOf: [
				{
					test: /\.module\.scss$/,
					use: [
						MiniCssExtractPlugin.loader,
						{
							loader: "css-loader",
							options: {
								modules: {
									localIdentName: '[path][name]__[local]--[hash:base64:5]',
								},
								sourceMap: DEV,
							}
						},
						{
							loader: "sass-loader",
							options: {
								sourceMap: DEV,
							}
						},
					]
				},
				{
					use: [
						MiniCssExtractPlugin.loader,
						{
							loader: "css-loader",
							options: {
								sourceMap: DEV,
							}
						},
						{
							loader: "sass-loader",
							options: {
								sourceMap: DEV,
							}
						},
					],
				}
			],
		},
    ...
   ]
 },
 plugins: [
		...
		new MiniCssExtractPlugin({
			filename: DEV ? '[name].css' : '[name].[contenthash].css',
			chunkFilename: DEV ? '[id].css' : '[id].[hash].css'
		}),
	]
使用*.module.scss 的 moudles 特性可以解决命名冲突问题, 用法如下
//app.scss

.main {
	 background: white;
  ...
}

// app.tsx
import styles from "./app.module.scss"
...
 	<div className={`${styles.main}`}>
 		...
   	</div>
...
● 开发过程中尽量使用方式二
注:
- 很多旧的 css-loader 教程中直接在 option 中设置 localIdentName, 由于版本的更新已经不支持这样直接写入 localIdentName, 最新官方文档的写法是将配置包裹进 modules 的 object 里
...
{
  loader: "css-loader",
  options: {
      sourceMap: true,
      modules: {
      	localIdentName: '[path][name]__[local]--[hash:base64:5]',
    },
  }
},
...- typescript 中直接 import styles from "./index.scss"会报找不到模块的错误,解决方法为使用 require 或 添加以下全局声明,可参考这里
declare module '*.scss' {
  const content: any;
  export default content;
}- 只有在 css-loader 中的 modules 设置为 true|object 时,import styles from "./index.scss 中的 styles 才可以拿到对应的样式,否则 styles 为{}
yarn add antdant design 有以下三种导入方式
导入全局样式,该方法会导入所有的 antd 样式文件(600 多 K)
import 'antd/dist/antd.css';
import { Button } from 'antd';

...
    <Button>按钮</Button>
...手动按需导入,该方法只会导入用到的 css, 但是写法麻烦
import { Button } from 'antd';
import 'antd/es/button/style/css';

...
    <Button>按钮</Button>
...自动按需导入, 使用 ts-import-plugin(ts-loader)实现按需导入功能(babel-loader 时可使用 babel-plugin-import)
yarn -dev add ts-import-plugin

// webpack.config.js
const tsImportPluginFactory = require('ts-import-plugin')
....
  {
        test: /\.ts(x?)$/,
        exclude: /node_modules/,
        use: [
          {
            loader: "ts-loader",
            options: {
              silent: true,
              transpileOnly: DEV ? false : true,
              getCustomTransformers: () => ({
                before: [tsImportPluginFactory({
                  libraryName: 'antd',
                  libraryDirectory: 'lib',
                  style: 'css'
                })]
              }),
            }
          }
        ]
    },
...


// app.tsx
//配置好ts-import-plugin后直接import { Button } from 'antd';会按需加载样式文件
import { Button } from 'antd';
...
    <Button>按钮</Button>
...// app.tsx
import styles from "./app.module.scss";
import { Button } from 'antd';
...
<div className={styles.appContainer}>
<Button>按钮</Button>
</div>
...
// app.module.scss
.appContainer {
:global {
// 在这里通过找到antd类名来修改组件的样式
}
}本项目使用的国际化框架为react-intl,如果使用的是 vscode 编辑器,可以下载react-intl-linter插件便捷的添加国际化文本。
- 安装
react-intl依赖
yarn add react-intl- React 最外层添加
IntlProvider
import { IntlProvider } from 'react-intl';
import { getLocales, ILocales } from 'src/intl';

<IntlProvider
    locale={this.props.locale}
    messages={getLocales(this.props.locale)}
    onError={(err) => {
        // react-intl itself doesn't inherently have any locale-data. Ignore Error
        console.warn(err);
    }}
>
    {this.props.children}
</IntlProvider>;- 提供国际化配置文件
src
└── intl // 语言客户端
    ├── interface.ts // 中英文文本配置 interface
		├── zh_CN.ts // 中文文本配置
		├── en_US.ts // 英文文本配置
    └── index.ts // 导出国际化配置
- 使用
intl.formatMessage添加国际化文本,配合react-intl-lintervscode 插件可以更方便的去修改上一步的国际化配置文件
react-intl-linter 为 vscode 插件,直接搜索安装即可
import React from 'react';
import { useIntl } from 'react-intl';

interface Props { }

const HelloWorld: React.FunctionComponent<Props> = (props) => {
	const intl = useIntl()
	return (
		...
		{intl.formatMessage({ id: 'HELLO_WORLD' })}
		...
	);
};

export default HelloWorld;本项目使用的是 v6 版本,跟 v5 版本的写法会有所区别,详情请看react-router 升级指南
- 使用 Routes 替代原来的 Switch
- 使用 Navigate 替代原来的 Redirect: eg:
<Route path="*" element={<Navigate replace to={xxx} />} />
其他 API 或组件的使用细节请参考官方教程
本项目使用redux来管理项目状态,但要将redux集成到项目中要进行一系列繁琐的配置,使用Redux Toolkit可以redux配置变的更加简单
- 使用
configureStoreapi 创建一个Redux Store
// src/store/index.ts
import { BrowserHistory } from 'history';
import { routerReducer } from 'react-router-redux';
import {
    configureStore as _configureStore,
    combineReducers,
} from '@reduxjs/toolkit';
import application from './application/slice';

/**
 * Refrence: https://redux-toolkit.js.org/usage/usage-with-typescript
 */
export const rootReducer = combineReducers({
    application,
    routing: routerReducer,
});

function configureStore(history: BrowserHistory) {
    return _configureStore({
        reducer: rootReducer,
        middleware: (getDefaultMiddleware) =>
            getDefaultMiddleware({
                immutableCheck: false,
                serializableCheck: false,
            }),
    });
}

const store = configureStore();

export type AppState = ReturnType<typeof rootReducer>
export type AppDispatch = typeof store.dispatch
export const useAppDispatch = () => useDispatch<AppDispatch>() // Export a hook that can be reused to resolve types

export default store- 将 store 注入应用
// src/index.tsx
import { Provider as ReduxProvider } from 'react-redux';

/**
 * Init App
 */
const render = () => {
    ReactDOM.render(
        <ReduxProvider store={store}>...</ReduxProvider>,
        document.getElementById('react-app')
    );
};

render();- 使用
createSlice创建一个带有action creators和action types的reducer数据切片
// src/xxx/slice.ts
import { createSlice, PayloadAction } from '@reduxjs/toolkit';

export interface ILoading {
    visible: boolean;
    text?: string;
}

export interface IApplicationState {
    loading: ILoading;
}

const initialState: IApplicationState = {
    loading: {
        visible: false,
    },
};

/**
 * 使用`createSlice`创建一个带有`action creators`和`action types`的`reducer`数据切片
 * Redux 规定我们不可以直接在 switch cases 函数中直接修改 state 值,而是返回一个修改后的拷贝值
 * 而 Redux ToolKit 的 createSlice 和 createReducer 函数内部使用了 immer 让我们可以直接在函数中修改 state 中的属性值。
 * 但是需要注意的是,在同一个函数中我们不可以 既修改 state 又返回修改后的拷贝值,immer 是无法区分这两种情况的。
 */
const slice = createSlice({
    name: 'application',
    initialState,
    reducers: {
        SetLoadingAction(
            state: IApplicationState,
            action: PayloadAction<ILoading>
        ) {
            state.loading = action.payload;
        },
    },
});

export const { SetLoadingAction } = slice.actions;

export default slice.reducer;
Redux 规定我们不可以直接在 switch cases 函数中直接修改 state 值,而是返回一个修改后的拷贝值,而 Redux ToolKit 的 createSlice 和 createReducer 函数内部使用了 immer 让我们可以直接在函数中修改 state 中的属性值。但是需要注意的是,在同一个函数中我们不可以 既修改 state 又返回修改后的拷贝值,immer 是无法区分这两种情况的。
// 这种写法是允许的
const todosSlice = createSlice({
  name: 'todos',
  initialState: [],
  reducers: {
    todoAdded(state, action) {
      // "Mutate" the existing state, no return value needed
      state.push(action.payload)
    },
    todoDeleted(state, action.payload) {
      // Construct a new result array immutably and return it
      return state.filter(todo => todo.id !== action.payload)
    }
  }
})

// brokenReducer是不允许的,因为它既修改了 state 值,又返回了一个修改后的拷贝值
const todosSlice = createSlice({
  name: 'todos',
  initialState: [],
  reducers: {
    // ❌ ERROR: mutates state, but also returns new array size!
    brokenReducer: (state, action) => state.push(action.payload),
    // ✅ SAFE: the `void` keyword prevents a return value
    fixedReducer1: (state, action) => void state.push(action.payload),
    // ✅ SAFE: curly braces make this a function body and no return
    fixedReducer2: (state, action) => {
      state.push(action.payload)
    },
  },
})- 异步 react-thunk 配置
Redux ToolKit提供了createAsyncThunk函数供用户创建能够执行异步逻辑的派发函数,但是从调研结果来看,createAsyncThunk函数反而使这个流程变得繁琐了,所以本项目还是使用原生的react-thunk的方式
import { AppDispatch } from '..';
import { SetLoadingAction } from './slice';

export const actionCreators = {
    getAsyncResult: (id: number) => async (dispatch: AppDispatch) => {
        try {
            dispatch(SetLoadingAction({ visible: true }));
            const result = await getAsyncResultDetail(id);
            dispatch(SetAsyncResult(result));
        } catch (err) {
            console.error(err);
        } finally {
            dispatch(SetLoadingAction({ visible: false }));
        }
    },
};获取 redux 数据时使用proxy-memoize可以提高性能
import memoize from 'proxy-memoize';
import { useSelector } from 'react-redux';

const mySelector = memoize(
    (state) => state.values.value1 + state.values.value2
);
const sum = useSelector(mySelector);一个应用可以由多个独立的构建组成。这些独立的构建之间没有依赖关系,他们可以独立开发、部署。使用module federation,我们可以在一个 javascript 应用中动态加载并运行另一个 javascript 应用的代码,并实现应用之间的依赖共享。具体介绍可以查看官方文档
Module Federation 官方默认不支持 Typescript,本工程参考 Module Federation 调研 这篇文章进行配置,支持了 ts。
1. 修改 index.tsx,使用 import("xxx")来引用”bootstrap.tsx“
当引用内引用了 remote 模块,要确保所有 dependencies 在 bootstrap.tsx 之前被加载。例外,如果 TS 报错的话需要在 tsconfig.json 中加上 "module": "es2020",否则会报错”Shared module is not available for eager consumption: webpack/sharing/consume/default/react/react“(细节可以看下面的问题记录)
// bootstrap.tsx

import ReactDOM from 'react-dom';
import Home from './pages/Home/index';
import 'src/styles/app.scss';

const render = () => {
    ReactDOM.render(<Home />, document.getElementById('react-app'));
};

render();
将 index.tsx 的内容改为
// index.tsx

import('./bootstrap');
2. 配置 webpack
a. 使用webpack.container.ModuleFederationPlugin输出应用模块
b. 使用dts-loader输出类型定义文件
c. 使用tar-webpack-plugin将输出的类型定义文件打包和压缩
// webpack config
const {
	container: { ModuleFederationPlugin },
} = require("webpack")
const TarWebpackPlugin = require('tar-webpack-plugin').default;

const mfExportCfg = {
	libName: 'useful_module', // The name configured in ModuleFederationPlugin
	exposes: { // The exposes configured in ModuleFederationPlugin
		'./UsefulButton': '../src/components/MoudleFederation/LocalExportButton/index.tsx',
	},
	typesOutputDir: paths.buildPath(), // Optional, default is '.wp_federation'
	exportFileName: 'remoteEntry.js',
}
...
module.exports = {
	...
	module: {
		rules: [
			...
			{
				test: /\.ts(x?)$/,
				exclude: /node_modules/,
				use: [
					{
						loader: 'ts-loader',
						options: {
							...
						},
					},
					{
						loader: 'dts-loader',
						options: {
							name: mfExportCfg.libName,
							exposes: mfExportCfg.exposes,
							typesOutputDir: mfExportCfg.typesOutputDir,
						},
					},
				],
			},
			...
		],
	},
	plugins: [
		...
		new ModuleFederationPlugin({
			name: mfExportCfg.libName,
			filename: mfExportCfg.exportFileName,
			library: {
				type: 'var',
				name: mfExportCfg.libName,
			},
			exposes: mfExportCfg.exposes,
			shared: {
				react: {
					singleton: true,
					requiredVersion: false,
					version: false,
				},
			},
		}),
		new TarWebpackPlugin({
			action: 'c',
			gzip: true,
			cwd: paths.buildPath(),
			file: path.resolve(paths.buildPath(), `${mfExportCfg.libName}-ts.tgz`),
			fileList: [mfExportCfg.libName],
			delSource: !DEV, // development 环境下不删除压缩源文件,因为在 hot-update 时,如果仅仅是 css 文件的更改,则不会触发 dts-loader 的编译,从而不会产生新的类型定义文件夹,而该 TarWebpackPlugin 又会执行,当找不到压缩文件夹时会报错 [Error: ENOENT: no such file or directory]
		}),
		...
	]
	...
}
注:这一步需要注意的是 ts-loader 千万不要去掉,并且要放在 dts-loader 前面
a. 使用webpack.container.ModuleFederationPlugin引入远程模块
b. 使用webpack-remote-types-plugin下载远程模块类型文件
// webpack config
const {
	container: { ModuleFederationPlugin },
} = require("webpack")
const WebpackRemoteTypesPlugin = require('webpack-remote-types-plugin').default;

function getRemoteEntryUrl(port) {
    return `//localhost:${port}/remoteEntry.js`
}

const mfImportCfg = {
    remotes: {
        app2: `app2@${getRemoteEntryUrl(3002)}`, // 注意这里的app2是输出时的libName
    },
    typeRemotes: {
        app2: `app2@http:${getRemoteEntryUrl(3002)}`, // 注意这里多了字符串”http“
    },
    outputDir: 'src/types',
    remoteFileName: '[name]-ts.tgz', // default filename is [name]-dts.tgz where [name] is the remote name, for example, `app` with the above setup
}
...
module.exports = {
	...
	plugins: [
		...
		new ModuleFederationPlugin({
			remotes: mfImportCfg.remotes,
			shared: {
				react: {
					singleton: true,
					requiredVersion: false,
					version: false,
				},
			}
		}),
		new WebpackRemoteTypesPlugin({
			remotes: mfImportCfg.remotes,
			outputDir: mfImportCfg.outputDir,
			remoteFileName: mfImportCfg.remoteFileName,
		}),
		...
	]
	...
}
c. 在 React 引用远程模块,由于该模块是异步加载的,所以需要使用React.Suspense包住
import React, { useEffect } from 'react';
// import { Button as RemoteButton, ButtonProps } from "app2/Button";
// or
// const RemoteButton = React.lazy(() => import("app2/Button"));
// or
const RemoteButton = React.lazy(() =>
    import('app2/Button').then(({ Button }) => ({ default: Button }))
);

interface Props {}

/**
 * 该组件用于测试 Moudle Federation, 本工程作为子应用引入remote组件
 * @param props
 * @returns
 */
const RemoteImportButton: React.FunctionComponent<Props> = (props) => {
    useEffect(() => {
        console.log('MFTestComponent Loaded!');
    }, []);
    return (
        <React.Suspense fallback="Loading Button">
            <RemoteButton />
        </React.Suspense>
    );
};

export default RemoteImportButton;
d. 为了让 ts 能够正确的识别远程类型文件,tsconfig 配置添加下"path"
// tsconfig.json
	...
	"module": "es2020",
	...
	"paths": {
		"*": ["*", "./src/types/*"]
	}
...// 配置webpack config
const {
container: { ModuleFederationPlugin },
} = require("webpack")
const WebpackRemoteTypesPlugin = require('webpack-remote-types-plugin').default;
function getRemoteEntryUrl(port) {
return `//localhost:${port}/remoteEntry.js`
}
const mfImportCfg = {
remotes: {
app2: `app2@${getRemoteEntryUrl(3002)}`,
useful: `useful@${getRemoteEntryUrl(3000)}`,
},
typeRemotes: {
app2: `app2@http:${getRemoteEntryUrl(3002)}`,
useful: `useful@http:${getRemoteEntryUrl(3000)}`,
},
outputDir: 'src/types',
remoteFileName: '[name]-ts.tgz', // default filename is [name]-dts.tgz where [name] is the remote name, for example, `app` with the above setup
}
...
module.exports = {
...
plugins: [
...
new ModuleFederationPlugin({
remotes: mfImportCfg.remotes,
shared: {
react: {
singleton: true,
requiredVersion: false,
version: false,
},
}
}),
new WebpackRemoteTypesPlugin({
remotes: mfImportCfg.remotes,
outputDir: mfImportCfg.outputDir,
remoteFileName: mfImportCfg.remoteFileName,
}),
...
]
...
}
// 引用组件
import React, { useEffect } from 'react';
const RemoteButton = React.lazy(() => import('app2/Button'));
const RemoteButton2 = React.lazy(() => import('useful/UsefulButton'));
const App = () => (
<div>
<h1>Basic Host-Remote</h1>
<h2>App 1</h2>
<React.Suspense fallback="Loading Button">
<RemoteButton />
<RemoteButton2 />
</React.Suspense>
</div>
);
export default App;- 增加 xxx.module.scss 类型定义
// src/types/scss.d.ts
declare module '*.module.scss' {
    const content: Record<string, string>;
    export default content;
}
这种方式只能解决 VSCode 报错,无法通过 command+左键 定位到相对应的 className 定义
- 使用 typescript-plugin-css-modules 首先安装依赖
yarn add -D typescript-plugin-css-modules然后将该插件配置在 tsconfig.json 文件中
{
    "compilerOptions": {
        "plugins": [{ "name": "typescript-plugin-css-modules" }]
    }
}
配置 VSCode 中的 Typescript 版本为 4.3.5 参考,如下图
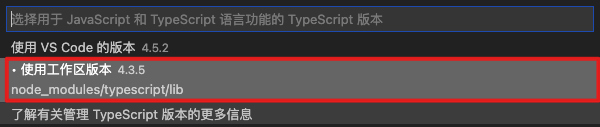
command+左键 定位到相对应的 className 定义,效果很好
根据错误提示大概意思是,「共享模块不可用于急切消费」。解决方法参考,新建一个 bootstrap.tsx ,将原有应用入口文件 index.tsx 中的内镕放到 bootstrap.tsx 中
// bootstrap.tsx

import ReactDOM from 'react-dom';
import Home from './pages/Home/index';
import 'src/styles/app.scss';

const render = () => {
	ReactDOM.render(
		<Home />,
		document.getElementById('react-app')
	);
};

render();
将 index.tsx 的内容改为
// index.tsx

import("./bootstrap")
这么做的原因就是,当应用内引用了 remote 模块,要确保所有 dependencies 在 bootstrap.tsx 之前被加载。例外,如果 TS 报错的话需要在 tsconfig.json 中加上 "module": "es2020"
Loading script failed.(missing: http://localhost:3000/remoteEntry.js)
在 development 环境下,当前应用 app3(http://localhost:3000)expose module 被另一个应用 app1 加载时会报上面的错误,经过排查,将 webpack.base.conf.js 中的 optimization 配置去掉,就可以解决该问题。
optimization 去掉前打包输出如下:
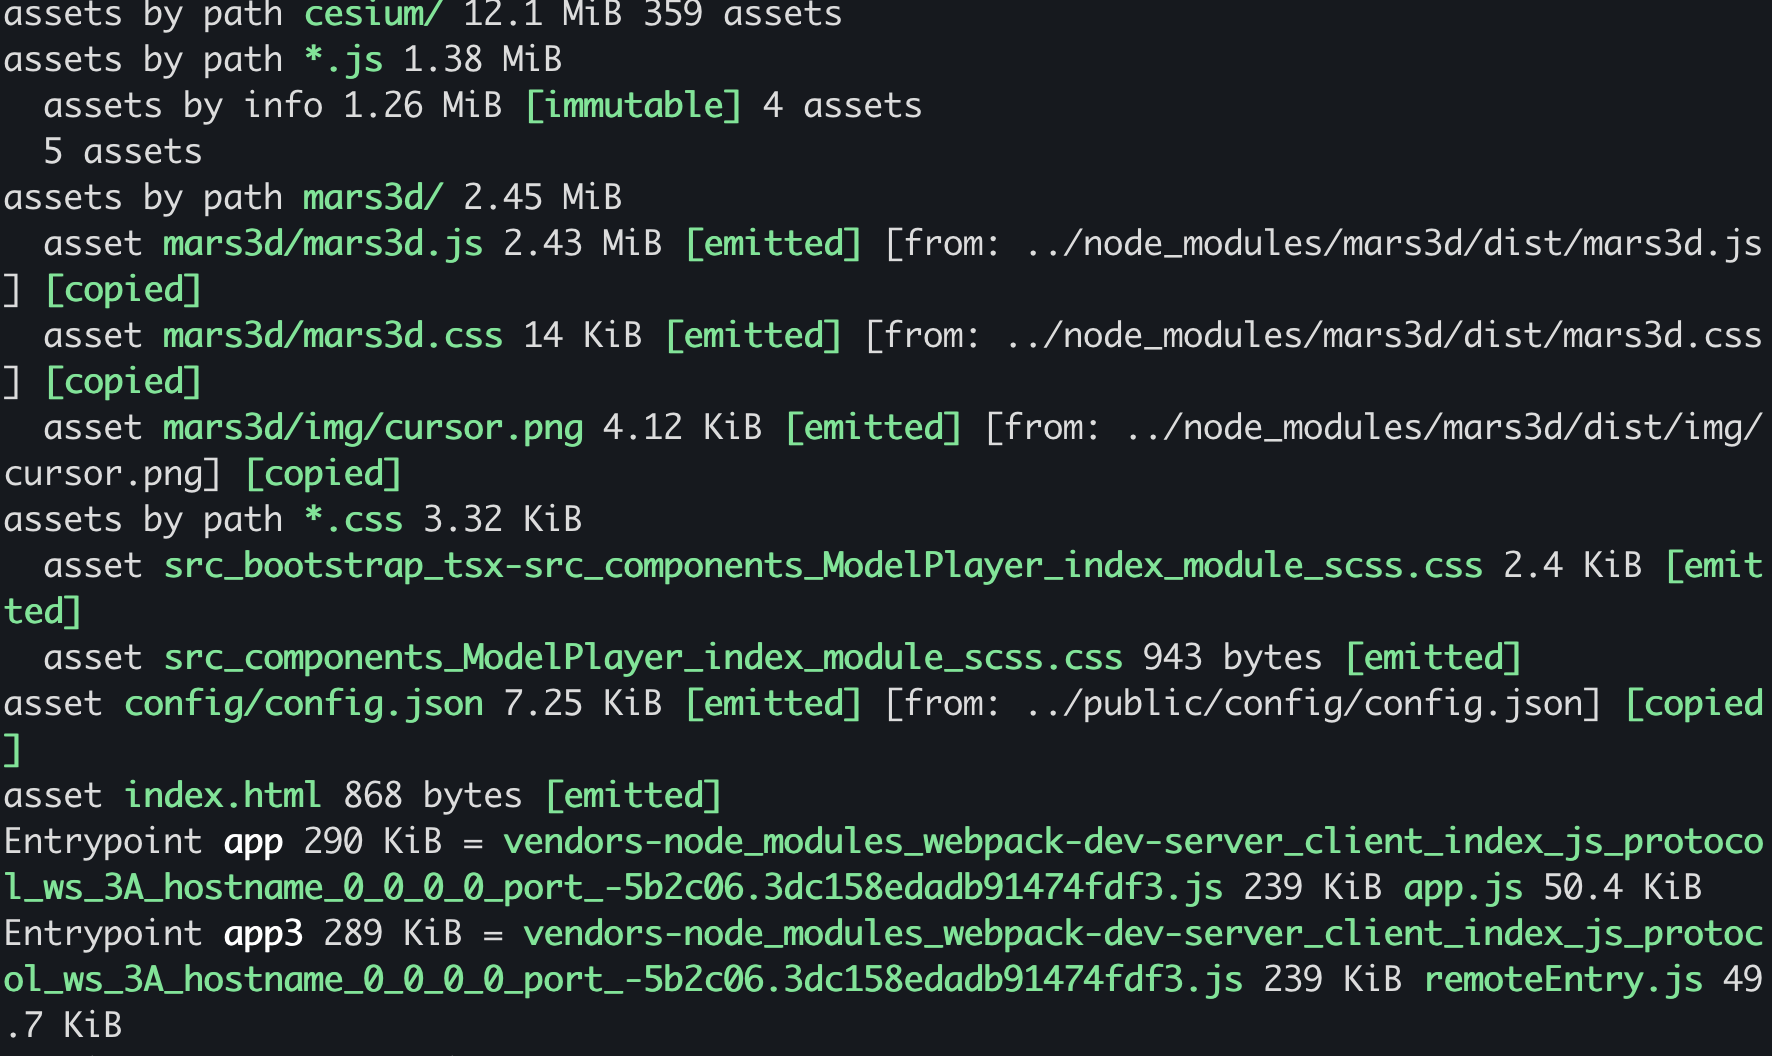
Entrypoint
optimization 去掉前输出的 remoteEntry.js 如下:
/******/ // module cache are used so entry inlining is disabled
/******/ // startup
/******/ // Load entry module and return exports
/******/ var __webpack_exports__ = __webpack_require__.O(
    undefined,
    [
        'vendors-node_modules_webpack-dev-server_client_index_js_protocol_ws_3A_hostname_0_0_0_0_port_-5b2c06',
        'default-webpack_sharing_provide_default_react',
    ],
    function () {
        return __webpack_require__('webpack/container/entry/app3');
    }
);
/******/ __webpack_exports__ = __webpack_require__.O(__webpack_exports__);
/******/ app3 = __webpack_exports__;
在加载 webpack/container/entry/app3 之前要先加载其他的依赖文件,如果这些依赖文件加载失败了,则会影响到 webpack/container/entry/app3 的加载。
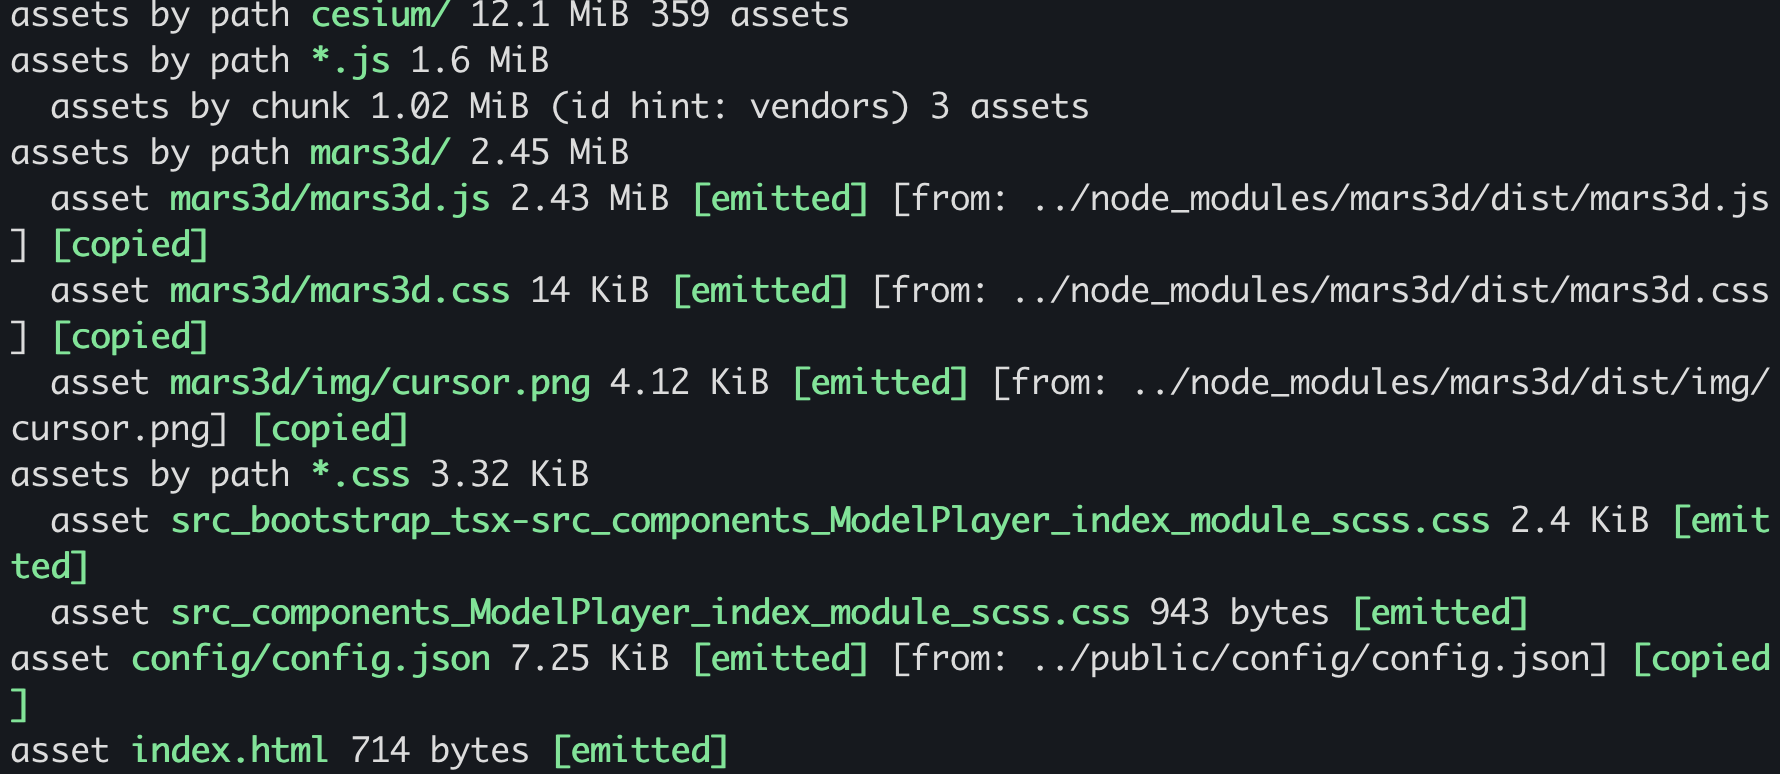
optimization 去掉后输出的 remoteEntry.js 如下:
/******/ // module cache are used so entry inlining is disabled
/******/ // startup
/******/ // Load entry module and return exports
/******/ __webpack_require__(
    '../node_modules/webpack-dev-server/client/index.js?protocol=ws%3A&hostname=0.0.0.0&port=3000&pathname=%2Fws&logging=info&reconnect=10'
);
/******/ var __webpack_exports__ = __webpack_require__(
    'webpack/container/entry/app3'
);
/******/ app3 = __webpack_exports__;
加载 webpack/container/entry/app3 与加载其他依赖是并行的,加载失败也不受影响
消费端的加载源码如下:
/***/ "webpack/container/reference/app3":
/*!*******************************************************!*\
  !*** external "app3@//localhost:3000/remoteEntry.js" ***!
  \*******************************************************/
((module, __unused_webpack_exports, __webpack_require__) => {
"use strict";
var __webpack_error__ = new Error();
module.exports = new Promise((resolve, reject) => {
	if(typeof app3 !== "undefined") return resolve();
	__webpack_require__.l("//localhost:3000/remoteEntry.js", (event) => {
		if(typeof app3 !== "undefined") return resolve();
		var errorType = event && (event.type === 'load' ? 'missing' : event.type);
		var realSrc = event && event.target && event.target.src;
		__webpack_error__.message = 'Loading script failed.\n(' + errorType + ': ' + realSrc + ')';
		__webpack_error__.name = 'ScriptExternalLoadError';
		__webpack_error__.type = errorType;
		__webpack_error__.request = realSrc;
		reject(__webpack_error__);
	}, "app3");
}).then(() => (app3));
})详细的报错如下:
Hooks can only be called inside of the body of a function component. This could happen for one of the following reasons:
1. You might have mismatching versions of React and the renderer (such as React DOM)
2. You might be breaking the Rules of Hooks
3. You might have more than one copy of React in the same app
参考这个issues,大致可以得知造成该问题的原因是在两个 React 版本导致的,因此将 app3 的配置增加 singleton: true 代表 react 只能有一个版本:
new ModuleFederationPlugin({
	...
	shared: {
		react: {
			singleton: true,
			requiredVersion: false,
			version: false,
		},
	},
}),
同样消费者端 app1 的配置也需增加
new ModuleFederationPlugin({
	...
	shared: ['react']
}),在打包过程中,发现部分 plugin 会被执行两次,如下图所示:

const baseWebpackConfig = require("./webpack.base.conf")
const { merge } = require("webpack-merge")

export default merge(baseWebpackConfig, {
	...,
	plugin: [
		...baseWebpackConfig.plugin,
		// ...省略其他plugin
	]
})
正确的写法是
const baseWebpackConfig = require("./webpack.base.conf")
const { merge } = require("webpack-merge")

export default merge(baseWebpackConfig, {
	...,
	plugin: [
		// ...省略其他plugin
	]
})
webpack-merge 会将 plugin 数组进行合并,并不是进行重置,因此不需要我们手动做数组重构