- Color/Detail control for Stable Diffusion web-ui
- 色調や書き込み量を調節するweb-ui拡張です。
Update 2023.12.19.2300(JST)
- add new parameter: saturation
- 彩度が調節できるようになりました
Update 2023.10.18.1930(JST)
- supprot refiner/change model in steps
- refinerやモデルの途中変更に対応
Update 2023.08.19.0200(JST)
- add new feature:Direct Color Control
- 新機能:色補正
Update 2023.07.13.0030(JST)
- add brightness
- color adjusting method is changed
- add disable checkbox
This is an extension to modify the amount of detailing and color tone in the output image. It intervenes in the generation process, not on the image after it's generated. It works on a mechanism different from LoRA and is compatible with 1.X and 2.X series. In particular, it can significantly improve the quality of generated products during Hires.fix.
It automatically activates when any value is set to non-zero. Please be careful as inevitably the amount of noise increases as the amount of detailing increases. During the use of Hires.fix, the output might look different, so it is recommended to try with expected settings. Values around 5 should be good, but it also depends on the model. If a positive value is input, the detailing will increase.
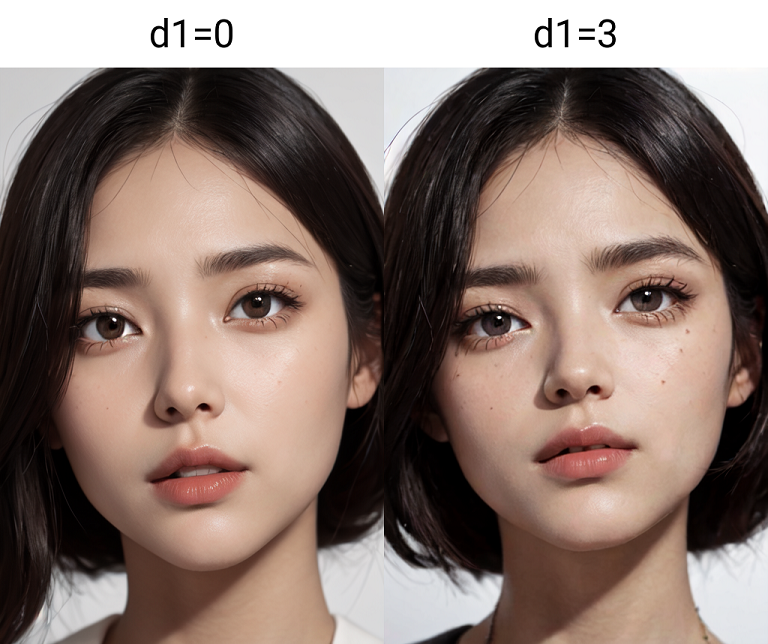
When set to negative, it becomes flat and slightly blurry. When set to positive, the detailing increases and becomes noisy. Even if it is noisy in normal generation, it might become clean with hires.fix, so be careful. Detail1 and 2 both have similar effects, but Detail1 seems to have a stronger effect on the composition. In the case of 2.X series, the reaction of Detail 1 may be the opposite of normal, with more drawings in negative.
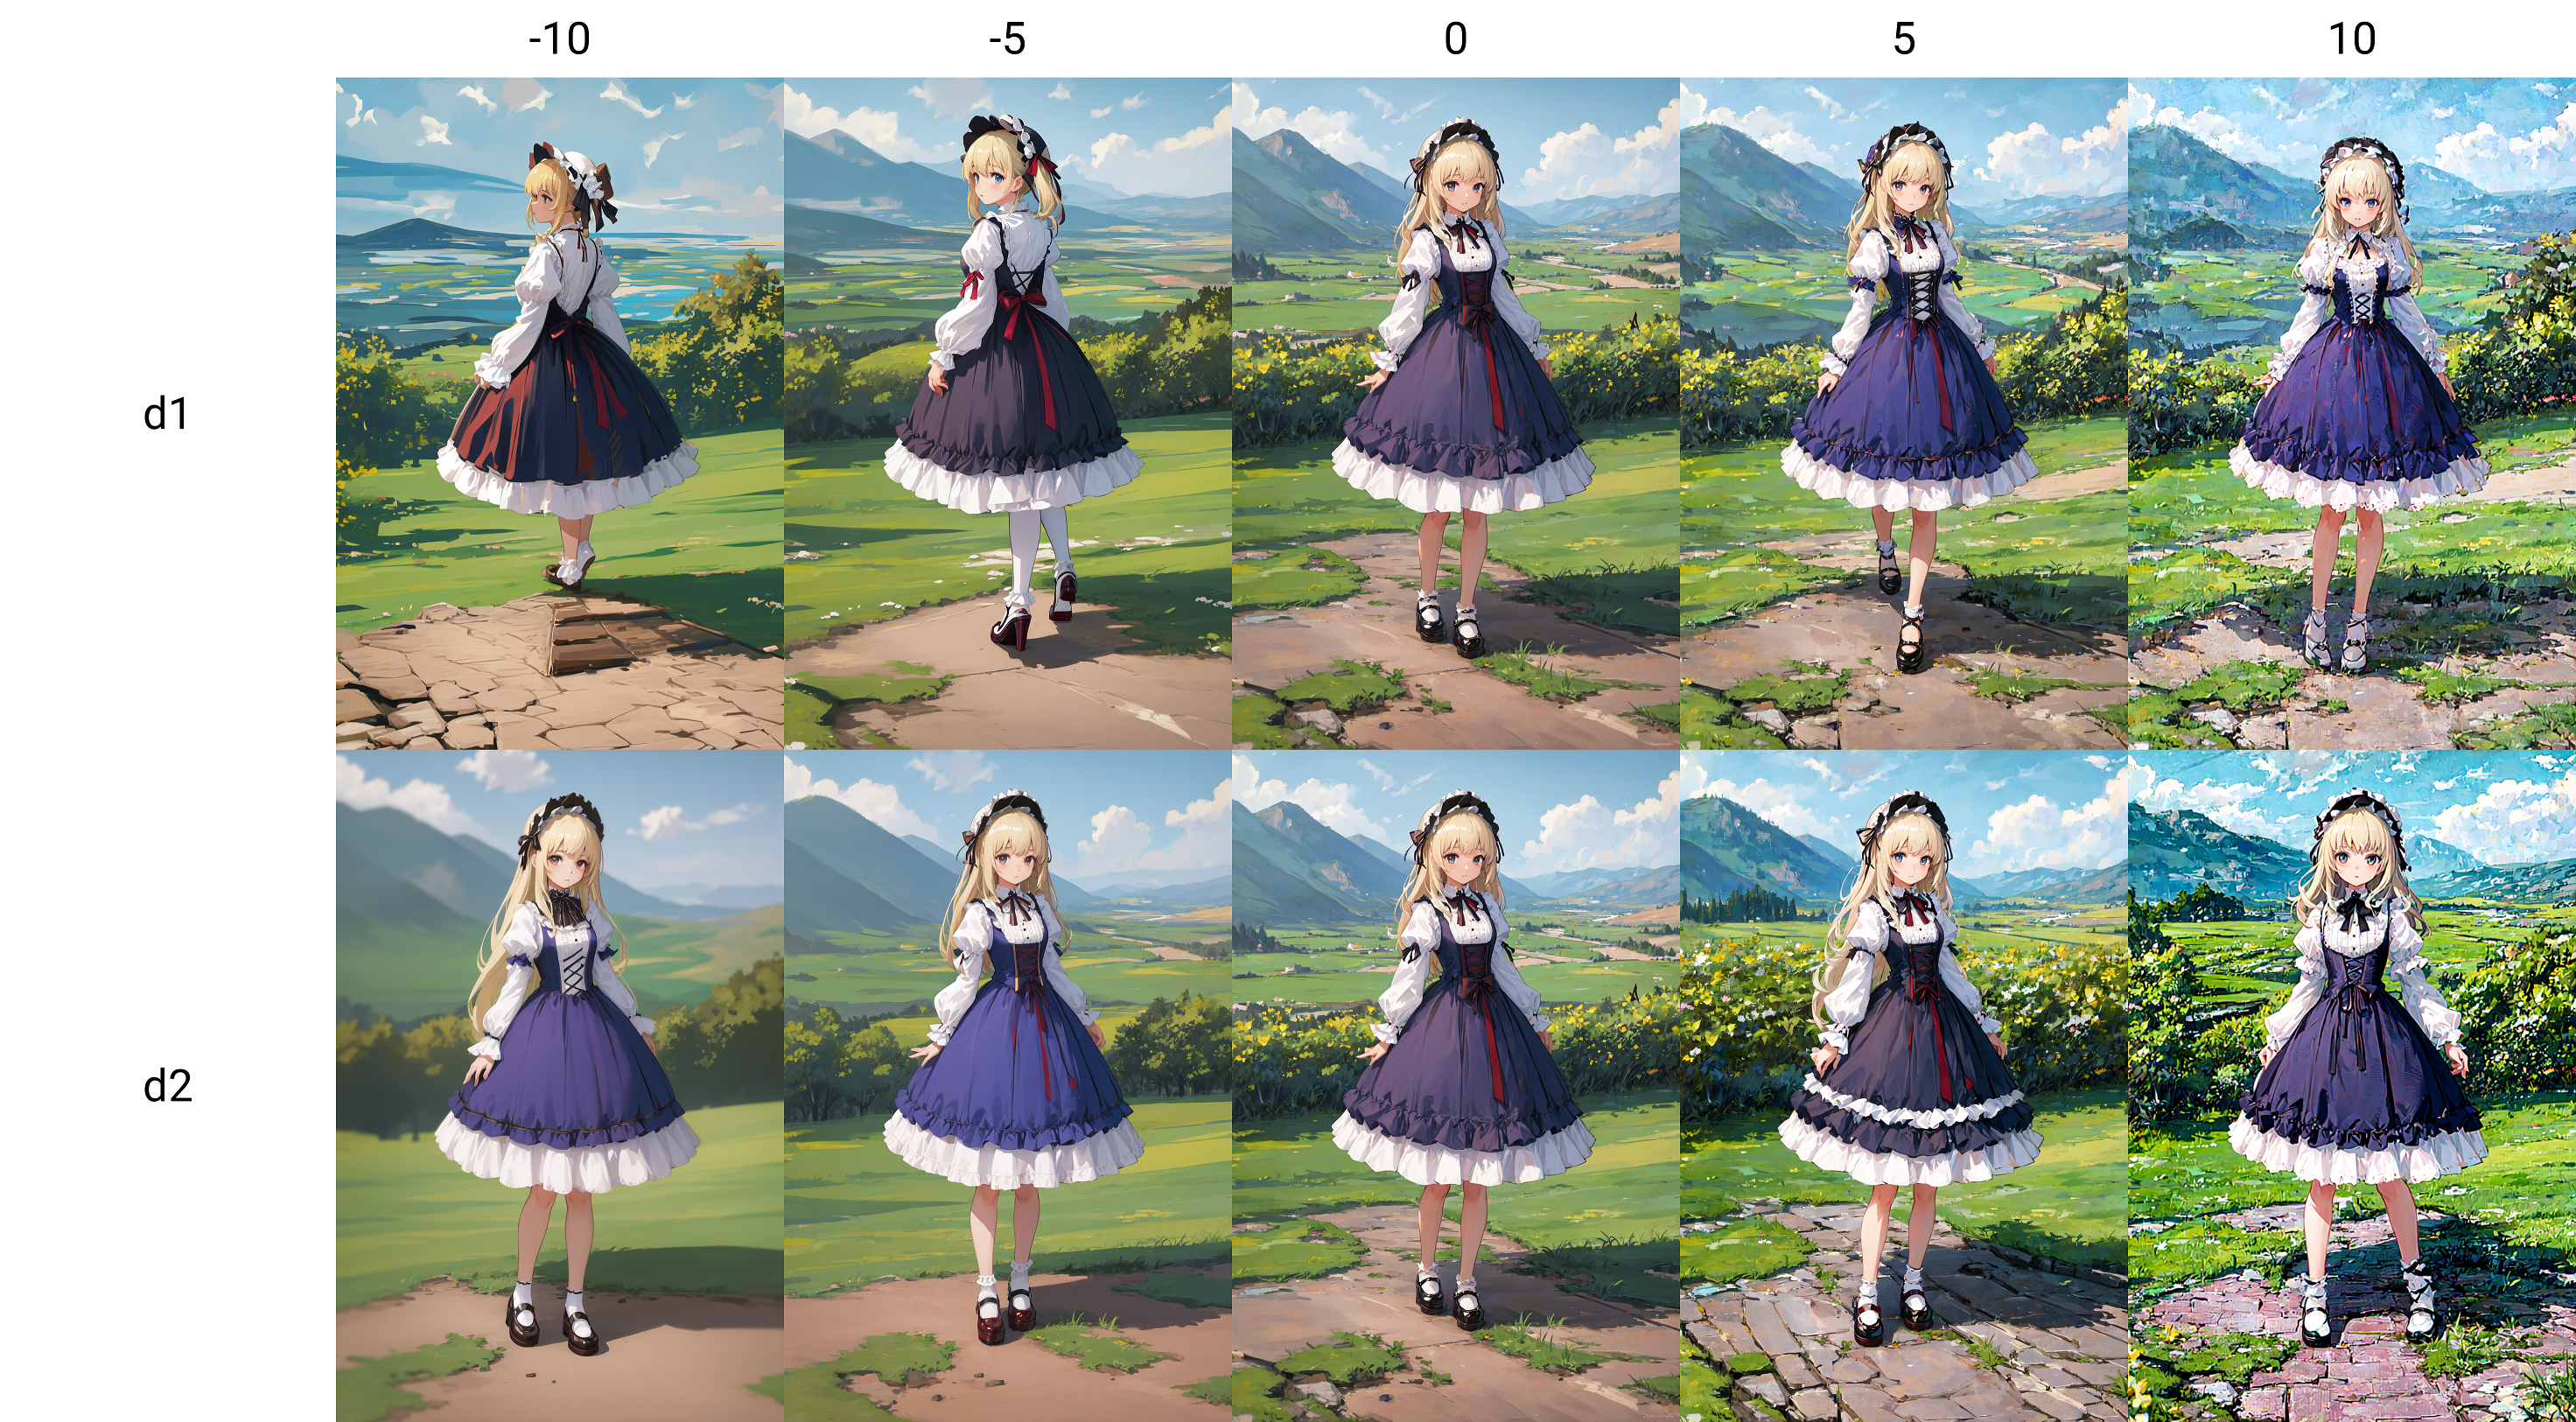
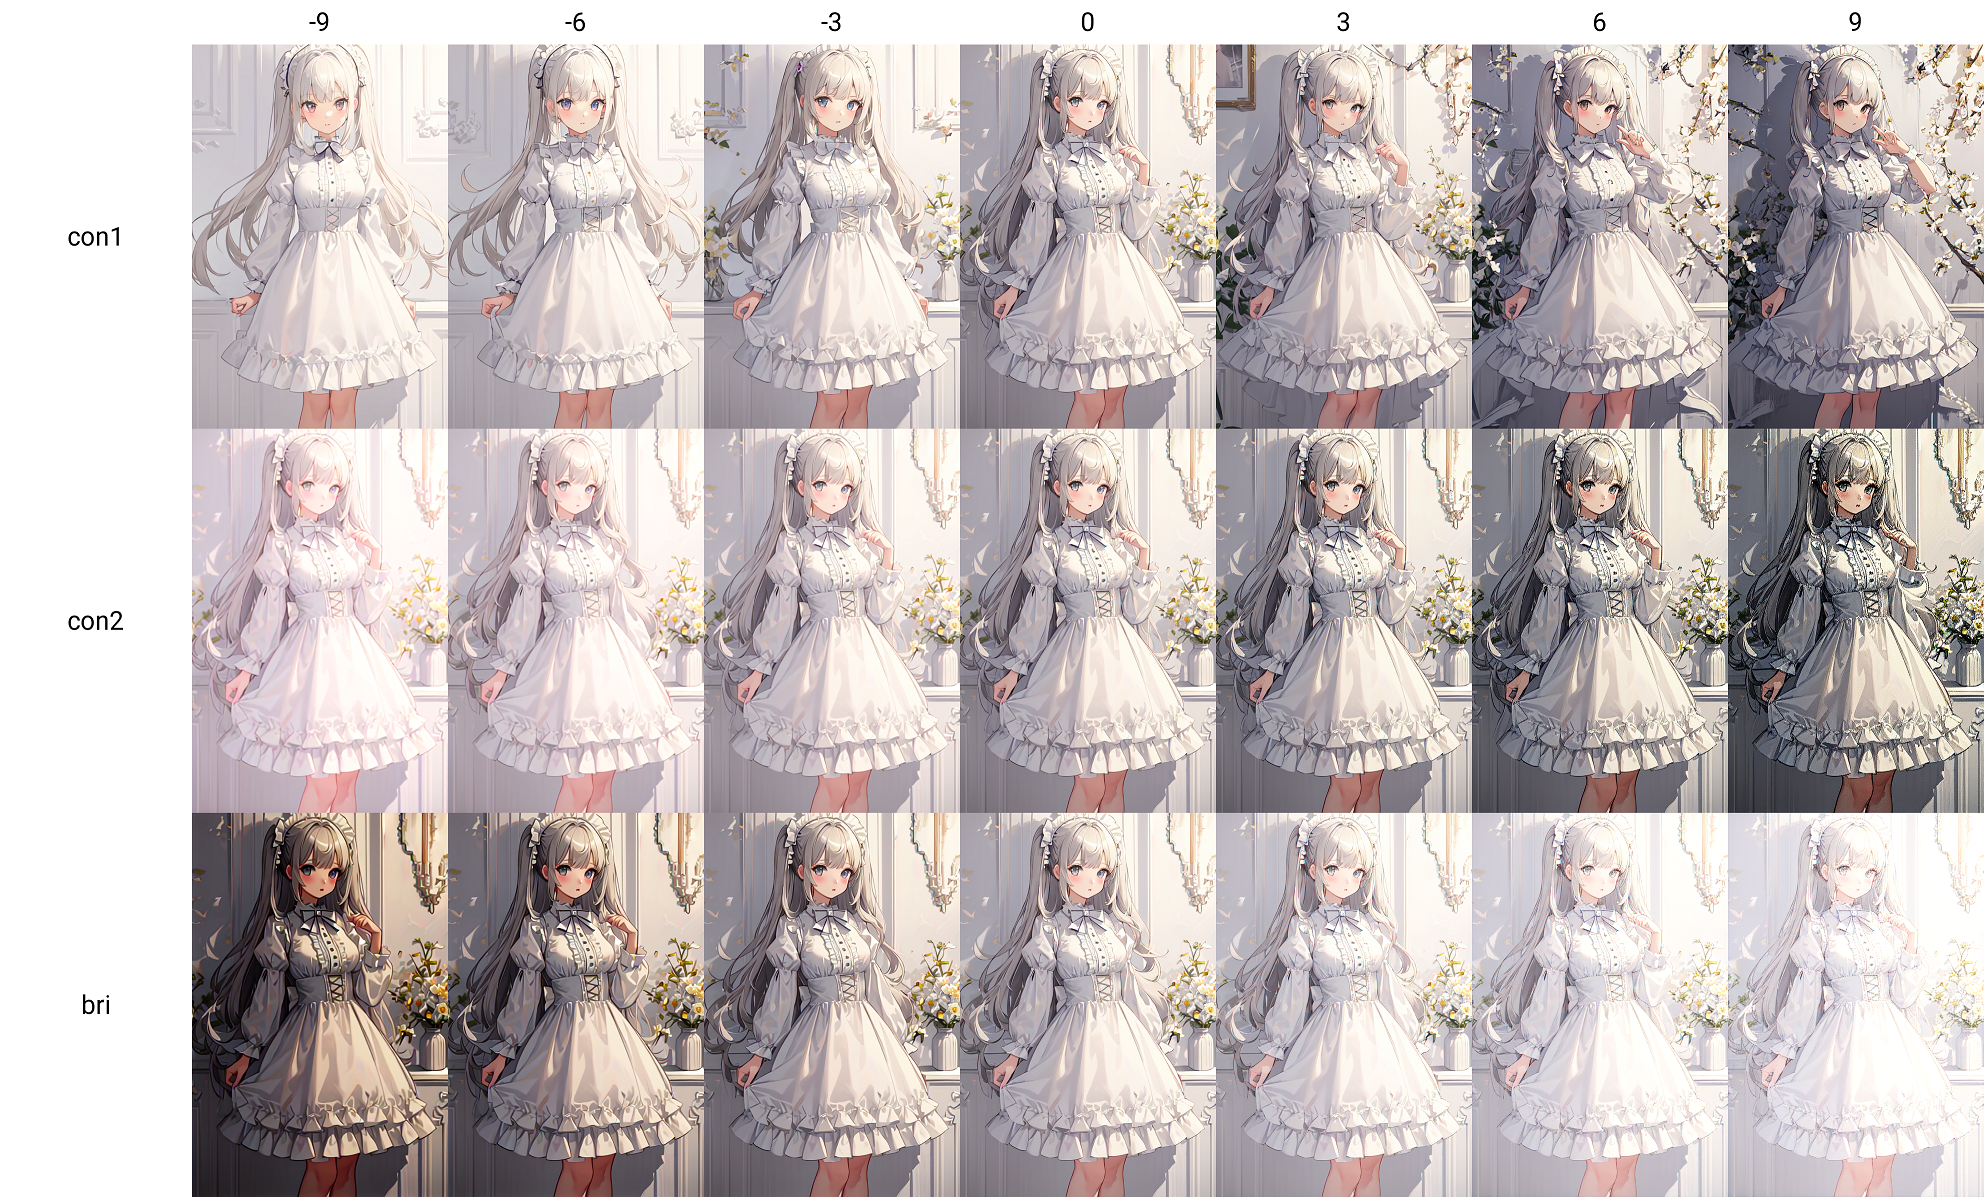
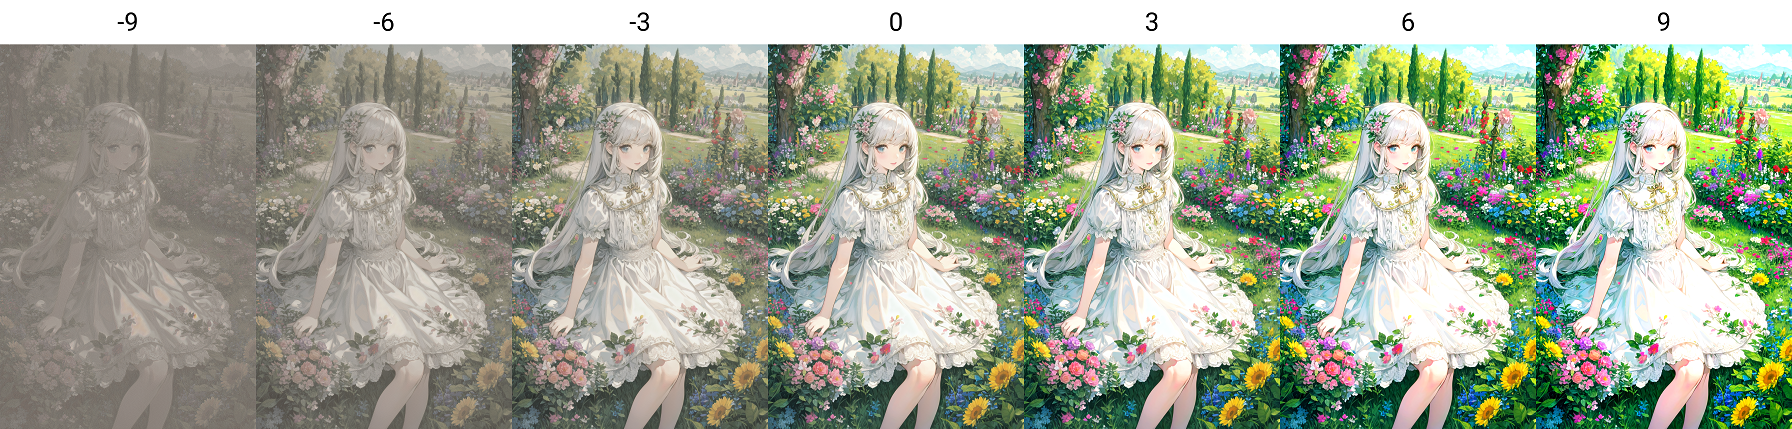
Contrast and brightness change, and at the same time the amount of detailing also changes. It would be quicker to see the sample.
The difference between Contrast 1 and Contrast 2 lies in whether the adjustment is made during the generation process or after the generation is complete. Making the adjustment during the generation process results in a more natural outcome, but it may also alter the composition.
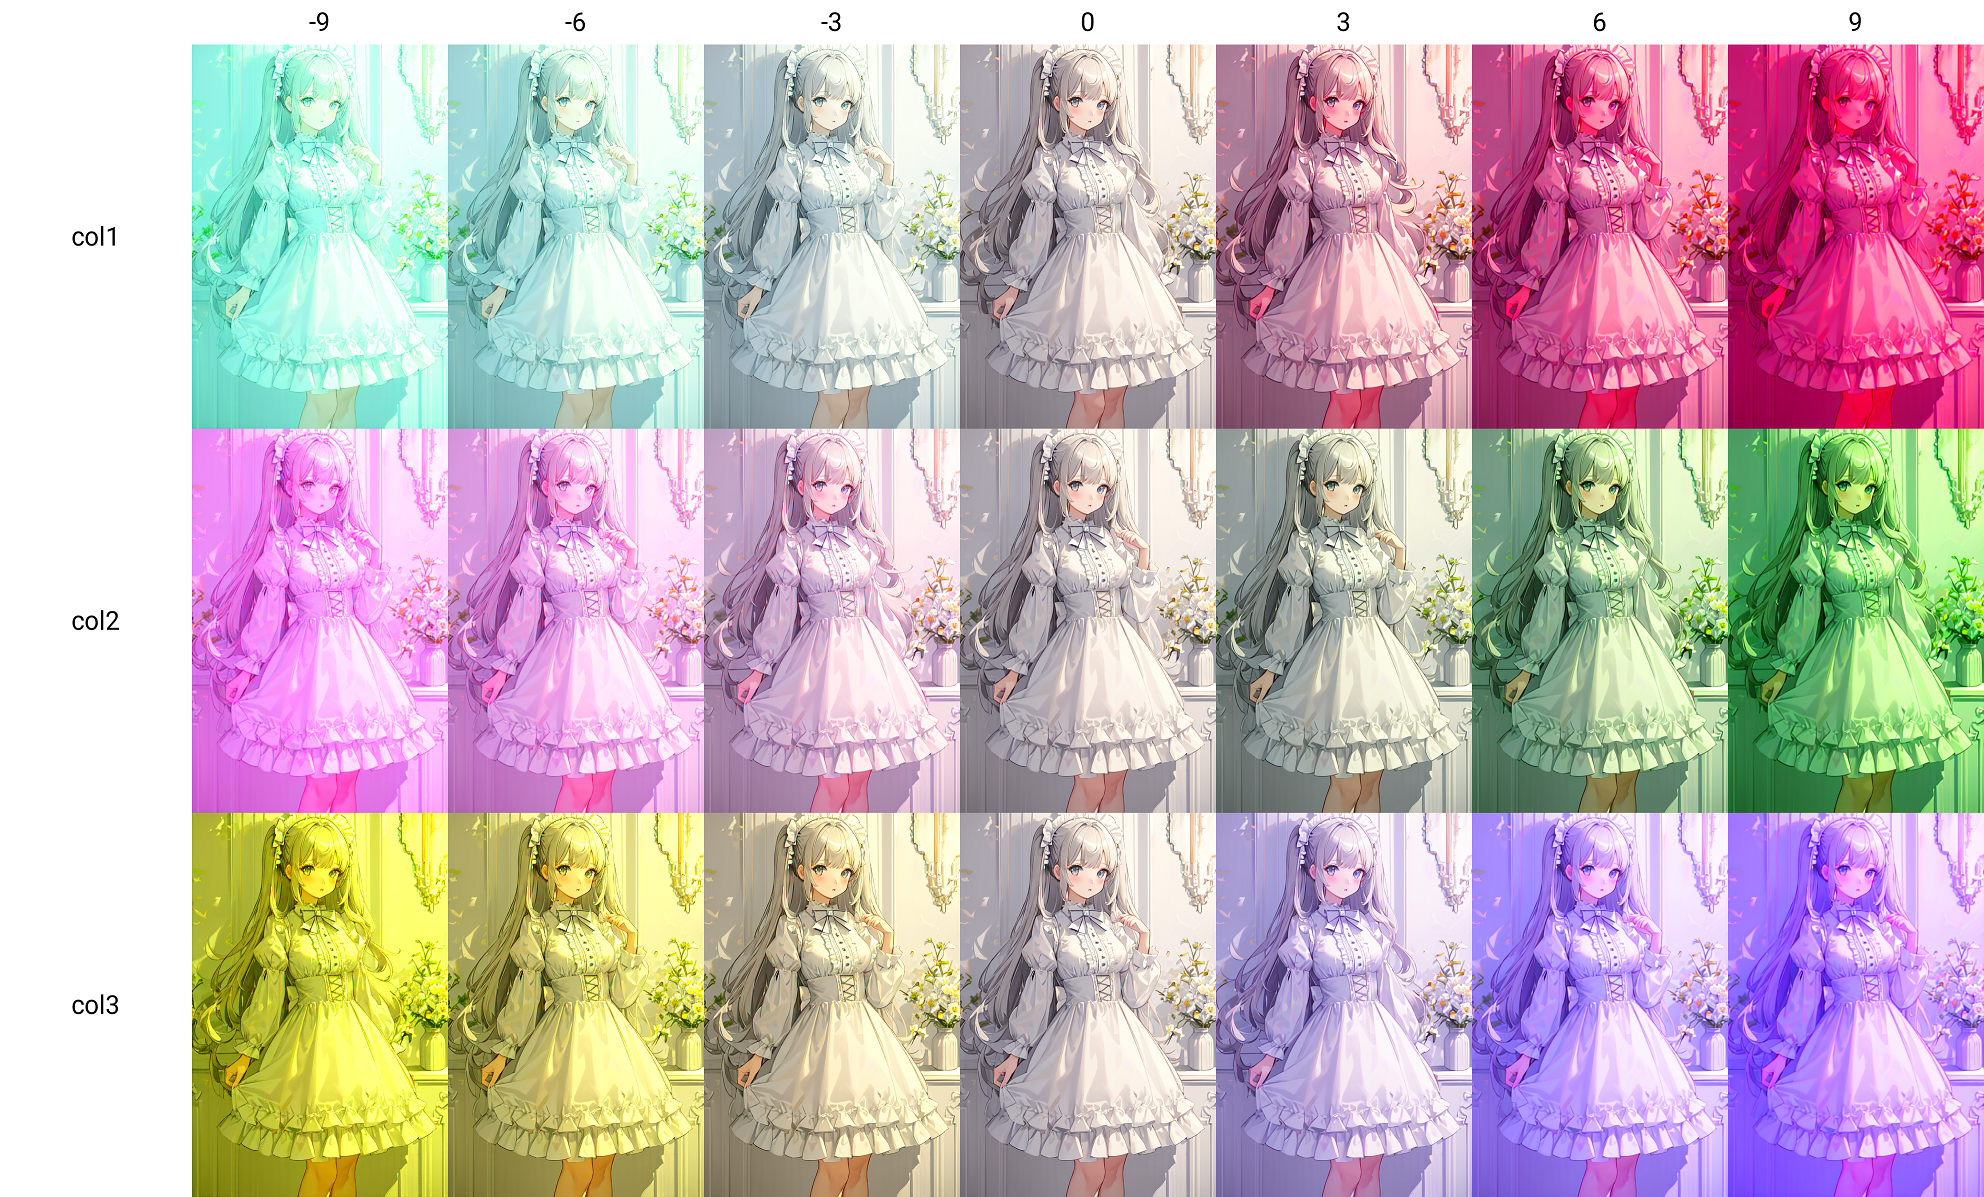
You can tune the color tone. For Cyan-Red, it becomes Cyan when set to negative and Red when set to positive.
You can tune the saturation.
In the case of using Hires-fix, the optimal settings often differ from the usual. Basically, when using Hires-Fix, it is better to input larger values than when not using it. Hr-Detail1,2 is used when you want to set a different value from when not used during Hires-Fix generation. Hires-Scaling is a feature that automatically sets the value at the time of Hires-Fix. The value of Hires-scale squared is usually multiplied by the original value.
You can specify the value in prompt by entering in the following format. Please use this if you want to use it in XYZ plot.
<cdt:d1=2;col1=-3>
<cdt:d2=2;hrs=1>
<cdt:1>
<cdt:0;0;0;-2.3;0,2>
<cdt:0;0;0;-2.3;0;2;0;0;1>
The available identifiers are d1,d2,con1,con2,bri,col1,col2,col3,hd1,hd2,hrs,st1,st2. When describing in the format of 0,0,0..., please write in this order. It is okay to fill in up to the necessary places. The delimiter is a semicolon (;). If you write 1,0,4, d1,d2,cont will be set automatically and the rest will be 0. hrs turns on when a number other than 0 is entered.
This value will be prioritized if a value other than 0 is set.
At this time, Skipping unknown extra network: cdt will be displayed, but this is normal operation.
You can specify the number of steps to stop the adjustment. In Hires-Fix, the effects are often not noticeable after the initial few steps. This is because in most samplers, a rough image is already formed within the first 10 steps.
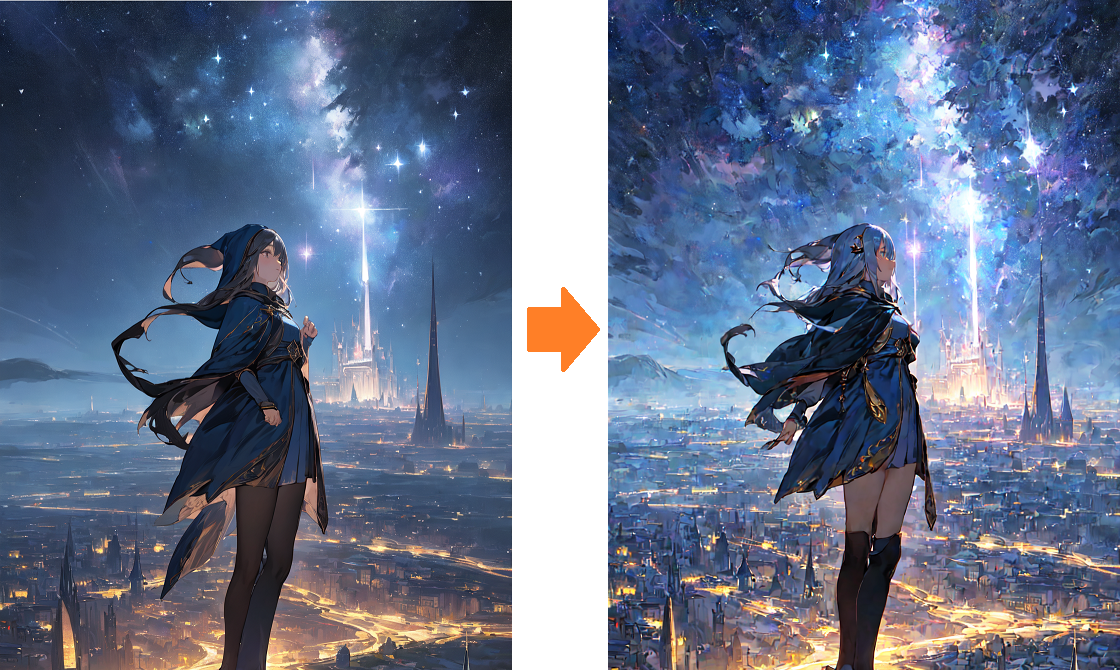
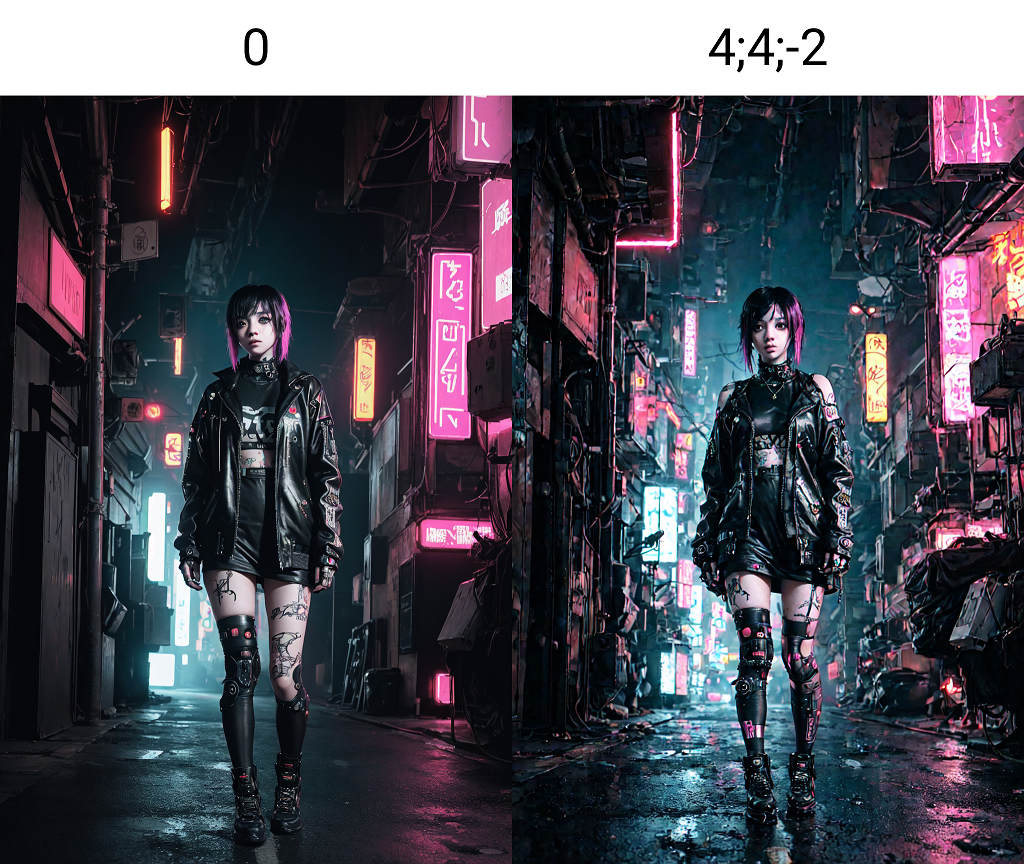
The left is before use, the right is after use. Click the image to enlarge it. Here, we are increasing the amount of drawing and making it blue. The difference is clearer when enlarged.
You can expect an improvement in reality with real-series models.
Enhance the responsiveness of prompts by controlling the color of the noise during the generation process. Color settings can either be uniform or set by dividing the screen.
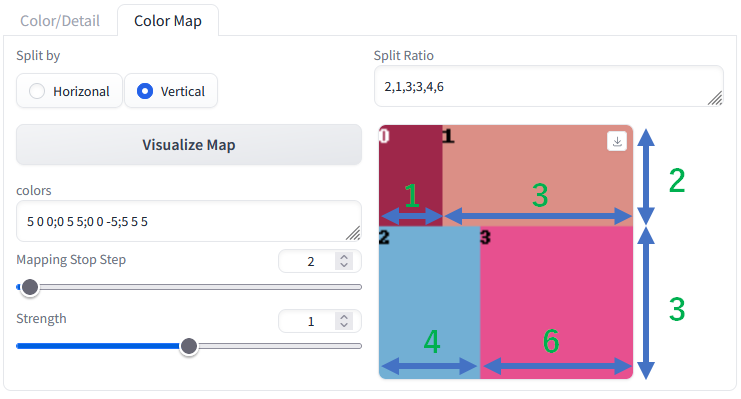
Operate within the Color Map tab.
Determine the direction to split the range for color setting. The result is the same for a single color. If set to "Horizonal", it will split horizontally, separating it into upper and lower directions.
Set the ratio for division. The format is the same as the Regional Prompter. While dividing in the vertical direction, horizontal division within is also possible. For a single color, simply input "1".
1,1,1,1
In this case, it is simply quartered.
3,1,2,1
For this example, it will be divided into a 3:1:2:1 ratio.
To add further divisions, separate with ;.
2,1,3;3,4,6
For this example, the ratio split by ; becomes the sub-region ratio. Within the sub-region, the first number (2,3) represents the primary direction ratio, while the next two represent the ratio within the sub-region.
Specify with either 3 or 4 values. These correspond to Brightness, Cyan-Red, Magenta-Green, and Yellow-Blue respectively.
5 has been set as the optimal value.
When you input 3 values, they are treated as specifications for the three colors. If you input 4 values, they include Brightness in the value. Separators can be a space or a ,. For separating areas, you can use ; or |. When specifying within a prompt, please use |. The example provided:
5 0 0;0 5 5;0 0 -5;5 5 5
indicates red, blue, yellow, and purple respectively. For color specifications, please refer to the table provided at the end.
Specify the number of steps for color correction and the intensity of the correction. Typically, it is Step 1-3, Strength 1, but it's also possible to extend the step count (e.g., 10) and decrease the strength (e.g., 0.5).
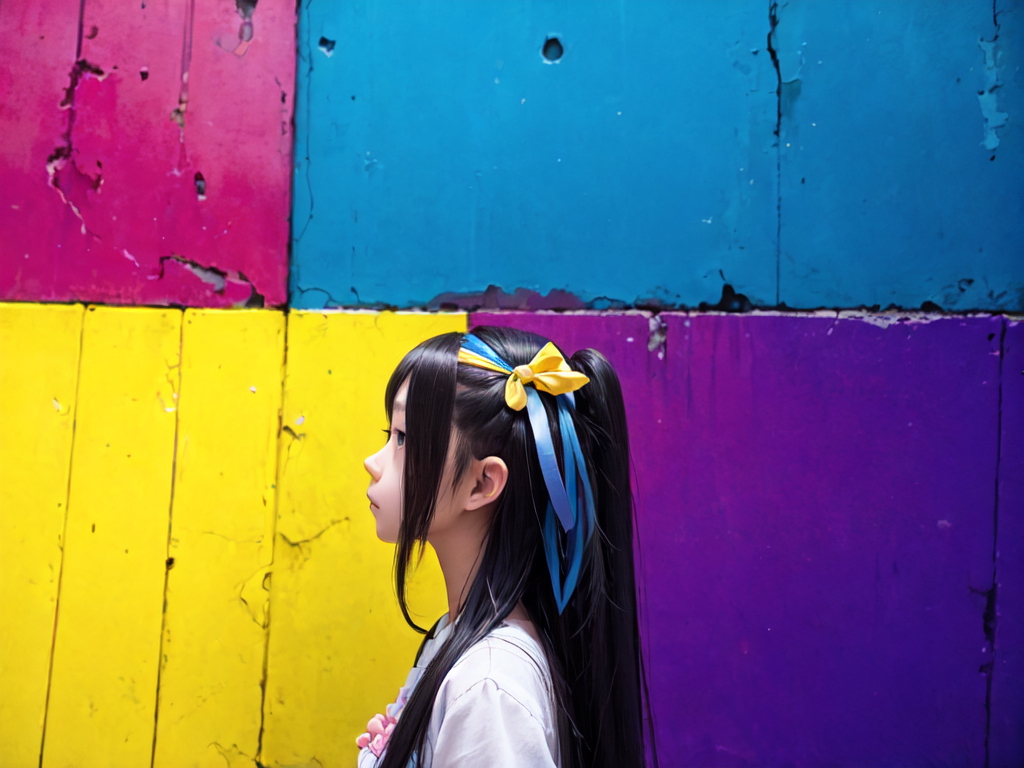
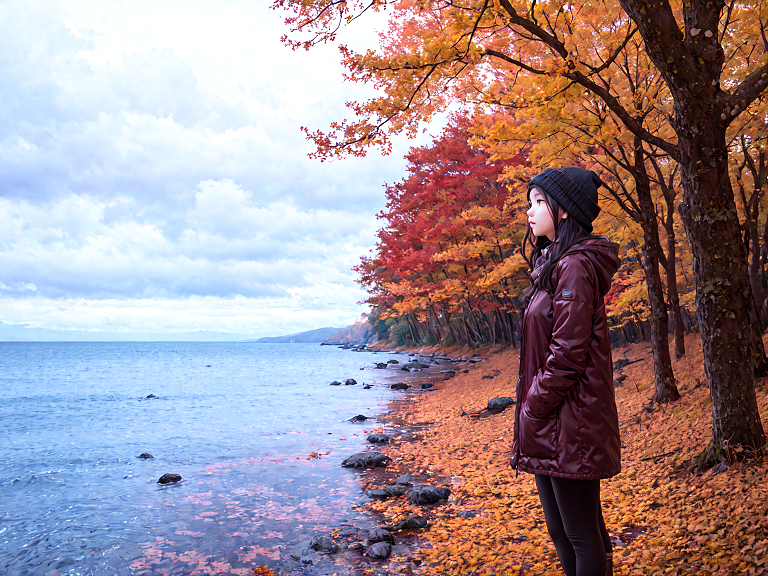
While a certain colors is specified in this correction, it doesn't mean that the area will have that exact color. Although we're changing the color of the noise, images are generated based on the relationship between the prompt and the color. If the prompt does not have anything related to color, it might be disregarded. The image below was generated with the prompt sea, autumn forest, girl and color corrections to blue on the left and red on the right. sea responds to the blue noise, and autumn forest to the red noise, thus resulting in the image below. Think of it as a correction to enhance the responsiveness of the prompt.
Specify using "sp" (Split ratio), "by" (Split by), "cols" (colors), "stc" (Stop Step), and "str" (Strength), or input values in this order. For md, abbreviations H and V can be used.
<cdtc:1,1;H;5 0 0|-5 0 0;2;1>
<cdtc:by=H;str=1.1>
出力画像の描き込み量や色調を変更する拡張機能です。生成後の画像に対してではなく生成過程に介入します。LoRAとは異なる仕組みで動いています。2.X系統にも対応しています。特にHires.fix時の生成品質を大幅に向上させることができます。
どれかの値が0以外に設定されている場合、自動的に有効化します。描き込み量が増えると必然的にノイズも増えることになるので気を付けてください。Hires.fix使用時では出力が違って見える場合があるので想定される設定で試すことをおすすめします。数値は大体5までの値を入れるとちょうど良いはずですがそこはモデルにも依存します。正の値を入力すると描き込みが増えたりします。
マイナスにするとフラットに、そして少しぼけた感じに。プラスにすると描き込みが増えノイジーになります。通常の生成でノイジーでもhires.fixできれいになることがあるので注意してください。Detail1,2共に同様の効果がありますが、Detail1は2に比べて構図への影響が強く出るようです。2.X系統の場合、Detail 1の反応が通常とは逆になり、マイナスで書き込みが増える場合があるようです。
コントラストや明るさがかわり、同時に描き込み量も変わります。サンプルを見てもらった方が早いですね。
色調を補正できます。Cyan-RedならマイナスにするとCyan、プラスにするとRedになります。
彩度を補正できます。
Hires-fixを使用する場合、最適な設定値が通常とは異なる場合が多いです。基本的にはHires-Fix使用時には未使用時より大きめの値を入れた方が良い結果が得られます。Hr-Detail1,2ではHires-Fix生成時に未使用時とは異なる値を設定したい場合に使用します。Hires-Scalingは自動的にHires-Fix使用時の値を設定する機能です。おおむねHires-scaleの2乗の値が元の値に掛けられます。
promptに以下の書式で入力することでpromptで値を指定できます。XYZ plotで利用したい場合にはこちらを利用して下さい。
<cdt:d1=2;col1=-3>
<cdt:d2=2;hrs=1>
<cdt:1>
<cdt:0;0;0;-2.3;0,2>
<cdt:0;0;0;-2.3;0;2;0;0;1>
使用できる識別子はd1,d2,con1,con2,bri,col1,col2,col3,hd1,hd2,hrs,st1,st2,satです。0,0,0...の形式で記述する場合にはこの順に書いてください。区切りはセミコロン「;」です。記入は必要なところまでで大丈夫です。1,0,4なら自動的にcontまでが設定され残りは0になります。hrsは0以外の数値が入力されるとオンになります。
0以外の値が設定されている場合にはこちらの値が優先されます。
このときSkipping unknown extra network: cdtと表示されますが正常な動作です。
補正を停止するステップ数を指定できます。Hires-Fixでは最初の数ステップ以降は効果が感じられないことが多いです。大概のサンプラーで10ステップ絵までには大まかな絵ができあがっているからです。
リアル系モデルでリアリティの向上が見込めます。
生成過程においてノイズの色をコントロールすることでプロンプトの反応をよくします。色の設定は単色あるいは画面を分割して設定することが可能です。
Color Mapタブで操作します。
色を設定する範囲を分割する方向を設定します。単色の場合どちらでも同じ結果になります。Horizonalだと水平線で分割するために上下方向に分かれます。
分割する比率を設定します。Regional Prompterと同じ書式です。上下方向に分割しつつ、その中で横方向に分割することが可能です。単色の場合は1と入力すればいいです。
1,1,1,1
の場合、単純に四分割されます。
3,1,2,1
の場合、3:1:2:1に分割されます。
追加の分割を行いたい場合は;で区切ります。
2,1,3;3,4,6
の場合、;で区切られた比率が副領域の比率になります。副領域の中で、最初の数値(2,3)が主方向の比率、残りの二つが副領域内の比率になります。
3あるいは4つの数値で指定します。それぞれBrightness,Cyan-Red,Magenta-Green,Yellow-Blueに対応します。
5が最適になるようになっています。
3つの数値を入力した場合、三色の指定として扱われ、4つの数値を入力するとBrightness込みの値として扱われます。区切りは半角スペースあるいは,が使えます。領域ごとの区切りには;か|が使えます。プロンプト中で指定する場合には|を用いてください。例で出している
5 0 0;0 5 5;0 0 -5;5 5 5
はそれぞれ赤、青、黄色、紫を指定しています。色の指定は最後にある対照表を参考にしてください。
色の補正を行うステップ数をと、補正の強さを指定します。基本はStep 1~3,Strength 1ですが、ステップ数を長くして(10)Strengthを小さくする(0.5)運用も可能です。
この補正では色を指定していますが、その領域がその色になるわけではありません。ノイズの色を変えていますが、プロンプトと色の関係から画像が生成されるので、プロンプトに色に関係のあるものがないと無視されることがあります。以下の画像はsea, autumn forest, girlというプロンプトと、左右に青と赤を補正して生成した画像です。seaは青いノイズに反応し、autumn forestは赤いノイズに反応するので以下のような画像が生成されます。あくまでプロンプトの反応をよくする補正だと考えてください。
"sp"(Spilt ratio),"by"(Split by),"cols"(colors),"stc"(Stop Step),"str"(Strength)で指定するか、この順に値を入れてください。mdはH,Vの略が使用可能です。
<cdtc:1,1;H;5 0 0|-5 0 0;2;1>
<cdtc:by=H;str=1.1>
| Cyan | シアン | -5 0 0 |
| Magenda | マゼンダ | 0 -5 0 |
| Yellow | 黄色 | 0 0 -5 |
| Red | 赤 | 5 0 0 |
| Green | 緑 | 0 5 0 |
| Blue | 青 | 0 0 5 |
| VeryLightBlue | 水色 | -5 -5 0 |
| YellowGreen | 黄緑 | -5 0 -5 |
| Orange | オレンジ | 0 -5 -5 |
| Malachite | マラカイト | -5 5 0 |
| BrightCyan | 明るいシアン | -5 0 5 |
| VioretPink | バイオレットピンク | 0 -5 5 |
| DeepPink | 深ピンク | 5 -5 0 |
| GuardsmanRed | 朱色 | 5 0 -5 |
| DeepGreen | 深緑 | 0 5- 5 |
| Black | 黒 | 5 5 0 |
| BrightNeonPink | ネオンピンク | 5 0 5 |
| NeonBlue | ネオン青 | 0 5 5 |
| GreenYellow | 緑黄色 | -5 -5 -5 |
| LightBlue | 明るい青 | -5 -5 5 |
| LimeGreen | ライム | -5 5 -5 |
| BrightCyan | 明るいシアン | -5 5 5 |
| Red | 赤 | 5 -5 -5 |
| DeepPink | 深ピンク | 5 -5 5 |
| DeepBrown | 焦茶色 | 5 5 -5 |
| VioletBlue | 青紫 | 5 5 5 |