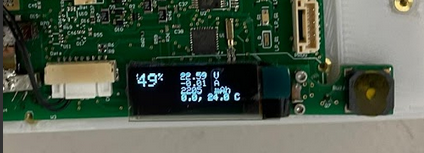
When you receive a battery with integrated Batmon, the OLED display (if applicable) and red/green LED's should be flashing periodically, displaying the battery state of charge, the min and max cell voltages, and current in Amps. The button is used to cycle through screens. Batmon will default back to the periodically flashing screen after some time to conserve energy; the lower the state of charge, the less frequently data will be displayed.
If you see the < ! > symbol on the OLED display, this means that one or more safety warning conditions have been met. Press the button to see the warning(s) present.
The optional OLED display/buzzer attachment extends Batmon functionality by providing a user-friendly interface for displaying state of charge, voltages, warnings, and more. The small board is attached to the main Batmon board via a small connector.
Warning: this connector is rated for a limited number of plug-unplug cycles. It is recommended to attach/detach this accessory as little, and as carefully as possible.
You’ll notice that the XT90 on a Batmon equipped smart battery, while compatible with all XT90 connectors, is not standard. The two small pins in the middle of the connector are for interfacing with an autopilot via an opto-isolated I2C connection.
Connect the smart battery and I2C opto-isolator board to one of the autopilot’s I2C ports as shown:


Follow the schematics from https://github.com/rotoye/batmon_reader/blob/ArduinoAsMaster/HARDWARE/6-10%20Cell%20Connection%20schematic.pdf to remove the jumpers before connecting any battery to BatMon
If cell voltage is applied across any cell jumpers, they will short the cell and blow. Please check that your pack configuration corresponds appropriately to the jumpers.
Clone or download Rotoye's fork of PX4:
Checkout the batmon_4.03 branch
Build and upload the firmware according to PX4 documentation instructions
In ground control software of choice, set the BATx_SOURCE parameters to "External", set SENS_EN_BAT to true, and BAT_SMBUS_MODEL to 3:Rotoye
Start the batt_smbus script on NuttShell
For example, running two BatMons on the same bus:
batt_smbus start -X -b 1 -a 11 * External bus 1, address 0x0b
batt_smbus start -X -b 1 -a 12 * External bus 1, address 0x0c
Clone or download Ardupilot firmware
Check out the master branch, build from source, and flash the firmware. Batmon support is not yet in a stable release of Ardupilot.
In ground control software of choice, manually set the BATTx_MONITOR parameter to 19 (or select Rotoye by name, if enumerated), and select the appropriate BATTx_BUS (0-3), where x is the Batt number (multiple Smart Batteries can be used at once!)
See the full list of parameters for more detail
You should now be able to verify through a tool such as MAVLink Inspector in QGroundControl that Batmon is sending data to the autopilot:
Instruction to run ReadBatmon
- Copy the ReadBatmon folder to local directory.
- Open the sketch using Arduino IDE.
- Open Sketch->Include Library-> Add .ZIP library
- Give location of FastCRC.zip file. The FastCRC library would now be added.
- Connect the Power, GND, SDA, SCL lines from Arduino to Batmon
- Connect the cells to Batmon pcb as given by 6-10 cell connection schematic
- Upload code to Arduino
- Run serial monitor to see output