Henry Yau May 28, 2018
The challenge presented was to perform a pixel wise identification of the road and vehicles from a video of the car simulator Carla. http://carla.readthedocs.io/en/latest/ The solution attempted here is image segmentation using a U-Net implemented with Keras with a TensorFlow backend.
The training data provided is a set of 1000 800x600 PNG images from the hood of a simulated car and their corresponding labels, also 800x600 PNG images. The training labels have integer values in the red channels corresponding to the ID of the particular object located at that given pixel. The training labels are preprocessed to move ID's not corresponding to the road or vehicles to a single label and to relabel pixels corresponding to road markings to the road label. In addition, pixels corresponding to the vehicle hood are set to 0 (none). To prevent overfitting, additional simulated runs on Carla were generated providing 2300 more training images and labels. In addition to the additional simulated runs, data augmentation was used. The input images and labels are then resized to 256x256.
Training image and label:

The standard data generator on Keras does not appear to be meant for multiclass image segmentation problems like this one. However there is a trick intended for transforming masks which can be applied here. By providing a the same seed to both the image and label ImageDataGenerator, the same transformations are applied to both. Using zip() creates an iterator which provides the image/label pair.
data_gen_args = dict(featurewise_center=False,featurewise_std_normalization=False, rotation_range=10.,width_shift_range=0.3,
height_shift_range=0.3,zoom_range=[0.7,1.3], horizontal_flip=True, fill_mode = 'constant', cval = 0.0, shear_range = 0.3)
image_datagen = ImageDataGenerator(**data_gen_args)
mask_datagen = ImageDataGenerator(**data_gen_args)
seed = 1
image_datagen.fit(imgs_train, augment=True, seed=seed)
mask_datagen.fit(imgs_mask_train, augment=True, seed=seed)
...
train_generator = zip(image_generator, mask_generator)
It is possible to leave the label information in a single channel, then in the loss function convert the values into a OHE tensor. To make implementing the loss function more straight forward, the label data is preprocessed so that the road labels are in the R-channel as ones and zeros and the vehicle labels are in the G-channel and the remaining labels are set tot the B-channel.
The U-Net architecture is a fairly recent advancement in the image segmentation field, originally developed by Ronneberger, et al. at the University of Freiberg to perform image segmentation on neuronal structures. https://lmb.informatik.uni-freiburg.de/people/ronneber/u-net/
The general structure of the U-Net starts out similar to a generic CNN used for image classification. That is, a series of 3x3 convolutionals filters and ReLU activation functions with a max pooling layer. This contraction pass results in a long single feature vector, in the original work a 2x1024 representing the background and foreground features. The implementation in this project has a 4x1024 vector representing no label, road label, vehicle label, all additional labels, and a none channel. In a classification problem, a fully connected layer and a sigmoid activation function would be placed here after this to get an output, however U-Net differs significantly from here on. An expansion path is performed which results in a label image with the same dimensions as the input image. The expansion is performed with a series of up-convolutions. What makes U-Net unique is that the weights are passed directly from the contraction path and to the corresponding layer of the expansion path. This kernel is used to map the feature vector into a 2x2 pixel output.
This implementation used here is derived from: https://github.com/petrosgk/Kaggle-Carvana-Image-Masking-Challenge
The contraction path layers are implemented in Keras as :
    down = Conv2D(64, (3, 3), padding='same')(input)
    down = BatchNormalization()(down)
    down = Activation('relu')(down)
    down = Conv2D(64, (3, 3), padding='same')(down)
    down = BatchNormalization()(down)
    down = Activation('relu')(down)
    down_pool = MaxPooling2D((2, 2), strides=(2, 2))(down)
With each subsequent layer doubling until being squeezed into a 1024 center layer. The up-convolution layers use UpSampling2D((2,2)) which doubles the size of the input followed by concatenate([down, up]) which combines the learned weights of the contraction path layer to the expansion layer. The Conv2D() layer that follows then uses those weights to map the input feature vector to a 2x2 pixel output. The each additional layer doubles the output dimensions until the original dimensions are reached. The original implementation uses no padding so the output dimensions are smaller than the original image.
The loss function is combination of one minus the F-Beta score, one minus the Dice score, and a weighted categorical cross entropy. The F-Beta score is computed as the average of the two F-Beta score for the vehicle and the road. To implement this the Lambda function is used to separate the two channels. For example, the predictions are separated using:
pred0 = Lambda(lambda x : x[:,:,:,0])(y_pred)
pred1 = Lambda(lambda x : x[:,:,:,1])(y_pred)
From here, the prediction and truths are flattened to a 1D tensor to compute precision and recall which are then used to compute the F-Beta scores using the definitions:
The F-beta is a generalization of the F1 score where one can add more weight to either precision or recall. The Dice index is a measure of how similar two sets are, similar to precision and recall. One minus the Dice index is a commonly used loss function for the image segmentation problem. The Dice index is defined as:
Finally a weighted cross entropy is a log loss function where each categorical label can be assigned a weight
I intended to train the model with only the weighted categorical cross entropy and the dice loss then add the f-beta loss when a local mininum was found, but ran out of time on the virtual machine. The validation Dice score was around 0.98 at the end of training. The model still produces adequate results at over 11 frames per second with an f-beta score of over 0.98 for the road and 0.81 for vehicles. With more time for further training, the accuracy can likely be increased significantly.
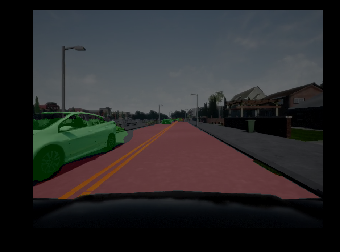
A video of a test sample can be viewed in the images directory. Clicking on the sample test output image below links to a video of a sample output overlaid on the test video.
Convert to TensorRT. Has custom loss functions which need to be converted to plug-ins.