PLOVER: Fast, Multi-core Scalable Virtual Machine Fault-tolerance
Cloud computing enables a vast deployment of online services in virtualized infrastructures, making it crucial to provide fast fault-tolerance for virtual machines (VM). Unfortunately, despite much effort, achieving fast and multi-core scalable VM fault-tolerance is still an open problem. A main reason is that the dominant primarybackup approach (e.g., REMUS) transfers an excessive amount of memory pages, all of them, updated by a service replicated on the primary VM and the backup VM. This approach makes the two VMs identical but greatly degrades the performance of services.
State machine replication (SMR) enforces the same total order of inputs for a service replicated across physical hosts. This makes most updated memory pages across hosts the same and they do not need to be transferred. We present Virtualized SMR (VSMR), a new approach to tackle this open problem. VSMR enforces the same order of inputs for a VM replicated across hosts. It uses commodity hardware to efficiently compute updated page hashes and to compare them across replicas. Therefore, VSMR can efficiently enforce identical VMs by transferring only divergent pages. An extensive evaluation on PLOVER, the first VSMR system, shows that PLOVER’s throughput on multi-core is 2.2X to 3.8X higher than three popular primary-backup systems. Meanwhile, PLOVER consumed 9.2X less network bandwidth than both of them.
Cheng Wang, Xusheng Chen, Weiwei Jia, Boxuan Li, Haoran Qiu, Shixiong Zhao, and Heming Cui, The University of Hong Kong
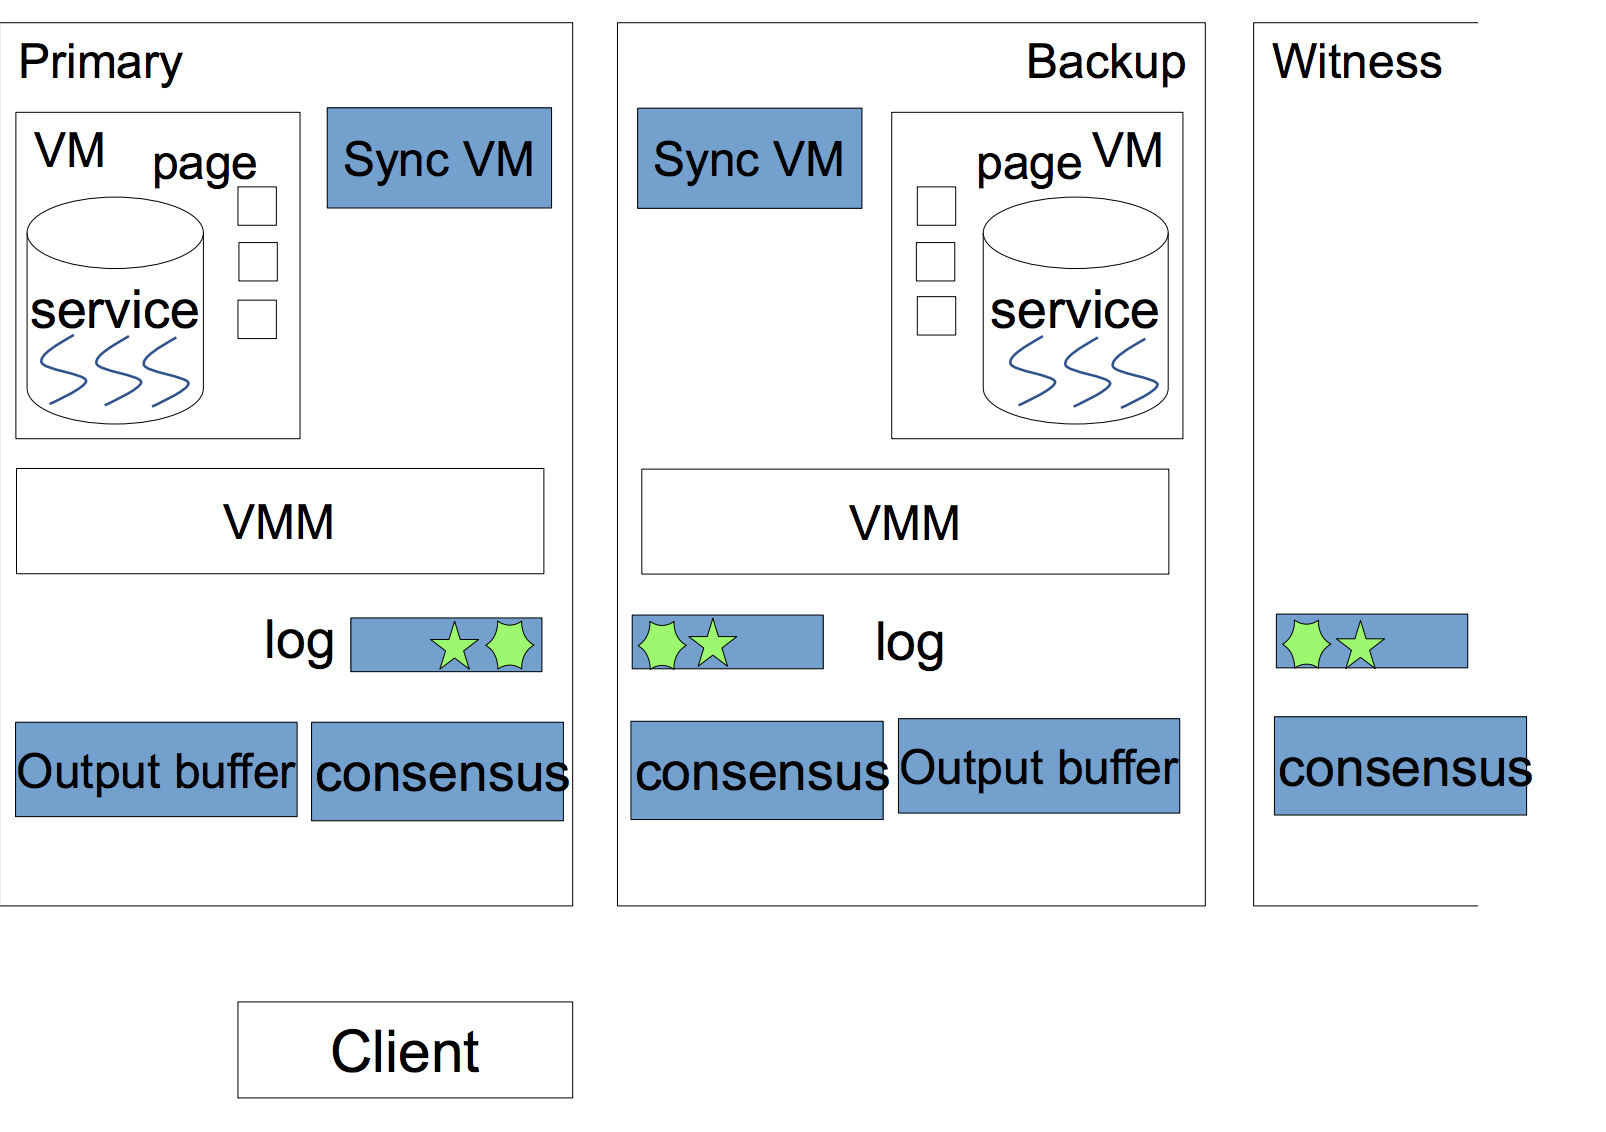
The architecture of Plover is shown in the diagram below. Plover combines SMR (State Machine Replication) and primary/backup approach. PLOVER’s architecture has four key components: the PAXOS input coordinator (PAXOS), the consensus log (log), the output buffering guard (guard), and the syncvm component. The PAXOS coordinators reside in all three replicas to maintain a consensus log with the same order of SMR operations, including input requests, syncvm, and role changes.
-
RDMA-based input consensus:
- Primary: propose request and execute
- Backup: agree on request and execute
- Witness: agree on request and ignore
-
RDMA-based VM synchronization:
- Exchange and union dirty page bitmap
- Compute hash of each dirty page
- Compare hashes
- Transfer divergent pages
-
Dirty Page Hashes computation:
Plover uses a multi-threaded dirty page hash computing mechanism. The mechanism detects the number of CPU cores on local host creates same number of threads to compute hashes of dirty physical pages since the last PLOVER syncvm operation, using Google’s CityHash.
-
Server program idle status determination:
To efficiently find the idle status of a service, PLOVER creates a simple, non-intrusive algorithm without modifying guest OS. This algorithm uses the threading hierarchy of QEMU: all QEMU virtual threads (threads that emulate vCPUs) are spawned from the QEMU hypervisor process (§2.2). PLOVER creates an internal thread in the process to call clock(), which gets the total CPU clock of a process and its children. If PLOVER finds that the increment rate of this clock is as small as an vacant VM for a threshold (100µs), it finds the service idle.
Tested using Ubuntu 16.04.2 (64bit), MLNX_OFED_LINUX-3.4-2.0.0.0-ubuntu16.04-x86_64
# export VMFT_ROOT=<absolute path of vm-ft>
-
Install MLNX_OFED driver
-
RDMA Paxos
# apt-get install libev-dev libdb-dev libconfig-dev
# cd rdma-paxos/target
# make
- Qemu colo
# apt-get install zlib1g-dev libglib2.0-dev libpixman-1-dev libgnutls-dev
# dpkg -i dep-lib/*.deb
# cd qemu
# ./configure --disable-werror --target-list=x86_64-softmmu --extra-ldflags="-Wl,--no-as-needed -lnl-3 -lnl-cli-3 -lnl-route-3 -lnl-3 -lnl-cli-3 -lnl-route-3 -L$VMFT_ROOT/rdma-paxos/target -linterpose" --extra-cflags="-I$VMFT_ROOT/rdma-paxos/src/include/rsm-interface -I/usr/include/libnl3"
- Set Up the Bridge and network environment
In each machine, setup a bridge br0, using command brctl as follows (change 192.168.0.33 according to your need):
# ifconfig eth0 down
# ifconfig eth0 0.0.0.0
# brctl addbr br0
# brctl addif br0 eth0
# ifconfig br0 192.168.0.33 netmask 255.255.255.0
# ifconfig eth0 up
- Qemu-ifup/Qemu-ifdown
We need a script to bring up the TAP interface. a qemu-ifdown script is needed to reset you networking configuration which is configured by qemu-ifup script You can find this info from http://en.wikibooks.org/wiki/QEMU/Networking.
On each machine, moving qemu-ifup and qemu-ifdown scripts to /etc/ as follows:
# mv qemu-ifup qemu-ifdown /etc/
Note: Please change the ip address in sh file.
- Primary side:
# primary_start_plover.sh
- Secondary side:
# qemu-img create -f qcow2 /mnt/ramfs/active_disk.img 10G

# qemu-img create -f qcow2 /mnt/ramfs/hidden_disk.img 10G

# secondary_start_plover.sh
- Sentinel side:
# sentinel_start_plover.sh
- Primary side:
# run_test_plover.sh
Note:
a. Active disk, hidden disk and nbd target's length should be the same.
b. It is better to put active disk and hidden disk in ramdisk.
Plover is presented in NSDI 2018. Presentation slides can be found here. Paper can be found here.