Step by Step Tutorial OLD
This guide explains how to set up and use EOP. It offers step-by-step instructions to download, install, configure, and run EOP code and its related support resources and tools. It has been thought for users who want to use the software platform as it is whereas developers who want to contribute to the code have to follow the instruction reported in the developers distribution page accessible from the menu bar on the right.
The EOP library contains several components for preprocessing data and for annotating textual entailment relations. Components for pre-processing allow for annotating data with useful information (e.g. lemma, part-of-speech) whereas textual entailment components allow for training new models end then using them to annotate entailment relations in new data. Each of these facilities is accessible via the EOP Application Program Interface ( ). In addition, a Command Line Interface (
 ) is provided for convenience of experiments and training.
In the rest of this guide we will report examples for both of these possibilities whereas Java code examples is on the line of the material used in the Fall School class for Textual Entailment in Heidelberg; see their web site for further information and code updates: http://fallschool2013.cl.uni-heidelberg.de/. A [basic Maven project] (http://hlt-services4.fbk.eu:8080/artifactory/simple/private-internal/eu/excitementproject/eop-resources/java_examples/myProject-EOPv1.1.1.tar.gz) containing the Hello World example as well as the examples contained in Appendix B is provided too.
We assume some familiarity with Unix-like command-line shells such as bash for Linux and the reference operating system to be Ubuntu 12.04 LTS (http://www.ubuntu-it.org/download/).
Questions about EOP should be directed to the EOP mailing list.
- [Basic Installation](#Basic Installation)
- [Hello World! Example](#Hello World! Example)
- [Preprocessing data sets](#Preprocessing data sets)
- [Annotating a single T/H pair by using pre-trained models](#Annotating a single T/H pair by using pre-trained models)
- [Annotating T/H pairs from files by using pre-trained models](#Annotating T/H pairs from files by using pre-trained models)
- [Training new models](#Training new models)
- [Evaluating the results](#Evaluating the results)
- [Advanced Installation](#Advanced Installation)
Appendix A: [TreeTagger Installation](Step-by-Step, TreeTagger-Installation)
Appendix B: [Code Examples](Step-by-Step, Code-Examples)
Appendix C: [Utility Code](Step-by-Step, Utility-Code)
The basic installation is for users who want to start using EOP from now and it requires PCs with 4GB of RAM installed. The Basic Installation is then the preliminary step for the Advanced Installation.
Installation, main steps:
1a. [Installing tools and environments](#Installing tools and environments)
1b. [Obtaining the EOP code and installing it](#Obtaining the EOP code and installing it)
EOP is written for Java 1.7+. If your JVM is older than 1.7, then you should upgrade. The same applies to Apache Maven: EOP requires version 3.0.x and older versions might not work. The necessity to install some tools like Maven itself or environments like Eclipse depends on the modality being used to run EOP: vs . In the following we report the list of the tools required to run EOP whereas a note after the name of the tool (i.e. or ) let users know if such tool is necessary for the chosen EOP modality.
This is the list of the tools and environments needed by EOP:
- Java 1.7
- Eclipse + m2e Maven plugin (Juno or later)
- Maven tool (3.x or later)
Installing Java 1.7: Java is a programming language and computing platform first released by Sun Microsystems in 1995. There are lots of applications like EOP that will not work unless you have Java installed. Regardless of your operating system, you will need to install some Java virtual machine (JVM). Given that we want to use Eclipse for Java development, then we need to install the Java Development Kit JDK (the JDK includes--among other useful things--the source code for the standard Java libraries). There are several sources for JDK. Here are some of the more common/popular ones (listed alphabetically):
There are two ways of installing Java in Ubuntu:
- Using Ubuntu Software Center
- Download Git and then install manually:
Installing Eclipse: Installing Eclipse is relatively easy, but does involve a few steps and software from at least two different sources. Eclipse is a Java-based application and, as such, requires a Java runtime environment (JRE) in order to run.
There are two ways of installing Eclipse IDE in Ubuntu:
- Using Ubuntu Software Center
- Download Eclipse IDE package and then install manually (http://www.eclipse.org/juno/)
In addition to Eclipse we would need to install m2e Maven plugin. Apache Maven is a software project management and comprehension tool. Based on the concept of a project object model (POM), we use Maven to manage the EOP project's build and test. The goal of the m2e project is to provide a first-class Apache Maven support in the Eclipse IDE, making it easier to edit Maven's pom.xml, run a build from the IDE and much more. Any “Eclipse for Java” later than “Juno” version already has this plug-in pre-installed whereas if you have installed Eclipse Juno you would need to install m2e separately: http://www.eclipse.org/m2e/
Installing Maven tool: Apache Maven is a software project management and comprehension tool. Based on the concept of a project object model (POM), we use Maven to manage the EOP project's build and test. Maven tool (3.x or later) is required to use EOP and you can download and install it from its web site: http://maven.apache.org/
EOP functionalities are accessible both via and . Using EOP via involves using the EOP maven dependencies in the users code whereas the command line can be used by downloading the EOP archive zip file and installing it. These are the two possible choices:
- [EOP archive zip file distribution](#EOP archive zip file distribution)
- [EOP maven artifacts distribution](#EOP maven artifacts distribution)
This is the distribution for users who want to use EOP via . We provide a shell script for installing EOP automatically (this is described in the Quick Start page) however here we will see the needed steps to install EOP manually.
- Download the Excitement-Open-Platform-{version}.tar.gz archive file from:
https://github.com/hltfbk/Excitement-Open-Platform/archive/v{_version_}.tar.gz
where version refers to the EOP release version you want to install (e.g. 1.1.0).
- Copy the archive file from the directory where it has been saved into the directory where you want to have it, e.g. your programs directory under your home:
> cp Excitement-Open-Platform-{version}.tar.gz ~/programs/
- Go into the programs directory and extract/unpack it, i.e.
> cd ~/programs/
> tar -xvzf Excitement-Open-Platform-{version}.tar.gz
It will create the directory Excitement-Open-Platform-{version} containing the source code.
Building the EOP code: To compile the source code and "assemble" the produced files, directories and the needed dependencies, the Maven tool needs to be used:
Go into the Excitement-Open-Platform-{version} directory, i.e.
> cd Excitement-Open-Platform-{version}
Then, build the EOP code using the Maven command, i.e.
> mvn clean package assembly:assembly
It creates a directory called target in Excitement-Open-Platform-{version} containing a zip file (i.e. eop-{version}-bin.zip) of the generated binary code.
Go into the target directory, i.e.
> cd target
and from this directory unzip the new Zip File created before (eop-{version}-bin.zip), i.e.
> unzip eop-{version}-bin.zip
It creates a new directory (i.e. EOP-{version}) containing the binary files (i.e. jar files) that you have to use to run EOP.
Installing the EOP resources: Resources like WordNet and Wikipedia as well as the configuration files of the platform and the pre-trained models are distributed in a separated archive file that has to be download and unpack before using it:
-
Follow this link to download the archive file of the resources:
http://hlt-services4.fbk.eu:8080/artifactory/repo/eu/excitementproject/eop-resources/eop-resources-{version}.tar.gz -
Copy the archive file into the EOP-{version} directory created in the previous point, e.g.
> cp eop-resources-{version}.tar.gz ~/programs/Excitement-Open-Platform-{version}/target/EOP-{version}/eop-resources-{version}.tar.gz -
From the EOP-{version} directory where the archive file has been saved, extract/unpack it, i.e.
> cd  ~/programs/Excitement-Open-Platform-{version}/target/EOP-{version}/
> tar -xvzf eop-resources-{version}.tar.gz
It will create the directory eop-resources-{version} containing all the needed files.
EOP is also distributed via the EOP maven artifactory repository. Maven artifacts include the binary code, the sources code and the javadoc jars. All what you would need to do is to specify a dependency to EOP in the pom.xml file of your project; all transient dependencies are resolved automatically.
<dependencies>
  <dependency>
    <groupId>eu.excitementproject</groupId>
    <artifactId>core</artifactId>
    <version>{version}</version>
  </dependency>
  <dependency>
    <groupId>eu.excitementproject</groupId>
    <artifactId>lap</artifactId>
    <version>{version}</version>
  </dependency>
</dependencies>
where version is the EOP version, e.g. 1.1.0.
Whenever a project has a dependency upon an artifact, Maven will first attempt to use a local copy of the specified artifact. If that artifact does not exist in the local repository, it will then attempt to download from a remote repository. The repository elements within a POM specify those alternate repositories to search. To use EOP the following repository has to be included into the pom.xml file of your project in addition to the dependency that we have reported above:
<repositories>
  <repository>
    <id>FBK</id>
    <url>http://hlt-services4.fbk.eu:8080/artifactory/repo</url>
    <snapshots>
      <enabled>false</enabled>
    </snapshots>
  </repository>
</repositories>
You will see an example on how to use these dependencies in Section [Hello World! Example](#Hello World! Example).
Installing the EOP resources: Resources like WordNet and Wikipedia as well as the configuration files of the platform and the pre-trained models are distributed in a separated archive file that has to be download and unpack before using it:
-
Follow this link to download the archive file of the resources:
http://hlt-services4.fbk.eu:8080/artifactory/repo/eu/excitementproject/eop-resources/eop-resources-{version}.tar.gz -
Copy it just next to your programs directory into your home would be fine, e.g.
> cp eop-resources-{version}.tar.gz ~/programs/ -
extract/unpack it, i.e.
> cd  ~/programs/
> tar -xvzf eop-resources-{version}.tar.gz
It will create the directory eop-resources-{version} containing all the needed files.
We dedicated an entire section to an example showing how to annotate a T/H pair with EOP. Running it it also a good way to check if the Basic Installation works correctly. The proposed example involves running both a linguistic analysis pipeline (LAP) for pre-processing T/H pairs and an entailment decision algorithms (EDA) to see if an entailment relation exists between T and H. More in details this task can be split in the following main steps:
- Pre-processing a given T/H pair by calling a LAP
- Initialize an EDA with its configuration file and pre-trained model
- Using the selected EDA to see if an entailment relations exists between T and H
We will propose this example by and .
This section shows, with minimal code, how to annotate entailment relation via . We will use Eclipse IDE to write and run the code.
- Open Eclipse IDE
- In Eclipse, navigate to File > New > Other… in order to start the project creation wizard.

3. Scroll to the Maven folder, open it, and choose Maven Project. Then choose Next.
4. Choose to Create a simple project. For the purposes of this tutorial, we will choose the simple project. This will create a basic, Maven-enabled Java project. Leave other options as is, and click Next.
5. Now, you will need to enter information regarding the Maven Project you are about to create. Visit the Maven documentation for a more in-depth look at the Maven Coordinates (http://maven.apache.org/pom.html#Maven_Coordinates). Basically, the Group Id should correspond to your organization name, and the Artifact Id should correspond to the project’s name. The version is up to your discretion as is the packing and other fields. Fill out the appropriate information, and click Finish.
6. At this point your project should have been created. We will place our Java code in /src/main/java.
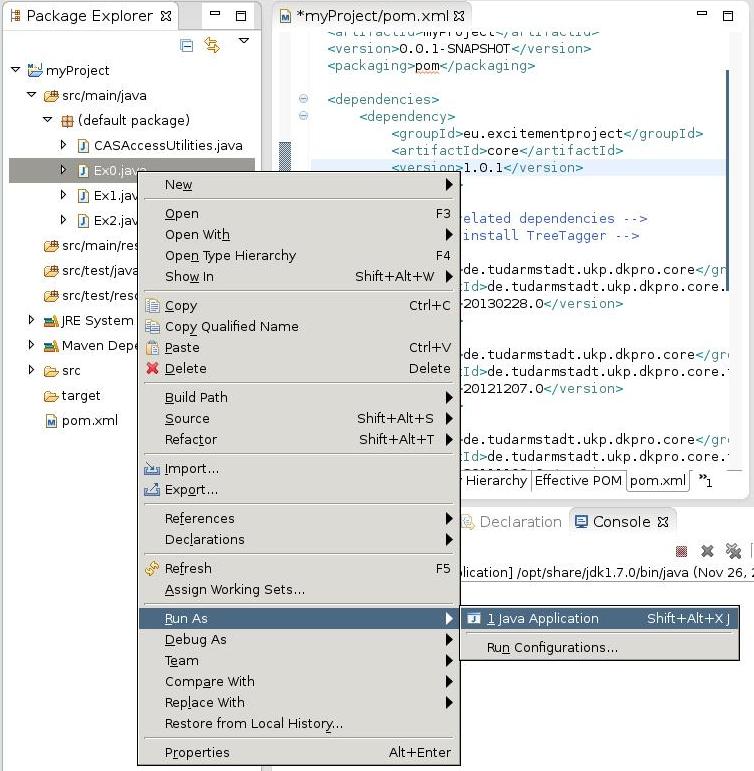
7. Open the pom.xml file to view the structure Maven has set up. In this file, you can see the information entered in Step 5. Now we have to specify the EOP dependencies and the repository where they are into the pom.xml file. 8. Always in Eclipse, navigate to src/main/java > New > Class in order to start writing your code. You can name it as Ex0.

9. Add the following code into the page of the created Java class; here to make the example easier we will not create a package for our Java class but we will use the default one.import java.io.File;
import org.apache.log4j.BasicConfigurator;
import org.apache.log4j.Level;
import org.apache.log4j.Logger;
import org.apache.uima.jcas.JCas;
import eu.excitementproject.eop.common.EDABasic;
import eu.excitementproject.eop.common.TEDecision;
import eu.excitementproject.eop.common.configuration.CommonConfig;
import eu.excitementproject.eop.core.ClassificationTEDecision;
import eu.excitementproject.eop.common.utilities.configuration.ImplCommonConfig;
import eu.excitementproject.eop.core.MaxEntClassificationEDA;
import eu.excitementproject.eop.lap.LAPAccess;
import eu.excitementproject.eop.lap.LAPException;
import eu.excitementproject.eop.lap.dkpro.OpenNLPTaggerEN;
/**
* Hello World to introduce a minimal "running" example for EOP. It consists of 3 steps:
* 1. Doing pre-processing by calling a LAP
* 2. Initialize an EDA with its configuration file and pre-trained model
* 3. Annotating entailment relations with the selected EDA
*/
public class Ex0 {
public static void main( String[] args ) {
// init logs
BasicConfigurator.resetConfiguration();
BasicConfigurator.configure();
Logger.getRootLogger().setLevel(Level.WARN);
//
System.out.println( "Hello World!" );
//
// Here's T-H of this Hello World code.
String text = "The students had 15 hours of lectures and practice sessions on the topic of Textual Entailment.";
String hypothesis = "The students must have learned quite a lot about Textual Entailment.";
//
// 1) Do pre-processing, via a LAP.
// Here, it runs one pipeline based on OpenNLP tagger for the English language
System.out.println( "Running LAP for the T-H pair." );
JCas annotated_THpair = null;
try {
// make a new OpenNLP based LAP
LAPAccess lap = new OpenNLPTaggerEN();
// make a new MaltParser based LAP
//LAPAccess lap = new MaltParserEN();
// ask it to process this T-H.
annotated_THpair = lap.generateSingleTHPairCAS(text, hypothesis);
} catch (LAPException e) {
System.err.print(e.getMessage());
System.exit(1);
}
//
//
// 2) Initialize an EDA with a configuration file (& corresponding model)
// (the model path is given in the configuration file)
System.out.println("Initializing the EDA.");
EDABasic<ClassificationTEDecision> eda = null;
try {
//Make sure that the path of the model in the configuration file below refers to:
//the directory where the models are: /home/user_name/programs/eop-resources-{version}/models/
File configFile = new File("/home/user_name/programs/eop-resources-{version}/configuration-files/MaxEntClassificationEDA_Base+OpenNLP_EN.xml");
CommonConfig config = new ImplCommonConfig(configFile);
//creating an instance of TIE EDA
eda = new MaxEntClassificationEDA();
//EDA initialization
eda.initialize(config);
} catch (Exception e) {
System.err.print(e.getMessage());
System.exit(1);
}
//
//
// 3) Now, the input data is ready, and the EDA is also ready.
// Calling the EDA.
System.out.println("Calling the EDA for decision.");
// the generic type that holds Entailment decision result
TEDecision decision = null;
try {
decision = eda.process(annotated_THpair);
} catch (Exception e) {
System.err.print(e.getMessage());
System.exit(1);
}
System.out.println("Run complete: EDA returned decision: " + decision.getDecision().toString());
}
}
Before going on be sure that the configFile variable in the code above contains the right path to the configuration file on your file system, i.e. /home/user_name/programs/eop-resources-{version}/configuration-files/MaxEntClassificationEDA_Base+OpenNLP_EN.xml
and that the model file name written in that configuration file points to the right model to be used, i.e. /home/user_name/programs/eop-resources-{version}/models/.
- Navigate to Ex0.java > Run As > Java Application to run the code.
Another way to run the example before is by using a command line standalone Java class, serving as a unique entry point to the EOP main included functionalities. The class that is located in the util package can call both the linguistic analysis pipeline to pre-process the data to be annotated and the selected entailment algorithm (EDA) and it is the simplest way to use EOP.
Then, go into the EOP-{version} directory, i.e.
> cd ~/programs/Excitement-Open-Platform-{version}/target/EOP-{version}/
and call the EOPRunner class with the needed parameters as shown in the example below. A complete list of EOPRunner parameters can be seen here
> java -Djava.ext.dirs=../EOP-{version}/ eu.excitementproject.eop.util.runner.EOPRunner
     -config ./eop-resources-{version}/configuration-files/MaxEntClassificationEDA_Base+OpenNLP_EN.xml
     -test
     -text "The students had 15 hours of lectures and practice sessions on the topic of Textual Entailment."
     -hypothesis "The students must have learned quite a lot about Textual Entailment."
     -output ./eop-resources-{version}/results/
where:
- config is the configuration containing the linguistic analysis pipeline, the EDA and the pre-trained model that have to be used to annotate the data to be annotated.
- test means that the selected EDA has to make its annotation by using a pre-trained model.
- text is the text.
- hypothesis is the hypothesis.
- output is the directory where the result file (results.xml) containing the prediction has to be stored.
All textual entailment algorithms requires some level of pre-processing; they are mostly linguistic annotations like tokenization, sentence splitting, Part-of-Speech tagging, and dependency parsing.
EOP standardizes linguistic analysis modules in two ways:
- it has one common output data format
- it defines common interface that all pipelines needs to perform.
-
Common Data format EOP has borrowed one powerful abstraction that is called CAS (Common Analysis Structure). CAS is a data structure that is used in Apache UIMA. It has type system strong enough to represent any annotation, and metadata. CAS is the data output format in EOP linguistic analysis pipelines (LAPs). LAPs output their results in CAS and we can see CAS as a big container with type system that defines many annotations.
-
Common access interfaces In EOP, all pipelines are provided with the same set of “access methods”. Thus, regardless of your choice of the pipeline (e.g. tagger only pipeline, or tagging, parsing, and NER pipeline), they all react to the same set of common methods.
In this example we will use OpeNLP tagger to pre-process all the T/H pairs of the RTE-3 English training data set. The annotation will include tokenization, sentence splitting and Part-Of-Speech tagging.
LAPs implement the interface LAPAccess and the first step to pre-process data consists in initializing a LAP; in the current example we will see how to instantiate and use a LAP for the English language based on OpenNLP tagger:
LAPAccess ttLap = null;
try {
  //ttLap = new TreeTaggerEN(); //this requires to have TreeTagger already installed
  ttLap = new OpenNLPTaggerEN(); //the OpenNLP tagger
} catch (LAPException e) {
  System.out.println("Unable to initiated LAP: " + e.getMessage());
  System.exit(1);
}
Then we need to prepare the input file containing the T/H pairs and output directory. In the example the input file is the English RTE data set that is distributed as part of the eop-resources file while the output directory is the tmp directory:
//the English RTE data set
File f = new File("/home/user_name/programs/eop-resources-{version}/data-set/English_dev.xml");
//the output directory
File outputDir = new File("/tmp/");
After that we call the method for file processing. This could take some time given that RTE data contains 800 T/H pairs. Each case, will be first annotated as a UIMA CAS, and then it will be serialized into one XMI file.
try {
  ttLap.processRawInputFormat(f, outputDir);
} catch (LAPException e) {
  System.out.println("Failed to process EOP RTE data format: " + e.getMessage());
  System.exit(1);
}
The whole example is reported in Appendix B.
As usual we can use the standalone Java class, serving as a unique entry point to the EOP main included functionalities, to run the preprocessing.
Go into the EOP-{version} directory, i.e.
> cd ~/Excitement-Open-Platform-{version}/target/EOP-{version}/
Call the EOPRunner class with either of the following sets of parameters:
 -lap <LAP class>
 -language <the language for the LAP>
 -train|-test (indicate whether you want to do training or testing)
 -trainFile|-testFile <the file for preprocessing>
 -trainDir|-testDir <the directory where the LAP will write the xmi files>
or
 -config <configuration file -- make sure the LAP is specified in there>
 -train|-test (indicate whether you want to do training or testing)
 -trainFile|-testFile <the file for preprocessing>
 -trainDir|-testDir <the directory where the LAP will write the xmi files> -- OPTIONAL! (if these are given in the configuration file, no need for specifying them again)
Example:
> java -Djava.ext.dirs=../EOP-{version}/ eu.excitementproject.eop.util.runner.EOPRunner
       -config ./eop-resources-{version}/configuration-files/MaxEntClassificationEDA_Base+OpenNLP_EN.xml
       -train
       -trainFile ./eop-resources-{version}/data-set/English_dev.xml
where:
- config is the configuration containing the linguistic analysis pipeline, the EDA and the pre-trained model that have to be used to annotate the data to be annotated.
- train indicates that the system will perform training
- trainFile is the RTE-formatted data for the English development set.
This step involves annotating a single T/H pair with an entailment relation by using a pre-trained model. To do that we will use TIE EDA.
First we need to create an instance of EDA (i.e. TIE EDA) and then we need to initialize it:
EDABasic eda = null;
try {
  //creating an instance of TIE EDA
  eda = new MaxEntClassificationEDA();
  //this is the configuration file we want to use with TIE
  File configFile = new File("/home/user_name/programs/eop-resources-{version}/configuration-files/MaxEntClassificationEDA_Base+OpenNLP_EN.xml");
  //Loading the configuration file
  CommonConfig config = new ImplCommonConfig(configFile);
  //EDA initialization
  eda.initialize(config);
} catch (Exception e) {
  System.out.println("Failed to init the EDA: "+ e.getMessage());
  System.exit(1);
}
The EDA is ready now. Let's prepare one T-H pair and use it. Note that (as written in the configuration file), the current configuration uses OpenNLP tagger for preprocessing the data set.
//T
String text = "The sale was made to pay Yukos' US$ 27.5 billion tax bill, Yuganskneftegaz was originally sold for US$ 9.4 billion to a little known company Baikalfinansgroup which was later bought by the Russian state-owned oil company Rosneft.";
//H
String hypothesis = "Baikalfinansgroup was sold to Rosneft.";

JCas thPair = null;
try {
  //this requires to have TreeTagger already installed
  //LAPAccess lap = new TreeTaggerEN();
  //OpenNLP tagger
  LAPAccess lap = new OpenNLPTaggerEN();
  // T/H pair preprocessed by LAP
  thPair = lap.generateSingleTHPairCAS(text, hypothesis);
} catch (LAPException e) {
  System.err.print("LAP annotation failed:" + e.getMessage());
  System.exit(1);
}
The annotated pair has been added into the UIMA CAS. Call process() method to get Entailment decision. Entailment decisions are represented with TEDecision class.
TEDecision decision = null;
try {
  decision = eda.process(thPair);
} catch (Exception e) {
  System.err.print("EDA reported exception" + e.getMessage());
  System.exit(1);
}
And let's look at the result.
DecisionLabel r = decision.getDecision();
System.out.println("The result is: " + r.toString());
We can call process() multiple times as much as you like. Once all is done, we should call the shutdown method.
//shutdown
eda.shutdown();
The whole example is reported in Appendix B.
Another way to run EOP by a command line standalone java class, serving as a unique entry point to the EOP main included functionalities.
Go into the EOP-{version} directory, i.e.
> cd ~/Excitement-Open-Platform-{version}/target/EOP-{version}/
EOPRunner calls the specified LAP for pre-processing the data set and puts the produced files into the directory always specified in the EDA's configuration file by its own parameter (e.g. testDir). Before running EOPRunner you should check that that directory (e.g. /tmp/EN/test/) exists and in case create one (e.g. mkdir -p /tmp/EN/test/). After that you can call the EOPRunner class with either of the following sets of parameters:
> java -Djava.ext.dirs=../EOP-{version}/ eu.excitementproject.eop.util.runner.EOPRunner
     -config ./eop-resources-{version}/configuration-files/MaxEntClassificationEDA_Base+OpenNLP_EN.xml
     -test
     -text "The sale was made to pay Yukos' US$ 27.5 billion tax bill, Yuganskneftegaz was originally sold for US$ 9.4 billion to a little known company Baikalfinansgroup which was later bought by the Russian state-owned oil company Rosneft."
     -hypothesis "Baikalfinansgroup was sold to Rosneft."
     -output ./eop-resources-{version}/results/
where:
- config is the configuration containing the linguistic analysis pipeline, the EDA and the pre-trained model that have to be used to annotate the data to be annotated.
- test means that the selected EDA has to make its annotation by using a pre-trained model.
- text the text portion of the text/hypothesis entailment pair.
- hypothesis the hypothesis portion of the text/hypothesis entailment pair.
- output is the directory where the result file (results.xml) containing the prediction has to be stored.
Differently to the previuos step when a single T/H pair was annotated, this step involves annotating multiple T/H pairs that are stored in a file by using a pre-trained model. Also in this case we will work with TIE EDA.
As usual we first need to create an instance of an EDA (i.e. TIE EDA) and then we have to initialize it:
EDABasic eda = null;
try {
  eda = new MaxEntClassificationEDA(); //TIE EDA
  //the configuration file to be used with the selected EDA
  File configFile = new File("/home/user_name/programs/eop-resources-{version}/configuration-files/MaxEntClassificationEDA_Base+OpenNLP_EN.xml");
  //Loading the configuration file
  CommonConfig config = new ImplCommonConfig(configFile);
  //EDA initialization
  eda.initialize(config);
} catch (Exception e) {
  System.out.println("Failed to init the EDA: "+ e.getMessage());
  System.exit(1);
}
The EDA is ready now. Let's pre-process the T/H pairs:
try {
  //this requires to have TreeTagger already installed
  //LAPAccess ttLap = new TreeTaggerEN();
  //the OpenNLP tagger
  LAPAccess ttLap = new OpenNLPTaggerEN();
  //Set the input file containing the T/H pairs (i.e. RTE-3 English test data set), and
  //the output directory where to store the pre-processed pairs.
  File f = new File("/home/user_name/programs/eop-resources-{version}/data-set/English_test.xml");
  //the output directory where to store the serialized annotated files
  File outputDir = new File("/tmp/EN/test/");
  if (!outputDir.exists()) {
    outputDir.mkdirs();
  }
  //file pre-processing
  ttLap.processRawInputFormat(f, outputDir);
} catch (LAPException e) {
  System.out.println("Training data annotation failed: " + e.getMessage());
  System.exit(1);
}
Now we can annotate the test data set to be annotated:
try {
  //loading the pre-processed files
  for (File xmi : (outputDir.listFiles())) {
    if (!xmi.getName().endsWith(".xmi")) {
      continue;
    }
    // The annotated pair has been added into the UIMA CAS.
    JCas cas = PlatformCASProber.probeXmi(xmi, null);
    // Call process() method to get Entailment decision.
    TEDecision decision = eda.process(cas);
    // Entailment decisions are represented with "TEDecision" class.
    DecisionLabel r = decision.getDecision();
    System.out.println("The result is: " + r.toString());
  }
} catch (Exception e) {
  System.err.print("EDA reported exception" + e.getMessage());
  System.exit(1);
}
Th last thing to do is to call the method shutdown():
//shutdown
eda.shutdown();
Another way to run EOP by a command line standalone java class, serving as a unique entry point to the EOP main included functionalities.
Go into the EOP-{version} directory, i.e.
> cd ~/Excitement-Open-Platform-{version}/target/EOP-{version}/
EOPRunner calls the specified LAP for pre-processing the data set and puts the produced files into the directory always specified in the EDA's configuration file by its own parameter (e.g. testDir). Before running EOPRunner you should check that that directory (e.g. /tmp/EN/test/) exists and in case create one (e.g. mkdir -p /tmp/EN/test/). After that you can call the EOPRunner class with either of the following sets of parameters:
> java -Djava.ext.dirs=../EOP-{version}/ eu.excitementproject.eop.util.runner.EOPRunner
       -config ./eop-resources-{version}/configuration-files/MaxEntClassificationEDA_Base+OpenNLP_EN.xml
       -test
       -testFile ./eop-resources-{version}/data-set/English_test.xml
       -testDir /tmp/EN/test/
       -output ./eop-resources-{version}/results/
where:
- MaxEntClassificationEDA_Base+OpenNLP_EN.xml is the configuration file containing the linguistic analysis pipeline, the EDA and the pre-trained model that have to be used to annotate the data.
- test means that the selected EDA has to perform its annotation by using a pre-trained model.
- testFile is the data set of the text/hypothesis pairs that has to be annotated.
- testDir is the directory for writing the analysed (LAP processed) T/H pairs (optional if it is provided in the configuration file)
- output is the directory where the result file (results.xml) containing the prediction has to be stored.
To test on already preprocessed data, do not provide the test file (no -testFile option), but make sure that the test directory with the previously preprocessed data (serialized CAS objects in xmi files) is either provided in the configuration file, or as an argument:
> java -Djava.ext.dirs=../EOP-{version}/ eu.excitementproject.eop.util.runner.EOPRunner
   -config ./eop-resources-{version}/configuration-files/MaxEntClassificationEDA_Base+OpenNLP_EN.xml
   -test
   -testDir /tmp/EN/test/
This step shows how to train an EDAs on a new data set and build a new model. TIE EDA will be used for this purpose.
Training also requires the configuration file. We will load a configuration file first:
CommonConfig config = null;
try {
  //This is the configuration file to be used with the selected EDA (i.e. TIE EDA).
  File configFile = new File("/home/user_name/programs/eop-resources-{version}/configuration-files/MaxEntClassificationEDA_Base+OpenNLP_EN.xml");
  config = new ImplCommonConfig(configFile);
}
catch (ConfigurationException e) {
  System.out.println("Failed to read configuration file: "+ e.getMessage());
  System.exit(1);
}
Before calling start_training() we have to provide pre-processed training data. This EDA will train itself with the provided data that is pointed by trainDir.
try {
  //this requires to have TreeTagger already installed
  //LAPAccess ttLap = new TreeTaggerEN();
  //The OpenNLP tagger is used for pre-processing the data set (i.e. RTE-3 train data set)
  LAPAccess ttLap = new OpenNLPTaggerEN();
  Prepare input file, and output directory.
  //RTE-3 train data set
  File f = new File("/home/user_name/programs/eop-resources-{version}/data-set/English_dev.xml");
  //The pre-processed data set is stored in the following directory. The resulted files will be read
  //by the EDA from this directory and so you have to be sure that this is the train input directory
  //also set in the EDA configuration file.
  File outputDir = new File("/tmp/EN/dev/");
  if (!outputDir.exists()) {
    outputDir.mkdirs();
  }
  //data set pre-processing.
  ttLap.processRawInputFormat(f, outputDir);
} catch (LAPException e) {
  System.out.println("Training data annotation failed: " + e.getMessage());
  System.exit(1);
}
RTE-3 should have been tagged and stored in the outputDir directory. Let's ask EDA to train itself.
try {
  EDABasic eda = null;
  //creating an instance of TIE EDA
  eda = new MaxEntClassificationEDA();
  //EDA initialization and start training
  eda.startTraining(config); // This *MAY* take a some time.
} catch (Exception e) {
  System.out.println("Failed to do the training: "+ e.getMessage());
  System.exit(1);
}
Another way to run EOP by a command line standalone java class.
Go into the EOP-{version} directory, i.e.
> cd ~/Excitement-Open-Platform-{version}/target/EOP-{version}/
EOPRunner calls the specified LAP for pre-processing the data set and puts the produced files into the directory always specified in the EDA's configuration file by its own parameter (e.g. trainDir). Before running EOPRunner you should check that that directory (e.g. /tmp/EN/dev/) exists and in case create one (e.g. mkdir -p /tmp/EN/dev/). After that you can call the EOPRunner class with either of the following sets of parameters:
> java -Djava.ext.dirs=../EOP-{version}/ eu.excitementproject.eop.util.runner.EOPRunner
   -config ./eop-resources-{version}/configuration-files/MaxEntClassificationEDA_Base+OpenNLP_EN.xml
   -train
   -trainFile ./eop-resources-{version}/data-set/English_dev.xml
   -trainDir /tmp/EN/dev/
where:
- config is the configuration containing the linguistic analysis pipeline, the EDA and the pre-trained model that have to be used to annotate the data.
- train indicates that the system will perform training
- trainFile the file with training data (in RTE format).
- trainDir the directory for LAP's output. If this is already specified in the configuration file, no need to pass it as an argument here.
To train a new model from already preprocessed data, do not provide the training file (no -trainFile option), but make sure that the training directory with the previously preprocessed data (serialized CAS objects in xmi files) is either provided in the configuration file, or as an argument:
> java -Djava.ext.dirs=../EOP-{version}/ eu.excitementproject.eop.util.runner.EOPRunner
   -config ./eop-resources-{version}/configuration-files/MaxEntClassificationEDA_Base+OpenNLP_EN.xml
   -train
   -trainDir /tmp/EN/dev/
The annotation produced by EDAs can be evaluated in terms of accuracy, Precision, Recall, and F1 measure. EOP provides a scorer for producing those measures.
EDAScorer is the class implementing the scorer for evaluating annotation results. The annotated data set needs to be in a particular format to be evaluated by EDAScorer. Here is an example of such a file:
747     NONENTAILMENT   NonEntailment   0.2258241758241779
795     ENTAILMENT      Entailment      0.5741758241758221
60      ENTAILMENT      Entailment      0.24084249084248882
546     NONENTAILMENT   NonEntailment   0.15309690309690516
.....................
.....................
509     ENTAILMENT      Entailment      0.07417582417582214
The first columns is the T/H pair id, the second is the annotation of the gold standard, the third is the annotation made by the EDA and the last one is the confidence of that annotation. To produce that file we need to revise a little bit the code in Section 5. In the rest of the section we suppose that the data set has been already processed by LAPs.
The first thing to do when one wants to use EDAScorer is to add an additional EOP dependency into your project. Open the pom.xml file of your project and add this dependency:
<dependency>
  <groupId>eu.excitementproject</groupId>
  <artifactId>util</artifactId>
  <version>{version}</version>
</dependency>
where version is the EOP release (e.g. 1.1.0).
Then you would need to import these classes into your java code too:
import org.apache.uima.cas.FSIterator;
import org.apache.uima.jcas.cas.TOP;
import eu.excitement.type.entailment.Pair;
import eu.excitementproject.eop.util.eval.EDAScorer;
After that we would need to process the data set to be annotated and to save the produced annotation into a file. In fact EDAScorer evaluates annotated T/H pairs from files. To do that we reuse the code also used in Section 5 with some changes done: the annotation are written into a file instead of the standard output.
Writer writer = null;
try {
  //this is the file needed by EDAScorer containing the EDA prediction
  //as well as the gold standard annotation.
  writer = new BufferedWriter(new OutputStreamWriter(
      new FileOutputStream("/home/user_name/programs/eop-resources-{version}/results/myResults.txt"),"utf-8"));
  //loading the pre-processed files
  for (File xmi : (outputDir.listFiles())) {
    if (!xmi.getName().endsWith(".xmi")) {
      continue;
    }
    // The annotated pair has been added into the CAS.
    JCas cas = PlatformCASProber.probeXmi(xmi, null);
    // Call process() method to get Entailment decision.
    // Entailment decisions are represented with "TEDecision" class.
    TEDecision decision = eda.process(cas);
    // the file containing the annotated T/H pairs needed by EDAScorer is produced.
    // getGoldLabel (i.e. returns the gold standard annotation) and
    // getPairID (i.e.  returns the pairID of the T-H pair) are methods whose
    // implementation is given below.
    writer.write(getPairID(cas) + "\t" + getGoldLabel(cas) + "\t"  + decision.getDecision().toString() + "\t" + decision.getConfidence() + "\n");
    System.out.println("The result is: " + decision.getDecision().toString());
  }
  writer.close();
} catch ( Exception e ) {
   e.printStackTrace();
}
here is the implementation of the getPairID and getGoldLabel methods that we used in the code above and that you have to add into your Java code:
/**
* @param aCas
* @return returns the pairID of the T-H pair
*/
String getPairID(JCas aCas) {
  FSIterator<TOP> pairIter = aCas.getJFSIndexRepository().getAllIndexedFS(Pair.type);
  Pair p = (Pair) pairIter.next();
  return p.getPairID();
}

/**
* @param aCas
* @return if the T-H pair contains the gold answer, returns it; otherwise, returns null
*/
String getGoldLabel(JCas aCas) {
  FSIterator<TOP> pairIter = aCas.getJFSIndexRepository().getAllIndexedFS(Pair.type);
  Pair p = (Pair) pairIter.next();
  if (null == p.getGoldAnswer() || p.getGoldAnswer().equals("") || p.getGoldAnswer().equals("ABSTAIN")) {
    return null;
  } else {
  return p.getGoldAnswer();
  }
}
Finally EDAScorer can be called.
EDAScorer.score(new File(/home/user_name/programs/eop-resources-{version}/results/myResults.txt), /home/user_name/programs/eop-resources-{version}/results/myResults.eval);
where myResults.eval will contain the scorer output consisting of the accuracy and F1 measure for the annotated data set while myResults.txt is the file containing the annotated T/H pairs produced with the code above.
Another way to run EOP by a command line standalone java class.
Go into the EOP-{version} directory, i.e.
> cd ~/Excitement-Open-Platform-{version}/target/EOP-{version}/
and call the EOPRunner class with the needed parameters as reported below, i.e.
> java -Djava.ext.dirs=../EOP-{version}/ eu.excitementproject.eop.util.runner.EOPRunner
   -score -results <ResultsFile>
where:
- score signals to the system to perform scoring
- ResultsFile is the file containing the annotated entailment relations.
The results are saved in a file having the same ResultsFile's name but with extension .xml.
The advanced installation is for users with skills in computer science and that would like to exploit the full potentially of EOP. Advanced installation is required to run BIUTEE EDA implementing transformation-based algorithm. This EDA requires a specific LAP, provided as part of its package. We refer you to the BIUTEE page for further information.