In this tutorial, we're going to learn how to seperate our asynchronous email functions from our API endpoints. We'll use Redis Queues with a NodeJs library Bull to send emails using Nodemailer, this is a basic setup that helps you to quickly setup your queues and intergate your email functions which you can modify to suite your codebase.
Developers are always very curious about how to make API responses as fast as possible even with asynchronous functions, a starting point will be to seperate some jobs to be done at a later time while still giving users quick feedbacks. Starting with email jobs which is most time handled by a thrid party, responses could be slow therefore increasing the total response time, so we can utilize the power of Queues and Redis to seperate the jobs and monitor the status of such jobs compared to making the requests synchronous with your API's response. An added benefit is the ability to retry a job after it has failed and setup event listeners for each of the jobs.
To follow along with this tutorial you will need the following:
- NodeJs and Yarn installed on your machine
- Docker installed on your machine
- Basic knowledge of Typescript and NodeJS.
- Setup NodeJS Express Project with Typescript and Bull.
- Setup Redis Server
- Setting up Queues and Processes
- Configuring adapters to monitor queues
- Connecting to a free redis database
We would be creating a new project and installing all the dependencies. Navigate to the folder you want to install the project then copy and run the following
yarn init -y && yarn add dotenv express nodemailer @bull-board/api @bull-board/expressyarn add -D typescript nodemon eslint @typescript-eslint/parser @types/nodemailer @typescript-eslint/eslint-plugin @types/node @types/express ts-nodeCreate a new src folder then create an app.ts file in the folder created. Copy and paste the following;
// src/app.ts

import express, { Express, Request, Response } from "express";
import dotenv from "dotenv";

dotenv.config();

const PORT = process.env.PORT || 3000;

const app: Express = express();

app.use(express.json());

app.post("/", async (req: Request, res: Response) => {
  res.send("Redis Email");
});

app.listen(PORT, () => {
  console.log(`\n Server is running at http://localhost:${PORT} ✅`);
});
Then edit the package.json file to contain the following scripts commands
  "scripts": {
    "dev": "nodemon --quiet src/app.ts",
    "start": "node build/src/index.js",
    "build": "tsc --project ./",
    "lint": "eslint src/**/*.ts",
    "format": "eslint src/**/*.ts --fix"
  },
You can now start the app in your terminal by running yarn dev in the root directory.
To continue this process, please make sure you have docker installed on your machine. You can check this link Install Docker desktop
We are now going to create a docker-compose.yml file and copy the following into it
# docker-compose.yml

version: "3.7"

services:
  redis:
    image: redis
    container_name: tutorial_redis_email
    environment:
      - ALLOW_EMPTY_PASSWORD=yes
    ports:
      - 6379:6379

  redis-commander:
    container_name: email-api-redis
    image: rediscommander/redis-commander
    restart: always
    environment:
      - REDIS_HOSTS=local:redis:6379
    ports:
      - "8080:8080"
Let's create a .env file to set the PORT and a REDIS_URL variable
# .env

PORT=3000
REDIS_URL=http://localhost:6379
We would ensure docker is completely setup on our local machine. Then open another instance of your terminal then run the following and ensure the container is running
docker-compose up
There are other methods to get the redis server up and running, but to keep things simple and straighforward for both linux and windows users, we would be going with the docker method.
Bull is a Node library that implements a fast and robust queue system based on redis. So let's quickly go through some basic terms
- Queue: A queue is a First-In-First-Out (FIFO) data structure and a queue instance can normally have 3 main different roles: A job producer, a job consumer or/and an events listener.
- Job Producer: A job producer is simply some Node program that adds jobs to a queue.
- Job Consumers: A job consumer or worker, is nothing more than a Node program that defines a process function. The queue executes every job with the consumer process.
- Event Listeners: This helps us to listen to events that happen in the queue. The Event listeners are attacked to every process. Now lets get into setting up the queue.
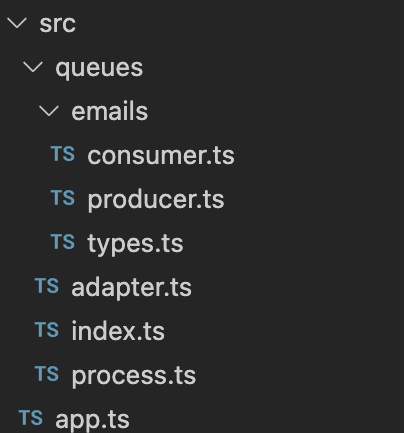
We will be working with the folder structure shown above. Starting with defining the queue, let's create a new folder queues in the src folder and then create an index.ts file. Copy and paste the following into the file that was created.
// src/queues/index.ts

import Bull from "bull";
import dotenv from "dotenv";

dotenv.config();

export const emailQueue = new Bull("email", {
  redis: process.env.REDIS_URL,
});
This will define a queue for us called email and we will be using an instance of the queue to define our producers and consumers. Then we will create a folder emails inside the queues directory to define our producers and consumers. Create two files consumer.ts and producer.ts
// src/queues/emails/producer.ts

import { emailQueue } from "..";
import { EmailData } from "./types";

export const sendMail = (data: EmailData) => {
  emailQueue.add(data, { attempts: 3 });
};
We have deined and exported a producer function to add our job to the email queue, now let's move to the process to execute the job.
// src/queues/emails/consumer.ts

import { Job } from "bull";
import { EmailData } from "./types";
import nodemailer from "nodemailer";

const emailProcessor = async ({ data }: Job<EmailData>) => {
  try {
    const testMailAccount = await nodemailer.createTestAccount();

    const transporter = nodemailer.createTransport({
      host: "smtp.ethereal.email",
      port: 587,
      secure: false,
      auth: {
        user: testMailAccount.user, // generated ethereal user
        pass: testMailAccount.pass, // generated ethereal password
      },
      tls: {
        rejectUnauthorized: false,
      },
    });

    const response = await transporter.sendMail(data);

    console.log("Message sent to", data?.to);

    const responseUrl = nodemailer.getTestMessageUrl(response);

    console.log(responseUrl);

    return responseUrl;
  } catch (error) {
    throw new Error(error?.toString());
  }
};

export default emailProcessor;
This defines a function that sends a test email to an email address using nodemailer.
// src/queues/emails/types.ts

export type EmailData = {
  from: string;
  to: string;
  subject: string;
  html: string;
};
We have just defined the type of our job data, so lets proceed to attaching our queue to its consumer and defining some event listeners
// src/queues/process.ts

import { Job } from "bull";
import { emailQueue } from ".";
import emailProcessor from "./emails/consumer";

const handleFailure = (job: Job, err: Error) => {
  if (job.attemptsMade >= (job?.opts?.attempts || 0)) {
    console.log(
      `Job failures above threshold in ${job.queue.name} for: ${JSON.stringify(
        job.data
      )}`,
      err
    );
    job.remove();
    return null;
  }
  console.log(
    `Job in ${job.queue.name} failed for: ${JSON.stringify(job.data)} with ${
      err.message
    }. ${(job?.opts?.attempts || 0) - job.attemptsMade} attempts left`
  );
};

const handleCompleted = (job: Job) => {
  console.log(
    `Job in ${job.queue.name} completed for: ${JSON.stringify(job.data)}`
  );
  job.remove();
};

const handleStalled = (job: Job) => {
  console.log(
    `Job in ${job.queue.name} stalled for: ${JSON.stringify(job.data)}`
  );
};

export const startQueues = () => {
  try {
    emailQueue.process(emailProcessor);
    emailQueue.on("failed", handleFailure);
    emailQueue.on("completed", handleCompleted);
    emailQueue.on("stalled", handleStalled);
    console.log("\n Queue jobs started successfully ✅");
  } catch (err) {
    console.log("Queue Jobs Error: ", err);
  }
};
We have attached our job consumer to our queue, we can now define an adapter so we can view our queue processes. We will be using bull-board which is one of some other third-party UIs that you can use for monitoring your queues. Check here Bull Package
// src/queues/adapter.ts
import { createBullBoard } from "@bull-board/api";
import { BullAdapter } from "@bull-board/api/bullAdapter";
import { ExpressAdapter } from "@bull-board/express";
import { emailQueue } from ".";

const serverAdapter = new ExpressAdapter();

createBullBoard({
  queues: [new BullAdapter(emailQueue)],
  serverAdapter,
});

export default serverAdapter;
Finally lets start our queues from our app.ts file, edit your app.ts file to contain the following
// src/app.ts

import express, { Express, Request, Response } from "express";
import dotenv from "dotenv";
import { sendMail } from "./queues/emails/producer";
import { startQueues } from "./queues/process";
import serverAdapter from "./queues/adapter";

dotenv.config();

const app: Express = express();
const PORT = process.env.PORT;

app.use(express.json());

startQueues();

app.post("/mail", async (req: Request, res: Response) => {
  const { message, ...emailData } = req.body;
  await sendMail({ ...emailData, html: `<p>${message}</p>` });
  res.send("Sent Email");
});

app.use("/admin/queues", serverAdapter.getRouter());

app.listen(PORT, () => {
  console.log(`\n Server is running at http://localhost:${PORT} ✅`);
});
So we imported our startQueues function to start our queues and we edited the /mail endpoint to pass a job object into our email producer.
We also added a new path /admin/queues for us to inspect our queues.
If you go to the endpoint you should see your job data in your console.
To setup a redis database for production, you can check the available services provided by your cloud server e.g Heroku Redis, Redis.com etc. We would be using the redis.com free database for this tutorial. Visit redis.com, create an account and proceed to create a free redis database. You should have something like this;

Click on connect, then we will copy the url displayed in the RedisInsight connection box.

Click on copy to get the full url or replace the url should with the username and password for your account. It will be in this format.
# sample link

redis://default:1dESKLjbMoOnN528sNgCiMuAPLSzO2ynJ@redis-18364.c92.us-east-1-3.ec2.cloud.redislabs.com:18364
After we have copied the link, we will replace our REDIS_URL environment variable to the link copied
# .env

PORT=3000
REDIS_URL=redis://<username>:<password>@redis-13975.c81.us-east-1-2.ec2.cloud.redislabs.com:13975
Then you can stop your docker instance and restart your app, any request send to the /mail endpoint should still work correctly with the remote redis server.
We have been able setup a redis queue to send our emails. Queues can be used for a wide range of functions, you can take your time to study these queues and how they can help you to seperate some jobs on your server.
You can take a look at the Github Repository