Text2Video-Zero: Text-to-Image Diffusion Models are Zero-Shot Video Generators is by Levon Khachatryan, Andranik Movsisyan, Vahram Tadevosyan, Roberto Henschel, Zhangyang Wang, Shant Navasardyan, Humphrey Shi.
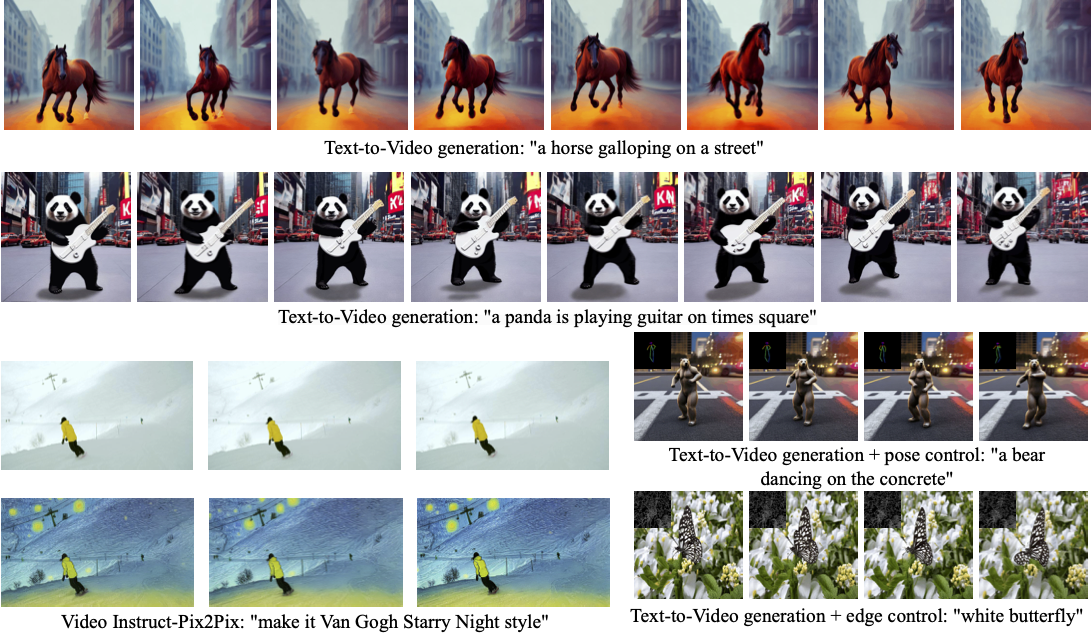
Text2Video-Zero enables zero-shot video generation using either:
- A textual prompt
- A prompt combined with guidance from poses or edges
- Video Instruct-Pix2Pix (instruction-guided video editing)
Results are temporally consistent and closely follow the guidance and textual prompts.
The abstract from the paper is:
Recent text-to-video generation approaches rely on computationally heavy training and require large-scale video datasets. In this paper, we introduce a new task of zero-shot text-to-video generation and propose a low-cost approach (without any training or optimization) by leveraging the power of existing text-to-image synthesis methods (e.g., Stable Diffusion), making them suitable for the video domain. Our key modifications include (i) enriching the latent codes of the generated frames with motion dynamics to keep the global scene and the background time consistent; and (ii) reprogramming frame-level self-attention using a new cross-frame attention of each frame on the first frame, to preserve the context, appearance, and identity of the foreground object. Experiments show that this leads to low overhead, yet high-quality and remarkably consistent video generation. Moreover, our approach is not limited to text-to-video synthesis but is also applicable to other tasks such as conditional and content-specialized video generation, and Video Instruct-Pix2Pix, i.e., instruction-guided video editing. As experiments show, our method performs comparably or sometimes better than recent approaches, despite not being trained on additional video data.
You can find additional information about Text2Video-Zero on the project page, paper, and original codebase.
To generate a video from prompt, run the following Python code:
import torch
from diffusers import TextToVideoZeroPipeline

model_id = "runwayml/stable-diffusion-v1-5"
pipe = TextToVideoZeroPipeline.from_pretrained(model_id, torch_dtype=torch.float16).to("cuda")

prompt = "A panda is playing guitar on times square"
result = pipe(prompt=prompt).images
result = [(r * 255).astype("uint8") for r in result]
imageio.mimsave("video.mp4", result, fps=4)
You can change these parameters in the pipeline call:
- Motion field strength (see the paper, Sect. 3.3.1):
motion_field_strength_xandmotion_field_strength_y. Default:motion_field_strength_x=12,motion_field_strength_y=12
TandT'(see the paper, Sect. 3.3.1)t0andt1in the range{0, ..., num_inference_steps}. Default:t0=45,t1=48
- Video length:
video_length, the number of frames video_length to be generated. Default:video_length=8
We can also generate longer videos by doing the processing in a chunk-by-chunk manner:
import torch
from diffusers import TextToVideoZeroPipeline
import numpy as np

model_id = "runwayml/stable-diffusion-v1-5"
pipe = TextToVideoZeroPipeline.from_pretrained(model_id, torch_dtype=torch.float16).to("cuda")
seed = 0
video_length = 24  #24 ÷ 4fps = 6 seconds
chunk_size = 8
prompt = "A panda is playing guitar on times square"

# Generate the video chunk-by-chunk
result = []
chunk_ids = np.arange(0, video_length, chunk_size - 1)
generator = torch.Generator(device="cuda")
for i in range(len(chunk_ids)):
    print(f"Processing chunk {i + 1} / {len(chunk_ids)}")
    ch_start = chunk_ids[i]
    ch_end = video_length if i == len(chunk_ids) - 1 else chunk_ids[i + 1]
    # Attach the first frame for Cross Frame Attention
    frame_ids = [0] + list(range(ch_start, ch_end))
    # Fix the seed for the temporal consistency
    generator.manual_seed(seed)
    output = pipe(prompt=prompt, video_length=len(frame_ids), generator=generator, frame_ids=frame_ids)
    result.append(output.images[1:])

# Concatenate chunks and save
result = np.concatenate(result)
result = [(r * 255).astype("uint8") for r in result]
imageio.mimsave("video.mp4", result, fps=4)In order to use the SDXL model when generating a video from prompt, use the TextToVideoZeroSDXLPipeline pipeline:
import torch
from diffusers import TextToVideoZeroSDXLPipeline

model_id = "stabilityai/stable-diffusion-xl-base-1.0"
pipe = TextToVideoZeroSDXLPipeline.from_pretrained(
    model_id, torch_dtype=torch.float16, variant="fp16", use_safetensors=True
).to("cuda")To generate a video from prompt with additional pose control
-
Download a demo video
from huggingface_hub import hf_hub_download

filename = "__assets__/poses_skeleton_gifs/dance1_corr.mp4"
repo_id = "PAIR/Text2Video-Zero"
video_path = hf_hub_download(repo_type="space", repo_id=repo_id, filename=filename)
-
Read video containing extracted pose images
from PIL import Image
import imageio

reader = imageio.get_reader(video_path, "ffmpeg")
frame_count = 8
pose_images = [Image.fromarray(reader.get_data(i)) for i in range(frame_count)]
To extract pose from actual video, read ControlNet documentation.
-
Run
StableDiffusionControlNetPipelinewith our custom attention processorimport torch from diffusers import StableDiffusionControlNetPipeline, ControlNetModel from diffusers.pipelines.text_to_video_synthesis.pipeline_text_to_video_zero import CrossFrameAttnProcessor model_id = "runwayml/stable-diffusion-v1-5" controlnet = ControlNetModel.from_pretrained("lllyasviel/sd-controlnet-openpose", torch_dtype=torch.float16) pipe = StableDiffusionControlNetPipeline.from_pretrained( model_id, controlnet=controlnet, torch_dtype=torch.float16 ).to("cuda") # Set the attention processor pipe.unet.set_attn_processor(CrossFrameAttnProcessor(batch_size=2)) pipe.controlnet.set_attn_processor(CrossFrameAttnProcessor(batch_size=2)) # fix latents for all frames latents = torch.randn((1, 4, 64, 64), device="cuda", dtype=torch.float16).repeat(len(pose_images), 1, 1, 1) prompt = "Darth Vader dancing in a desert" result = pipe(prompt=[prompt] * len(pose_images), image=pose_images, latents=latents).images imageio.mimsave("video.mp4", result, fps=4)
-
Since our attention processor also works with SDXL, it can be utilized to generate a video from prompt using ControlNet models powered by SDXL:
 import torch
 from diffusers import StableDiffusionXLControlNetPipeline, ControlNetModel
 from diffusers.pipelines.text_to_video_synthesis.pipeline_text_to_video_zero import CrossFrameAttnProcessor

 controlnet_model_id = 'thibaud/controlnet-openpose-sdxl-1.0'
 model_id = 'stabilityai/stable-diffusion-xl-base-1.0'

 controlnet = ControlNetModel.from_pretrained(controlnet_model_id, torch_dtype=torch.float16)
 pipe = StableDiffusionControlNetPipeline.from_pretrained(
 	model_id, controlnet=controlnet, torch_dtype=torch.float16
 ).to('cuda')

 # Set the attention processor
 pipe.unet.set_attn_processor(CrossFrameAttnProcessor(batch_size=2))
 pipe.controlnet.set_attn_processor(CrossFrameAttnProcessor(batch_size=2))

 # fix latents for all frames
 latents = torch.randn((1, 4, 128, 128), device="cuda", dtype=torch.float16).repeat(len(pose_images), 1, 1, 1)

 prompt = "Darth Vader dancing in a desert"
 result = pipe(prompt=[prompt] * len(pose_images), image=pose_images, latents=latents).images
 imageio.mimsave("video.mp4", result, fps=4)
To generate a video from prompt with additional Canny edge control, follow the same steps described above for pose-guided generation using Canny edge ControlNet model.
To perform text-guided video editing (with InstructPix2Pix):
-
Download a demo video
from huggingface_hub import hf_hub_download

filename = "__assets__/pix2pix video/camel.mp4"
repo_id = "PAIR/Text2Video-Zero"
video_path = hf_hub_download(repo_type="space", repo_id=repo_id, filename=filename)
-
Read video from path
from PIL import Image
import imageio

reader = imageio.get_reader(video_path, "ffmpeg")
frame_count = 8
video = [Image.fromarray(reader.get_data(i)) for i in range(frame_count)]
-
Run
StableDiffusionInstructPix2PixPipelinewith our custom attention processorimport torch from diffusers import StableDiffusionInstructPix2PixPipeline from diffusers.pipelines.text_to_video_synthesis.pipeline_text_to_video_zero import CrossFrameAttnProcessor model_id = "timbrooks/instruct-pix2pix" pipe = StableDiffusionInstructPix2PixPipeline.from_pretrained(model_id, torch_dtype=torch.float16).to("cuda") pipe.unet.set_attn_processor(CrossFrameAttnProcessor(batch_size=3)) prompt = "make it Van Gogh Starry Night style" result = pipe(prompt=[prompt] * len(video), image=video).images imageio.mimsave("edited_video.mp4", result, fps=4)
Methods Text-To-Video, Text-To-Video with Pose Control and Text-To-Video with Edge Control can run with custom DreamBooth models, as shown below for Canny edge ControlNet model and Avatar style DreamBooth model:
-
Download a demo video
from huggingface_hub import hf_hub_download

filename = "__assets__/canny_videos_mp4/girl_turning.mp4"
repo_id = "PAIR/Text2Video-Zero"
video_path = hf_hub_download(repo_type="space", repo_id=repo_id, filename=filename)
-
Read video from path
from PIL import Image
import imageio

reader = imageio.get_reader(video_path, "ffmpeg")
frame_count = 8
canny_edges = [Image.fromarray(reader.get_data(i)) for i in range(frame_count)]
-
Run
StableDiffusionControlNetPipelinewith custom trained DreamBooth modelimport torch from diffusers import StableDiffusionControlNetPipeline, ControlNetModel from diffusers.pipelines.text_to_video_synthesis.pipeline_text_to_video_zero import CrossFrameAttnProcessor # set model id to custom model model_id = "PAIR/text2video-zero-controlnet-canny-avatar" controlnet = ControlNetModel.from_pretrained("lllyasviel/sd-controlnet-canny", torch_dtype=torch.float16) pipe = StableDiffusionControlNetPipeline.from_pretrained( model_id, controlnet=controlnet, torch_dtype=torch.float16 ).to("cuda") # Set the attention processor pipe.unet.set_attn_processor(CrossFrameAttnProcessor(batch_size=2)) pipe.controlnet.set_attn_processor(CrossFrameAttnProcessor(batch_size=2)) # fix latents for all frames latents = torch.randn((1, 4, 64, 64), device="cuda", dtype=torch.float16).repeat(len(canny_edges), 1, 1, 1) prompt = "oil painting of a beautiful girl avatar style" result = pipe(prompt=[prompt] * len(canny_edges), image=canny_edges, latents=latents).images imageio.mimsave("video.mp4", result, fps=4)
You can filter out some available DreamBooth-trained models with this link.
Make sure to check out the Schedulers guide to learn how to explore the tradeoff between scheduler speed and quality, and see the reuse components across pipelines section to learn how to efficiently load the same components into multiple pipelines.
[[autodoc]] TextToVideoZeroPipeline - all - call
[[autodoc]] TextToVideoZeroSDXLPipeline - all - call
[[autodoc]] pipelines.text_to_video_synthesis.pipeline_text_to_video_zero.TextToVideoPipelineOutput