
Imperva eDSF Kit is a Terraform toolkit designed to automate the deployment and upgrade of Imperva's Data Security Fabric.
eDSF Kit enables you to deploy the full suite of the DSF sub-products - DSF Hub & Agentless Gateway (formerly Sonar), DAM (Data Activity Monitoring) MX and Agent Gateway and DRA (Data Risk Analytics) Admin and Analytics.
Currently, eDSF Kit supports deployments on AWS and Azure cloud providers. In the near future, it will support other major public clouds, on-premises (vSphere) and hybrid environments.
eDSF Kit enables you to upgrade DSF Hubs and Agentless Gateways (formerly Sonar) which are deployed on AWS.
In the future, eDSF Kit will enable you to upgrade the full suite of the DSF sub-products, including DAM and DRA, and will support other major clouds, on-premises (vSphere) and hybrid environments.
This guide is intended for Imperva Sales Engineers (SE) for the purpose of Proof-of-Concept (POC) demonstrations and preparing for these demonstrations, aka, Lab.
It is also intended for Imperva Professional Services (PS) and customers for actual deployments of DSF.
This guide covers the following main topics. Additional guides are referenced throughout, as listed in the Quick Links section below.
- How to deploy Imperva’s Data Security Fabric (DSF) with step-by-step instructions.
- How to verify that the deployment was successful using the eDSF Kit output.
- How to undeploy DSF with step-by-step instructions.
- How to upgrade Imperva’s Data Security Fabric (DSF) Hub and Agentless Gateway, with step-by-step instructions.
This guide uses several text styles for an enhanced readability and several call-out features. Learn about their meaning from the table below.
| Convention | Description |
| Code, commands or user input |
|
| Instruction to change code, commands or user input |
|
| Placeholder |
${placeholder}: Used within commands to indicate that the user should replace the placehodler with a value, including the $, { and }. |
| Hyperlinks | Clickable URLs embedded within the guide are blue and underlined. E.g., www.imperva.com |
This guide references the following information and links, some of which are available via the Documention Portal on the Imperva website: https://docs.imperva.com. (Login required)
| Link | Details |
| Data Security Fabric v1.0 | DSF Overview |
| Sonar v4.14 | DSF Components Overview |
| Imperva Terraform Modules Registry | |
| eDSF Kit GitHub Repository | |
| Download Git | |
| Download Terraform | Latest Supported Terraform Version: 1.7.x. Using a higher version may result in unexpected behavior or errors. |
| Request access to DSF installation software on AWS | Grants access for a specific AWS account to the DSF installation software. |
| Request access to DSF installation software on Azure | Copies DSF installation to Azure storage account and configures programmatic deployment for Azure images. |
The following table lists the latest eDSF Kit releases, their release date and a high-level summary of the release's content.
| Date | Version | Details |
| 3 Apr 2023 | 1.4.0 |
1. Added support for the new Sonar version '4.11'.
2. Added support for Agentless Gateway HADR. |
| 13 Apr 2023 | 1.4.1 | Bug fixes. |
| 17 Apr 2023 | 1.4.2 | Updated DSFKit IAM required permissions. |
| 20 Apr 2023 | 1.4.3 |
1. First Alpha deployment of Agent Gateway and MX. It can be used with caution.
2. Updated DSFKit IAM required permissions. |
| 2 May 2023 | 1.4.4 |
1. Minimum supported Sonar version is now 4.11. To deploy earlier versions, work with earlier DSFKit versions.
2. In the POC examples, onboarded the demo databases to the Agentless Gateway instead of the DSF Hub. |
| 16 May 2023 | 1.4.5 |
1. Defined separate security groups for the DSF node according to the traffic source type (e.g., web console, Hub).
2. Added the option to provide custom secrets for the DSF Hub and Agentless Gateway. 3. Updated the POC multi_account_deployment example. |
| 28 May 2023 | 1.4.6 |
1. Replaced IAM Role variable with instance profile.
2. Removed usage of AWS provider's default_tags feature. 3. First Alpha deployment of DRA. It can be used with caution. 4. Alpha deployment example of full DSF - Sonar, DAM and DRA. It can be used with caution. |
| 11 Jun 2023 | 1.4.7 |
1. Triggered the first replication cycle as part of an HADR setup.
2. Added LVM support (DSF Hub and Agentless GW). 3. Fixed error while onboarding MSSQL RDS. |
| 14 Jun 2023 | 1.4.8 |
1. Fixed typo in the required IAM permissions.
2. Added support for Terraform version 1.5.0. 3. Fixed global tags. |
| 4 Jul 2023 | 1.5.0 |
1. Added support for the new DSF version '4.12'.
2. Released full DSF POC example. 3. Bug fixes. |
| 18 Jul 2023 | 1.5.1 |
1. Released full DSF installation example.
2. Added support for DAM activation code in addition to the already supported option of a license file. 3. Added security groups samples to the documentation. 4. Improvements and bug fixes. |
| 1 Aug 2023 | 1.5.2 |
1. Added DSF instances' required IAM permissions samples to the documentation.
2. Improvements and bug fixes. |
| 16 Aug 2023 | 1.5.3 | Improvements and bug fixes. |
| 11 Sep 2023 | 1.5.4 | Improvements and bug fixes. |
| 27 Sep 2023 | 1.5.5 |
1. Azure Alpha release. It can be used with caution.
2. Renamed DSF Hub and Agentless Gateway terminology from "primary" and "secondary" to "main" and "DR". 3. Improvements and bug fixes. |
| 15 Oct 2023 | 1.5.6 |
1. Sonar upgrade Alpha release. It can be used with caution.
2. Added support for DSF version 4.13/14.13. 3. Added support for Terraform version 1.6.x. |
| 24 Oct 2023 | 1.5.7 |
1. Added the option to provide a custom installation base directory for the DSF Hub and Agentless Gateway via the 'base_directory' variable.
2. Updated the Sonar upgrade Alpha release. |
| 6 Nov 2023 | 1.6.0 |
1. Sonar upgrade Beta release.
2. Added automatic association between the DSF Hub and the DRA Admin and Analytics. As a result of this association, the DRA sends its security issues to the DSF Hub, and the DSF Hub sends its security issues and audit from agent and agentless sources to the DRA. 3. Added the option to provide a URL to download the DSF Hub and Agentless Gateway tarball via the 'tarball_url' variable. 4. Added the option to deploy the Agentless Gateway in a public subnet via the 'use_public_ip' variable. 5. Added the option to provide a different IP for federation via the 'dsf_hub_federation_ip' and 'dsf_gw_federation_ip' variables. |
| 14 Nov 2023 | 1.7.0 | Sonar deployment on Azure Beta release. |
| 22 Nov 2023 | 1.7.1 | Improvements and bug fixes. |
| 12 Dec 2023 | 1.7.2 | Improvements and bug fixes. |
| 26 Dec 2023 | 1.7.3 | Improvements and bug fixes. |
| 9 Jan 2024 | 1.7.4 | Added support for DAM in Azure. |
| 16 Jan 2024 | 1.7.5 |
1. Added a new agentless source for AWS - RDS PostreSQL.
2. Updated Azure IAM required permissions. 3. Improvements and bug fixes. |
| 24 Jan 2024 | 1.7.8 |
1. Added support for DRA in Azure.
2. Added a new agentless source for Azure - MSSQL. 3. Improvements and bug fixes. |
| 31 Jan 2024 | 1.7.9 |
1. Added support for DSF version 4.14/14.14.
2. Added support for Terraform version 1.7.x. |
| 19 Feb 2024 | 1.7.10 |
1. Moved AWS and Azure access request google forms to eDSF Kit open source code.
2. Improvements and bug fixes. |
| 6 Mar 2024 | 1.7.11 |
1. Added support for DSF version 4.15/14.15.
2. Added support for Sonar version 4.13.0.30. 3. Improvements and bug fixes. |
| 7 Apr 2024 | 1.7.12 |
1. Added support for DRA version 4.15.0.11 (following 4.15.0.10 recall).
2. Changed the default version and size of the MySQL RDS which is onbaorded to the DSF Hub in POC examples. 3. Used the Sonar health-checker tool to run upgrade preflight validations for versions 4.15 and up. |
| 7 May 2024 | 1.7.13 |
1. Dropped support for DRA version 4.14.* in eDSF Kit due to a bug.
2. Updated Sonar base AMI to latest RedHat 8.6. |
eDSF Kit offers several deployment modes:
-
CLI Deployment Mode: This mode offers a straightforward deployment option that relies on running a Terraform script on the user's computer which must be a Linux/Unix machine, e.g, Mac.
For more details, refer to CLI Deployment Mode.
-
Installer Machine Deployment Mode: This mode is similar to the CLI mode except that the Terraform is run on an EC2 machine that the user launches, instead of on their computer. This mode can be used if a Linux/Unix machine is not available, or eDSF Kit cannot be run on the available Linux/Unix machine, e.g., since it does not have permission or network access to the deployment environment, or if the user doesn't want to install additional software on their computer.
For more details, refer to Installer Machine Deployment Mode.
-
Terraform Cloud Deployment Mode: This mode makes use of Terraform Cloud, a service that exposes a dedicated UI to create and destroy resources via Terraform. This mode can be used for purposes similar to the Installer Machine Deployment Mode, but it is usually used by advanced users.
For more details, refer to Terraform Cloud Deployment Mode.
The first step in the deployment is to choose the deployment mode most appropriate to you. If you need more information to decide on your preferred mode, refer to the detailed instructions for each mode here.
Before using eDSF Kit to deploy DSF, it is necessary to satisfy a set of prerequisites.
- Only if you chose the CLI Deployment Mode, install Git.
- Only if you chose the CLI Deployment Mode, install Terraform. It is recommended on MacOS systems to use the "Package Manager" option during installation.
- Latest Supported Terraform Version: 1.7.x. Using a higher version may result in unexpected behavior or errors.
- jq - Command-line JSON processor.
- curl - Command-line tool for transferring data.
- Create an AWS User with secret and access keys which comply with the required IAM permissions (see IAM Permissions for Running eDSF Kit section).
- The deployment requires access to the DSF installation software. Click here to request access.
- Establish an Azure App Registration and assign it a custom role (without role assignment conditions) under the associated subscription, ensuring the custom role includes the required IAM permissions (see IAM Permissions for Running eDSF Kit section).
- The deployment requires access to the DSF installation software. Click here to request access.
An important thing to understand about the DSF deployment, is that there are many variations on what can be deployed, e.g., with or without DRA, the number of Agentless Gateways, with or without HADR, the number of VPCs, etc.
We provide several of out-of-the-box Terraform recipes we call "examples" which are already configured to deploy common DSF environments. You can use the example as is, or customize it to accommodate your deployment requirements.
These examples can be found in the eDSF Kit GitHub Repository under the examples directory. Some examples are intended for Lab or POC and others for actual DSF deployments by Professional Services and customers.
For more details about each example, click on the example name.
| Example | Purpose | Description | Download |
| Sonar Basic Deployment | Lab/POC | A DSF deployment with a DSF Hub, an Agentless Gateway, federation, networking and onboarding of a MySQL DB. | sonar_basic_deployment_1_7_13.zip |
| Sonar HADR Deployment | Lab/POC | A DSF deployment with a DSF Hub, an Agentless Gateway, DSF Hub and Agentless Gateway HADR, federation, networking and onboarding of a MySQL DB. | sonar_hadr_deployment_1_7_13.zip |
| Sonar Single Account Deployment | PS/Customer | A DSF deployment with a DSF Hub HADR, an Agentless Gateway and federation. The DSF nodes (Hubs and Agentless Gateway) are in the same AWS account and the same region. It is mandatory to provide as input to this example the subnets to deploy the DSF nodes on. | sonar_single_account_deployment_1_7_13.zip |
| Sonar Multi Account Deployment | PS/Customer | A DSF deployment with a DSF Hub, an Agentless Gateway and federation. The DSF nodes (Hub and Agentless Gateway) are in different AWS accounts. It is mandatory to provide as input to this example the subnets to deploy the DSF nodes on. | sonar_multi_account_deployment_1_7_13.zip |
| DSF Deployment | Lab/POC | A full DSF deployment with DSF Hub and Agentless Gateways (formerly Sonar), DAM (MX and Agent Gateways), DRA (Admin and DRA Analytics), and Agent and Agentless audit sources. | dsf_deployment_1_7_13.zip |
| DSF Single Account Deployment | PS/Customer | A full DSF deployment with DSF Hub and Agentless Gateways (formerly Sonar), DAM (MX and Agent Gateways) and DRA (Admin and DRA Analytics). | dsf_single_account_deployment_1_7_13.zip |
| Sonar Upgrade (Alpha) | All | Upgrade of DSF Hub and Agentless Gateway (formerly Sonar). | sonar_upgrade_1_7_13.zip |
| Example | Purpose | Description | Download |
| DSF Deployment | Lab/POC | A DSF deployment with a DSF Hub, an Agentless Gateway, DSF Hub and Agentless Gateway HADR, federation and networking, DAM (MX and Agent Gateways), and Agent audit sources. | dsf_deployment_1_7_13.zip |
If you are familiar with Terraform, you can go over the example code and see what it consists of. The examples make use of the building blocks of the eDSF Kit - the modules, which can be found in the Imperva Terraform Modules Registry. As a convention, the eDSF Kit modules' names have a 'dsf' prefix.
Fill out the eDSF Kit pre-deployment questionnaire google form if you need help choosing or customizing an example to fit your use case.
When using eDSF Kit, there is no need to manually download the DSF installation software, eDSF Kit will do that automatically based on the Sonar, DAM and DRA versions specified in the Terraform example. In order to be able to download the installation software during deployment, you must request access beforehand. See Deployment Prerequisites.
This includes the following version of the DSF sub-products:
| DSF Sub-Product | Default Version | Supported Versions |
| Sonar | 4.14.0.10 | 4.9 and up
Restrictions on modules may apply |
| DAM | 14.15.1.10 | 14.11.1.10 and up
14.7.x.y (LTS) |
| DRA | 4.15.0.10 | 4.11.0.10 and up |
Relevant variables are:
variable "sonar_version" {
    type    = string
}

variable "dam_version" {
    type    = string
}

variable "dra_version" {
    type    = string
}
When specifying Sonar and DRA versions, both long and short version formats are supported, for example, 4.12.0.10 or 4.12. The short format maps to the latest patch.
When specifying a DAM version, only long format is supported.
Make sure that the version you are using is supported by all the modules which are part of your deployment. To see which versions are supported by each module, refer to the specific module. (For example, DSF Hub module)
After you have chosen the deployment mode, follow the step-by-step instructions below to ensure a successful deployment. If you have any questions or issues during the deployment process, please contact Imperva Technical Support.
This mode offers a straightforward deployment option that relies on running a Terraform script on the user's computer which must be a Linux/Unix machine, e.g, Mac. This mode makes use of the Terraform Command Line Interface (CLI) to deploy and manage environments.
-
Download the zip file of the example you've chosen (See the Choosing the Example/Recipe that Fits Your Use Case section) from the eDSF Kit GitHub Repository, e.g., if you choose the "sonar_basic_deployment" example, you should download sonar_basic_deployment.zip.
-
Unzip the zip file in CLI or using your operating system's UI. For example, in CLI:
unzip sonar_basic_deployment.zip >>>> Change this command depending on the example you chose -
In CLI, navigate to the directory which contains the Terraform files. For example:
cd sonar_basic_deployment

>>>> Change this command depending on the example you chose
-
Optionally make changes to the example's Terraform code to fit your use case. If you need help doing that, please contact Imperva Technical Support.
-
Terraform leverages the cloud provider's shell environment for authentication. For AWS, refer to the AWS CLI Configuration Guide, and for Azure, refer to the Azure CLI Configuration Guide. In this example, we'll use environment variables for simplicity.
-
AWS environment variables
export AWS_ACCESS_KEY_ID=${access_key}
export AWS_SECRET_ACCESS_KEY=${secret_key}
export AWS_REGION=${region}

>>>> Fill the values of the access_key, secret_key and region placeholders, e.g., export AWS_ACCESS_KEY_ID=5J5AVVNNHYY4DM6ZJ5N46.
-
Azure environment variables
export ARM_TENANT_ID=${tenant_id}
export ARM_SUBSCRIPTION_ID=${subscription_id}
export ARM_CLIENT_ID=${client_id}
export ARM_CLIENT_SECRET=${client_secret}

>>>> Fill the values of the tenant_id, subscription_id, client_id and client_secret placeholders, e.g., export ARM_TENANT_ID=XXXXXXXX-XXXX-XXXX-XXXX-XXXXXXXXXXXX.
-
-
Run:
terraform init
-
Run:
terraform apply
This should take about 30 minutes.
-
Depending on your deployment:
To access the DSF Hub, extract the web console admin password and DSF URL using:
terraform output "web_console_dsf_hub"To access the DAM, extract the web console admin password and DAM URL using:
terraform output "web_console_dam"To access the DRA Admin, extract the web console admin password and DRA URL using:
terraform output "web_console_dra" -
Access the DSF Hub, DAM or DRA web console from the output in the previous step by entering the outputted URL into a web browser, “admin” as the username and the outputted admin_password value. Note, there is no initial login password for DRA.
The CLI Deployment is now completed and a functioning version of DSF is now available.
This mode is similar to the CLI mode except that the Terraform is run on an EC2 machine that the user launches, instead of on their computer. This mode can be used if a Linux/Unix machine is not available, or eDSF Kit cannot be run on the available Linux/Unix machine, e.g., since it does not have permission or network access to the deployment environment, or if the user doesn't want to install additional software on their computer.
NOTE: The steps provided below are specific to deployment in an AWS environment. For deployment in an Azure environment, it is necessary to create an Azure virtual machine instance based on Linux/Unix.
-
In AWS, choose a region for the installer machine while keeping in mind that the machine should have access to the DSF environment that you want to deploy, and preferably be in proximity to it.
-
Launch an Instance: Use the RHEL-8.6.0_HVM-20240419-x86_64-63-Hourly2-GP3 community AMI or similar.
-
Select t2.medium 'Instance type', or t3.medium if T2 is not available in the region.
-
Create or select an existing 'Key pair' that you will later use to run SSH to the installer machine.
-
In the Network settings panel - make your configurations while keeping in mind that the installer machine should have access to the DSF environment that you want to deploy, and that your computer should have access to the installer machine.
-
In the “Advanced details” panel, copy and paste the contents of this bash script into the User data textbox.
-
Click on Launch Instance. At this stage, the installer machine is initializing and downloading the necessary dependencies.
-
When launching is completed, run SSH to the installer machine from your computer:
ssh -i ${key_pair_file} ec2-user@${installer_machine_public_ip}

>>>> Replace the key_pair_file with the name of the file from step 4, and the installer_machine_public_ip with
    the public IP of the installer machine which should now be available in the AWS EC2 console.
    E.g., ssh -i a_key_pair.pem ec2-user@1.2.3.4
NOTE: You may need to decrease the access privileges of the key_pair_file in order to be able to use it in for ssh. For example:
chmode 400 a_key_pair.pem -
Download the zip file of the example you've chosen (See the Choosing the Example/Recipe that Fits Your Use Case section) from the eDSF Kit GitHub Repository, e.g., if you choose the "sonar_basic_deployment" example, you should download sonar_basic_deployment.zip. Run:
wget https://github.com/imperva/dsfkit/raw/1.7.13/examples/aws/poc/sonar_basic_deployment/sonar_basic_deployment_1_7_13.zip

or

wget https://github.com/imperva/dsfkit/raw/1.7.13/examples/aws/poc/sonar_hadr_deployment/sonar_hadr_deployment_1_7_13.zip

or

wget https://github.com/imperva/dsfkit/raw/1.7.13/examples/aws/installation/sonar_single_account_deployment/sonar_single_account_deployment_1_7_13.zip

or

wget https://github.com/imperva/dsfkit/raw/1.7.13/examples/aws/installation/sonar_multi_account_deployment/sonar_multi_account_deployment_1_7_13.zip

or

wget https://github.com/imperva/dsfkit/raw/1.7.13/examples/aws/poc/dsf_deployment/dsf_deployment_1_7_13.zip

or

wget https://github.com/imperva/dsfkit/raw/1.7.13/examples/aws/installation/dsf_single_account_deployment/dsf_single_account_deployment_1_7_13.zip
-
Continue by following the CLI Deployment Mode beginning at step 2.
IMPORTANT: Do not destroy the installer machine until you are done and have destroyed all other resources. Otherwise, there may be leftovers in your AWS account that will require manual deletion which is a tedious process. For more information see the Installer Machine Undeployment Mode section.
The Installer Machine Deployment is now completed and a functioning version of DSF is now available.
This deployment mode uses the Terraform Cloud service, which allows deploying and managing deployments via a dedicated UI. Deploying the environment is easily triggered by clicking a button within the Terraform interface, which then pulls the required code from the Imperva GitHub repository and automatically runs the scripts remotely.
This deployment mode can be used to demonstrate DSF in a customer's Terraform Cloud account or the Imperva Terraform Cloud account, which is accessible for internal use (SEs, QA, Research, etc.), and can be used to deploy/undeploy POC environments on AWS accounts owned by Imperva.
It is required that you have access to a Terraform Cloud account.
If you want to use Imperva's Terraform Cloud account, contact Imperva's Technical Support.
NOTE: Currently this deployment mode doesn't support customizing the chosen example's code.
-
Connect to Terraform Cloud: Connect to the desired Terraform Cloud account, either the internal Imperva account or a customer account if one is available.
-
Create a new workspace: Complete these steps to create a new workspace in Terraform Cloud that will be used for the DSF deployment.
-
Click the + New workspace button in the top navigation bar to open the Create a new Workspace page.

-
Choose Version Control Workflow from the workflow type options.

-
Choose github.com/dsfkit as the version control provider.

-
Choose imperva/dsfkit as the repository.
If this option is not displayed, type imperva/dsfkit in the “Filter” textbox.
-
Name the workspace in the following format:
dsfkit-${customer_name}-${environment_name}

>>>> Fill the values of the customer_name and environment_name placeholders, e.g., dsfkit-customer1-poc1
-
Click on the Advanced options button.

-
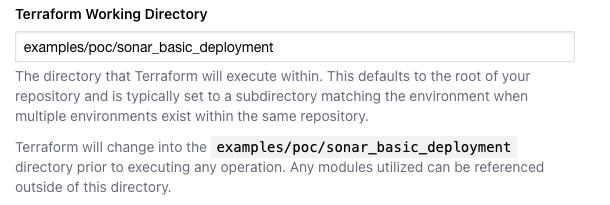
Enter the path to the example you've chosen (See the Choosing the Example/Recipe that Fits Your Use Case section), e.g., “examples/aws/poc/sonar_basic_deployment”, into the Terraform working directory input field.
>>>> Change the directory in the above screenshot depending on the example you chose -
Select the “Auto apply” option as the Apply Method.

-
To avoid automatic Terraform configuration changes when the GitHub repo updates, set the following values under “Run triggers”:

As displayed in the above screenshot, the Custom Regular Expression field value should be “23b82265”. -
Click “Create workspace” to finish and save the new eDSF Kit workspace.

-
-
Add the AWS variables: The next few steps will configure the required AWS variables.
-
Once the eDSF Kit workspace is created, click the "Go to workspace overview" button.

-
Click on the "Configure Variables" button.

-
Add the following workspace variables by entering the name, value, category and sensitivity as listed below.
Variable Name Value Category Sensitive AWS_ACCESS_KEY_ID Your AWS credentials access key Environment variable True AWS_SECRET_ACCESS_KEY Your AWS credentials secret key Environment variable True AWS_REGION The AWS region you wish to deploy into Environment variable False

>>>> Change the AWS_REGION value in the above screenshot to the AWS region you want to deploy in
NOTE: The workspace variables mentioned above are tailored for deployment in an AWS environment. For deployment in an Azure environment, it is necessary to include distinct workspace variables, and these will be addressed in a future release.
-
-
Run the Terraform: The following steps complete setting up the eDSF Kit workspace and running the example's Terraform code.
-
Click on the Actions dropdown button from the top navigation bar, and select the "Start new run" option from the list.

-
Enter a unique, alphanumeric name for the run, and click on the "Start run" button.

>>>> Change the "Reason for starting run" value in the above screenshot to a run name of your choosing -
Wait for the run to complete, it should take about 30 minutes and is indicated by "Apply finished".

-
-
Inspect the run result: These steps provide the necessary information to view the run output, and access the deployed DSF.
-
Scroll down the "Apply Finished" area to see which resources were created.
-
Scroll to the bottom to find the "State versions created" link which can be helpful to investigate issues.

-
Scroll up to view the "Outputs" of the run which should be expanded already. Depending on your deployment, locate the "web_console_dsf_hub", "web_console_dam" or "web_console_dra" JSON object. Copy the "public_url" or "private_url" and "admin_password" fields' values for later use (there is no initial login password for DRA), for example:
-
Enter the "public_url" or "private_url" value you copied into a web browser. For example, enter the "web_console_dsf_hub" URL to access the Imperva Data Security Fabric (DSF) login screen.

-
Sonar is installed with a self-signed certificate, as a result, when opening the web page you may see a warning notification. For example, in Google Chrome, click "Proceed to domain.com (unsafe)".

-
Enter “admin” into the Username field and the "admin_password" value you copied into the Password field. Click "Sign In".
-

The Terraform Cloud Deployment is now complete and a functioning version of DSF is now available.
To be able to create AWS resources inside any AWS Account, you need to provide an AWS User or Role with the required permissions in order to run eDSF Kit Terraform. The permissions are separated to different policies. Use the relevant policies according to your needs:
- For general required permissions such as create an EC2, security group, etc., use the permissions specified here - general required permissions.
- In order to create network resources such as VPC, NAT Gateway, Internet Gateway etc., use the permissions specified here - create network resources permissions.
- In order to onboard a MySQL RDS with CloudWatch configured, use the permissions specified here - onboard MySQL RDS permissions.
- In order to onboard a MsSQL RDS with audit configured and with synthetic data, use the permissions specified here - onboard MsSQL RDS with synthetic data permissions.
NOTE: When running the deployment with a custom 'deployment_name' variable, you should ensure that the corresponding condition in the AWS permissions of the user who runs the deployment reflects the new custom variable.
NOTE: The permissions specified in option 2 are irrelevant for customers who prefer to use their own network objects, such as VPC, NAT Gateway, Internet Gateway, etc.
To be able to create Azure resources inside any Azure Account, you need to provide an Azure user or application registration service principal with the required permissions in order to run eDSF Kit Terraform. Use the relevant permissions according to your needs:
- For general required permissions such as create a virtual machine, security group, etc., use the permissions specified here - general required permissions.
- In order to create network resources such as VNET, NAT Gateway etc., add the permissions specified here - create network resources permissions.
If you are running an installation example and want to provide your own instance profiles as variables, you can find samples of the required permissions here - DSF Instances Permissions.
If you are running an installation example and want to provide your own security groups as variables, you can find samples of the required security groups rules here - Security Groups samples.
Depending on the deployment mode you chose, follow the undeployment instructions of the same mode to completely remove Imperva DSF from AWS.
The undeployment process should be followed whether the deployment was successful or not. In case of failure, the Terraform may have deployed some resources before failing, and want these removed.
-
Navigate to the directory which contains the Terraform files. For example:
cd sonar_basic_deployment

>>>> Change this command depending on the example you chose
-
Terraform leverages the cloud provider's shell environment for authentication. For AWS, refer to the AWS CLI Configuration Guide, and for Azure, refer to the Azure CLI Configuration Guide. In this example, we'll use environment variables for simplicity.
-
AWS environment variables
export AWS_ACCESS_KEY_ID=${access_key}
export AWS_SECRET_ACCESS_KEY=${secret_key}
export AWS_REGION=${region}

>>>> Fill the values of the access_key, secret_key and region placeholders, e.g., export AWS_ACCESS_KEY_ID=5J5AVVNNHYY4DM6ZJ5N46.
-
Azure environment variables
export ARM_TENANT_ID=${tenant_id}
export ARM_SUBSCRIPTION_ID=${subscription_id}
export ARM_CLIENT_ID=${client_id}
export ARM_CLIENT_SECRET=${client_secret}

>>>> Fill the values of the tenant_id, subscription_id, client_id and client_secret placeholders, e.g., export ARM_TENANT_ID=XXXXXXXX-XXXX-XXXX-XXXX-XXXXXXXXXXXX.
-
-
Run:
terraform destroy -auto-approve
-
Run SSH to installer machine from the deployment client's machine:
ssh -i ${key_pair_file} ec2-user@${installer_machine_public_ip}

>>>> Fill the values of the key_pair_file and installer_machine_public_ip placeholders
-
Continue by following the CLI Undeployment Mode steps.
-
Wait for the environment to be destroyed.
-
Terminate the EC2 installer machine via the AWS Console.
-
To undeploy the DSF deployment, click on Settings and find "Destruction and Deletion" from the navigation menu to open the "Destroy infrastructure" page. Ensure that the "Allow destroy plans" toggle is selected, and click on the Queue Destroy Plan button to begin.

-
The DSF deployment is now destroyed and the workspace may be re-used if needed. If this workspace is not being re-used, it may be removed with “Force delete from Terraform Cloud” that can be found under Settings.

NOTE: Do not remove the workspace before the deployment is completely destroyed. Doing so may lead to leftovers in your AWS account that will require manual deletion which is a tedious process.
eDSF Kit offers several upgrade modes:
-
CLI Upgrade Mode: This mode offers a straightforward upgrade option that relies on running a Terraform script on the user's computer which must be a Linux/Unix machine, e.g, Mac.
For more details, refer to CLI Upgrade Mode.
-
Installer Machine Deployment Mode: This mode is similar to the CLI mode except that the Terraform is run on an EC2 machine that the user launches, instead of on their computer. This mode can be used if a Linux/Unix machine is not available, or eDSF Kit cannot be run on the available Linux/Unix machine, e.g., since it does not have permission or network access to the deployment environment, or if the user doesn't want to install additional software on their computer.
For more details, refer to Installer Machine Upgrade Mode.
The first step in the upgrade is to choose the upgrade mode most appropriate to you. If you need more information to decide on your preferred mode, refer to the detailed instructions for each mode here.
Before using eDSF Kit to upgrade DSF Hubs and Agentless Gateways, it is necessary to satisfy a set of prerequisites.
- The upgrade requires access to the DSF installation software. Click here to request access.
- Only if you chose the CLI Upgrade Mode, install Git.
- Only if you chose the CLI Upgrade Mode, install Terraform. It is recommended on MacOS systems to use the "Package Manager" option during installation.
- Only if you chose the CLI Upgrade Mode, install Python 3.
- Latest Supported Terraform Version: 1.7.x. Using a higher version may result in unexpected behavior or errors.
- The upgrade requires permission and network access (SSH) from your computer or the installer machine (depending on your choice of upgrade mode) to the deployed environment on AWS.
If the DSF deployment has not been deployed using the eDSF Kit, it is also necessary to satisfy the following prerequisites:
- Grant the DSF Hubs and Agentless Gateways IAM roles access to the S3 bucket containing the DSF installation software, use the permissions specified here - IAM Permissions for Granting Access to DSF Installation.
- Allow outbound connections from the DSF Hubs and Agentless Gateways to the S3 bucket containing the DSF installation software.
- AWS CLI installed on the DSF Hubs and Agentless Gateways.
When using eDSF Kit, there is no need to manually download the DSF installation software, eDSF Kit will do that automatically based on the Sonar target version specified in the Terraform example. In order to be able to download the upgrade software during upgrade, you must request access beforehand. See Upgrade Prerequisites.
Sonar version constrains can be found in the Sonar Upgrader module.
The target version should be specified in the Sonar upgrade example main.tf file, for example:
target_version = "4.12.0.10.0"After you have chosen the upgrade mode, follow the step-by-step instructions below to ensure a successful upgrade. If you have any questions or issues during the upgrade process, please contact Imperva Technical Support.
This mode offers a straightforward deployment option that relies on running a Terraform script on the user's computer which must be a Linux/Unix machine, e.g, Mac. This mode makes use of the Terraform Command Line Interface (CLI) to deploy and manage environments.
-
Download the zip file of the Sonar upgrade example: sonar_upgrade_1_7_13.zip.
-
Unzip the zip file in CLI or using your operating system's UI. For example, in CLI:
unzip sonar_upgrade_<x_y_z>.zip

>>>> Replace the x_y_z with the eDSF Kit version in the zip file name
-
In CLI, navigate to the directory which contains the Terraform files.
cd sonar_upgrade_<x_y_z>

>>>> Replace the x_y_z with the eDSF Kit version in the zip file name
-
Enter the details of DSF Hubs and Agentless Gateways which you want to upgrade, and the desired configuraiton options, in the main.tf file.
More information can be found in the Sonar Upgrader module.
If you need help doing that, please contact Imperva Technical Support.
-
Run:
terraform init
-
Run the upgrade:
terraform apply
Wait for it to complete.
-
To re-apply when there are no Terraform changes (the Terraform infrastructure matches the configuration), run:
terraform apply -replace="module.sonar_upgrader.null_resource.upgrade_cmd"
The CLI Upgrade is now completed and a functioning upgraded version of DSF is now available.
This mode is similar to the CLI mode except that the Terraform is run on an EC2 machine that the user launches, instead of on their computer. This mode can be used if a Linux/Unix machine is not available, or eDSF Kit cannot be run on the available Linux/Unix machine, e.g., since it does not have permission or network access to the deployment environment, or if the user doesn't want to install additional software on their computer.
-
In AWS, choose a region for the installer machine while keeping in mind that the machine should have access to the DSF environment that you want to upgrade, and preferably be in proximity to it.
-
Launch an Instance: Use the RHEL-8.6.0_HVM-20240419-x86_64-63-Hourly2-GP3 community AMI or similar.
-
Select t2.medium 'Instance type', or t3.medium if T2 is not available in the region.
-
Create or select an existing 'Key pair' that you will later use to run SSH to the installer machine.
-
In the Network settings panel - make your configurations while keeping in mind that the installer machine should have access to the DSF environment that you want to deploy, and that your computer should have access to the installer machine.
-
In the “Advanced details” panel, copy and paste the contents of this bash script into the User data textbox.
-
Click on Launch Instance. At this stage, the installer machine is initializing and downloading the necessary dependencies.
-
When launching is completed, run SSH to the installer machine from your computer:
ssh -i ${key_pair_file} ec2-user@${installer_machine_public_ip}

>>>> Replace the key_pair_file with the name of the file from step 4, and the installer_machine_public_ip with
    the public IP of the installer machine which should now be available in the AWS EC2 console.
    E.g., ssh -i a_key_pair.pem ec2-user@1.2.3.4
NOTE: You may need to decrease the access privileges of the key_pair_file in order to be able to use it in for ssh. For example:
chmode 400 a_key_pair.pem -
Continue by following the CLI Upgrade Mode beginning at step 1.
Note: It is safe to destroy the installer machine at any time, since currently no AWS resources are deployed during the upgrade process.
The Installer Machine Deployment is now completed and a functioning upgraded version of DSF is now available.
If you do not wish to use Terraform to run the upgrade, it is possible to bypass it and run the Python utility directly.
Use the Python Upgrader utility.
Information about additional topics can be found in specific examples, when relevant.
For example: Sonar Single Account Deployment
These topics include:
- Customizing Variables
- Working with DSF Hub and Agentless Gateway without outbound internet access
The Terraform state file contains sensitive information and should be stored in a secure backend storage.
For example, an AWS S3 bucket with a DynamoDB table for state locking to prevent concurrent state operations.
To configure your Terraform state file to be stored in an AWS S3 bucket with state locking, add, for example, the following backend.tf file to your Terraform configuration:
terraform {
  backend "s3" {
    bucket         = "dsfkit-terraform-state-bucket"
    key            = "states/terraform.tfstate"
    dynamodb_table = "terraform-state-lock"
    region         = "us-east-1"
  }
}If you encounter a problem that is not covered below, please open a Github issue and attach the relevant terraform logs. You can automatically persist the logs with the following apply command:
terraform apply -auto-approve | tee tf.log
Below is a list of possible issues and troubleshooting remediations.
Common issues
| Title | Error message | Remediation |
| Sonar HADR setup internal error | Replication failed! Replication script exited with code 1 |
Contact Imperva's Technical Support. |
| Sonar federation internal error | python_commons.http_client.UnexpectedStatusCode: Failed to run: federated_asset_connection_sync. Check /data_vol/sonar-dsf/jsonar/logs/sonarfinder/catalina.out for details., status: 500, data: None See log "/data_vol/sonar-dsf/jsonar/logs/sonarg/federated.log" for details |
Contact Imperva's Technical Support. |
| DAM configuration script exists with status code 28 | : exit status 28. Output: + set -e | Rerun “terraform apply”. |
AWS issues
| Title | Error message | Remediation |
| VPC quota exceeded | error creating EC2 VPC: VpcLimitExceeded: The maximum number of VPCs has been reached | Remove unneeded vpc via vpc dashboard, or increase vpc quota via this page and run again. |
| Elastic IP quota exceeded | Error creating EIP: AddressLimitExceeded: The maximum number of addresses has been reached | Remove unneeded Elastic IPs via this dashboard, or increase Elastic IP quota via this page and run again. |
| Option Group quota exceeded | Error: "Cannot create more than 20 option groups". Remediation similar to the other exceeded errors | Remove unneeded Option Groups here, or increase Option Group quota via this page and run again. |
| AWS glitch | Error: creating EC2 Instance: InvalidNetworkInterfaceID.NotFound: The networkInterface ID 'eni-xxx does not exist | Rerun “terraform apply”. |
| AWS ENI deletion limitation | error deleting security group: DependencyViolation: resource sg-xxxxxxxxxxxxx has a dependent object | According to AWS support, an ENI can take up to 24 hours to be deleted. Suggestion: Try to delete the ENI from AWS console or wait for 24 hours. |
| Blocked by Security Group or Network | timeout - last error: dial tcp x.y.z.w:22: i/o timeout or timeout - last error: Error connecting to bastion: dial tcp x.y.z.w:22: connect: connection timed out |
Check your security group and network configuration |
| Invalid EC2 SSH Keys | timeout - last error: Error connecting to bastion: ssh: handshake failed: ssh: unable to authenticate, attempted methods [none publickey], no supported methods remain |
Check the SSH keys you are using and the SSH keys variables values that you are passing. |
| No outbound internet access | Error: No outbound internet access. Either enable outbound internet access, or make sure x is installed in the base ami | If you intended the DSF node to have outbound intent access, then make sure the private subnets have routing to a NAT gateway or equivalent. If you didn't intend the DSF node to have outbound internet access, follow the instructions for 'Deploying DSF Nodes without Outbound Internet Access' in your example. |
| Sonar upgrade tarball download error - missing IAM role on Sonar node EC2 | Downloading tarball... fatal error: Unable to locate credentials |
Attach an IAM role to the Sonar node EC2 with permission to download the tarball. Follow the instructions in the Additional Prerequisites. |
| Sonar upgrade tarball download error - missing IAM role permission on Sonar node EC2 | Downloading tarball... fatal error: An error occurred (403) when calling the HeadObject operation: Forbidden |
Add a policy to the IAM role attached to the Sonar node EC2 with permission to download the tarball. Follow the instructions in the Additional Prerequisites. |
| Sonar upgrade tarball download error - aws cli profile misconfiguration in Sonar node EC2 | Downloading tarball... fatal error: An error occurred (403) when calling the HeadObject operation: Forbidden |
Connect with SSH to the Sonar node EC2 and fix the aws cli profile misconfiguration. Run, for example, 'aws sts get-caller-identity' to test it. |
Azure issues
| Title | Error message | Remediation |
| Cores quota exceeded | Error: creating Linux Virtual Machine ...: compute.VirtualMachinesClient#CreateOrUpdate: Failure sending request: StatusCode=0 -- Original Error: autorest/azure: Service returned an error. Status= Code="OperationNotAllowed" Message="Operation could not be completed as it results in exceeding approved *** Cores quota. | Increase the quota using the link provided in your own error message. |
| Public IP quota exceeded | Error: "Cannot create more than 10 public IP addresses for this subscription in this region." | Increase the quota using the link provided in your own error message. |
| Image legal terms not accepted | compute.VirtualMachinesClient#CreateOrUpdate: Failure sending request: StatusCode=400 -- Original Error: Code="ResourcePurchaseValidationFailed" Message="User failed validation to purchase resources. Error message: 'You have not accepted the legal terms on this subscription | Configure programmatic deployment for the desired image. Follow the instructions in the Azure Prerequisites. |