Bulk uploading image files
The easiest way to add imaging data is via the web interface, using the method described in Submitting Specimen Data. If you have many files to upload, however, it may be more convenient to use the Deriva bulk uploader tool.
If you're not already familiar with the concepts and steps described in the Submitting Specimen Data page, please review it and/or the tutorials linked there. The bulk upload tool is a replacement for Step 4 (Add Image Records) from that page.
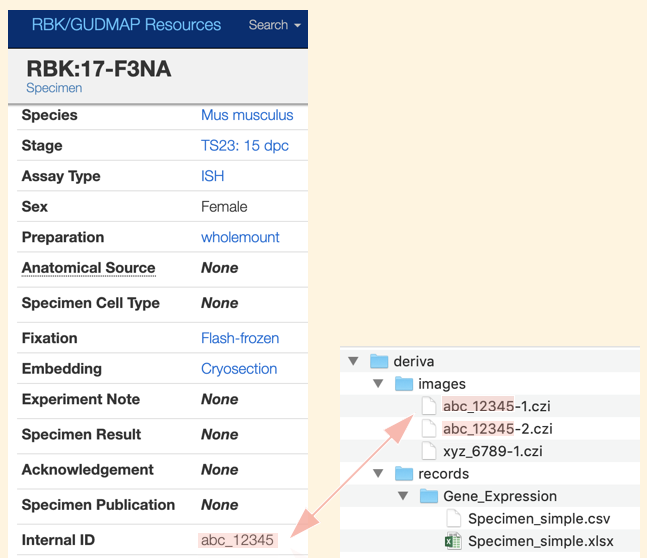
Create specimen records using either the the web interface, as described in Submitting Specimen Data, or the bulk upload process described in Adding specimen records from a spreadsheet or CSV. Make sure you assign each record a unique Internal ID; the Internal ID is used to link image files with the corresponding Specimen records.
In order for the upload tool to find your image files, you'll need to organize your files as follows:
- Create a folder called
deriva. - Within
deriva, create a folder calledimages - Within
images, save your image files, using filenames with the following naming convention:
{internal_id}-{number}.{suffix}
Where:
-
{internal_id}is the same as theInternal_IDvalue of the corresponding specimen -
{number}is a number; if you have a specimen with multiple images, this will control the order in which they're displayed (if you only have one image per specimen, just use "1"). -
{suffix}is the suffix, indicating the file type (czi,jpeg,tiff, etc.) - Note that a hyphen (
-) is used to separate the{internal_id}and the{number}in the image filename.
For example:
- Create a folder called
deriva. - Within
deriva, create a folder calledimage_3d - Within
image_3d, save your image files, using filenames with the following naming convention, whereimage_typeis eithervolumeorsurface, depending on the type of data:
{internal_id}-{image-type}.{suffix}
Where:
-
{internal_id}is the same as theInternal_IDvalue of the corresponding specimen -
{number}is a number; if you have a specimen with multiple images, this will control the order in which they're displayed (if you only have one image per specimen, just use "1"). -
{suffix}is the suffix, indicating the file type (czi,jpeg,tiff, etc.) - Note that a hyphen (
-) is used to separate the{internal_id}and the{image-type}in the image filename.
Follow these instructions to upload your file, pointing the uploader at the images subfolder.
Follow the instructions at Submitting Specimen Data to add anatomical sites, antibodies, etc.
Your new records will initially be marked "In Preparation" and will be visible only to consortium members. Change the Specimen records' status to "Submitted" to forward them on to the biocurator for review and release.
![]()
- Using the GUDMAP/RBK Data Browser
- Uploading Files using Deriva Client Tools
- Batch Query
- Exporting Data
- Standard files and formats for submission
- Antibodies
- Cell Lines
- Data Collections
- Imaging Data (Histology, Immunofluorescence/Immunohistochemistry, In Situ Hybridization)
- Protocols
- Sequencing/Metabolomics/IMC Data
- Single Cell Visualization Files
- Specimens
- Bulk uploading image files
- Bulk uploading Specimen data from a file(DRAFT)
- Annotating images
- Color palette for image annotation