

微服务架构风格,就像是把一个单独的应用程序开发为一套小服务,每个小服务运行在自己的进程中,并使用轻量级机制通信,通常是 HTTP API。这些服务围绕业务能力来构建,并通过完全自动化部署机制来独立部署。这些服务使用不同的编程语言书写,以及不同数据储存技术,并保持最低限度的集中式管理。
简而言之:拒绝大型单体应用,基于业务边界进行微服务化拆分,各个服务独立部署运行。
集群是个物理形态,分布式是个工作方式。
只要是一堆机器,就可以叫集群,他们是不是一起协作干活,这个谁也不知道。《分布式系统原理与范型》定义:分布式系统是若干独立计算机的集合,这些计算机对于用户来说就像单个相关系统,分布式系统(distribute system)是建立在网络智商的软件系统。分布式是指将不同的业务分布在不同的地方。集群指的是将几台机器集中在一起,实现同一业务。
例如:**京东是一个分布式系统,众多业务运行在不同的机器,所有业务构成一个大型的业务集群。**每一个小的业务,比如用户系统,访问压力大的时候一台服务器是不够的。我们就应该将用户系统部署到多个服务器,也就是每一个业务系统也可以做集群化。
分布式的每一个节点,都可以做集群。而集群并不一定就是分布式的。
节点:集群中的一个服务器。
在分布式系统中,各个服务可能处于不同的主机,但是服务之间不可避免的徐亚 互相调用,我们称之为远程调用。
Spring Cloud 中使用的 HTTP + JSON 的方式完成远程调用。


分布式系统中,A 服务需要调用 B 服务,B 服务在多台服务器中都存在,A 调用任意一个服务器均可完成功能。
为了是每一个服务器都不要太忙或者太闲,我们可以负载均衡的调用每一个服务器,提升网站的健壮性。
常见的负载均衡算法:
- 轮询:为每一个请求选择健康池中的第一个后端服务器,然后按照顺序往后依次选择,直到最后一个,然后选循环。
- 最小连接:优先选择连接数最小,也就是压力最小的后端服务器,在会话较长的情况下可以考虑这种方式。
- 散列:根绝请求源的 IP 的散列(hash)来选择要转发的服务器。这种方式可以一定程度上保证特定用户能连接到相同的服务器。如果你的应用需要处理状态而要求用户能连接到和之前相同的服务器,可以考虑采取这种方式。
A 服务调用 B 服务,A 服务并不知道 B 服务当前在哪几台服务器有,哪些正常的,哪些服务已经下线。解决这个问题就可以引入注册中心。

如果某些服务下线,我们其他人可以实时的感知到其他服务的状态,从而避免调用不可用的服务。

每一个服务最终都有大量的配置,并且每个服务器都有可能部署在多台服务器上,我们经常需要变更配置,我们可以让每个服务在配置中心获取自己的配置。
配置中心用来集中管理微服务的配置信息。
在微服务架构中,微服务之间通过网络进行通信,存在互相依赖,当其中一个服务不可用时,有可能会造成雪崩效应。要防止这种的情况,必须要有容错机制来保护服务。

-
服务熔断:
设置服务的超时,当被调用的服务经常失败到达某个阈值,我们可以开启断路保护机制,后来的请求不再去调用这个服务。本地直接返回默认的数据。
-
服务降级
在运维期间,当系统处于高峰期,系统资源紧张,我们可以让非核心业务降级运行。降级:某些服务不处理,或者简单处理(比如:抛异常、返回 null、调用 Mock 数据、调用 Faceback 处理逻辑)。
在微服务架构中,API Gateway 作为整体架构的重要组件,他抽象了微服务中都需要的公共功能,同时提供了客户端负载均衡、服务自动熔断、灰度发布、统一认证、限流流控、日志统计等丰富的功能,帮助我们解决很多 API 管理难题。

- 下载安装 Virtual Box ,开启虚拟化: https://www.virtualbox.org/wiki/Downloads
- 下载安装 Vagrant :Vagrant 可以快速下载镜像文件整合 Virtual Box。
- Vagrant 下载:https://www.vagrantup.com/downloads.html
- Vagrant 官方仓库:https://app.vagrantup.com/boxes/search
测试 Vagrant 是否安装成功:在终端中输入 vagrant 命令
# itzhouq @ itzhouqdeMacBook-Pro in ~ [12:11:23]
$ vagrant
Usage: vagrant [options] <command> [<args>]

    -h, --help                       Print this help.

Common commands:
     box             manages boxes: installation, removal, etc.
     cloud           manages everything related to Vagrant Cloud
     destroy         stops and deletes all traces of the vagrant machine
     global-status   outputs status Vagrant environments for this user
     halt            stops the vagrant machine
     help            shows the help for a subcommand
     init            initializes a new Vagrant environment by creating a Vagrantfile
     login
不报错说明安装成功。
- 初始化一个centos 7 系统
$ vagrant init centos/7
A `Vagrantfile` has been placed in this directory. You are now
ready to `vagrant up` your first virtual environment! Please read
the comments in the Vagrantfile as well as documentation on
`vagrantup.com` for more information on using Vagrant.
在家目录下会创建一个 Vagrantfile 文件。
- 启动环境
根据提示输入:
$ vagrant up
Bringing machine 'default' up with 'virtualbox' provider...
==> default: Box 'centos/7' could not be found. Attempting to find and install...
    default: Box Provider: virtualbox
    default: Box Version: >= 0
==> default: Loading metadata for box 'centos/7'
    default: URL: https://vagrantcloud.com/centos/7
==> default: Adding box 'centos/7' (v2004.01) for provider: virtualbox
    default: Downloading: https://vagrantcloud.com/centos/boxes/7/versions/2004.01/providers/virtualbox.box
Download redirected to host: cloud.centos.org
Progress: 5% (Rate: 9883/s, Estimated time remaining: 18:45:04)
有个下载的过程。我本机下载太慢了。考虑使用外部下载。先使用 control + C 终止下载。
- 外部下载
复制链接:https://vagrantcloud.com/centos/boxes/7/versions/2004.01/providers/virtualbox.box。使用迅雷下载。
下载后复制路径【换成自己的】,添加本地 box。
$ vagrant box add centos/7 /Users/itzhouq/Downloads/virtualbox.box
==> box: Box file was not detected as metadata. Adding it directly...
==> box: Adding box 'centos/7' (v0) for provider:
    box: Unpacking necessary files from: file:///Users/itzhouq/Downloads/virtualbox.box
==> box: Successfully added box 'centos/7' (v0) for 'virtualbox'!
Successfully 成功了。
再使用 vagrant up启动:
$ vagrant up
Bringing machine 'default' up with 'virtualbox' provider...
An action 'up' was attempted on the machine 'default',
but another process is already executing an action on the machine.
Vagrant locks each machine for access by only one process at a time.
Please wait until the other Vagrant process finishes modifying this
machine, then try again.

If you believe this message is in error, please check the process
listing for any "ruby" or "vagrant" processes and kill them. Then
try again.
又报错了。意思是之前运行的程序没停止冲突了。
$ ps -ef | grep ruby
  501  1449  1448   0 12:19下午 ttys000    0:18.46 ruby /opt/vagrant/embedded/gems/2.2.9/gems/vagrant-2.2.9/bin/vagrant up
  501  1462  1449   0 12:19下午 ttys000    0:01.46 /opt/vagrant/embedded/bin/curl -q --fail --location --max-redirs 10 --verbose --user-agent Vagrant/2.2.9 (+https://www.vagrantup.com; ruby2.6.6)  --continue-at - --output /Users/itzhouq/.vagrant.d/tmp/box59ea1c1664883a8671659ef6c8355b0ed54a3954 https://vagrantcloud.com/centos/boxes/7/versions/2004.01/providers/virtualbox.box
  501  1810  1350   0  1:29下午 ttys000    0:00.00 grep --color=auto --exclude-dir=.bzr --exclude-dir=CVS --exclude-dir=.git --exclude-dir=.hg --exclude-dir=.svn --exclude-dir=.idea --exclude-dir=.tox ruby

# itzhouq @ itzhouqdeMacBook-Pro in ~ [13:29:26]
$ ps -ef | grep vagrant
  501  1448  1350   0 12:19下午 ttys000    0:00.01 vagrant up
  501  1449  1448   0 12:19下午 ttys000    0:18.46 ruby /opt/vagrant/embedded/gems/2.2.9/gems/vagrant-2.2.9/bin/vagrant up
  501  1462  1449   0 12:19下午 ttys000    0:01.46 /opt/vagrant/embedded/bin/curl -q --fail --location --max-redirs 10 --verbose --user-agent Vagrant/2.2.9 (+https://www.vagrantup.com; ruby2.6.6)  --continue-at - --output /Users/itzhouq/.vagrant.d/tmp/box59ea1c1664883a8671659ef6c8355b0ed54a3954 https://vagrantcloud.com/centos/boxes/7/versions/2004.01/providers/virtualbox.box
  501  1818  1350   0  1:29下午 ttys000    0:00.00 grep --color=auto --exclude-dir=.bzr --exclude-dir=CVS --exclude-dir=.git --exclude-dir=.hg --exclude-dir=.svn --exclude-dir=.idea --exclude-dir=.tox vagrant
尝试了网上一个办法:
kenorb commented on 27 Jun 2016 •
Try either (when ruby process exists):

killall ruby
or:

vagrant global-status --prune
when ruby process doesn't exist, to fix the above issue.
还是不行,然后我重启,好了~~~
vagrant up 启动成功后会自动启动虚拟机。

- 连接虚拟机
vagrant 创建虚拟机的时候,创建了 SSH 连接,可以使用本地终端远程连接虚拟机。
# itzhouq @ itzhouqdeMacBook-Pro in ~ [13:36:33]
$ vagrant ssh
[vagrant@localhost ~]$
这样就是远程连接成功了。
系统 root 用户的密码是 vagrant。
- vagrant 其他常用命令:
- vagrant ssh:自动使用 vagrant 用户连接虚拟机
- vagrant upload source [ destination ] [ name | id] 上传文件
- 虚拟机网络设置
修改 Vagrantfile 固定 IP 地址。
https://blog.csdn.net/qq_29695701/article/details/86750556
本机开虚拟机发热太厉害,使用阿里云的服务器。
- 远程登录云主机
## 类似下面这种,IP 换成自己的
ssh -p 22 root@111.111.111.111- 测试连通性
-
获取本机外网 IP:在百度中输入 IP 地址可以得到
-
使用阿里云的外网 IP 和本机的外网 IP 互相能 ping 通就没问题。
-
Docker 虚拟化容器技术 Docker 基于镜像,可以秒级启动各种容器,每一种容器都是一个完整的运行环境,容器之间互相隔离。

Docker 安装文档:https://docs.docker.com/engine/install/centos/
- 卸载旧版本
sudo yum remove docker \
                  docker-client \
                  docker-client-latest \
                  docker-common \
                  docker-latest \
                  docker-latest-logrotate \
                  docker-logrotate \
docker-engine- 安装依赖
sudo yum install -y yum-utils- 安装仓库
sudo yum-config-manager \
    --add-repo \
https://download.docker.com/linux/centos/docker-ce.repo- 安装 Docker
sudo yum install docker-ce docker-ce-cli containerd.io- 查看版本
[root@itzhouc yum.repos.d]# docker -v
Docker version 19.03.12, build 48a66213fe- 设置 Docker 开机自启
sudo systemctl enable docker- 配置镜像
为了加快速度,需要配置阿里云镜像。登录阿里云之后在这个https://cr.console.aliyun.com/cn-hangzhou/instances/mirrors链接中可以看到。

sudo mkdir -p /etc/docker

sudo tee /etc/docker/daemon.json <<-'EOF'
{
  "registry-mirrors": ["https://as5ebylp.mirror.aliyuncs.com"]
}
EOF

sudo systemctl daemon-reload

sudo systemctl restart docker- 拉取 MySQL5.7 的镜像
[root@itzhouc ~]# docker pull mysql:5.7
[root@itzhouc ~]# docker images
REPOSITORY          TAG                 IMAGE ID            CREATED             SIZE
mysql 5.7 d05c76dbbfcf 4 days ago 448MB- 创建实例并启动
docker run -p 3306:3306 --name mysql \   ## 将容器的3306端口映射到主机的3306端口
-v /mydata/mysql/log:/var/log/mysql \    ## 将配置文件夹/var/log/mysql挂载到主机
-v /mydata/mysql/data:/var/lib/mysql \   ## 将配置文件夹/var/lib/mysql挂载到主机
-v /mydata/mysql/conf:/etc/mysql \			 ## 将配置文件夹/etc/mysql挂载到主机
-e MYSQL_ROOT_PASSWORD=123456 \          ## 初始化root用户密码
-d mysql:5.7- 查看是否启动
[root@itzhouc ~]# docker ps
CONTAINER ID        IMAGE               COMMAND                  CREATED             STATUS              PORTS                               NAMES
4628e0a359b4 mysql:5.7 "docker-entrypoint.s…" 16 seconds ago Up 15 seconds 0.0.0.0:3306->3306/tcp, 33060/tcp mysql- Docker 容器文件挂载与端口映射

- 进入容器内部、查看 MySQL 的位置
[root@itzhouc ~]# docker exec -it mysql /bin/bash
root@4628e0a359b4:/# whereis mysql
mysql: /usr/bin/mysql /usr/lib/mysql /etc/mysql /usr/share/mysql
root@4628e0a359b4:/#- 修改 MySQL 配置文件
退出容器,在挂载文件中修改配置文件:
vi /mydata/mysql/conf/my.cnf[client]
default-character-set=utf-8
[mysql]
default-character-set=utf-8
[mysqld]
init_connect='SET collation_connection=utf8_unicode_ci'
init_connect='SET NAMES utf8'
default-set-server=utf-8
collation-server=utf8_unicode_ci
skip-cahracter-set-client-handshake
skip-name-resolve- 重启 MySQL
docker restart mysql启动成功即可。
- 下载镜像文件
docker pull redis- 创建实例并启动
mkdir -p /mydata/redis/conf
touch /mydata/redis/conf/redis.conf

docker run -p 6379:6379 --name redis \
-v /mydata/redis/data:/data \
-v /mydata/redis/conf/redis.conf:/etc/redis/redis.conf \
-d redis redis-server /etc/redis/redis.conf- 连接
[root@itzhouc ~]# docker exec -it redis redis-cli
127.0.0.1:6379> ping
PONG
127.0.0.1:6379>- Redis 配置
配置文件可以参考官网:
修改 Redis 持久化配置:
vi /mydata/redis/conf/redis.conf
添加配置 appendonly yes
docker restart redis- JDK:1.8 及以上
$ java -version
java version "1.8.0_241"
Java(TM) SE Runtime Environment (build 1.8.0_241-b07)
Java HotSpot(TM) 64-Bit Server VM (build 25.241-b07, mixed mode)-
maven:3.6.1 以上
-
maven 配置
配置阿里云镜像
<mirror>
  <id>alimaven</id>
  <mirrorOf>central</mirrorOf>
  <name>aliyun maven</name>
  <url>http://maven.aliyun.com/nexus/content/groups/public/</url>
</mirror>
配置使用 JDK 1.8 编译项目
<profile>
  <id>jdk-1.8</id>
  <activation>
    <activeByDefault>true</activeByDefault>
    <jdk>1.8</jdk>
  </activation>
  <properties>
    <maven.compiler.source>1.8</maven.compiler.source>
    <maven.compiler.target>1.8</maven.compiler.target>
    <maven.compiler.compilerVersion>1.8</maven.compiler.compilerVersion>
  </properties>
</profile> - 前端开发工具:VScode,安装一些插件
- Auto Close Tag
- Auto Rename Tag
- Chinese (Simplified) Language Pack for Visual Studio Code
- ESLint
- HTML CSS Support
- HTML Snippets
- JavaScript (ES6) code snippets
- Live Server
- open in browser
- Vetur
6、配置 Git
7、项目结构创建、提交到码云/GitHub
- 创建一个项目下载到本地使用 IDEA 打开,创建模块

依次创建 商品模块(product)、优惠券模块(coupon)、订单模块(order)、仓储模块(ware)、用户模块(user)。每个模块中默认选中 Spring Web 和 OpenFeign 组件。

- 设置聚合工程
随便复制一个 pom 文件到根目录下,修改为如下:

- 添加总的服务

- 修改忽略文件
**/mvnw
**/mvnw.cmd
**/.mvn

**/target/

.idea

**/.gitignore

*.iws
*.iml
*.ipr
log/

.DS_Store
6、代码提交
git status  ## 查看代码状态
git add .   ## 将没有被忽略的文件都添加到版本控制
git commit -m "project init"   ## 提交代码到本地仓库
git push origin master         ## 推送代码到远程 master 分支
git checkout -b dev            ## 创建一个 dev 分支并切换到该分支
git remote prune origin        ## 删除远程无效分支
7、数据库初始化
后台管理系统使用【人人开源】的脚手架搭建。
前端:https://gitee.com/renrenio/renren-fast-vue
后端:https://gitee.com/renrenio/renren-fast

下载上述两个项目到本地。分别删除其中的.git文件夹。
将后端项目拷贝到总项目根目录下,添加到模块中。

- 初始化数据库
新建数据库 gulimall-admin,执行项目下db/mysql.sql文件初始化数据库。
修改数据库连接配置信息。启动项目。
- 前端初始化
使用 Vscode 打开项目。确保有 node 环境。
Npm 是随 node 一起安装的包管理工具。为了加快下载依赖速度,需要配置 npm 使用淘宝镜像:
# itzhouq @ itzhouqdeMacBook-Pro in ~ [10:41:50]
$ npm config set registry https://registry.npm.taobao.org

# itzhouq @ itzhouqdeMacBook-Pro in ~ [10:42:48]
$ npm config get registry
https://registry.npm.taobao.org/- 下载依赖
进入前端项目根目录下,执行以下命令:
npm install依赖下载完成之后启动项目
- 启动前端项目
npm run dev前端项目下载依赖的时候容易报错,注意看报错信息。我遇到一个依赖需要手动下载。
- 前后端联调
启动后端项目,前端能登录进去就说明调通了。
-
下载逆向工程
下载 renren-generator 到本地 https://gitee.com/renrenio/renren-generator.git。
删除文件夹中的
.git/文件夹,导入总项目。

- 修改 renren-generator 配置
修改 application.yml 的数据库连接为 pms 数据库。
修改 generator.properties 代码生成器信息。

注释掉 resource/template/Controller.java.vm文件中的所有的 @RequiresPermissions注解。
这个是跟 Shrio相关的注解,暂时用不上。

- 启动项目,生成代码

下载解压文件,将 main文件夹拷贝到 product项目的 src目录下,替换原来的 main文件夹。下面解决报错和依赖问题。
- 创建common 模块
使用 maven 创建一个 gulimall-common模块,其余的模块都依赖于这个模块。

在 product模块中引入common模块的依赖:
<dependency>
  <groupId>com.atguigu.gulimall</groupId>
  <artifactId>gulimall-common</artifactId>
  <version>0.0.1-SNAPSHOT</version>
</dependency>- 根据
prodcut中的报错信息,导入相关依赖。
- 整合
mybatis-plus
1、导入依赖
在 product模块中导入 mybatis-plus依赖:
<dependency>
  <groupId>com.baomidou</groupId>
  <artifactId>mybatis-plus-boot-starter</artifactId>
  <version>3.3.1</version>
</dependency>
2、配置
product模块中新建 application.yml。配置数据源和mappers文件位置、主键生成策略。
spring:
  datasource:
    type: com.alibaba.druid.pool.DruidDataSource
    driverClassName: com.mysql.cj.jdbc.Driver
    url: jdbc:mysql://47.96.30.109:3306/gulimall_pms?useUnicode=true&characterEncoding=UTF-8&useSSL=false&serverTimezone=Asia/Shanghai
    username: root
    password: 123456

mybatis-plus:
  mapper-locations: classpath*:/mapper/**/*.xml    # 配置 mapper 文件的位置
  global-config:
    db-config:
id-type: auto # 配置主键生成规则在启动类上添加@MapperScan注解。
@MapperScan("com.atguigu.gulimall.product.dao")
@SpringBootApplication
public class GulimallProductApplication {
    public static void main(String[] args) {
        SpringApplication.run(GulimallProductApplication.class, args);
    }
}- 测试
在 GulimallProductApplicationTests测试类中编写单元测试。
采用上述类似方式生成代码,注意修改配置。
Spring Cloud Alibaba 中文文档:https://github.com/alibaba/spring-cloud-alibaba/blob/master/README-zh.md
根据官网,使用之前先使用版本管理限定版本。在 common 模块中引入:
<dependencyManagement>
    <dependencies>
        <dependency>
            <groupId>com.alibaba.cloud</groupId>
            <artifactId>spring-cloud-alibaba-dependencies</artifactId>
            <version>2.1.0.RELEASE</version>
            <type>pom</type>
            <scope>import</scope>
        </dependency>
    </dependencies>
</dependencyManagement>官网:https://nacos.io/zh-cn/docs/quick-start.html
- 引入依赖 Nacos Discovery Starter
在 common 中引入:
<dependency>
     <groupId>com.alibaba.cloud</groupId>
     <artifactId>spring-cloud-starter-alibaba-nacos-discovery</artifactId>
</dependency>- 配置 Nacos Server 的地址
如果我们需要将 coupon 模块注册到注册中心,需要在 coupon 模块的配置文件中添加配置。
spring:
  cloud:
    nacos:
      discovery:
server-addr: 127.0.0.1:8848- 使用 @EnableDiscoveryClient 注解开启服务注册与发现功能
在 coupon 的启动类上添加该注解。
@MapperScan("com.atguigu.gulimall.coupon.dao")
@SpringBootApplication
@EnableDiscoveryClient
public class GulimallCouponApplication {
    public static void main(String[] args) {
        SpringApplication.run(GulimallCouponApplication.class, args);
    }
}- 启动 Nacos Server
根据官网下载压缩包解压后,启动 Nacos Server。
官网下载太慢,可以使用这个地址:https://gitee.com/itzhouq/software
- Linux/Unix/Mac 操作系统,执行命令
sh startup.sh -m standalone - Windows 操作系统,执行命令
cmd startup.cmd
- 应用启动
增加配置,在 coupon 模块的配置文件中添加基本配置信息
spring:
  application:
    name: gulimall-coupon
server:
  port: 7000
注意:如果被注册的模块没有服务名,则不会显示。
- 验证
访问 127.0.0.1:8848/nacos, 使用 nacos/nacos 登录。

再注册一个 product 试试。

服务注册成功时会提示:
nacos registry, gulimall-product 192.168.0.104:10000 register finished
- 注意:如果模块启动报错,可以尝试更换
spring cloud的版本。
我开始使用的 2.2.0.RELEASE版本报错:
nacos Caused by: java.lang.NoClassDefFoundError: org/springframework/cloud/client/discovery/ReactiveDiscoveryClient
换成 2.1.0.RELEASE后成功。
Feign 是一个声明式的 HTTP 客户端,他的目的就是让远程调用更加简单。Feign 提供了 HTTP 请求模板,通过编写简答的接口和插入注解,就可以定义好 HTTP 请求的参数、格式、地址等信息。
Feign 整合了 Ribbon(负载均衡)和 Hytrix(服务熔断),可以让我们不再需要显式地使用这两个组件。
SpringCloudFeign 在 Nexflix 的基础上扩展了对 Spring MVC 注解的支持,在其实现下,我们只需要创建一个接口并采用注解的方式来配置它,即可完成对服务提供方的接口绑定。简化了 SpringCloudRibbon 自行封装服务客户调用客户端的开发量。
假设会员想要从优惠券服务中获取所有的优惠券信息。我们使用这个需求尝试使用 OpenFeign。
- 引入依赖
首先 member 项目中已经引用了 OpenFeign:
<dependency>
  <groupId>org.springframework.cloud</groupId>
  <artifactId>spring-cloud-starter-openfeign</artifactId>
</dependency>
这样 member 就可以调用别的服务了。
- 编写测试接口
首先在 coupon 中编写测试接口:

- 在 member 中编写远程调用接口

- 开启远程调用
在 member 启动类上添加注解 @EnableFeignClients。
@EnableDiscoveryClient
@SpringBootApplication
@EnableFeignClients(basePackages = "com.atguigu.gulimall.member.feign")
@MapperScan("com.atguigu.gulimall.member.dao")
public class GulimallMemberApplication {
	public static void main(String[] args) {
		SpringApplication.run(GulimallMemberApplication.class, args);
	}
}- 编写测试

- 启动测试
重启项目访问:http://localhost:8000/member/member/coupons

成功。
- 引入依赖
各个模块都需要使用配置中心,所以在 common 模块中添加依赖:
<dependency>
     <groupId>com.alibaba.cloud</groupId>
     <artifactId>spring-cloud-starter-alibaba-nacos-config</artifactId>
</dependency>- 创建配置文件
bootstrap.properties
选择一个模块测试,这里选择 coupon 模块。在其 resources文件夹下新建配置文件bootstrap.properties,该文件的优先级高于 application.yml。
配置 Nacos Config 元数据:
spring.application.name=gulimall-coupon
spring.cloud.nacos.config.server-addr=127.0.0.1:8848
以前我们读取配置都是通过配置文件 application.properties配置,然后在代码中使用@Value注解读取。
比如:在 coupon 的 application.properties中添加配置:
coupon.user.name=zhangsan
coupon.user.age=20
然后在代码中读取:

启动项目,可以读取到配置的数据。

但是这样的问题是,每次我们修改配置需要重启服务才能生效。这种问题在服务比较多和服务不能随便停止的项目中弊端凸显。为此需要使用配置中心。
- 配置数据集
当项目中引入 Nacos-Config 依赖之后,项目启动时会去配置中心加载配置,从启动信息中可以看到:
Located property source: CompositePropertySource {name='NACOS', propertySources=[NacosPropertySource {name='gulimall-coupon.properties'}]}
可以看到数据源默认是应用名.properties。
我们去 Nacos 的控制台添加配置测试。
- 添加配置
在 Nacos 配置管理 --> 配置列表 --> 新增配置 中添加如下配置,重新项目,可以读取到配置。

- 动态获取配置
第一次可以读取到配置,但是我们修改的配置不会再次被读取到。根据官方文档,需要在对应的 Controller 类上添加 @RefreshScope 打开动态刷新功能。再次测试可以动态刷新。
- 命名空间
主要用于配置隔离。默认新增的配置都在 public 空间。我们可以创建多个命名空间,比如 dev、prod、test等。在配置中间中对应配置。

spring.cloud.nacos.config.namespace=23374e75-f3b6-420c-bd9a-9e5c4bb97ac3该维度也用于不同微服务使用不同命名空间,每个微服务只读取自己命名空间下的所有配置。
- 配置集
一组相关或者不相关的配置项的集合称之为配置集。在系统中,一个配置文件通常就是一个配置集,包含了系统各个方面的配置。例如,一个配置集可能包含了数据源、线程池、日志级别等配置项。
- 配置集 ID
Data id 类似于文件名。
- 配置分组
默认所有的配置集都属于 DEFAULT_GROUP。
对应的配置:
spring.cloud.nacos.config.group=dev**本项目:每个微服务创建自己的命名空间,使用配置分组区分环境,dev、test、prod。

bootstrap.properties的配置:
spring.application.name=gulimall-coupon
spring.cloud.nacos.config.server-addr=127.0.0.1:8848

spring.cloud.nacos.config.namespace=23374e75-f3b6-420c-bd9a-9e5c4bb97ac3
spring.cloud.nacos.config.group=dev- 同时加载多个配置集
微服务任何配置信息,任何配置文件都可以放在配置中心中。
只需要在 bootstrap.properties中说明加载配置中心的哪些配置即可
以前 SpringBoot 任何从配置文件中获取值的方式都可以使用,配置中心有的配置优先使用配置中心的。
下面提取application.yml中的所有配置到配置中心:

在 bootstrap.properties中引入这些配置,删除 application.yml后,重启项目还是可以正常启动和读取配置信息。
项目启动的控制台信息中可以看到读取的是哪个配置:
2020-07-22 00:17:51.141  INFO 7070 --- [           main] c.a.c.n.c.NacosPropertySourceBuilder     : Loading nacos data, dataId: 'datasource.yml', group: 'dev'
2020-07-22 00:17:51.157  INFO 7070 --- [           main] c.a.c.n.c.NacosPropertySourceBuilder     : Loading nacos data, dataId: 'mybatis.yml', group: 'dev'
2020-07-22 00:17:51.160  INFO 7070 --- [           main] c.a.c.n.c.NacosPropertySourceBuilder     : Loading nacos data, dataId: 'other.yml', group: 'dev'
2020-07-22 00:17:51.164  INFO 7070 --- [           main] c.a.c.n.c.NacosPropertySourceBuilder     : Loading nacos data, dataId: 'gulimall-coupon.properties', group: 'dev'
这种配置的方式更加灵活。
官网文档:https://cloud.spring.io/spring-cloud-static/spring-cloud-gateway/2.2.3.RELEASE/reference/html/
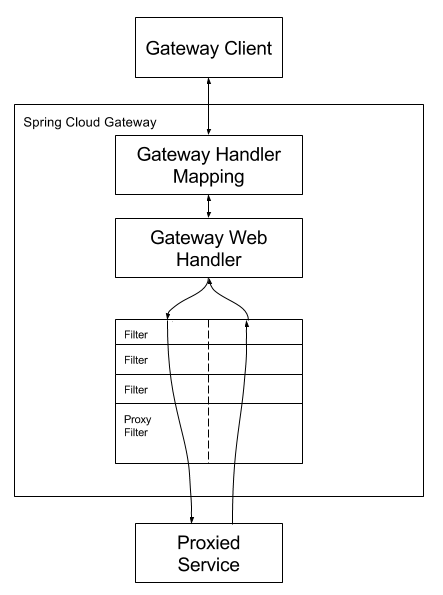
网关作为流量的入口,常用功能包括路由转发、权限校验、限流控制等。而SpringCloud Gateway 作为 SpringCloud官方推出的第二代网关框架,取代了 Zuul 网关。
使用网关可以将一些与业务无关的功能提取出来,比如鉴权、限流、日志等。


网关提供了 API 全托管服务,丰富的 API 管理功能,辅助企业管理大规模的 API,以降低管理成本和安全风险,包括协议适协议转发、安全策略、防刷、流量、监控日志等功能。
Spring Cloud Gateway 旨在提供一种简单而有效的方式来对 API 进行路由,并为他们提供切面,如安全性,监控和弹性等。


项目中引入 Gateway。
- 新建模块 gulimall-gateway

引入 Gateway 依赖,common 依赖,统一 SpringBoot 和 Spring Cloud 版本。
- 开启服务注册与发现
在启动类上添加 @EnableDiscoveryClient 注解。
- 配置 nacos 地址和模块应用名
server.port=88
spring.cloud.nacos.discovery.server-addr=127.0.0.1:8848
spring.application.name=gulimall-gateway- 添加配置中心文件 bootstrap
spring.application.name=gulimall-gateway

spring.cloud.nacos.config.server-addr=27.0.0.1:8848

spring.cloud.nacos.config.namespace=86fe8e82-b32d-4806-84c8-17c5433fafdf
在 nacos 中添加命名空间和配置
application.yml
spring:
  cloud:
    gateway:
      routes:
        - id: test_route
          uri: https://www.baidu.com
          predicates:
            - Query=url, baidu
        - id: qqq
          uri: https://www.qq.com
          predicates:
            - Query=url, qq
项目启动后访问 http://localhost:88/hello?url=qq 会转发到 qq 页面。
- 引入 的common 依赖中包含 Spring-web 的依赖,数据库的依赖,但是 Gateway 可能不会使用数据库,也就不会添加 数据库 URL 等配置信息,这时候项目会报错。解决的办法是排除 数据库的依赖:
<exclusion>
  <groupId>org.springframework.boot</groupId>
  <artifactId>spring-boot-starter-web</artifactId>
</exclusion>
<exclusion>
  <groupId>com.baomidou</groupId>
  <artifactId>mybatis-plus-boot-starter</artifactId>
</exclusion>- 还有一种解决方式是在
@SpringBootApplication中使用exclude属性排除掉
@EnableDiscoveryClient
@SpringBootApplication(exclude = {DataSourceAutoConfiguration.class, DruidDataSourceAutoConfigure.class})
public class GulimallGatewayApplication {

	public static void main(String[] args) {
		SpringApplication.run(GulimallGatewayApplication.class, args);
	}
}
关于 Spring Boot 自动配置的原理,可以参考:https://www.cnblogs.com/niechen/p/9027804.html
我在这里遇到一个问题就是,排除 DataSourceAutoConfiguration后,项目依然报错,查看报错信息, 看到还是加载了数据源。明明已经排除了。。。后面仔细看项目启动的初始化信息,注意到:
2020-07-26 12:30:42.125 INFO 9857 --- [ main] c.a.d.s.b.a.DruidDataSourceAutoConfigure : Init DruidDataSource
我猜测这里是数据库连接池 DruidDataSource 问题,尝试将这个也排除
@EnableDiscoveryClient
@SpringBootApplication(exclude = {DataSourceAutoConfiguration.class, DruidDataSourceAutoConfigure.class})
public class GulimallGatewayApplication {

	public static void main(String[] args) {
		SpringApplication.run(GulimallGatewayApplication.class, args);
	}
}
输入 Druid 后面就有自动提示。排除之后成功启动。
-
我开始以为是
exclude = {DataSourceAutoConfiguration.class这个没有生效,开源码确定生效了。- 点进
@SpringBootApplication的源码,该注解由三个注解组合而成
@SpringBootConfiguration
@EnableAutoConfiguration
@ComponentScan
- 查看
@EnableAutoConfiguration
@AutoConfigurationPackage
@Import({AutoConfigurationImportSelector.class})
public @interface EnableAutoConfiguration {
    String ENABLED_OVERRIDE_PROPERTY = "spring.boot.enableautoconfiguration";

    Class<?>[] exclude() default {};

    String[] excludeName() default {};
}
- 这个注解
AutoConfigurationImportSelector是重点,其中有个方法exclusions是排除自动配置的:
protected AutoConfigurationImportSelector.AutoConfigurationEntry getAutoConfigurationEntry(AutoConfigurationMetadata autoConfigurationMetadata, AnnotationMetadata annotationMetadata) {
  if (!this.isEnabled(annotationMetadata)) {
    return EMPTY_ENTRY;
  } else {
    AnnotationAttributes attributes = this.getAttributes(annotationMetadata);
    List<String> configurations = this.getCandidateConfigurations(annotationMetadata, attributes);
    configurations = this.removeDuplicates(configurations);
    Set<String> exclusions = this.getExclusions(annotationMetadata, attributes);
    this.checkExcludedClasses(configurations, exclusions);
    configurations.removeAll(exclusions);
    configurations = this.filter(configurations, autoConfigurationMetadata);
    this.fireAutoConfigurationImportEvents(configurations, exclusions);
    return new AutoConfigurationImportSelector.AutoConfigurationEntry(configurations, exclusions);
  }
}
在这个地方断点,就能确定某个自动配置是否被排除。
- 点进
参考:https://www.cnblogs.com/itzhouq/p/12345150.html
- M:即 Model ,模型,包括数据和一些基本操作
- V:即 View ,视图,页面渲染结果
- VM:即 View-Model ,模型和视图间的双向操作,无需开发人员干涉
在 MVVM 之前,开发人员从后端获取需要的数据模型,然后要通过 DOM 操作 Model 渲染到 View 中,而后当用户操作视图,我们还需要通过 DOM获取 View 中的数据,然后同步到 Model中。
而 MVVM 中的 VM 要做的事情就是把 DOM操作完全封装起来,开发人员不用关心 Model 和 View 之前要如何互相影响。
Vue (读音 /vjuː/,类似于 view) 是一套用于构建用户界面的渐进式框架。与其它大型框架不同的是,Vue 被设计为可以自底向上逐层应用。Vue 的核心库只关注视图层,不仅易于上手,还便于与第三方库或既有项目整合。另一方面,当与现代化的工具链以及各种支持类库结合使用时,Vue 也完全能够为复杂的单页应用提供驱动。
官网教程:https://cn.vuejs.org/v2/guide/
- 安装
在用 Vue 构建大型应用时推荐使用 NPM 安装[1]。NPM 能很好地和诸如 webpack 或 Browserify 模块打包器配合使用。同时 Vue 也提供配套工具来开发单文件组件。
新建项目文件夹
$ npm init -y  # 初始化
$ npm install vue   # 最新稳定版
在代码中引入,编写 HelloWorld 程序。
<!DOCTYPE html>
<html lang="en">
<head>
    <meta charset="UTF-8">
    <meta name="viewport" content="width=device-width, initial-scale=1.0">
    <title>Document</title>
</head>
<body>
    <div id="app">
        <h1>{{name}}, 非常帅</h1>
    </div>

    <script src="./node_modules/vue/dist/vue.js"></script>

    <script>
        let vm = new Vue({
            el: '#app',
            data: {
                name: "张三"
            }
        })
    </script>
</body>
</html>Vue 开发中浏览器插件 vue-devtools,可以方便的调试。
官方地址:https://github.com/vuejs/vue-devtools
文档:https://cn.vuejs.org/v2/guide/syntax.html#Attribute
- 插值表达式
作用:给标签体绑定值
格式:{{xxx}}
说明:
- 该表达式支持 JS 语法,可以调用 JS 内置函数,但是必须有返回值,没有结果的表达式不允许使用,如:
let a = 1 + 1
- 可以直接获取 Vue 实例中定义的数据或函数
- 插值闪烁
使用插值表达式在网速较慢的情况下会显示原始的 {{}},加载完毕后才显示正常的数据,该现象称为插值闪烁。
- v-text 和 v-html
给属性绑定值,v-html 会渲染标签,v-text 会原样显示
<!DOCTYPE html>
<html lang="en">
<head>
    <meta charset="UTF-8">
    <meta name="viewport" content="width=device-width, initial-scale=1.0">
    <title>Document</title>
</head>
<body>
    <div id="app">
        <span v-text="msg"></span> <br>
        <span v-html="msg"></span>

        {{msg}} --- {{1 + 1}} --- {{hello()}}
    </div>

    <script src="./node_modules/vue/dist/vue.js"></script>

    <script>
        new Vue({
            el: "#app",
            data: {
                msg: "<h1>Hello</h1>"
            },
            methods: {
                hello() {
                    return "World"
                }
            }
        })
    </script>
</body>
</html>
访问改页面会显示:

- v-bind
作用:给属性绑定值
用法:
<!DOCTYPE html>
<html lang="en">
<head>
    <meta charset="UTF-8">
    <meta name="viewport" content="width=device-width, initial-scale=1.0">
    <title>Document</title>
</head>
<body>

    <div id="app">
        <a v-bind:href="link">gogogo</a>

        <!-- class, style -->
        <span v-bind:class="{active: isActive, 'text-danger': hasError}">你好</span>
    </div>

    <script src="./node_modules/vue/dist/vue.js"></script>

    <script>
        let vm = new Vue({
            el: "#app",
            data: {
                link: "http://baidu.com",
                isActive: true,
                hasError: true
            }
        })
    </script>
</body>
</html>
常用在 class、style 等属性的绑定上。效果如下:

缩写:
<!-- 完整语法 -->
<a v-bind:href="url">...</a>

<!-- 缩写 -->
<a :href="url">...</a>

<!-- 动态参数的缩写 (2.6.0+) -->
<a :[key]="url"> ... </a>上面几个指令都是单向绑定,页面元素改变,对应数据不一定会改变。如果需要页面元素和数据的双向绑定,需要使用 v-model 指令。
- v-model
<!DOCTYPE html>
<html lang="en">
<head>
    <meta charset="UTF-8">
    <meta name="viewport" content="width=device-width, initial-scale=1.0">
    <title>Document</title>
</head>
<body>
    <div id="app">
        精通的语言:<br>
        <input type="checkbox" v-model='language' value="Java">Java <br>
        <input type="checkbox" v-model='language' value="PHP">PHP <br>
        <input type="checkbox" v-model='language' value="Python">Python <br>
        选中了 {{language.join(',')}}
    </div>
    <script src="./node_modules/vue/dist/vue.js"></script>
    <script>
        let vm = new Vue({
            el: "#app",
            data: {
                language: []
            }
        })
    </script>
</body>
</html>
页面数据:

- v-on 用于绑定事件,如 click 等
缩写:
<!-- 完整语法 -->
<a v-on:click="doSomething">...</a>

<!-- 缩写 -->
<a @click="doSomething">...</a>

<!-- 动态参数的缩写 (2.6.0+) -->
<a @[event]="doSomething"> ... </a>- v-for 用于遍历
- v-if 用于判断
文档:https://cn.vuejs.org/v2/guide/computed.html
文档:https://cn.vuejs.org/v2/guide/components.html
文档:https://cn.vuejs.org/v2/guide/instance.html
文档:https://cn.vuejs.org/v2/guide/routing.html
- 全局安装 webpack
npm install webpack -g- 全局安装 Vue 脚手架
npm install -g @vue/cli-init安装提示 zsh: command not found: vue ,使用下面命令安装成功:
npm install @vue/cli -g- 初始化项目
vue init webpack appname初始化过程:
➜  Desktop vue init webpack vue-demo

? Project name vue-demo
? Project description A Vue.js project
? Author itzhouq <itzhouq@163.com>
? Vue build standalone
? Install vue-router? Yes
? Use ESLint to lint your code? No
? Set up unit tests No
? Setup e2e tests with Nightwatch? No
? Should we run `npm install` for you after the project has been created? (recommended) npm

   vue-cli · Generated "vue-demo".


# Installing project dependencies ...- 启动 Vue 项目
npm run dev项目启动后自动打开首页。
官网:https://element.eleme.cn/#/zh-CN
文档:https://element.eleme.cn/#/zh-CN/component/installation
在 vscode 中首选项 --> 用户片段 --> 输入 vue 新建全局代码,输入以下模板:
{
	"生成vue模板": {
		"prefix": "vue",
		"body": [
			"<!-- $1 -->",
			"<template>",
			"<div class='$2'>$5</div>",
			"</template>",
			"",
			"<script>",
			"//这里可以导入其他文件(比如:组件,工具js,第三方插件js,json文件,图片文件等等)",
			"//例如:import 《组件名称》 from '《组件路径》';",
			"",
			"export default {",
			"//import引入的组件需要注入到对象中才能使用",
			"components: {},",
			"data() {",
			"//这里存放数据",
			"return {",
			"",
			"};",
			"},",
			"//监听属性 类似于data概念",
			"computed: {},",
			"//监控data中的数据变化",
			"watch: {},",
			"//方法集合",
			"methods: {",
			"",
			"},",
			"//生命周期 - 创建完成(可以访问当前this实例)",
			"created() {",
			"",
			"},",
			"//生命周期 - 挂载完成(可以访问DOM元素)",
			"mounted() {",
			"",
			"},",
			"beforeCreate() {}, //生命周期 - 创建之前",
			"beforeMount() {}, //生命周期 - 挂载之前",
			"beforeUpdate() {}, //生命周期 - 更新之前",
			"updated() {}, //生命周期 - 更新之后",
			"beforeDestroy() {}, //生命周期 - 销毁之前",
			"destroyed() {}, //生命周期 - 销毁完成",
			"activated() {}, //如果页面有keep-alive缓存功能,这个函数会触发",
			"}",
			"</script>",
			"<style scoped>",
			"$4",
			"</style>"
		],
		"description": "生成vue模板"
	}
}
使用时直接输入 vue 即可。
类似 coupon 模块,在 nacos 中做配置文件,保证 product 模块能正常启动。
- 导入 SQL
将资料中的数据 /guli/docs/分布式基础篇/sql/pms_catelog.sql导入到对应数据库中执行。
- 查询商品的所有分类和子分类信息,以树形结构组装起来
在 product模块的 CategoryController 中编写代码。
查出所有分类以及子分类,以树形结构组装起来
- CategoryController
/**
 * 查出所有分类以及子分类,以树形结构组装起来
 */
@RequestMapping("/list/tree")
public R list() {
  List<CategoryEntity> entities = categoryService.listWithTree();
  return R.ok().put("data", entities);
}- CategoryServiceImpl
@Override
public List<CategoryEntity> listWithTree() {
  // 1. 查出所有分类
  List<CategoryEntity> entities = baseMapper.selectList(null);

  // 2. 组装成父子的树形结构
  // 2.1 找到所有的一级分类
  List<CategoryEntity> level1Menus = entities.stream()
    .filter(categoryEntity ->categoryEntity.getParentCid() == 0)
    .map(menu -> {
    // 2.2 设置子菜单
    menu.setChildren(getChildren(menu, entities));
    return menu;
    // 2.3 排序
  }).sorted(Comparator.comparingInt(menu -> (menu.getSort() == null ? 0 : menu.getSort())))
    .collect(Collectors.toList());
  return level1Menus;
}

/**
 * 递归查找所有菜单的子菜单
 */
private List<CategoryEntity> getChildren(CategoryEntity root, List<CategoryEntity> all) {
  List<CategoryEntity> children = all.stream().filter(categoryEntity ->
    categoryEntity.getParentCid() == root.getCatId()
  ).map(categoryEntity -> {
    // 1. 找到子菜单
    categoryEntity.setChildren(getChildren(categoryEntity, all));
    return categoryEntity;
  }).sorted(Comparator.comparingInt(menu -> (menu.getSort() == null ? 0 : menu.getSort()))).collect(Collectors.toList());
  return children;
}- 对于 CategoryEntity 实体,添加了一个表示自菜单的属性,但是这个属性不属于数据库字段,因此需要添加注解
@TableField(exist = false)
private List<CategoryEntity> children;菜单是有层级结构的。

开始编写后端管理系统的前端项目,维护三级分类的增删改查。
使用 vscode 打开 renren-fast-vue,启动后台服务 renren-fast。
前端使用 npm run dev启动。访问系统后,在菜单管理中手动添加“商品系统”的一级菜单。

添加“分类”子菜单:

现在需要在分类维护标签中显示三级分类信息。观察页面路由规则,路由 sys/role会被解析成 sys-role存在数据库中。页面的请求路径是 http://localhost:8001/#/sys-role。前端对应的机制是在对应目录src/views/modules/sys下的一个组件role.vue。

我们安装该机制编写,在modules 下新建文件夹product,新建组件category.vue。
根据 ElementUI 的树形组件编写树形菜单:https://element.eleme.cn/#/zh-CN/component/tree
<template>
  <el-tree :data="data" :props="defaultProps" @node-click="handleNodeClick"></el-tree>
</template>

<script>
//这里可以导入其他文件(比如:组件,工具js,第三方插件js,json文件,图片文件等等)
//例如:import 《组件名称》 from '《组件路径》';

export default {
  //import引入的组件需要注入到对象中才能使用
  components: {},
  data() {
    return {
      data: [],
      defaultProps: {
        children: "children",
        label: "label",
      },
    };
  },
  methods: {
    handleNodeClick(data) {
      console.log(data);
    },
    getMenus() {
        this.$http({
          url: this.$http.adornUrl('/product/category/list/tree'),
          method: 'get'
        }).then(data => {
          console.log('成功获取到数据', data)
        })
    }
  },
  //监听属性 类似于data概念
  computed: {},
  //监控data中的数据变化
  watch: {},
  //生命周期 - 创建完成(可以访问当前this实例)
  created() {
      this.getMenus();
  },
  //生命周期 - 挂载完成(可以访问DOM元素)
  mounted() {},
  beforeCreate() {}, //生命周期 - 创建之前
  beforeMount() {}, //生命周期 - 挂载之前
  beforeUpdate() {}, //生命周期 - 更新之前
  updated() {}, //生命周期 - 更新之后
  beforeDestroy() {}, //生命周期 - 销毁之前
  destroyed() {}, //生命周期 - 销毁完成
  activated() {}, //如果页面有keep-alive缓存功能,这个函数会触发
};
</script>
<style scoped>
</style>
保存访问,出现路径不一致问题,我们需要修改前面的基本路径。

在前端项目中搜索基本路径可以定位到 static/config/index.js文件。
将该路径修改为网关地址:
// api接口请求地址
window.SITE_CONFIG['baseUrl'] = 'http://localhost:8080/renren-fast';
// api接口请求地址
window.SITE_CONFIG['baseUrl'] = 'http://localhost:88';刷新页面需要重新登录,但是验证码的请求失败,原来是请求的路径不对,请求应该是到达后台系统renren-fast而不是网关。
Request URL: http://localhost:88/captcha.jpg?uuid=05ffa49a-adbe-4c3f-8e81-3a2bfd816701
现在需要网关将这个请求发送到 renren-fast 服务,所以需要将 renren-fast 服务注册到注册中心 nacos 中。
引入 common、配置应用名、配置注册中心地址、开启服务注册发现功能。
- 网关配置处理请求
使用 断言Predicate处理请求路径。根据 Spring Cloud Gateway 的 文档配置:The Path Route Predicate Factory
定义一个规则,只要前端请求,都带上/api的前缀,同时修改static/config/index.js文件:
  // api接口请求地址
  window.SITE_CONFIG['baseUrl'] = 'http://localhost:88/api';
修改网关的配置文件:
- id: admin_route
uri: lb://renren-fast     ## load-balance 负载均衡
predicates:
- Path=/api/**
重启网关和后台系统,验证码依然不可用,查看路径是:
http://localhost:88/captcha.jpg?uuid=cc53c398-ddb0-41fa-8c38-58c0bf94ed41
丢失了应用名:
http://localhost:88/renren-fast/captcha.jpg?uuid=cc53c398-ddb0-41fa-8c38-58c0bf94ed41
这个时候需要使用 Gateway 的 Filter 路径重写功能。
过滤器GatewayFilter: The RewritePath GatewayFilter Factory
        - id: admin_route
          uri: lb://renren-fast     ## load-balance 负载均衡
          predicates:
            - Path=/api/**
          filters:
            - RewritePath=/api/(?<segment>/?.*), /renren-fast/$\{segment}

## 前端项目, /api
## http://localhost:88/api/captcha.jpg http://localhost:8080/captcha.jpg注意:如果出现 503 报错,很有可能是 Gateway 中没有被引入 nacos 依赖,没有注入到注册中心。
重启项目之后可以加载验证码了,但是登录报错。

跨域问题。
关于跨域:https://developer.mozilla.org/zh-CN/docs/Web/HTTP/Access_control_CORS
跨域解决:
-
方式一:使用 nginx 部署为统一域
-
配置当次请求允许跨域,添加响应头
Access-Controller-Allow-Origin:支持哪些来源的请求跨域Access-Control-Allow-Methods:支持哪些方法跨域Access-Control-Allow-Credentials:跨域请求默认不包含 cookie,设置为 true 可以包含Access-Control-Expose-Header:跨域请求暴露的字段
CORS 请求时,XMLHttpRequest 对象的 getResponseHeader() 方法只能拿到 6 个基本字段:Cache-Control、Control-Language、Content-Type、Expires、Last-Modified、Paragma。如果想要拿到其他字段,就必须在 Access-Control-Expose-Headers 里面指定。
Access-Control-Max-Age:表明该响应的有效时间为多少秒,在有效时间内,浏览器无需为同一请求再次发送预检请求。
在 Gateway 中编写过滤器统一处理跨域问题。
package com.atguigu.gulimall.gateway.config;

import org.springframework.context.annotation.Configuration;
import org.springframework.web.cors.CorsConfiguration;
import org.springframework.web.cors.reactive.CorsWebFilter;
import org.springframework.web.cors.reactive.UrlBasedCorsConfigurationSource;

/**
 * 跨域处理过滤器
 */
@Configuration
public class GulimallCorsConfiguration {

    @Bean
    public CorsWebFilter corsWebFilter() {
        UrlBasedCorsConfigurationSource source = new UrlBasedCorsConfigurationSource();
        CorsConfiguration corsConfiguration = new CorsConfiguration();

        // 配置跨域
        corsConfiguration.addAllowedHeader("*");
        corsConfiguration.addAllowedMethod("*");
        corsConfiguration.addAllowedOrigin("*");
        corsConfiguration.setAllowCredentials(true);

        source.registerCorsConfiguration("/**", corsConfiguration);
        return new CorsWebFilter(source);
    }
}
重启项目 Gateway 和 renren-fast,出现报错信息:

意思是 Access-Control-Allow-Origin 有多个值。再看响应头信息:

也是有多个。猜测可能是项目中配置了两次跨域,但是整个项目只有renren-fast 不是自己编写的,里面可能已经存在跨域配置,注释掉重启项目即可解决该问题。
- 后台服务路由
跨域问题虽然解决了,但是三级分类的请求还是 404 。

这个时候请求 http://localhost:88/api/product/category/list/tree会被转发到 renren-fast,而不是我们想要的 product。所以需要修改 Gateway 路由设置。
在 gateway 的配置文件 application.yml 中添加配置:
- id: product_route
uri: lb://gulimall-product     ## load-balance 负载均衡
predicates:
- Path=/api/product/**
filters:
- RewritePath=/api/(?<segment>/?.*), /$\{segment}

- id: admin_route
uri: lb://renren-fast     ## load-balance 负载均衡
predicates:
- Path=/api/**
filters:
- RewritePath=/api/(?<segment>/?.*), /renren-fast/$\{segment}
注意将精细的路由写在上面优先匹配。
配置好 product 服务。重启 Gateway、renren-fast、product 服务,尝试请求:
http://localhost:10000/product/category/list/tree能拿到数据说明后台服务之间通信是流畅的。

- 前端数据获取展示
前端获取的数据在 data.data 中,使用解构表达式解构到 data 中:
getMenus() {
  this.$http({
    url: this.$http.adornUrl("/product/category/list/tree"),
    method: "get"
  }).then(({data}) => {
    console.log("成功获取到菜单数据", data.data);
    this.menus = data.data;
  });
}
菜单中要展示的菜单名称和子菜单属性名可以看参考文档https://element.eleme.cn/#/zh-CN/component/tree,这里的菜单名和子菜单属性名分别为 name 和 children。

vue 代码:category.vue 文件
<template>
  <el-tree :data="menus" :props="defaultProps" @node-click="handleNodeClick"></el-tree>
</template>

<script>
export default {
  components: {},
  data() {
    return {
      menus: [],
      defaultProps: {
        children: "children",
        label: "name",
      },
    };
  },
  computed: {},
  watch: {},
  methods: {
    getMenus() {
      this.$http({
        url: this.$http.adornUrl("/product/category/list/tree"),
        method: "get"
      }).then(({data}) => {
          console.log("成功获取到菜单数据", data.data);
          this.menus = data.data;
      });
    }
  },
  created() {
      this.getMenus();
  },
  mounted() {},
  beforeCreate() {},
  beforeMount() {},
  beforeUpdate() {},
  updated() {},
  beforeDestroy() {},
  destroyed() {},
  activated() {},
};
</script>
<style scoped>
</style>
页面效果:

可以删除的菜单:没有子菜单并且没有被别的菜单引用。
根据 elementUI 的Tree 组件文档编写:https://element.eleme.cn/#/zh-CN/component/tree

复制示例代码到 tree 标签中:
<el-tree :data="menus" :props="defaultProps" @node-click="handleNodeClick">
  <span class="custom-tree-node" slot-scope="{ node, data }">
    <span>{{ node.label }}</span>
<span>
      <el-button type="text" size="mini" @click="() => append(node, data)">Append</el-button>
<el-button type="text" size="mini" @click="() => remove(node, data)">Delete</el-button>
</span>
</span>
</el-tree>
node 指的是当前节点,data 存的是数据。
编写点击事件的方法:
append(data) {
  console.log("append", node, data)
},
remove(node, data) {
  console.log("remove", node, data)
},
- expand-on-click-node:是否在点击节点的时候展开或者收缩节点, 默认值为 true,如果为 false,则只有点箭头图标的时候才会展开或者收缩节点。
- 一级和二级菜单才显示Append,没有子菜单才显示 Delete:添加判断
- show-checkbox:节点是否可被选择
- node-key:每个树节点用来作为唯一标识的属性,整棵树应该是唯一的
添加以上属性
<el-tree
    :data="menus"
    :props="defaultProps"
    :expand-on-click-node="false"
    show-checkbox
    node-key="catId"
  >
    <span class="custom-tree-node" slot-scope="{ node, data }">
      <span>{{ node.label }}</span>
      <span>
        <el-button
          v-if="node.level <= 2"
          type="text"
          size="mini"
          @click="() => append(node, data)"
        >Append</el-button>
        <el-button
          v-if="node.childNodes.length == 0"
          type="text"
          size="mini"
          @click="() => remove(node, data)"
        >Delete</el-button>
      </span>
    </span>
</el-tree>- 测试 product 中 category 的删除功能。
mybatis-plus 自动生成的delete方法可以根据传入的菜单Id的数组,批量删除菜单。
/**
* 删除
* @RequestBody :获取请求体,必须发送Post请求
* SpringMVC自动将请求体的数据json转为对应的对象
*/
@RequestMapping("/delete")
public R delete(@RequestBody Long[] catIds){
  categoryService.removeByIds(Arrays.asList(catIds));
  return R.ok();
}
但是这里有两个问题:一是这样删除的方式是物理删除,删除之后不能找回;二是在删除之前需要检查被删除菜单是否被其他菜单引用,没有引用的菜单才能被删除。
一般系统中的删除都采用逻辑删除。意思是通过一个字段来标识删除的状态,不是真的删除一条记录。mybatis也提供了逻辑删除的功能,我们通过官方文档编写实现。
文档:https://mp.baomidou.com/guide/logic-delete.html
- 配置 application.yml
mybatis-plus:
  global-config:
    db-config:
      logic-delete-field: flag  # 全局逻辑删除的实体字段名(since 3.3.0,配置后可以忽略不配置步骤2)
      logic-delete-value: 1 # 逻辑已删除值(默认为 1)
logic-not-delete-value: 0 # 逻辑未删除值(默认为 0)- 实体类字段上加上
@TableLogic注解
@TableLogic
private Integer deleted;
我们选择category 表的show_status字段作为标识字段,所以在改字段添加这个注解。
@TableLogic(value = "1", delval = "0")
private Integer showStatus;
因为删除的标识和全局刚好是反的,所以这里通过value和delval属性自定义删除标识,只在改表有效。
配置文件中添加配置显示 SQL 语句:
logging:
  level:
    com.atguigu.gulimall: debug
重启项目。
再次发送删除的请求,相关记录还在,只是吸怪了show_status 的值为 0,说明逻辑删除生效。
localhost:88/api/product/category/delete
发送的 SQL:
Preparing: UPDATE pms_category SET show_status=0 WHERE cat_id IN ( ? ) AND show_status=1在 category.vue 组件中发送请求删除菜单。
发送请求的方式参考 role.vue ,发送 get 和 post 请求的代码都是模板代码,添加到代码片段中。
"http-get请求": {
  "prefix": "httpget",
    "body": [
      "this.\\$http({",
      "url: this.\\$http.adornUrl(''),",
      "method: 'get',",
      "params: this.\\$http.adornParams({})",
      "}).then(({ data }) = {",
      "})"
    ],
      "description": "httpGET请求"
},
  "http-post请求": {
    "prefix": "httppost",
      "body": [
        "this.\\$http({",
        "url: this.\\$http.adornUrl(''),",
        "method: 'post',",
        "data: this.\\$http.adornData(data, false)",
        "}).then(({ data }) => { }); "
      ],
        "description": "httpPOST请求"
  }
在 remove 方法中编写发送请求的逻辑和请求成功后的效果:
<template>
  <el-tree
    :data="menus"
    :props="defaultProps"
    :expand-on-click-node="false"
    show-checkbox
    node-key="catId"
    :default-expanded-keys="expandedKey"
  >
    <span class="custom-tree-node" slot-scope="{ node, data }">
      <span>{{ node.label }}</span>
      <span>
        <el-button
          v-if="node.level <= 2"
          type="text"
          size="mini"
          @click="() => append(node, data)"
        >Append</el-button>
        <el-button
          v-if="node.childNodes.length == 0"
          type="text"
          size="mini"
          @click="() => remove(node, data)"
        >Delete</el-button>
      </span>
    </span>
  </el-tree>
</template>

<script>
export default {
  components: {},
  data() {
    return {
      menus: [],
      expandedKey: [],
      defaultProps: {
        children: "children",
        label: "name",
      },
    };
  },
  computed: {},
  watch: {},
  methods: {
    getMenus() {
      this.$http({
        url: this.$http.adornUrl("/product/category/list/tree"),
        method: "get",
      }).then(({ data }) => {
        console.log("成功获取到菜单数据", data.data);
        this.menus = data.data;
      });
    },
    append(node, data) {
      console.log("append", node, data);
    },
    remove(node, data) {
      var ids = [data.catId];
      this.$confirm(`是否删除【${data.name}】菜单?`, "提示", {
        confirmButtonText: "确定",
        cancelButtonText: "取消",
        type: "warning",
      })
        .then(() => {
          this.$http({
            url: this.$http.adornUrl("/product/category/delete"),
            method: "post",
            data: this.$http.adornData(ids, false),
          }).then(({ data }) => {
            this.$message({
              message: "菜单删除成功",
              type: "success",
            });
            // 刷新出新的菜单
            this.getMenus();
            // 设置需要默认展开的菜单
            this.expandedKey = [node.parent.data.catId]
          });
        })
        .catch(() => {});
      console.log("remove", node, data);
    },
  },
  created() {
    this.getMenus();
  },
  mounted() {},
  beforeCreate() {},
  beforeMount() {},
  beforeUpdate() {},
  updated() {},
  beforeDestroy() {},
  destroyed() {},
  activated() {},
};
</script>
<style scoped>
</style>- 请求成功后需要刷新菜单:再次调用
this.menus()方法。 - 删除成功后需要展开被删除菜单的父菜单:参考官网绑定
default-expanded-keys属性。 - 确认删除和删除后的提示弹窗也是参考官网文档。

点击 Append 添加菜单需要Dialog 对话框组件,参考官方文档。
<el-dialog title="提示" :visible.sync="dialogVisible" width="30%">
  <el-form :model="category">
    <el-form-item label="分类名称">
      <el-input v-model="category.name" autocomplete="off"></el-input>
    </el-form-item>
  </el-form>

  <span slot="footer" class="dialog-footer">
    <el-button @click="dialogVisible = false">取 消</el-button>
    <el-button type="primary" @click="addCategory">确 定</el-button>
  </span>
</el-dialog>
添加菜单的方法:
// 添加的三级分类
addCategory() {
  console.log("添加的三级分类数据", this.category);
  this.$http({
    url: this.$http.adornUrl("/product/category/save"),
    method: "post",
    data: this.$http.adornData(this.category, false),
  }).then(({ data }) => {
    this.$message({
      message: "菜单保存成功",
      type: "success",
    });
    // 关闭对话框
    this.dialogVisible = false;
    // 刷新出新的菜单
    this.getMenus();
    // 设置需要默认展开的菜单
    this.expandedKey = [this.category.parentCid];
  });
}
- Append 按钮后添加 Edit 按钮
- 数据修改之前发送请求得到节点最新数据
- 添加图标和计量单位两个文本框
- 发送修改请求,请求结束后清除 dialog 中的值,关闭对话框,刷新菜单。
关键代码:
<template>
  <div>
    <el-tree
      :data="menus"
      :props="defaultProps"
      :expand-on-click-node="false"
      show-checkbox
      node-key="catId"
      :default-expanded-keys="expandedKey"
    >
      <span class="custom-tree-node" slot-scope="{ node, data }">
        <span>{{ node.label }}</span>
        <span>
          <el-button
            v-if="node.level <= 2"
            type="text"
            size="mini"
            @click="() => append(node, data)"
          >Append</el-button>
          <el-button type="text" size="mini" @click="edit(data)">Edit</el-button>
          <el-button
            v-if="node.childNodes.length == 0"
            type="text"
            size="mini"
            @click="() => remove(node, data)"
          >Delete</el-button>
        </span>
      </span>
    </el-tree>

    <el-dialog :title="title" :visible.sync="dialogVisible" width="30%" :close-on-click-modal="false">
      <el-form :model="category">
        <el-form-item label="分类名称">
          <el-input v-model="category.name" autocomplete="off"></el-input>
        </el-form-item>
        <el-form-item label="图标">
          <el-input v-model="category.icon" autocomplete="off"></el-input>
        </el-form-item>
        <el-form-item label="计量单位">
          <el-input v-model="category.productUnit" autocomplete="off"></el-input>
        </el-form-item>
      </el-form>

      <span slot="footer" class="dialog-footer">
        <el-button @click="dialogVisible = false">取 消</el-button>
        <el-button type="primary" @click="submitData()">确 定</el-button>
      </span>
    </el-dialog>
  </div>
</template>

<script>
export default {
  components: {},
  data() {
    return {
      menus: [],
      title: "",
      dialogType: "", // add edit
      category: {
        name: "",
        parentCid: 0,
        catLevel: 0,
        showStatus: 1,
        sort: 1,
        productUnit: "",
        icon: "",
        catId: null,
      },
      dialogVisible: false,
      expandedKey: [],
      defaultProps: {
        children: "children",
        label: "name",
      },
    };
  },
  methods:
    submitData() {
      if (this.dialogType == "add") {
        this.addCategory();
      }
      if (this.dialogType == "edit") {
        this.editCategory();
      }
    },
    // 修改三级分类数据
    editCategory() {
      var {catId, name, icon, productUnit} = this.category;
      this.$http({
        url: this.$http.adornUrl("/product/category/update"),
        method: "post",
        data: this.$http.adornData({catId, name, icon, productUnit}, false),
      }).then(({ data }) => {
        this.$message({
          message: "菜单修改成功",
          type: "success",
        });
        // 关闭对话框
        this.dialogVisible = false;
        // 刷新出新的菜单
        this.getMenus();
        // 设置需要默认展开的菜单
        this.expandedKey = [this.category.parentCid];
      });
    },
    edit(data) {
      console.log("要修改的数据: ", data);
      this.dialogVisible = true;
      this.dialogType = "edit";
      this.title = "修改分类";
      // 发送请求获取当前节点最新的数据
      this.$http({
        url: this.$http.adornUrl(`/product/category/info/${data.catId}`),
        method: "get",
      }).then(({ data }) => {
        // 请求成功
        console.log("要回显的数据", data);
        this.category.name = data.category.name;
        this.category.catId = data.category.catId;
        this.category.icon = data.category.icon;
        this.category.productUnit = data.category.productUnit;
        this.category.parentCid = data.category.parentCid;
      });
    },
    // 添加的三级分类
    addCategory() {
      console.log("添加的三级分类数据", this.category);
      this.$http({
        url: this.$http.adornUrl("/product/category/save"),
        method: "post",
        data: this.$http.adornData(this.category, false),
      }).then(({ data }) => {
        this.$message({
          message: "菜单保存成功",
          type: "success",
        });
        // 关闭对话框
        this.dialogVisible = false;
        // 刷新出新的菜单
        this.getMenus();
        // 设置需要默认展开的菜单
        this.expandedKey = [this.category.parentCid];
      });
    },
    append(node, data) {
      console.log("append", node, data);
      this.dialogType = "add";
      this.title = "添加分类";
      this.dialogVisible = true;
      this.category.parentCid = data.catId;
      this.category.catLevel = data.catLevel * 1 + 1;
        this.category.name = "";
        this.category.catId = null;
        this.category.icon = "";
        this.category.productUnit = "";
        this.category.sort = 0;
        this.category.showStatus = 1;
    }
  }
};参考 Tree 树形控件可拖拽节点的文档。
添加属性:
- draggable:是否开启拖拽节点功能
- allow-drop:拖拽时判定目标节点能否被放置。
type参数有三种情况:'prev'、'inner' 和 'next',分别表示放置在目标节点前、插入至目标节点和放置在目标节点后。
Function(draggingNode, dropNode, type)。
- 拖拽判断
- 被拖动的当前节点以及所在父节点总层数不能大于3
- 编写一个计算被拖拽的当前节点的总层数的函数
关键代码:
allowDrop(draggingNode, dropNode, type) {
  // 1. 被拖动的当前节点以及所在父节点总层数不能大于3
  // 1)被拖动的当前节点的总层数
  console.log("allowDrop: ", draggingNode, dropNode, type);
  this.countNodeLevel(draggingNode.data);
  // 当前正在拖动的节点 + 父节点所在的深度不大于3即可
  let deep = (this.maxLevel - draggingNode.data.catLevel) + 1;
  console.log("深度:", deep);

  if(type == "inner") {
    return (deep + dropNode.level) <= 3;
  } else {
    return (deep + dropNode.parent.level) <= 3;
  }
},
  countNodeLevel(node) {
    // 找到所有子节点,求出最大深度
    if (node.children != null && node.children.length > 0) {
      for (let i = 0; i < node.children.length; i++) {
        if (node.children[i].catLevel > this.maxLevel) {
          this.maxLevel = node.children[i].catLevel;
        }
        this.countNodeLevel(node.children[i]);
      }
    }
},菜单拖拽会影响父Id,层级,和排序。为了拿到这些数据,我们需要监听菜单拖拽成功事件。
参考文档得到需要监听的事件:
- node-drop:拖拽成功完成时触发的事件。共四个参数,依次为:被拖拽节点对应的 Node、结束拖拽时最后进入的节点、被拖拽节点的放置位置(before、after、inner)、event。
- 需要收集的数据主要有:
- 获取节点最新的父节点Id
- 当前拖拽节点的最新顺序
- 当前拖拽节点的最新层级
关键代码:
handleDrop(draggingNode, dropNode, dropType, ev) {
  console.log("handleDrop: ", draggingNode, dropNode, dropType);

  // 1. 获取节点最新的父节点Id
  let pCid = 0; // 父节点的catId
  let siblings = null; // 新位置的兄弟节点的集合
  if (dropType == "before" || dropType == "after") {
    pCid =
      dropNode.parent.data.catId == undefined
      ? 0
    : dropNode.parent.data.catId;
    siblings = dropNode.parent.childNodes;
  } else {
    pCid = dropNode.data.catId;
    siblings = dropNode.childNodes;
  }

  // 2. 当前拖拽节点的最新顺序
  for (let i = 0; i < siblings.length; i++) {
    if (siblings[i].data.catId == draggingNode.data.catId) {
      // 如果遍历的是当前正在拖拽的节点
      let catLevel = draggingNode.level;
      if (siblings[i].level != draggingNode.level) {
        // 当前节点的层级发生变化
        catLevel = siblings[i].level;
        // 修改子节点的层级
        this.updateChildNodeLevel(siblings[i]);
      }
      this.updateNodes.push({
        catId: siblings[i].data.catId,
        sort: i,
        parentCid: pCid,
        catLevel: catLevel,
      });
    } else {
      this.updateNodes.push({ catId: siblings[i].data.catId, sort: i });
    }
  }

  // 3. 当前拖拽节点的最新层级
  console.log("updateNodes: ", this.updateNodes);
  this.$http({
    url: this.$http.adornUrl("/product/category/update/sort"),
    method: "post",
    data: this.$http.adornData(this.updateNodes, false),
  }).then(({ data }) => {
    this.$message({
      message: "菜顺序单修改成功",
      type: "success",
    });
    // 刷新出新的菜单
    this.getMenus();
    // 设置需要默认展开的菜单
    this.expandedKey = [pCid];
    this.updateNodes = [];
    this.maxLevel = 0;
  });
},
  updateChildNodeLevel(node) {
    if (node.childNodes.length > 0) {
      for (let i = 0; node.childNodes.length; i++) {
        var cNode = node.childNodes[i].data;
        this.updateNodes.push({
          catId: cNode.catId,
          catLevel: node.childNodes[i].level,
        });
        this.updateChildNodeLevel(node.childNodes[i]);
      }
    }
  }
后台添加批量修改的接口:
/**
 * 批量修改
 */
@RequestMapping("/update/sort")
public R updatSort(@RequestBody CategoryEntity[] category){
  categoryService.updateBatchById(Arrays.asList(category));
  return R.ok();
}参考文档,添加批量删除的按钮。
<el-button type="danger">危险按钮</el-button>参考 tree 组件的文档,获取被选中的节点。
- getCheckedNodes:若节点可被选择(即
show-checkbox为true),则返回目前被选中的节点所组成的数组。(leafOnly, includeHalfChecked) 接收两个 boolean 类型的参数,1. 是否只是叶子节点,默认值为false2. 是否包含半选节点,默认值为false。
关键代码:
batchDelete() {
  let catIds = [];
  let checkNodes = this.$refs.menuTree.getCheckedNodes();
  console.log("被选中的元素", checkNodes);
  for (let i = 0; i < checkNodes.length; i++) {
    catIds.push(checkNodes[i].catId);
  }
  this.$confirm(`是否批量删除【${catIds}】菜单?`, "提示", {
    confirmButtonText: "确定",
    cancelButtonText: "取消",
    type: "warning",
  })
    .then(() => {
    this.$http({
      url: this.$http.adornUrl("/product/category/delete"),
      method: "post",
      data: this.$http.adornData(catIds, false),
    }).then(({ data }) => {
      this.$message({
        message: "批量删除成功",
        type: "success",
      });
      // 刷新出新的菜单
      this.getMenus();
    });
  })
    .catch(() => {});
}将 生成的 brand.vue 和 brand-add-or-update.vue 文件拷贝到 vue 工程的 category 文件夹中。
在菜单管理中新增品牌管理。

暂时去除 vue 项目中的权限管理,让按钮都显示出来。

- 显示状态显示开关按钮,通过按钮操作发送请求修改显示状态。
参考 Table 表格组件的自定义列:https://element.eleme.cn/#/zh-CN/component/table
<template slot-scope="scope">
  <i class="el-icon-time"></i>
<span style="margin-left: 10px">{{ scope.row.date }}</span>
</template>
将其中的内容修改为开关组件switch。
<template slot-scope="scope">
  <el-switch v-model="scope.row.date" active-color="#13ce66" inactive-color="#ff4949"></el-switch>
</template>
新增弹窗中的使用同样的方式实现。
- 监听开关switch的change 事件获取操作数据
<el-switch
v-model="scope.row.showStatus"
active-color="#13ce66"
inactive-color="#ff4949"
:active-value = 1
:inactive-value = 0
@change="updateBrandStatus(scope.row)"updateBrandStatus(data) {
console.log("最新数据:", data);
let {brandId, showStatus} = data;
// 发送修改状态的请求
this.$http({
url: this.$http.adornUrl("/product/brand/update"),
method: "post",
data: this.$http.adornData({brandId, showStatus}, false),
}).then(({ data }) => {
this.$message({
type: "success",
message: "状态更新成功"
})
});
},
开通自己的阿里云 OSS 对象存储服务。
阿里云 OSS 控制台:https://oss.console.aliyun.com/overview
API 文档:https://help.aliyun.com/document_detail/31947.html?spm=5176.8465980.0.dexternal.4e701450SZBMtw

| 中文 | 英文 | 说明 |
|---|---|---|
| 存储空间 | Bucket | 存储空间是您用于存储对象(Object)的容器,所有的对象都必须隶属于某个存储空间。 |
| 对象/文件 | Object | 对象是 OSS 存储数据的基本单元,也被称为OSS的文件。对象由元信息(Object Meta)、用户数据(Data)和文件名(Key)组成。对象由存储空间内部唯一的Key来标识。 |
| 地域 | Region | 地域表示 OSS 的数据中心所在物理位置。您可以根据费用、请求来源等综合选择数据存储的地域。详情请查看OSS已经开通的Region。 |
| 访问域名 | Endpoint | Endpoint 表示OSS对外服务的访问域名。OSS以HTTP RESTful API的形式对外提供服务,当访问不同地域的时候,需要不同的域名。通过内网和外网访问同一个地域所需要的域名也是不同的。具体的内容请参见各个Region对应的Endpoint。 |
| 访问密钥 | AccessKey | AccessKey,简称 AK,指的是访问身份验证中用到的AccessKeyId 和AccessKeySecret。OSS通过使用AccessKeyId 和AccessKeySecret对称加密的方法来验证某个请求的发送者身份。AccessKeyId用于标识用户,AccessKeySecret是用户用于加密签名字符串和OSS用来验证签名字符串的密钥,其中AccessKeySecret 必须保密。 |
文件上传的示意图:

通过配置,前端直接上传文件到 OSS ,拿到文件的 URL。
通过 Java 代码上传文件。文档:https://help.aliyun.com/document_detail/32013.html?spm=5176.8466032.0.dexternal.59f714503evR2J
- 导入依赖:
<dependency>
    <groupId>com.aliyun.oss</groupId>
    <artifactId>aliyun-sdk-oss</artifactId>
    <version>3.10.2</version>
</dependency>- 编写测试类
@Test
public void testUpload() {
  // Endpoint以杭州为例,其它Region请按实际情况填写。
  String endpoint = "http://oss-cn-hangzhou.aliyuncs.com";
  // 阿里云主账号AccessKey拥有所有API的访问权限,风险很高。强烈建议您创建并使用RAM账号进行API访问或日常运维,请登录 https://ram.console.aliyun.com 创建RAM账号。
  String accessKeyId = "<yourAccessKeyId>";
  String accessKeySecret = "<yourAccessKeySecret>";

  // 创建OSSClient实例。
  OSS ossClient = new OSSClientBuilder().build(endpoint, accessKeyId, accessKeySecret);

  // 创建PutObjectRequest对象。
  PutObjectRequest putObjectRequest = new PutObjectRequest("<yourBucketName>", "<yourObjectName>", new File("<yourLocalFile>"));

  // 如果需要上传时设置存储类型与访问权限,请参考以下示例代码。
  // ObjectMetadata metadata = new ObjectMetadata();
  // metadata.setHeader(OSSHeaders.OSS_STORAGE_CLASS, StorageClass.Standard.toString());
  // metadata.setObjectAcl(CannedAccessControlList.Private);
  // putObjectRequest.setMetadata(metadata);

  // 上传文件。
  ossClient.putObject(putObjectRequest);

  // 关闭OSSClient。
  ossClient.shutdown();
}- endpoint:概览界面中的 endpoint:

- accessKeyId 和 accessKeySecret 需要开通子账号。

开通后可以得到这两个值。
开通授权:

运行测试代码成功。
Spring-Cloud-Alibaba-OSS 对文件操作进行了封装。
- 导入依赖: 导入到 common 中
<dependency>
  <groupId>com.alibaba.cloud</groupId>
  <artifactId>spring-cloud-starter-alicloud-oss</artifactId>
</dependency>- 配置文件中添加 AccessKey、secretKey、endpoint。
我这的配置文件放在 nacos 中配置。
- 编写测试类
@Resource
OSSClient ossClient;

@Test
public void testUploadStarter() {
  // 创建PutObjectRequest对象。
  PutObjectRequest putObjectRequest = new PutObjectRequest("gulimall-itzhouq", "6qvy97.jpg", new File("/Users/itzhouq/Pictures/6qvy97.jpg"));
  // 上传文件。
  ossClient.putObject(putObjectRequest);

  // 关闭OSSClient。
  ossClient.shutdown();
  System.out.println("上传成功");
}
也可以上传成功。
为了提高文件上传的效率,一般采用客户端获取服务端签名后,直接上传 OSS 的方式上传文件。如果文件上传到服务器再上传到 OSS 的方式,不仅会使服务端请求压力太大,上传的效率也有影响。
除了现在使用的对象存储服务,还可能会使用到其他第三方的服务如短信、物流等。考虑将这些服务聚合到一个单独的微服务中。

依赖 web 和 openFeign 以及 common 服务。加入依赖管理。
同时将 common 中的 OSS 移动到该模块。
<?xml version="1.0" encoding="UTF-8"?>
<project xmlns="http://maven.apache.org/POM/4.0.0" xmlns:xsi="http://www.w3.org/2001/XMLSchema-instance"
         xsi:schemaLocation="http://maven.apache.org/POM/4.0.0 https://maven.apache.org/xsd/maven-4.0.0.xsd">
    <modelVersion>4.0.0</modelVersion>
    <parent>
        <groupId>org.springframework.boot</groupId>
        <artifactId>spring-boot-starter-parent</artifactId>
        <version>2.1.8.RELEASE</version>
        <relativePath/> <!-- lookup parent from repository -->
    </parent>
    <groupId>com.atguigu.gulimall</groupId>
    <artifactId>gulimall-third-party</artifactId>
    <version>0.0.1-SNAPSHOT</version>
    <name>gulimall-third-party</name>
    <description>第三方服务</description>

    <properties>
        <java.version>1.8</java.version>
        <spring-cloud.version>Greenwich.SR3</spring-cloud.version>
    </properties>

    <dependencies>
        <dependency>
            <groupId>com.atguigu.gulimall</groupId>
            <artifactId>gulimall-common</artifactId>
            <version>0.0.1-SNAPSHOT</version>
            <exclusions>
                  <exclusion>
                      <groupId>com.baomidou</groupId>
                      <artifactId>mybatis-plus-boot-starter</artifactId>
                  </exclusion>
              </exclusions>
        </dependency>
        <dependency>
            <groupId>com.alibaba.cloud</groupId>
            <artifactId>spring-cloud-starter-alicloud-oss</artifactId>
        </dependency>
        <dependency>
            <groupId>org.springframework.boot</groupId>
            <artifactId>spring-boot-starter-web</artifactId>
        </dependency>
        <dependency>
            <groupId>org.springframework.cloud</groupId>
            <artifactId>spring-cloud-starter-openfeign</artifactId>
        </dependency>

        <dependency>
            <groupId>org.springframework.boot</groupId>
            <artifactId>spring-boot-starter-test</artifactId>
            <scope>test</scope>
        </dependency>
    </dependencies>

    <dependencyManagement>
        <dependencies>
            <dependency>
                <groupId>org.springframework.cloud</groupId>
                <artifactId>spring-cloud-dependencies</artifactId>
                <version>${spring-cloud.version}</version>
                <type>pom</type>
                <scope>import</scope>
            </dependency>
            <dependency>
                <groupId>com.alibaba.cloud</groupId>
                <artifactId>spring-cloud-alibaba-dependencies</artifactId>
                <version>2.1.0.RELEASE</version>
                <type>pom</type>
                <scope>import</scope>
            </dependency>
        </dependencies>
    </dependencyManagement>

    <build>
        <plugins>
            <plugin>
                <groupId>org.springframework.boot</groupId>
                <artifactId>spring-boot-maven-plugin</artifactId>
            </plugin>
        </plugins>
    </build>

</project>
配置文件 bootstrap.properties
spring.cloud.nacos.config.server-addr=127.0.0.1:8848
spring.cloud.nacos.config.namespace=5b64e030-e265-448e-8ad1-0af0c27d4ab0

spring.cloud.nacos.config.ext-config[0].data-id=oss.yml
spring.cloud.nacos.config.ext-config[0].group=DEFAULT_GROUP
spring.cloud.nacos.config.ext-config[0].refresh=true
在 nacos 中新建命名空间,新建 oss.yml 配置文件。将之前的 oss 配置添加到 oss.yml 中。
application.yml
spring:
  application:
    name: gulimall-third-party
  cloud:
    nacos:
      discovery:
        server-addr: 127.0.0.1:8848

server:
  port: 30000
单元测试:
@Resource
OSSClient ossClient;

@Test
public void testUpload() {

  // 创建PutObjectRequest对象。
  PutObjectRequest putObjectRequest = new PutObjectRequest("gulimall-itzhouq", "haha.jpg", new File("/Users/itzhouq/Pictures/gj3gwd.jpg"));

  // 上传文件。
  ossClient.putObject(putObjectRequest);

  // 关闭OSSClient。
  ossClient.shutdown();
  System.out.println("上传成功");
}- 服务端签名后直传:https://help.aliyun.com/document_detail/31926.html?spm=a2c4g.11186623.6.1552.775374b8VfM3Eh
服务端签名后直传的原理如下:
- 用户发送上传Policy请求到应用服务器。
- 应用服务器返回上传Policy和签名给用户。
- 用户直接上传数据到OSS。
根据官网示例代码编写一个测试的 Controller。
package com.atguigu.gulimall.thirdparty.controller;

import com.aliyun.oss.OSS;
import com.aliyun.oss.common.utils.BinaryUtil;
import com.aliyun.oss.model.MatchMode;
import com.aliyun.oss.model.PolicyConditions;
import org.springframework.beans.factory.annotation.Value;
import org.springframework.web.bind.annotation.RequestMapping;
import org.springframework.web.bind.annotation.RestController;

import javax.annotation.Resource;
import java.text.SimpleDateFormat;
import java.util.Date;
import java.util.LinkedHashMap;
import java.util.Map;

/**
 * 对象存储
 * @author zhouquan
 * @date 2020/8/5 23:24
 */
@RestController
public class OssController {

    @Resource
    private OSS ossClient;

    @Value("${spring.cloud.alicloud.oss.endpoint}")
    private String endpoint;

    @Value("${spring.cloud.alicloud.oss.bucket}")
    private String bucket;

    @Value("${spring.cloud.alicloud.access-key}")
    private String accessId;

    @RequestMapping("/oss/policy")
    public Map<String, String> policy() {
        String host = "https://" + bucket + "." + endpoint; // host的格式为 bucketname.endpoint
        String format = new SimpleDateFormat("yyyy-MM-dd").format(new Date());
        String dir = format +"/"; // 用户上传文件时指定的前缀。

        Map<String, String> respMap = null;
        try {
            long expireTime = 30;
            long expireEndTime = System.currentTimeMillis() + expireTime * 1000;
            Date expiration = new Date(expireEndTime);
            // PostObject请求最大可支持的文件大小为5 GB,即CONTENT_LENGTH_RANGE为5*1024*1024*1024。
            PolicyConditions policyConds = new PolicyConditions();
            policyConds.addConditionItem(PolicyConditions.COND_CONTENT_LENGTH_RANGE, 0, 1048576000);
            policyConds.addConditionItem(MatchMode.StartWith, PolicyConditions.COND_KEY, dir);

            String postPolicy = ossClient.generatePostPolicy(expiration, policyConds);
            byte[] binaryData = postPolicy.getBytes("utf-8");
            String encodedPolicy = BinaryUtil.toBase64String(binaryData);
            String postSignature = ossClient.calculatePostSignature(postPolicy);

            respMap = new LinkedHashMap<String, String>();
            respMap.put("accessid", accessId);
            respMap.put("policy", encodedPolicy);
            respMap.put("signature", postSignature);
            respMap.put("dir", dir);
            respMap.put("host", host);
            respMap.put("expire", String.valueOf(expireEndTime / 1000));
        } catch (Exception e) {
            // Assert.fail(e.getMessage());
            System.out.println(e.getMessage());
        } finally {
            ossClient.shutdown();
        }
        return respMap;
    }
}访问:http://localhost:30000/oss/policy

- 将请求配置成网关地址:所有的请求先通过网关。
- id: third_party_route
uri: lb://gulimall-third-party
predicates:
- Path=/api/thirdparty/**
filters:
- RewritePath=/api/thirdparty/(?<segment>/?.*), /$\{segment}访问:http://localhost:88/api/thirdparty/oss/policy 结果相同。
将资料/docs/代码/前端/upload中的 vue 文件和 js 文件拷贝到前端项目的components文件夹中。修改action。


现在需要将品牌新增logo地址改成文件上传组件。
修改brand-add-or-update.vue 文件:
- 引入组件
import SingleUpload from "@/components/upload/singleUpload";- 使用组件
<!-- <el-input v-model="dataForm.logo" placeholder="品牌logo地址"></el-input> -->
<single-upload v-model="dataForm.logo"></single-upload>- 声明组件
components: { SingleUpload },测试上传:

响应的数据格式如图。
beforeUpload(file) {
  let _self = this;
  return new Promise((resolve, reject) => {
    policy().then(response => {
      console.log("响应的数据" , response)
      _self.dataObj.policy = response.data.policy;
      _self.dataObj.signature = response.data.signature;
      _self.dataObj.ossaccessKeyId = response.data.accessid;
      _self.dataObj.key = response.data.dir +getUUID()+'_${filename}';
      _self.dataObj.dir = response.data.dir;
      _self.dataObj.host = response.data.host;
      resolve(true)
    }).catch(err => {
      reject(false)
    })
  })
},
但是组件中是从response.data 中取数据的,所以需要修改 policy 接口的后台代码。
将数据包装在 R 对象中。再次测试。

出现跨域问题。
需要将 OSS 对应的 Bucket 设置为可跨域访问的。文档:https://help.aliyun.com/document_detail/91868.html?spm=a2c4g.11186623.2.15.72676e28xJFHoa#concept-ahk-rfz-2fb

修改完成后再次测试上传文件。

文件上传成功后,表单的 logo 应该是存放的是图片的 OSS 地址。
修改按钮的显示状态:

<el-switch v-model="dataForm.showStatus" active-color="#13ce66" inactive-color="#ff4949" :active-value="1" :inactive-value="0"></el-switch>表单检验不够晚上,并且图片没有显示出来。
<template slot-scope="scope">
  <i class="el-icon-time"></i>
  <span style="margin-left: 10px">{{ scope.row.date }}</span>
</template>- 校验规则参考 Form 的自定义规则:https://element.eleme.cn/#/zh-CN/component/form
- 给 Bean 添加校验注解,并给出 message。
- 开启校验功能:@Valid
- 给校验的 Bean 后紧跟一个 BindingResult ,就可以获取到校验的结果。(可选)
在 Product 中添加统一异常处理类:
package com.atguigu.gulimall.product.exception;

import com.atguigu.common.exception.BizCodeEnum;
import com.atguigu.common.utils.R;
import lombok.extern.slf4j.Slf4j;
import org.springframework.validation.BindingResult;
import org.springframework.web.bind.MethodArgumentNotValidException;
import org.springframework.web.bind.annotation.ExceptionHandler;
import org.springframework.web.bind.annotation.RestControllerAdvice;

import java.util.HashMap;

/**
 * @author itzhouq
 * @date 2020/8/8 10:26
 */
@Slf4j
@RestControllerAdvice(basePackages = "com.atguigu.gulimall.product")
public class GulimallExceptionControllerAdvice {


    @ExceptionHandler(value = MethodArgumentNotValidException.class)
    public R handleValidException(MethodArgumentNotValidException e) {
        log.error("数据校验出现问题{}, 异常类型:{}", e.getMessage(), e.getCause());
        BindingResult bindingResult = e.getBindingResult();

        HashMap<String, String> map = new HashMap<>();
        bindingResult.getFieldErrors().forEach( fieldError -> {
            map.put(fieldError.getField(), fieldError.getDefaultMessage());
        });

        return R.error(BizCodeEnum.VALID_EXCEPTION.getCode(), BizCodeEnum.VALID_EXCEPTION.getMsg()).put("data", map);
    }

    @ExceptionHandler(value = Throwable.class)
    public R handleException(Throwable throwable) {
        return R.error();
    }
}
错误码在 common 中定义:
package com.atguigu.common.exception;

/**
 * @author itzhouq
 * @date 2020/8/8 10:34
 *
 * 错误码和错误信息定义类
 *
 * 1. 错误码定义规则为5个数字
 * 2. 前两位标识业务场景,最后三位表示错误码。
 * 3. 维护错误码后需要维护错误描述,将他们定义为枚举形式
 *
 * 错误码列表:
 *
 * 10:通用
 *      001:参数格式校验
 * 11:商品
 * 12:订单
 * 13:购物车
 * 14:物流
 */
public enum BizCodeEnum {

    UNKNOW_EXCEPTION(10000, "系统未知异常"),
    VALID_EXCEPTION(10001, "参数格式校验失败")

    ;

    public int code;
    public String msg;

    BizCodeEnum(int code, String msg){
        this.code = code;
        this.msg = msg;
    }

    public String getMsg() {
        return msg;
    }

    public int getCode() {
        return code;
    }
}
测试:

新增和更新品牌都需要校验参数,但是校验参数的个数和格式可能不同。这就需要使用分组校验的功能。
- 定义两个空接口用于分组
/**
	 * 品牌id
	 */
@TableId
@NotNull(message = "修改必须指定品牌id", groups = {UpdateGroup.class})
@Null(message = "新增不能指定品牌id", groups = {AddGroup.class})
private Long brandId;
/**
	 * 品牌名
	 */
@NotNull(message = "品牌名不能为空", groups = {AddGroup.class, UpdateGroup.class})
private String name;
/**
	 * 品牌logo地址
	 */
@NotEmpty(groups = {AddGroup.class})
@URL(message = "logo必须是合法的URL", groups = {AddGroup.class, UpdateGroup.class})
private String logo;
/**
	 * 介绍
	 */
private String descript;
/**
	 * 显示状态[0-不显示;1-显示]
	 */
private Integer showStatus;
/**
	 * 检索首字母
	 */
@NotEmpty(groups = {AddGroup.class})
@Pattern(regexp = "^[a-zA-Z]$", message = "检索首字母必须是一个字母", groups = {AddGroup.class, UpdateGroup.class})
private String firstLetter;
/**
	 * 排序
	 */
@NotNull(groups = {AddGroup.class})
@Min(value = 0, message = "排序必须大于等于0", groups = {AddGroup.class, UpdateGroup.class})
private Integer sort;- 默认没有指定分组的校验注解,在分组校验情况下不生效。
- 开启校验使用@Validated
@RequestMapping("/save")
public R save(@Validated({AddGroup.class}) @RequestBody BrandEntity brand){
  brandService.save(brand);
  return R.ok();
}有时候校自带的校验规则不能满足我们的校验需求,比如校验 showStatus 可以使用正则表达式也可以使用自定义的校验规则。自定义校验规则有以下几点注意:
-
编写一个自定义的校验注解
-
编写一个自定义的校验器
-
关联自定义的校验器和自定义的校验注解
-
导入依赖:
<dependency>
  <groupId>javax.validation</groupId>
  <artifactId>validation-api</artifactId>
  <version>2.0.1.Final</version>
</dependency>- 自定义注解
package com.atguigu.common.validator;

import com.atguigu.common.validator.group.ListValueConstraintValidator;

import javax.validation.Constraint;
import javax.validation.Payload;
import java.lang.annotation.*;

/**
 * 自定义注解
 * @author itzhouq
 * @date 2020/8/8 12:03
 */

@Target({ElementType.METHOD, ElementType.FIELD, ElementType.ANNOTATION_TYPE, ElementType.CONSTRUCTOR, ElementType.PARAMETER, ElementType.TYPE_USE})
@Retention(RetentionPolicy.RUNTIME)
@Documented
@Constraint(
        validatedBy = {ListValueConstraintValidator.class}
)
public @interface ListValue {

    String message() default "{com.atguigu.common.validator.ListValue.message}";

    Class<?>[] groups() default {};

    Class<? extends Payload>[] payload() default {};

    int[] value() default {};
}- 自定义校验器
package com.atguigu.common.validator.group;

import com.atguigu.common.validator.ListValue;

import javax.validation.ConstraintValidator;
import javax.validation.ConstraintValidatorContext;
import java.util.HashSet;
import java.util.Set;

/**
 * 自定义校验器
 * @author itzhouq
 * @date 2020/8/8 12:12
 */
public class ListValueConstraintValidator implements ConstraintValidator<ListValue, Integer> {

    private Set<Integer> set = new HashSet<>();
    // 初始化方法
    @Override
    public void initialize(ListValue constraintAnnotation) {

        int[] value = constraintAnnotation.value();
        for (int v : value) {
            set.add(v);
        }
    }

    /**
     * 判断是否校验成功
     * @param integer  需要检验的值
     * @param constraintValidatorContext  上下文对象
     * @return 是否校验成功
     */
    @Override
    public boolean isValid(Integer integer, ConstraintValidatorContext constraintValidatorContext) {
        return set.contains(integer);
    }
}
配置文件:/gulimall-common/src/main/resources/ValidationMessages.properties
com.atguigu.common.validator.ListValue.message=必须提交指定的值如果提示信息出现乱码可以将中文转成 Unicode 码。
com.atguigu.common.validator.ListValue.message=\u5fc5\u987b\u63d0\u4ea4\u6307\u5b9a\u7684\u503c测试接口:

- 测试前端
- SPU:标准化产品单元(Standard Product Unit)。是商品信息聚合的最小单元,是一组可复用、易检索的标准化信息的集合,该集合描述了一个产品的特性。
比如小米 8 手机。是一类信息的聚合,而不是一个具体的手机。小米 8 手机有不同的颜色、硬件配置等。
- SKU:库存量单位(Stock Keeping Unit):即库存进出计量的基本单元,可以是以件、盒、托盘等为单位。
SKU 指的是具体的某个产品。
- 规格参数与销售数据:每个分类下的商品共享规格参数,与销售属性。只是有些商品不一定要用这个分类下的全部属性。
- 属性是以三级分类组织起来的
- 规格参数中有些是可以提供检索的
- 规格参数也是基本属性,他们具有自己的分组
- 属性的分组也是以三级分类组织起来的
图中的规格参数,是手机这个三级分类下 SPU 共享的数据。

销售属性简单说,就是特定的 SKU 除了共享数据,有区别其他的参数,比如颜色和售价。
- 表设计


要做属性分组编辑的效果,点击左边菜单某个三级分类,右边显示该分组的规则参数。

需要多次使用到菜单的功能,所以考虑将菜单抽取为单独的组件,方便引用。
- 导入带单:将/sql/sys_menus.sql 导入到 gulimall-admin 库中执行。页面菜单显示:

- 修改品牌分组管理的模糊查询和分页功能。
- 分页功能参考 mybatisPlus 文档添加分页支持:https://mp.baomidou.com/guide/page.html
在 product 中添加配置类:
package com.atguigu.gulimall.product.config;

import com.baomidou.mybatisplus.extension.plugins.PaginationInterceptor;
import com.baomidou.mybatisplus.extension.plugins.pagination.optimize.JsqlParserCountOptimize;
import org.mybatis.spring.annotation.MapperScan;
import org.springframework.context.annotation.Bean;
import org.springframework.context.annotation.Configuration;
import org.springframework.transaction.annotation.EnableTransactionManagement;

/**
 * 分页插件
 * @author itzhouq
 * @date 2020/8/10 23:23
 */

@Configuration
@EnableTransactionManagement // 开启事务
@MapperScan("com.atguigu.gulimall.product.dao")
public class MybatisConfig {

    // 引入分页插件
    @Bean
    public PaginationInterceptor paginationInterceptor() {
        PaginationInterceptor paginationInterceptor = new PaginationInterceptor();
        // 设置请求的页面大于最大页后操作, true调回到首页,false 继续请求  默认false
        paginationInterceptor.setOverflow(true);
        // 设置最大单页限制数量,默认 500 条,-1 不受限制
        paginationInterceptor.setLimit(1000);
        // 开启 count 的 join 优化,只针对部分 left join
        paginationInterceptor.setCountSqlParser(new JsqlParserCountOptimize(true));
        return paginationInterceptor;
    }
}
分页功能可用。
- PO(Persistent Object)持久化对象
PO 就是对应数据库中的某个表中的一条记录,多个记录可以用 PO 的集合。PO 中应该不包括任何对数据的操作。
- DO(Domain Object)领域对象
就是从现实世界中抽取出来的有形或无形的业务实体。
- TO(Transfer Object)数据传输对象
不同的应用程序之间传输的对象。
- DTO(Data Transfer Object)数据传输对象
这个概念来源于 J2EE 的设计模式,原来的目的是为了 EJB 的分布式应用提供粗粒度的数据实体,以减少分布式调用的次数从而提高分布式调用的性能和降低网络负载,但现在泛指用于展示层和服务层之间的数据传输对象对象。
- VO(Value Object)值对象
通常用于业务层之间的数据传递,和 PO 一样也是仅仅包含数据而已。但应是抽象出的业务对象,可以和表对应,也可以不对应。
VO 也可以解释成 View Object 视图对象。用于接受页面传递来的数据,封装对象。将业务处理完成的对象,封装成页面要用的数据。
- BO(Business Object)业务对象
从业务模型的角度看,见 UML 元件领域模型中的领域对象。封装业务逻辑的 Java 对象,通过调用 DAO 方法,结合 PO,VO 进行业务操作。BO 主要作用是把业务逻辑封装为一个对象。这个对象可以包括一个或多个其他对象。比如一个简历,有教育经历,工作经历,社会关系等等。我们可以把教育经历对应一个 PO,工作经历对应一个 PO,社会关系对应一个 PO。建立一个对应简历的 BO 对象处理简历,每个 BO 包含这些 PO。着花样处理业务逻辑时,我们就可以针对 BO 去处理。
- 获取属性分组的关联的所有属性:https://easydoc.xyz/doc/75716633/ZUqEdvA4/LnjzZHPj
- 删除属性与分组的关联关系:https://easydoc.xyz/doc/75716633/ZUqEdvA4/qn7A2Fht
。。。