The main goal of the project is to build a app which allow real estate agencies to come in and create property listings for buyers to see.
- React (https://reactjs.org/)
- Leaflet (React-Leaflet https://react-leaflet.js.org/)
- MUI (Material UI - https://mui.com/)
- Django (https://www.djangoproject.com/)
- Django Rest Framework (https://www.django-rest-framework.org/)
- Django Geo (https://docs.djangoproject.com/en/4.1/ref/contrib/gis/tutorial/)
- PostGIS (https://postgis.net/PostGres -> extension to store Geo spacial coordinates)
Checkout final result -> here <-
- Create the backend folder and cd into it.
  mkdir backend
  cd  backend
- Let's stary by creating a virtual env and activate it :
  python -m venv venv
  .\venv\Scripts\activate
- Let's start a fresh Django project:
pip install Django
django-admin startproject backend
- Create an app inside the project called listings:
python manage.py startapp listings
- Add listings apps to the settings.py
INSTALLED_APPS = [
(...),
'listings.apps.ListingsConfig'
]
- Create a Listings model to create a table on our DB and save new Listings:
from django.contrib.gis.db import models
from django.utils import timezone

# Create your models here.
class Listing(models.Model):
    title = models.CharField(max_length=50)
    location = models.PointField(blank=True, null=True, srid=4326) #SRID stands for spatial reference Identifier
    description = models.TextField(null=True, blank=True)
    choices_area = (
        ('Inner London', 'Inner London'),
        ('Inner London', 'Inner London'),
    )
    area = models.CharField(max_length=20, blank=True, null=True, choices=choices_area)
    borough = models.CharField(max_length=50, blank=True, null=True)
    choices_listing_type = (
        ('House', 'House'),
        ('Apartment', 'Apartment'),
        ('Office', 'Office'),
    )
    listing_type = models.CharField(max_length=20, choices=choices_listing_type)
    choices_property_status = (
        ('Sale', 'Sale'),
        ('Rent', 'Rent'),
    )
    property_status = models.CharField(max_length=20, blank=True, null=True, choices=choices_property_status)
    price = models.DecimalField(max_digits=50, decimal_places=0)
    choices_rental_frequency = (
        ('Month','Month'),
        ('Week', 'Week'),
        ('Day', 'Day')
    )
    rental_frequency = models.CharField(max_length=20, blank=True, null=True, choices=choices_rental_frequency)
    rooms = models.IntegerField(blank=True, null=True)
    furnished = models.BooleanField(default=False)
    pool = models.BooleanField(default=False)
    elevator = models.BooleanField(default=False)
    cctv = models.BooleanField(default=False)
    parking = models.BooleanField(default=False)
    date_posted = models.TimeField(default=timezone.now)

    def __str__(self) -> str:
        return self.title
We will use GeoDjango to store the coordinates. GeoDjango is a special module for Django that turns it into a world-class geographic web-framework.
If it is not already in your model, add :
  from django.contrib.gis.db import models
  from django.contrib.gis.geos import Point

  #PointField is a special type not included in the default/main Django.
  location = models.PointField(blank=True, null=True, srid=4326) #SRID stands for spatial reference Identifier
SRID stands for spacial reference identifier. The most common identifier is the 4326, which enable us to represent spatial data using latitude and longitude.
- We also need to add 'django.contrib.gis' to our installed apps on settings.py :
INSTALLED_APPS = [
  (...),
  'django.contrib.gis',
  (...)
]
-
You can follow those instructions:
https://docs.djangoproject.com/en/4.1/ref/contrib/gis/install/
The installation is very easy on Linux and Mac, but it can be a little bit tricky on Windows.
-
If you are on Windows, you can just download the GDAL binaries that correspond to your Python version and OS , from : https://www.lfd.uci.edu/~gohlke/pythonlibs/
-
After the download , you can install it with :
pip install <path_to_binaries_you_downloaded>
- After this, you need to add the GDAL library we just installed on our virtual environment Path. For this, you can just copy the following snippet into your settings.py file:
```
  import os

  if os.name == 'nt':
VENV_BASE = os.environ['VIRTUAL_ENV']
os.environ['PATH'] = os.path.join(
    VENV_BASE, 'Lib\\site-packages\\osgeo') + ';' + os.environ['PATH']
os.environ['PROJ_LIB'] = os.path.join(
    VENV_BASE, 'Lib\\site-packages\\osgeo\\data\\proj') + ';' + os.environ['PATH']

```
- You can download PostGres DB from here : https://www.postgresql.org/download/
- Make sure you install pgAdmin and the stack Builder while in the installation process.
- Once you have created a DB for our project , add the "PostGIS" extension to it. You can do this by :
 Opening the application stack builder for PostgreSQL

2. Choose your version of PostgreSQL

3. Under "Categories", expand "Spatial extensions"

4. Check "PostGIS"
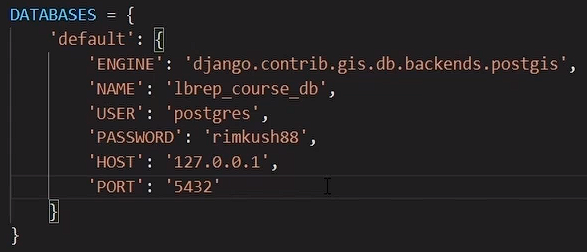
- We also need to modify our DATABASES settings in settings.py, into something like this :
- Don't hardcode you name and password, though...Create a .env file with your DB name, user, password and PORT and then import them into your settings.py. (and don't forget to add .env to your .gitignore)
Django comes with a default user Model, which means that , by default , there is a DB table for all the users of the application. That table is created, once you first run the migrations..
By default, the required fields for creating a new user are the username field, the password field and the password confirmation field.
We want to customize the user model by adding a new required field, in this case, the e-mail field.
Let's create a new separate app to handle our logic and the changes we want to make to the user:
python manage.py startapp users
In our users app models, let's make the changes we talked about:
from django.contrib.auth.models import AbstractUser

class User(AbstractUser):
  email = models.EmailField(unique=True)
We also need to tell Django, that we don't want the default User model, we want the custom one we just created. We can do this by adding the following on our settings.py
	#tell Django which User model you want to user

	AUTH_USER_MODEL = 'users.User'
By creating a superuser, we will have access to the admin panel. Run:
	python manage.py createsuperuser
	# Add username and password
We will be able to add listings from the admin panel.
- Create a new file on the listings app, call it "forms.py"-
- Create a class which will change the form for the model you specify in the meta class.
from django import forms
from .models import Listing

class ListingForm(forms.ModelForm)
	class Meta:
		# We add to 2 new fields to the form that don't exist on the model
		model = Listing
		fields = ['__all__', 'latitude', 'longitude']
	latitude = forms.FloatField()
	longitude = forms.FloatField()

    	def clean(self):
		data = super().clean()
		latitude = data.pop('latitude')
		longitude = data.pop('longitude')
		data['location'] = Point(latitude, longitude, srid=4326)
		return data

    	def __init__(self, *args, **kwargs):
		super().__init__(*args, **kwargs)
		location = self.initial.get('location')
		if isinstance(location, Point):
		    self.initial['latitude'] = location.tuple[0]
		    self.initial['longitude'] = location.tuple[1]
- Then, we need to add the modified form on the admin panel.
- Go to file "admin.py" and import the form we just modified.
- Register the Listing model in the site , along with the modified ModelAdmin class which we changed to receive the previously modified form.
from django.contrib import admini
from listings.models import Listing
from .forms import ListingsForm

class listingAdmin(admin.ModelAdmin):
	form = ListingsForm


admin.site.register(Listing, ListingAdmin)
- Install django rest framework and add it to your INSTALLED_APPS on settings.py as 'rest_framework' and 'rest_framework_gis'.
pip install djangorestframework
pip install djangorestframework-gis
- Also don't forget to install django-cors-headers and add it to your INSTALLED_APPS as 'corsheaders'. In the MIDDLEWARE settings, add "corsheaders.middleware.CorsMiddleware".
pip install django-cors-headers
- We need to create serializers in order to convert Django models into JSON format, which can then be used to send data to a client or API.
from rest_framework import serializers
from listings.models import Listing

class ListingSerializer(serializers.ModelSerializer):
	class Meta:
   	model = Listing
   	field = '__all__'
- We then need to define our handlers on views.py:
from .serializers import ListingsSerializer
from listings.models import Listing
from rest_framework import generics

class listingList(generics.ListAPIView):
	queryset = Listing.objects.all()
	serializer_class = ListingSerializer
- Let's match the route to the views, now on backend/urls.py:
from listings.api import views as lists_api_views

path = urlpatterns = [
	path('admin/', admin.site.urls),
	path('api/listings/', listings_api_views.ListingList.as_view()),
]