
- CodeCommit CodeCommit is a secure, highly scalable, fully managed source control service that hosts private Git repositories.
- CodeBuild CodeBuild is a fully managed continuous integration service that compiles source code, runs tests, and produces ready-to-deploy software packages.
- CodeArtifact CodeArtifact allows you to store artifacts using popular package managers and build tools like Maven, Gradle, npm, Yarn, Twine, pip, NuGet, and SwiftPM.
- CodeDeploy CodeDeploy is a fully managed deployment service that automates software deployments to various compute services, such as EC2, ECS, Lambda, and on-premises.
- CodePipeline CodePipeline is a fully managed continuous delivery service that helps you automate your release pipelines for fast and reliable application and infrastructure updates.
- Amazon S3 Amazon S3 is an object storage service offering industry-leading scalability, data availability, security, and performance.
- EC2 EC2 allows users to rent virtual computers (EC2) to run their own workloads and applications.
- CloudWatch Metrics Amazon CloudWatch can load all the metrics in your account (both AWS resource metrics and application metrics that you provide) for search, graphing, and alarms.
- CloudWatch Logs You can use CloudWatch Logs to monitor applications and systems using log data.
- Amazon SNS Amazon SNS sends notifications two ways and provides high-throughput, push-based, many-to-many messaging between distributed systems, microservices, and event-driven serverless applications.
- SonarCloud SonarCloud is a cloud-based code analysis service designed to detect coding issues in 26 different programming languages.
NOTE: a) Navigate to a Region on AWS that has all the AWS Code services (CodeCommit, CodeBuild, CodeArtifact, CodeDeploy and CodePipeline) b) You must Login as an IAM User before you can complete the below steps successfully (Login with a user that has Administrator Privileges)
1.1) Navigate to CodeCommit to create a Project Repository
- Click on
Create Repository - Name your repository
AWS-Native-CICD-Pipeline-Project - Click
Create

1.2) Configure SSH Connection On Local MacOs or Windows With CodeCommit
- Follow the steps provided in the Runbook below
- Runbook: https://docs.google.com/document/d/1vDu6TBcIrh2NbUtv5eayur1Cdo3Z8X5YSZ9t58ItlXo/edit?usp=sharing
1.3) Download the Project Zip Code From The Below Repository Link
- Project Code: https://github.com/jacodetunde/AWS-Native-CICD-Pipeline.git
- Unzip and Copy everything to the Code Commit Repository you just cloned
- Push the Code Upstream to Your CodeCommit Project Repository and Confirm you have everything in the Repository
- NOTE: Use the same Git commands you have always used to Push code to GitHub
- Create a CodeBuild Service Role in IAM with Administrator Privilege

- Navigate to IAM
- Click on
Roles - Click on
Create Role - Select
Service Role - Search/Select
CodeBuild- Click on
Next - Attach Policy:
AdministratorAccess - Click
Next - Role Name:
AWS-CodeBuild-Admin-Role - Click
Create
- Click on
- Click on

- Create a CodeBuild Service Role in IAM with Administrator Privilege
- Navigate to IAM
- Click on
Roles - Click on
Create Role - Select
Service Role - Search/Select
CodeDeploy- Click on
Next - Attach Policy:
AdministratorAccess - Click
Next - Role Name:
AWS-CodeDeploy-Deployment-Role - Click
Create
- Click on
- Click on
- Navigate to Amazon S3

- Click
Create Bucket- Name:
java-webapp-project-artifact-YOUR_ACCOUNT_ID - Region:
Select Your working Region - Click:
CREATE Bucket
- Name:

A) Sign up for SonarCloud using this URL: https://sonarcloud.io or https://sonarcloud.io/login

- Click on
SIGN UP - Click Sign Up With
GITHUB - Sign in with your
“GitHub” Account - Click on
“Authorize SonarCloud”- NOTE: Once you Authorize SonarCloud, It’ll take you directly to Dashboard (Similar to Traditional SonarQube Server Dashboard but this is cloud based)
B) We have to Generate a Token which CodeBuild will use during the Maven Execution

- Click on your Profile at the Top right and click on
My Account - Click on
Security - Generate Tokens (Provide a Name):
aws-native-cicd-pipeline-project - Copy the Token and Save it somewhere (on your NOTEPAD)
C) Click on the “+” symbol at the Top Right

- Click on Analyze new project
- Click on
create a project manually.- Click on
Create another organization- Name (Must be Unique):
yourfirst-or-lastname-aws-devops-org - Choose a plan: Select
“Free Plan” - Click on
Create Organization
- Name (Must be Unique):
- Click on
D) Create a SonarCloud Project
- Click on
Create Project- Project Key:
aws-native-cicd-pipeline-project - Display name:
This Will Populate Automatically - Public/Private: Public (because we’re using a free account)
- Click on
Next
- Select
Previous version - Click on
Create ProjectNOTE **Save yourProject Nameas well on Notepad, Save yourOrganization nameand the Sonarcloud url (https://sonarcloud.io). Make sure yourTokenhas been saved also.
- Project Key:

6) Create & Configure CodeArtifact Repository to Store and Manage All Application Maven Dependencies.
- Navigate to AWS
CodeArtifact - Click on
Repository- Click
Create Repositoy
- Repository Name:
java-webapp-maven-repo - Public Upstream Repository: Select
maven-central-store - Click on
Next- AWS Account: Select
This AWS Account - Domain Name:
java-webapp-maven-repo - Click on
Next - Click
Create Repository
- AWS Account: Select
- NOTE: Verify and Confirm both the
Repositoryand theRepository Domainwere created successfully
- Click


- Click on
Repositoriesif you’ve not already- Click on
maven-central-store - Click on
View Connection Instructions
- Step 1: Choose a package manager client: "Select (on the drop down):"
mvn - Step 3: COPY and Run The
exportCommand on your Local Terminal whereawscliis installed- NOTE:NOTE:NOTE:NOTE!!
- The command will look like this
- BUT COPY YOUR OWN
- Make sure your AWSCLI is configured (with a user with "Admin Priviledges")
export CODEARTIFACT_AUTH_TOKEN=`aws codeartifact get-authorization-token --domain java-webapp-maven-repo --domain-owner 213424289791 --region us-east-1 --query authorizationToken --output text`
- Also RUN:
echo $CODEARTIFACT_AUTH_TOKEN
- NOTE:NOTE:
- Copy the
CODEARTIFACT_AUTH_TOKENEncrypted Credential andSAVEon yourNOTEPAD/Somewhere - We’re going to store this Token in SSM Parameter Store from where our CodeBuild Job is going pick it up

- Copy the
- Step 1: Choose a package manager client: "Select (on the drop down):"
- Click on


- Still on
“View Connection Instructions”inmaven-central-store
- Under Step 5:
COPYthe Repositoryidand Paste it in thesettings.xmlfile online 29at the time of thisCOPYthe Repositoryurland Paste onLine 18andLine 30in thesettings.xmlat the time of thisSAVEthe changes made in the file


- Still on
“View Connection Instructions”inmaven-central-store - Under Step 5:
COPYthe Repositoryidand Paste it in thePOM.xmlfile onLine 75at the time of thisCOPYthe Repositoryurland Paste onLine 76in thePOM.xmlat the time of thisSAVEthe changes made in the fileCOMMITthe changes andPUSHto UpStream toCodeCommit

-
Navigate to SSM
-
NOTE!! Make sure you create the parameters in the same Region as the bucket (same for all project resources)

-
a) Click on
Parameter Store- Click on
Create Parameter - Name:
CODEARTIFACT_AUTH_TOKEN - Type: Select
Secure/String - Value:
provide your CodeArtifact Tokenthe one you copied when you ranecho $CODEARTIFACT_AUTH_TOKEN
- Click on
-
a) Click on
Parameter Store- Click on
Create Parameter - Name:
Organization - Type: Select
String - Value:
provide your SnarCloud Org name
- Click on
-
b) Click on
Parameter Store- Name:
HOST - Type: Select
String - Value: https://sonarcloud.io
- Name:
-
c) Click on
Parameter Store- Name:
Project - Type: Select
String - Value:
provide your SonaCloud Project name
- Name:
-
d) Click on
Parameter Store- Name:
sonartoken - Type: Select
Secure/String - Value:
provide your SonaCloud Project TokenNOTE: Confirm that these same parameter names exist in yoursonacloud_buildspec.yamlconfiguration.
- Name:


- Navigate To The AWS
CodeBuildService
- Click on
Create Build Project- Project Name:
Java-Webapp-CB-Build-Job - Source Provider: Select
AWS CodeCommit - Repository: Select
AWS-Native-CICD-Pipeline-Project - Branch:
master - Operating System:
Ubuntu - Runtime:
Standard - Image: MUST USE (
aws/codebuild/standard:5.0) or else it’ll BREAK - Image version: Select
Always use the latest for this runtime version - Environment type: Select
Linux EC2 - Service Role:
Existing Service Role- Role name: Select
AWS-CodeBuild-Admin-Role - Allow AWS CodeBuild to modify this service role so it can be used with this build project:
Disable/Uncheck
- Role name: Select
- Build Specifications: Pass
buildspecs/buildspec.yml - Artifacts:
- Type: Select
Amazon S3 - Bucket name: Select your bucket
java-webapp-project-artifact-YOUR_ACCOUNT_ID - Artifacts packaging: Select
Zip
- Type: Select
- Logs
- CloudWatch Logs:
Enable - Group Name:
Java-Webapp-CodeBuild-Project-Logs - Stream name:
Java-Webapp-CodeBuild-Build-Logs
- CloudWatch Logs:
- CLICK: Click
CREATE BUILD PROJECT
- Project Name:

- Navigate To The AWS
CodeBuildService
- Click on
Create Build Project- Project Name:
Java-Webapp-CB-SonarCloud-Job - Source Provider: Select
AWS CodeCommit - Repository: Select
AWS-Native-CICD-Pipeline-Project - Branch:
master - Operating System:
Ubuntu - Runtime:
Standard - Image: MUST USE (
aws/codebuild/standard:5.0) or else it’ll BREAK - Image version: Select
Always use the latest for this runtime version - Environment type: Select
Linux EC2 - Service Role:
Existing Service Role- Role name: Select
AWS-CodeBuild-Admin-Role - Allow AWS CodeBuild to modify this service role so it can be used with this build project:
Disable/Uncheck
- Role name: Select
- Build Specifications: Pass
buildspecs/sonarcloud_buildspec.yml - Artifacts:
- Type: Select
No Artifact
- Type: Select
- Logs
- CloudWatch Logs:
Enable - Group Name:
Java-Webapp-CodeBuild-Project-Logs - Stream name:
Java-Webapp-CodeBuild-SonarCloud-Logs
- CloudWatch Logs:
- CLICK: Click
CREATE BUILD PROJECT
- Project Name:


- Navigate to EC2

- Click
Launch Instances-
Name:
Stage-Env -
Click
Add additional tags- Click
Add new tag- Key:
Env - Value:
Stage
- Key:
- Click
-
Number of Instances:
1 -
AMI:
Amazon Linux 2 (HVM) -
Instance type:
t2.micro -
Key pair:
Select an existing KeyorCreate New -
Network Settings:
- VPC:
Defaultor a network that has Internet access - Auto-assign public IP:
Enable - Firewall (security groups): Open the following Ports
- Name:
Tomcat-App-SG - Description:
Tomcat-App-SG - Open Port
8080to0.0.0.0/0 - Open Port
22to eith your Network or Internet
- Name:
- VPC:
-
Edvance Details:
- IAM instance profile:
Select an EC2 Admin Role- NOTE:
If you do not have one, please go ahead and create before creating instance - NOTE:
If Not Yours Will Break
- NOTE:
- User data:
#!/bin/bash
sudo yum update
sudo yum install ruby -y
sudo yum install wget -y
cd /home/ec2-user
wget https://aws-codedeploy-us-west-2.s3.us-west-2.amazonaws.com/latest/install
chmod +x ./install
sudo ./install auto
sudo service codedeploy-agent status
- Click
Launch Instance
- IAM instance profile:
-

- Navigate to EC2
- Click
Launch Instances-
Name:
Prod-Env -
Click
Add additional tags- Click
Add new tag- Key:
Env - Value:
Prod
- Key:
- Click
-
Number of Instances:
1 -
AMI:
Amazon Linux 2 (HVM) -
Instance type:
t2.micro -
Key pair:
Select an existing KeyorCreate New -
Network Settings:
- VPC:
Defaultor a network that has Internet access - Auto-assign public IP:
Enable - Firewall (security groups): Open the following Ports
- Click on
Select existing security group - Security group: Select
Tomcat-App-SG
- Click on
- VPC:
-
Edvance Details:
- IAM instance profile: Select an EC2 Admin Role
- NOTE:
If you do not have one, please go ahead and create before creating instance - NOTE:
If Not Yours Will Break
- NOTE:
- User data:
#!/bin/bash
sudo yum update
sudo yum install ruby -y
sudo yum install wget -y
cd /home/ec2-user
wget https://aws-codedeploy-us-west-2.s3.us-west-2.amazonaws.com/latest/install
chmod +x ./install
sudo ./install auto
sudo service codedeploy-agent status
- Click
Launch Instance
- IAM instance profile: Select an EC2 Admin Role
-

- Navigate to CodeDeploy

- Click on
Applications- Click
Create Application- Name:
Java-Webapp-CodeDeploy-Application - Compute Platform:
EC2/On-premises - Click
Create Application
- Name:
- Click

- Navigate to CodeDeploy

- Click on
Applications- Click on
Java-Webapp-CodeDeploy-Application - Click on
Create deployment group- Deployment group name:
Java-Webapp-CodeDeploy-Stage-DG - Service role:
AWS-CodeDeploy-Deployment-Role - Deployment type: Select
In-place - Environment configuration: Select
Amazon EC2 instances- Key:
Env - Value:
Stage
- Key:
- Agent configuration with AWS Systems Manager:
Now and schedule updates- Basic Scheduler
- Deployment settings: Select
CodeDeployDefault.AllAtOnce- NOTE: CONFIRM THAT YOU SELECTED
CodeDeployDefault.AllAtOnceIF Not, yours will break.
- NOTE: CONFIRM THAT YOU SELECTED
- Load balancer: Uncheck the box to
Disable - Click
Create deployment group
- Deployment group name:
- Click on

- Navigate to CodeDeploy
- Click on
Applications- Click on
Java-Webapp-CodeDeploy-Application - Click on
Create deployment group- Deployment group name:
Java-Webapp-CodeDeploy-Prod-DG - Service role:
AWS-CodeDeploy-Deployment-Role - Deployment type: Select
In-place - Environment configuration: Select
Amazon EC2 instances- Key:
Env - Value:
Prod
- Key:
- Agent configuration with AWS Systems Manager:
Now and schedule updates- Basic Scheduler
- Deployment settings: Select
CodeDeployDefault.AllAtOnce- NOTE: CONFIRM THAT YOU SELECTED
CodeDeployDefault.AllAtOnceIF Not, yours will break.
- NOTE: CONFIRM THAT YOU SELECTED
- Load balancer: Uncheck the box to
Disable - Click
Create deployment group
- Deployment group name:
- Click on
- Navigate to
CodePipeline
- Click on
Create Pipeline-
Name:
AWS-Native-Java-Webapp-CICD-Pipeline-Automation -
Service role:
New service role- Role name:
The name will populate automatically
- Role name:
-
Allow AWS CodePipeline to create a service role so it can be used with this new pipeline: Chech box to
Enable- Click
Next
- Click
-
SOURCE PROVIDER
-
Source provider: Select
AWS CodeCommit- Repository name:
AWS-Native-CICD-Pipeline-Project - Branch name:
Master - Change detection options:
Amazon CloudWatch Events (recommended) - Output artifact format:
CodePipeline default - Click
Next
- Repository name:
-
BUILD PROVIDER
-
Build provider:
AWS CodeBuild- Region:
Your region will populate - Project name:
Java-Webapp-CB-Build-Job - Build type:
Single build - Click
Next
- Region:
-
DEPLOY PROVIDER
-
Deploy provider:
AWS CodeDeploy- Region:
Your region will populate - Application name:
Java-Webapp-CodeDeploy-Application - Deployment group:
Java-Webapp-CodeDeploy-Stage-DG - Click
Next
- Region:
-
Click
CREATE PIPELINE -
NOTE: Once you create the pipeline, it'll start Running Immediate. Just wait for all the various stages to complete
-
NOTE2: The Deployment Will Only Take Place In The Staging Environment (With Continuous Deployment)
-


- Click on
Editto add the following Pipeline Stages;- The
Testing Stage - The
Manual Approval Stage - The
Prod Deployment Stage
- The
- Click on
Add stage - NOTE: Make sure to add this Stage in between the
BuildandDesployStage
- Stage name:
SAST-Test-SonarCloud - Click on
Add action group-
Action name:
SAST-Test-SonarCloud -
Action provider:
AWS CodeBuild -
Region:
Select your project region -
Input artifact:
SourceArtifact -
Project name:
Select Your SonarCloud CodeBuild Job/Project -
Build type:
Single build -
Click
Done -
Click on
Doneagain
-

-
Click on
Add stage
-
Stage name:
Manual-Approval -
Click on
Add action group
-
Action name:
Manual-Approval -
Action provider:
Manual approval -
Click
Done -
Click on
Doneagain
-


- Click on
Add stage
- Stage name:
Deploy-Prod - Click on
Add action group-
Action name:
Deploy-Prod -
Action provider:
AWS CodeDeploy -
Region:
Select your project region -
Input artifact:
BuildArtifact -
Application name:
Java-Webapp-CodeDeploy-Application -
Deployment group:
Java-Webapp-CodeDeploy-Prod-DG -
Click
Done -
Click on
Doneto save changes -
SCROLL UPand Click onSAVE -
Click
SAVE
-

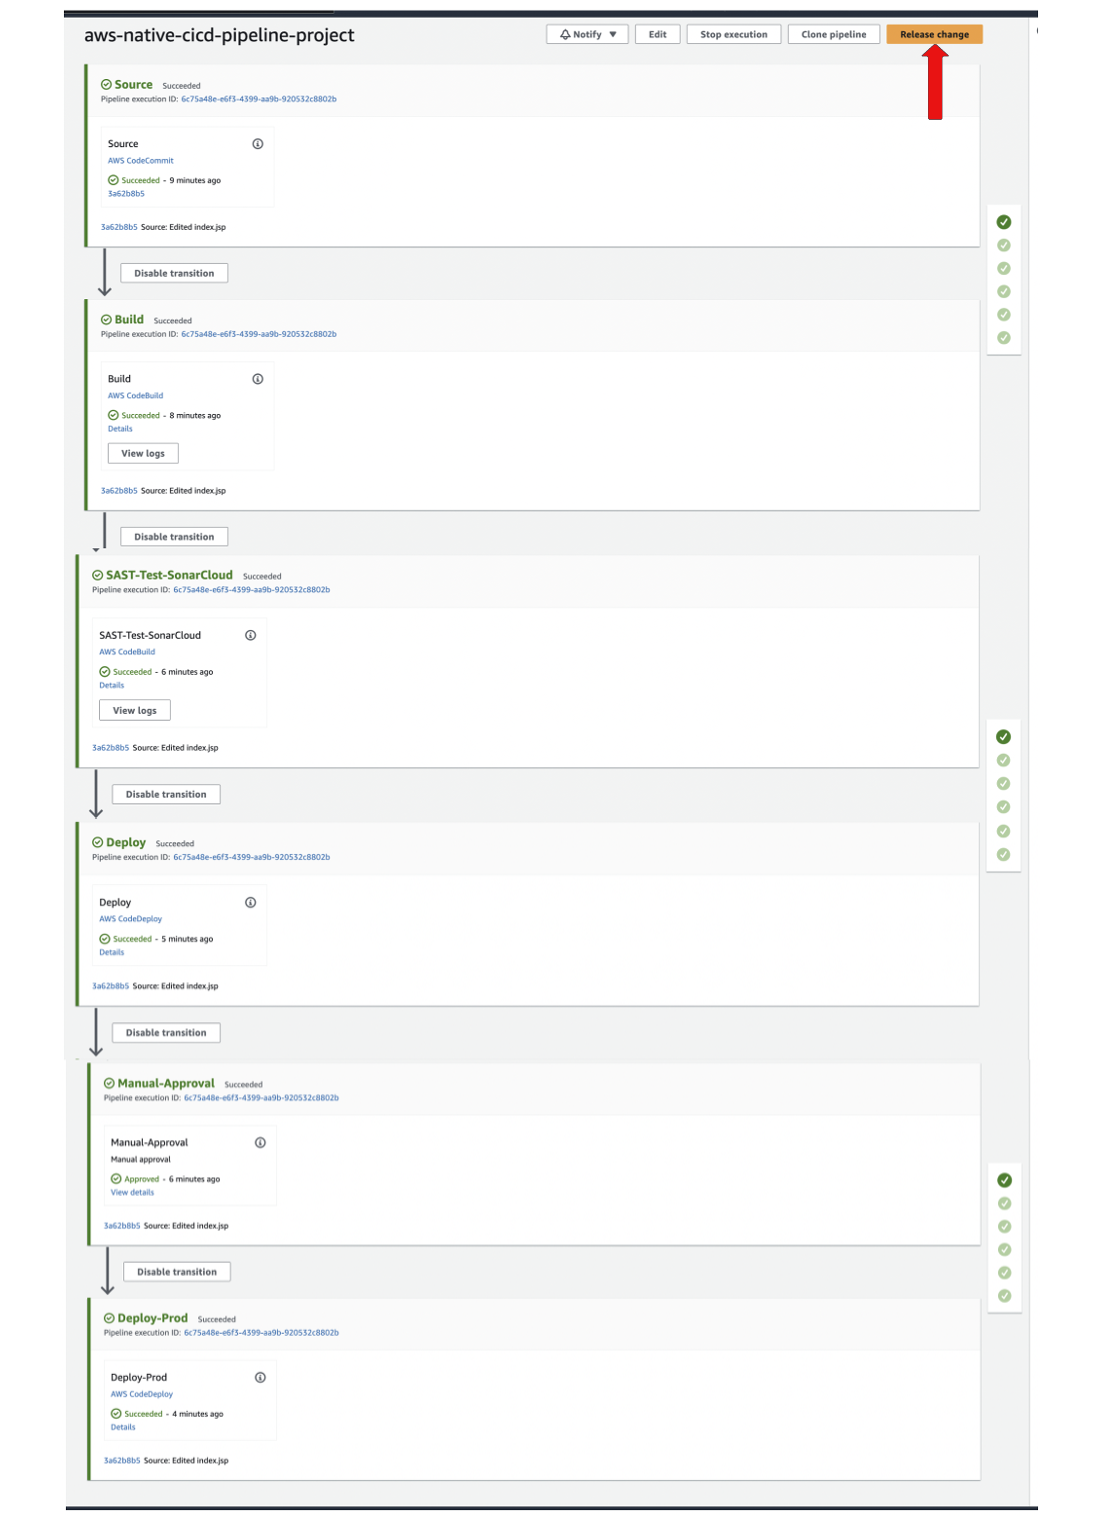
19) RE-RUN YOUR PIPELINE and CONFIRM THE APP IS AVAILABLE IN STAGING ENV BEFORE APPROVING PRODUCTION
- CLICK on
Release Change

- Navigate to EC2
- Copy the Public IP Addresses of the
Stage Instanceand Try Accessing the Application - URL: http://INSTANCE_PUBLIC_IP:8080/javawebapp


- Once you Confirm that The Application is working as Expected...
- You Then
APPROVE PRODDeployment
- Go through the
CodeArtifact Downloaded Dependencies - Go through the
CodeBuild Build & Test Job Outputs - Go through the
CodeDeploy Stage & Prod Prod Deployment Results - Go through the
SonarCloud Project/Analysisetc
i) CodeArtifact maven-central-store (These Dependencies Where All Downloaded From Maven Central and Stored Here)

ii) CodeBuild Project Logs (Build and Test Jobs)


- Navigate to
CodeDeploy


- Navigate to EC2
- Copy the Public IP Addresses of the Instances and Try Accessing the Application
- URL: http://INSTANCE_PUBLIC_IP:8080/javawebapp