Raspberry Pi Photobooth
A photobooth can be a way show off your wacky side or just a way to remember an important event such as a birthday party (or both!). In this tutorial, we'll show you how to set one up with your Raspberry Pi and camera module. First, install the picamera python module.
sudo apt-get install python-picamera
Open IDLE either from your desktop or through the menu at the bottom left. IDLE is an integrate development environment (IDE) for python. We'll be using it to input and run our photobooth python script. Let's start by taking our first picture. Click File - New Window, or press Control+N. In the new window, enter the following:
import picamera     # module for controlling the camera
import time         # module for adding delays


camera = picamera.PiCamera()   # initialize the camera
camera.start_preview()         # start previewing
time.sleep(5)                  # wait for 5 seconds
camera.stop_preview()          # stop the preview
camera.close()                 # close the camera
Save the file by clicking File - Save or by pressing Control+S. Name the file photobooth.py. To run your script press F5. You should see a preview of what the camera can see for 5 seconds before it closes. Now we'll edit our program above to behave like a photobooth. If you don't see a preview, then you may need to troubleshoot your camera connection or enable the camera in raspi-config settings.
Ok, now we're ready to turn our setup into a photobooth. To do so, we'll need to save 3 photos with a 5 second delay between each one. Let's go one step at a time.
To take a picture with the camera module use the capture() method:
camera.capture("photo0.jpg")
Let's edit our photobooth.py script to take a picture after waiting 5 seconds. Can you find where to put it? Once you've added the capture line to your program, run it again by pressing F5.
To display the photo we'll be using the Image Magick command, display. In a terminal, type the following command:
display photo0.jpg
If it doesn't show up, you may need to install Image Magick:
sudo apt-get install imagemagick
Modify your photobooth.py script to save 2 additional photos, photo1.jpg and photo2.jpg. Make sure to wait 5 seconds between each photo to allow time to change your pose! Make sure all three files are saved correctly by running the display from a terminal. You can view thumbnails of all of them at once using this command:
display 'vid:photo*.jpg'
If all three images are saved correctly when you run your script then you're ready to move on!
Compositing is when you combine multiple images together in various ways. In this case we want to combine our three images into two strips that fit on a 4"x6" photograph as shown in the image below.
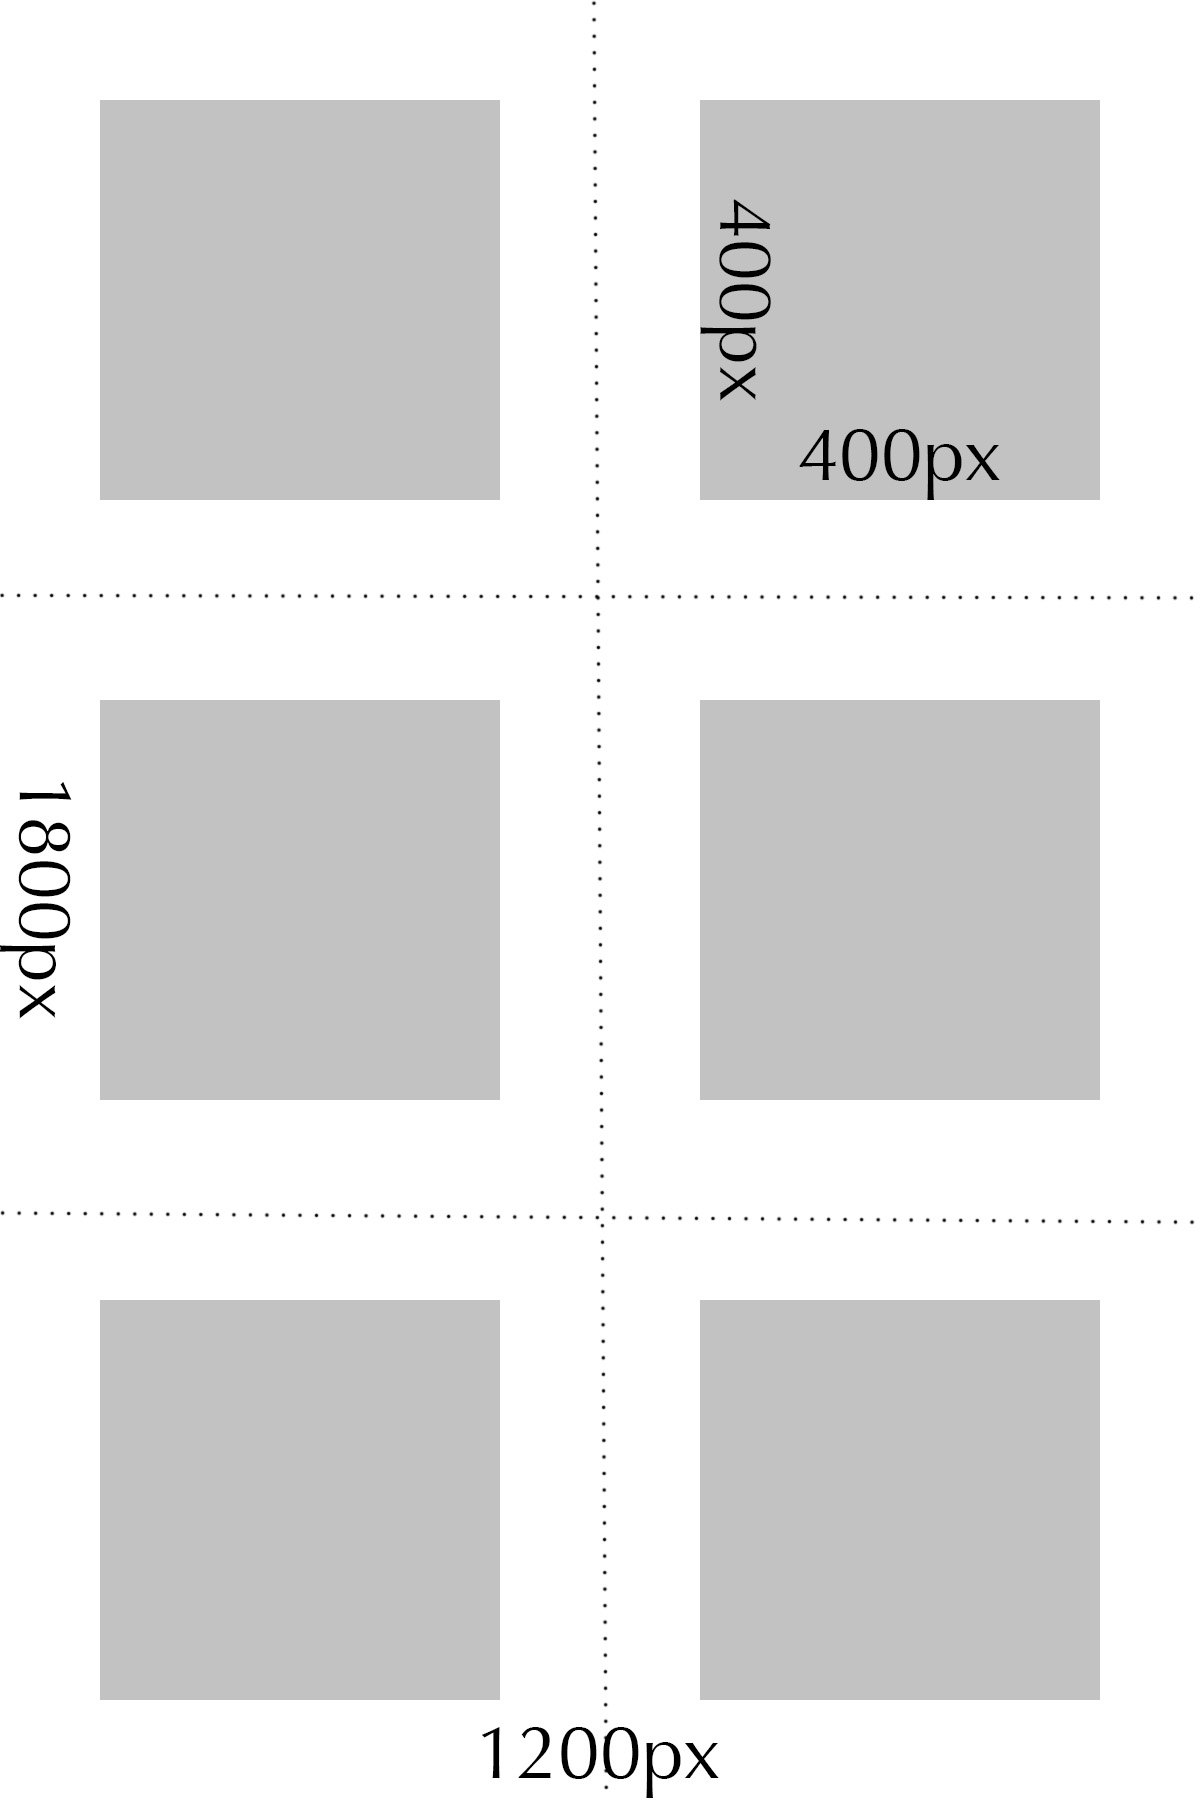
We'll start by cropping our images to be square, before we combine them.
The dimensions of your photos will be the same as the resolution of your screen. You can verify this by using the identify command (another Image Magick command).
identify photo0.jpg
Since we want each one of our images to be square we need to crop them in addition to scaling them to 400px x 400px. We can achieve this using the convert command. Copy this line into your terminal:
convert photo0.jpg -resize x400 -gravity center -crop 400x400+0+0 +repage photo0_crop.jpg
Then view the new image, photo0_crop.jpg, using display:
display photo0_crop.jpg
Repeat the convert command above with the other two images by replacing the 0 in photo0.jpg and photo0_crop.jpg with 1 and 2.
Hint: You can use the up arrow to bring up the last command, and press it again to bring up the one before that. Press up until the last convert command comes up and then use the left arrow to move over and modify the command.
Now we want to create the image that will be our final photo strip. We'll place our first image (the one in the top left) by using the convert command to resize photo0_crop.jpg to the full 1200px x 1800px that we want for the final image strips. Copy the following command into your terminal.
convert photo0_crop.jpg -extent 1200x1800-100-100 photo_strip.jpg
Now view the image we just created, photo_strip.jpg, to make sure everything worked correctly.
display photo_strip.jpg
If all went well, we're ready to composite the rest of your photos together.
We've already placed the top left image. Now we need to place the rest of the images using the composite command. Let's place the top right photo, which is going to be another copy of photo0_crop.jpg.
composite -compose atop -geometry +700+100 photo0_crop.jpg photo_strip.jpg photo_strip.jpg
Make sure it worked correctly by viewing *photo_strip.jpg.
display photo_strip.jpg
Now let's add the two middle photos.
composite -compose atop -geometry +100+700 photo1_crop.jpg photo_strip.jpg photo_strip.jpg
composite -compose atop -geometry +700+700 photo1_crop.jpg photo_strip.jpg photo_strip.jpg
Again, make sure it worked:
display photo_strip.jpg
Now let's add the final two photos.
composite -compose atop -geometry +100+1300 photo2_crop.jpg photo_strip.jpg photo_strip.jpg
composite -compose atop -geometry +700+1300 photo2_crop.jpg photo_strip.jpg photo_strip.jpg
And if all went well, we should have our final image strip:
display photo_strip.jpg
We don't want to manually enter each command every time we want to use our photobooth, so let's update our script to run all the commands we just entered. To run terminal commands in python, we'll be using the system function in the os module. In order to use system we'll need to add this line to the top of our script:
from os import system
Then at the bottom of our script (after we've closed the camera), we can start adding our commands. I'll give you the first one, which will scale down and crop the first photo:
system("convert photo0.jpg -resize x400 -gravity center -crop 400x400+0+0 +repage photo0_crop.jpg")
Now add the rest of the commands that you manually entered into the terminal. You should have a total of 9 lines of system calls. I've included a list of print calls so you can put the corresponding system call under each one:
print "Cropping photo1"
# add system("<copy entire terminal command here>")

print "Cropping photo2"
# add system("<copy entire terminal command here>")

print "Cropping photo3"
# add system("<copy entire terminal command here>")

print "Resizing photo1 to be the size of the full photo strip"
# add system("<copy entire terminal command here>")

print "Compositing the top right photo"
# add system("<copy entire terminal command here>")

print "Compositing the middle left photo"
# add system("<copy entire terminal command here>")

print "Compositing the middle right photo"
# add system("<copy entire terminal command here>")

print "Compositing the bottom left photo"
# add system("<copy entire terminal command here>")

print "Compositing the bottom right photo"
# add system("<copy entire terminal command here>")
And you're done!
Image Magick is a very power set of tools for manipulating images. You can check out the full documentation to do many other things!
This tutorial is very similar to Raspberry Pi Timelapse or Flipbook. Give it a shot, too!