Rodauth is a full-featured authentication framework for Ruby web apps. It offers a rich variety of loosely coupled features that can be combined to create a customized authentication experience. This includes advanced features such as multifactor authentication, passwordless authentication, and JSON API access, which are all provided out-of-the-box.
Rodauth is built on top of the Roda web framework and the Sequel database library, but it can be used with any web framework or ORM, including Rails and Active Record. In this episode, we'll show how to add Rodauth to an existing Rails application. The app we'll be working with has a simple home page, and a section for managing articles. For styling it uses the Bootstrap CSS framework.
For adding Rodauth, we'll be using the rodauth-rails gem that I created, which takes care of all of the necessary Rails glue code.
Let's start by installing the rodauth-rails gem:
$ bundle add rodauth-railsNext, we'll run its install generator:
$ rails generate rodauth:install
# create  db/migrate/20200820215819_create_rodauth.rb
# create  config/initializers/rodauth.rb
# create  config/initializers/sequel.rb
# create  app/misc/rodauth_app.rb
# create  app/misc/rodauth_main.rb
# create  app/controllers/rodauth_controller.rb
# create  app/models/account.rb
# create  app/mailers/rodauth_mailer.rb
This will generate a bunch of files, along with some setup instructions that we need to complete. The only thing we need to do here is setup default URL options for Action Mailer, in order for the Rodauth mailer to be able to generate email links. In production environment you'll want to set this to the domain of your app's production URL.
# config/environments/development.rb
Rails.application.configure do
  # ...
  config.action_mailer.default_url_options = { host: "localhost", port: 3000 }
end
The install generator created a Rodauth configuration in the app/misc directory, with some common authentication features enabled. These features correspond to the ones listed on the Rodauth website. The generator also created a migration for the accounts table and additional database tables used by the enabled features. We're going to keep all the default features, so let's run the database migration.
$ rails db:migrate
# == CreateRodauth: migrating ==========================
# -- create_table(:accounts)
# -- create_table(:account_password_hashes)
# -- create_table(:account_password_reset_keys)
# -- create_table(:account_verification_keys)
# -- create_table(:account_login_change_keys)
# -- create_table(:account_remember_keys)
# == CreateRodauth: migrated ===========================
Rodauth ships with complete authentication endpoints, along with some default view templates. However, unlike classic Rails engines, Rodauth endpoints are not routed through the Rails router, so we won't see them in rails routes.
$ rails routes
#       Prefix Verb   URI Pattern                  Controller#Action
#         root GET    /                            home#index
#     articles GET    /articles(.:format)          articles#index
#              POST   /articles(.:format)          articles#create
#  new_article GET    /articles/new(.:format)      articles#new
# edit_article GET    /articles/:id/edit(.:format) articles#edit
#      article GET    /articles/:id(.:format)      articles#show
#              PATCH  /articles/:id(.:format)      articles#update
#              PUT    /articles/:id(.:format)      articles#update
#              DELETE /articles/:id(.:format)      articles#destroy
They are routed by the Rack middleware that's sitting in front of the Rails router:
$ rails middleware
# ...
# use Rodauth::Rails::Middleware
# run MyApp::Application.routes
The rodauth:routes rake task can show us a list of Rodauth endpoints:
$ rails rodauth:routes
# Routes handled by RodauthApp:
#
#   /login                   rodauth.login_path
#   /create-account          rodauth.create_account_path
#   /verify-account-resend   rodauth.verify_account_resend_path
#   /verify-account          rodauth.verify_account_path
#   /logout                  rodauth.logout_path
#   /remember                rodauth.remember_path
#   /reset-password-request  rodauth.reset_password_request_path
#   /reset-password          rodauth.reset_password_path
#   /change-password         rodauth.change_password_path
#   /change-login            rodauth.change_login_path
#   /verify-login-change     rodauth.verify_login_change_path
#   /close-account           rodauth.close_account_path
We'll use this information to add some authentication links to the navbar. When the user is not logged in, we're displaying signin and signup links, otherwise we're displaying a dropdown with some account management links and the signout link.
<!-- app/views/application/_navbar.html.erb -->
<!-- ... -->
    <% if rodauth.logged_in? %>
      <div class="dropdown">
        <button class="btn btn-info dropdown-toggle" data-bs-toggle="dropdown" type="button">
          <%= current_account.email %>
        </button>
        <div class="dropdown-menu dropdown-menu-end">
          <%= link_to "Change password", rodauth.change_password_path, class: "dropdown-item" %>
          <%= link_to "Change email", rodauth.change_login_path, class: "dropdown-item" %>
          <div class="dropdown-divider"></div>
          <%= link_to "Close account", rodauth.close_account_path, class: "dropdown-item text-danger" %>
          <%= link_to "Sign out", rodauth.logout_path, data: { turbo_method: :post }, class: "dropdown-item" %>
        </div>
      </div>
    <% else %>
      <div>
        <%= link_to "Sign in", rodauth.login_path, class: "btn btn-outline-primary" %>
        <%= link_to "Sign up", rodauth.create_account_path, class: "btn btn-success" %>
      </div>
    <% end %>
<!-- ... -->Once we've restarted the rails server, when we go over to our app, we can see the new signin and signup buttons. Let's go ahead and create an account. We've received a verification email link, so let's open it and verify our account. Since we're logged in now, we can see our account management links in the dropdown.
If we head over to the rails server logs, we can see some SQL queries Rodauth executed during account verification.
Sequel (0.4ms)  SELECT "key" FROM "account_verification_keys" WHERE ("id" = '1') LIMIT 1 -- validate verification token
Sequel (0.4ms)  SELECT * FROM "accounts" WHERE (("id" = '1') AND ("status" = 'unverified')) LIMIT 1 -- retrieve account
TRANSACTION (0.1ms)  BEGIN
Sequel (3.5ms)  UPDATE "accounts" SET "status" = 'verified' WHERE ("id" = 1) -- verify account
Sequel (0.4ms)  DELETE FROM "account_verification_keys" WHERE ("id" = 1) -- delete verification key
TRANSACTION (2.6ms)  COMMIT
Now that we have accounts, let's assign articles to them. We'll add an account_id foreign key to the articles table, and define the has_many association on the Account model.
$ rails generate migration add_account_id_to_articles account:references
$ rails db:migrate
# app/models/account.rb
class Account < ApplicationModel
# ...
has_many :articles
endNext, we'll update the ArticlesController to scope articles under current_account, which is a helper that rodauth-rails provides for retrieving the current logged in account record.
# app/controllers/articles_controller.rb
class ArticlesController < ApplicationController
  # ...
  def index
    @articles = current_account.articles.all
  end
  # ...
  def create
    @article = current_account.articles.build(article_params)
    # ...
  end
  # ...
  private
    def set_article
      @article = current_account.articles.find(params[:id])
    end
    # ...
end
Since managing articles now requires the current account, we'll also require authentication before all article actions.
# app/controllers/articles_controller
class ArticlesController < ApplicationController
  before_action -> { rodauth.require_authentication }
  # ...
end
Now if we try to visit the articles page without being logged in, we'll be redirected to the login page with a message asking us to log in.
After we log in, notice that we're redirected to the home page, instead of the articles page we originally requested. Let's change that in our Rodauth configuration. While we're here, we'll also change the flash message for required login, and change the login label to say "Email".
# app/misc/rodauth_main.rb
class RodauthMain < Rodauth::Rails::Auth
  configure do
    # ...
    login_return_to_requested_location? true
    require_login_error_flash "Login is required for accessing this page"
    login_label "Email"
  end
end
Now when we request the articles page, we see the new flash message, and the email field label doesn't "Login" anymore. When we log in, we're now redirected to the articles page that we originally requested.
Let's say we now want to modify our routes. For example, we might want the create account route to be /register. Also, it can be useful to have a common prefix for all authentication routes, as currently they're all on the top level.
Let's go ahead and change the create account route to register. Let's also add a /user path prefix to all Rodauth routes.
# app/misc/rodauth_main.rb
class RodauthMain < Rodauth::Rails::Auth
  configure do
    # ...
    create_account_route "register"
    prefix "/user"
  end
end
Now when we visit the signup page, we can see the URL now says /register instead of /create-account, and there is the /user prefix.
So far we've made fairly simple tweaks to the Rodauth configuration. But what if we wanted to add new behaviour? For example, we might want users to enter their name upon registration, which is something that Rodauth doesn't provide out-of-the-box. Let's see how we'd go about adding a new field to the create account form.
Because user's name isn't authentication-related, we'll create a new profiles table to store it, which will have a foreign key to the accounts table. To make it easy to retrieve the profile record, we'll also define the association on the Account model.
$ rails generate model Profile name:string account:references
$ rails db:migrate
class Account < ApplicationRecord
# ...
has_one :profile
endSo far we've been using Rodauth's built-in view templates. Let's import them to our application, so that we can modify them.
$ rails generate rodauth:views
# create  app/views/rodauth/_login_form.html.erb
# create  app/views/rodauth/_login_form_footer.html.erb
# create  app/views/rodauth/_login_form_header.html.erb
# create  app/views/rodauth/login.html.erb
# create  app/views/rodauth/multi_phase_login.html.erb
# create  app/views/rodauth/logout.html.erb
# create  app/views/rodauth/create_account.html.erb
# create  app/views/rodauth/verify_account_resend.html.erb
# create  app/views/rodauth/verify_account.html.erb
# create  app/views/rodauth/reset_password_request.html.erb
# create  app/views/rodauth/reset_password.html.erb
# create  app/views/rodauth/change_password.html.erb
# create  app/views/rodauth/change_login.html.erb
# create  app/views/rodauth/close_account.html.erb
We'll go over to the create account template, and add a new name field to the top of the form.
<!-- app/views/rodauth/create_account.html.erb -->
<%= form_with url: rodauth.create_account_path, method: :post, data: { turbo: false } do |form| %>
  <div class="mb-3">
    <%= form.label :name, "Name", class: "form-label" %>
    <%= form.text_field :name, value: params[:name], class: "form-control #{"is-invalid" if rodauth.field_error("name")}", aria: ({ invalid: true, describedby: "login_error_message" } if rodauth.field_error("name")) %>
    <%= content_tag(:span, rodauth.field_error("name"), class: "invalid-feedback", id: "login_error_message") if rodauth.field_error("name") %>
  </div>
  <!-- ... -->
<% end %>
Next, we'll need to modify the Rodauth configuration to handle the new field. First, before account creation, we'll validate the presence of the name parameter. Then, after account creation, we'll create a profile record with name and foreign key column values set. Finally, if the user decides to close their account, we want to make sure the profile record gets deleted.
# app/misc/rodauth_main.rb
class RodauthMain < Rodauth::Rails::Auth
  configure do
    # ...
    before_create_account do
      throw_error_status(422, "name", "must be present") unless param_or_nil("name")
    end
    after_create_account do
      Profile.create!(account_id: account_id, name: param("name"))
    end
    after_close_account do
      Profile.find_by!(account_id: account_id).destroy
    end
    # ...
  end
end
Last thing, let's also display the user's name in the navbar instead of the email address we have now.
<!-- app/views/application/_navbar.html.erb -->
<!-- ... --->
  <div class="dropdown">
    <button class="btn btn-info dropdown-toggle" data-bs-toggle="dropdown" type="button">
      <%= current_account.profile.name %>
    </button>
    <!-- ... -->
  </div>
<!-- ... --->
Let's now see this in action. We'll fill in the account form details, leaving the name field blank, to see that our validation is working correctly. When we submit the form again, this time with name filled in, the account creation succeeds, and we can see the name we entered shown in the dropdown.
The last thing I want to show is how you'd add a new authentication feature. Wouldn't it be nice if instead of typing in their passwords, users had the option to log in via an email link? It turns out that Rodauth ships with the email authentication feature.
We'll start by enabling the feature in our Rodauth configuration:
# app/misc/rodauth_main.rb
class RodauthMain < Rodauth::Rails::Auth
  configure do
    # ...
    enable :email_auth
  end
end
This feature requires a database table for storing tokens, so we'll generate a migration for it and run it:
$ rails generate rodauth:migration email_auth
# create  db/migrate/20220206144306_create_rodauth_email_auth.rb

$ rails db:migrate
# == CreateRodauthEmailAuth: migrating ===========================
# -- create_table(:account_email_auth_keys)
# == CreateRodauthEmailAuth: migrated ==================
We can also generate view templates for email authentication:
$ rails generate rodauth:views email_auth
# create  app/views/rodauth/_email_auth_request_form.html.erb
# create  app/views/rodauth/email_auth.html.erb
Now when we open the login page again, we'll see it turned into a multi-phase login, where after entering our email address we can decide whether to enter our password or request a login link via email. When we request the email link, we can open it and log in without having to enter our password.
There are is lot more to Rodauth that I haven't covered here. I encourage you to head over to the website, and go to documentation, where you'll see all the features Rodauth provides, and you can click them to read their docs. There are also guides for common use cases.
If you're looking for an overview of the various database tables used by Rodauth, there is an excellent diagram that organizes them into categories.
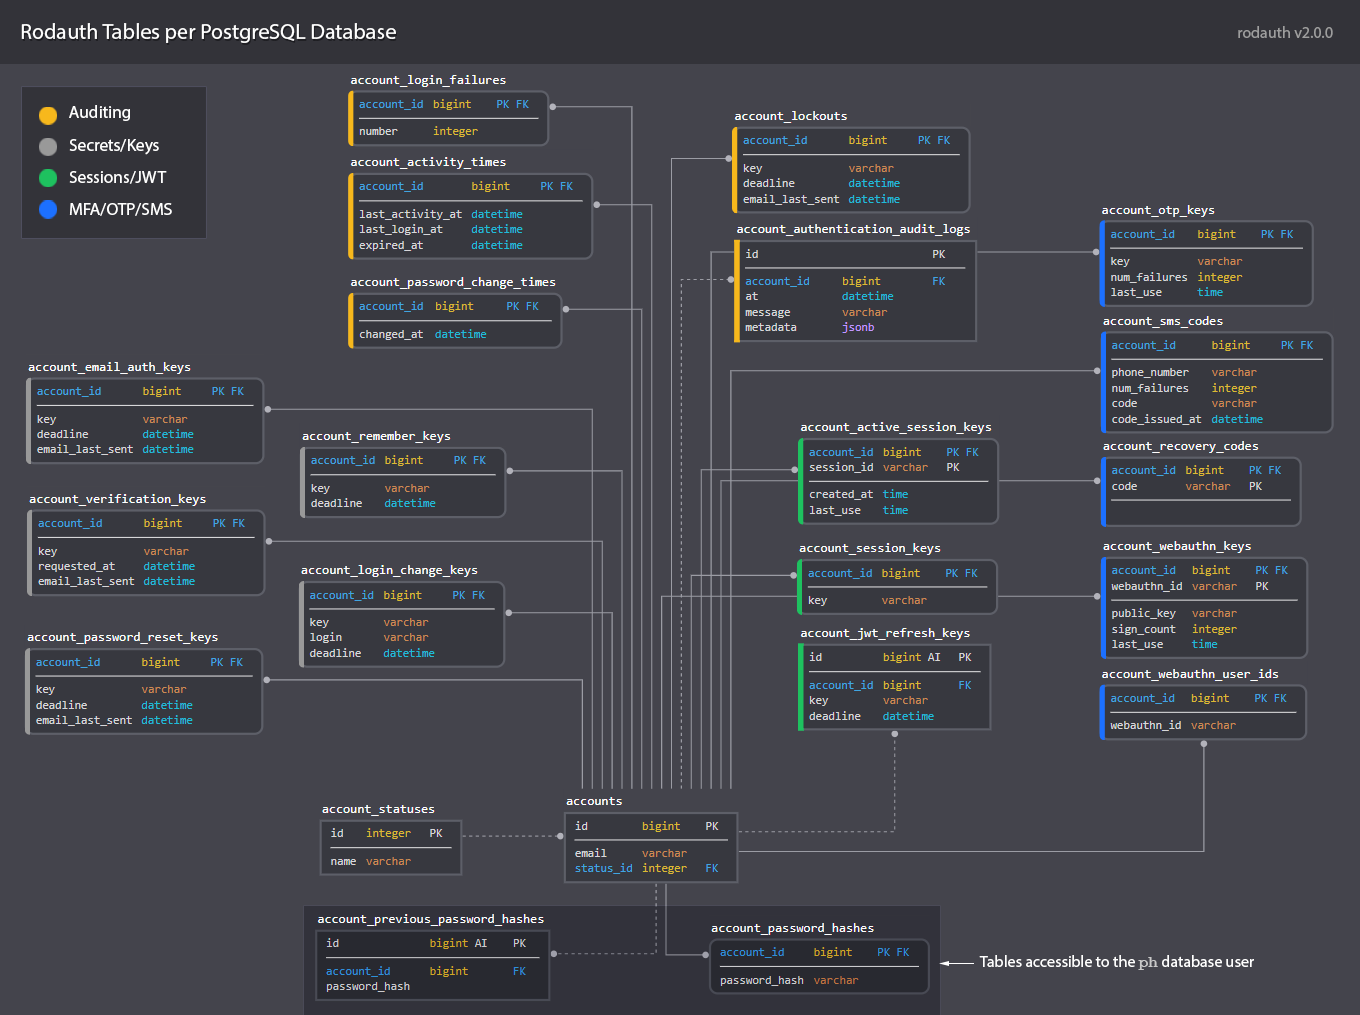
That's it for this episode, I hope it sparked a little bit of interest for this amazing library.