![]()
Arduino Library for the TM1637 Based LED Display Module
This is an Arduino library for 4 and 6 digit 7-segment LED display modules based on the TM1637 chip.
Connect the TM1637 display CLK and DIO pins to your Arduino GPIO pins, include this library, initialize TM1637TinyDisplay and call easy to use functions like showNumber(), showString(), showLevel() and showAnimation(). Display will scroll text for larger strings. Functions support screen splitting for easy number + text formatting. Library also runs well on tiny controllers including the ATtiny85.
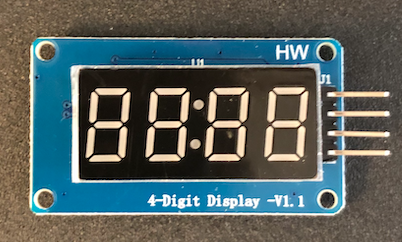
- 4-Digit Display modules based on the TM1637 chip are available from HiLetgo, DX and SeeedStudio.
- 6-Digit Display modules - see here.
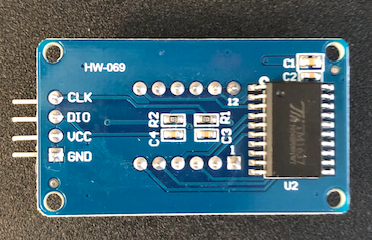
The display has four connectors:
- CLK - Clock - attach to any GPIO output
- DIO - Data - attach to any GPIO output
- VCC - Power 5v
- GND - Ground
Power Note: Steady clean power is important for circuit stability. If you are seeing display artifacts during high frequency updates or animation sequences, you may be experiencing power fluctuations that are impacting signal timing and communication with the TM1637. This is especially true with standalone microprocessor applications that lack any power conditioning (e.g. ATtiny85). A polarized 100uF electrolytic capacitor inserted across VCC and GND can help smooth out the spikes.
Decimals and Colons: Some TM1637 displays come equipped with a middle colon LED (like above) as used in digital clocks but with no decimal points. Some displays come with decimal point LEDS for each digit. Some come with both but often the decimal point LEDs are not connected. These extra LEDs are activated by setting the upper eighth bit (0x80) for the digit to the left of the dot. This library will handle setting that for you via the showNumber() function when you specify floating point numbers, or you can do it manually via the showNumberDec() function where you can set the decimal points/colon yourself.
This library is available via the Arduino IDE. Install this library via Tools, Manage Libraries, search for "TM1637TinyDisplay" and click Install.
Alternatively, you can install this manually by cloning this repo into your Arduino library folder (e.g. ~/Documents/Arduino/libraries).

Basic connection schematic done with Fritzing
#include <Arduino.h>
#include <TM1637TinyDisplay.h>

// Define Digital Pins
#define CLK 2
#define DIO 3

// Instantiate TM1637TinyDisplay Class
TM1637TinyDisplay display(CLK, DIO);

void setup() {
  // Initialize Display
  display.begin();
}

void loop() {
  // Say Hello
  display.showString("HELLO");
  delay(500);

  // Clear Screen
  display.clear();

  // We can count!
  for (int x = -100; x <= 100; x++) {
    display.showNumber(x);
  }

  // Level indicator
  for (int x = 0; x <= 100; x = x + 10) {
    display.showLevel(x, false);
    delay(20);
  }
  for (int x = 100; x >= 0; x = x - 10) {
    display.showLevel(x, false);
    delay(20);
  }

  // Split screen for temperature
  display.showString("\xB0", 1, 3);        // Degree Mark, length=1, position=3 (right)
  for (int x = -90; x < 200; x++) {
    display.showNumber(x, false, 3, 0);    // Number, length=3, position=0 (left)
    delay(10);
  }

  // The end
  display.showString("End");
  delay(1000);
}The showAnimation() function projects a sequence of frames (patterns) onto the display. This works by defining the animation sequence through a multi-dimensional array of patterns.
You can use the included javascript based interactive 7-Segment LED Animator Tool to help build your animation. The source code is in the Examples folder. This tool will let you set up the LED sequences you want, save each frame and copy the final code (a static array) directly into your sketch to use for the showAnimation(data, frames, timing) function. Here is an example:
// Data from Animator Tool
const uint8_t ANIMATION[12][4] = {
  { 0x08, 0x00, 0x00, 0x00 },  // Frame 0
  { 0x00, 0x08, 0x00, 0x00 },  // Frame 1
  { 0x00, 0x00, 0x08, 0x00 },  // Frame 2
  { 0x00, 0x00, 0x00, 0x08 },  // Frame 3
  { 0x00, 0x00, 0x00, 0x04 },  // Frame 4
  { 0x00, 0x00, 0x00, 0x02 },  // Frame 5
  { 0x00, 0x00, 0x00, 0x01 },  // Frame 6
  { 0x00, 0x00, 0x01, 0x00 },  // Frame 7
  { 0x00, 0x01, 0x00, 0x00 },  // Frame 8
  { 0x01, 0x00, 0x00, 0x00 },  // Frame 9
  { 0x20, 0x00, 0x00, 0x00 },  // Frame 10
  { 0x10, 0x00, 0x00, 0x00 }   // Frame 11
};

  // Display Animation sequence
  display.showAnimation(ANIMATION, FRAMES(ANIMATION), TIME_MS(50));

6-Digit Display modules based on the TM1637 chip are available from Amazon and AliExpress.
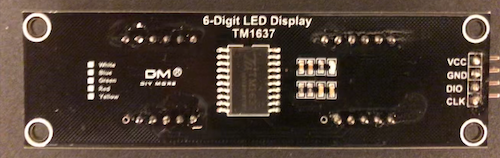
This library now supports the 6-digit display as well as the 4-digit display. The 6-digit display requires additional handling. Specifically, the display digits are not sequential (requires a map) and the 7-segment LED data must be uploaded in reverse order.
TM1637TinyDisplay6 handles this for you but you must initialize the display using the TM1637TinyDisplay6 class:
// Includes
#include <Arduino.h>
#include <TM1637TinyDisplay6.h>       // Include 6-Digit Display Class Header

// Define Digital Pins
#define CLK 2
#define DIO 3

TM1637TinyDisplay6 display(CLK, DIO); // 6-Digit Display Class

void setup()
{
  display.begin();
  display.showString("digits");
  delay(1000);
  display.showNumber(123456);
  delay(1000);
  display.showNumber(123.456);
  delay(1000);
}The library provides a single class named TM1637TinyDisplay with the following functions:
begin()- Initialize display memory and hardware (call insetup())clear()- Display an integer and floating point numbers (positive or negative)showNumber(..)- Display a numbershowNumberDec(..)- Display a number with ability to manually set decimal points or colonshowNumberHex(..)- Display a number in hexadecimal format and set decimal point or colonshowString(..)- Display a ASCII string of text with optional scrolling for long stringsstartStringScroll(..)- Begins a non-blocking scrolling of a string messageshowLevel(..)- Use display LEDs to simulate a level indicator (vertical or horizontal)showAnimation(..)- Display a sequence of frames to render an animationstartAnimation(..)- Begins a non-blocking animation of a sequence of framesAnimate()- Worker routine to be called regularly which handles animations and scrolling in a non-blocking mannerstopAnimation(..)- Stops non-blocking animationsetSegments(..)- Directly set the value of the LED segments in each digitsetBrightness(..)- Sets the brightness of the displaysetScrolldelay(..)- Sets the speed for text scrollingflipDisplay(..)- Sets/flips the orientation of the displayisflipDisplay()- Returns orientation of the display (True = flip)readBuffer(..)- Returns current display segment values
PROGMEM functions: Large string or animation data can be left in Flash instead of being loaded in to SRAM to save memory.
showAnimation_P(..)- Display a sequence of frames to render an animation (in PROGMEM)showString_P(..)- Display a ASCII string of text with optional scrolling for long strings (in PROGMEM)startAnimation_P(..)- Begins a non-blocking animation of a sequence of frames stored in PROGMEMstartStringScroll_P(..)- Begins a non-blocking scrolling of a string message stored in PROGMEM
Refer to TM1637TinyDisplay.h for information on available functions. See also Examples for more demonstration.
- Library: https://www.arduinolibraries.info/libraries/tm1637-tiny-display
- Scan Logs: http://downloads.arduino.cc/libraries/logs/github.com/jasonacox/TM1637TinyDisplay/
- This library is based on the great work by Avishay Orpaz - https://github.com/avishorp/TM1637
- SevenSegmentTM1637 Arduino Library by Bram Harmsen - https://github.com/bremme/arduino-tm1637
- Arduino - https://playground.arduino.cc/Main/TM1637/
- MCI Electronics Datasheet for TM1637 - https://www.mcielectronics.cl/website_MCI/static/documents/Datasheet_TM1637.pdf
- TM16xx - Library for entire TM16xx chip family include maxint-rd's own display-modules - https://github.com/maxint-rd/TM16xx