Node2Blog is a simple and easy to use blog template for the casual blogger. For those who wish to setup an operable blog in minutes, this is the project for you. The blog is built with Node.js, w/ Express.js, and Mongodb (with the mongoose driver). The instructions for quickly building a blog with the Node2Blog template is shown below.
Current verison: 0.2.2
- Intergration of the lightweight rich text editor, NicEdit.
- Utilizes the Express web framework.
- Uses MongoDB on the backend.
- An Admin interface, initiated by a password confirmation.
- Simplistic design: Allowing for the user to easily build on top of the layout.
- Each post has a Facebook 'like' button and a Twitter 'tweet' button.
- Commenting system within each post.
- Easy Heroku integration.
- Create, edit, and delete your posts.
- RSS capable.
- And much more...
- Node.js (version 0.10.0 or above, download here)
- NPM (comes with recent versions of node)
- Express.js (version 3 or above, and will be install with npm)
- A recent version of Mongodb (download here)
- Mongoose (will be installed with npm)
In your terminal, 'cd' to the directory where you want to develop the blog and do the following commands
$ git clone git@github.com:jawerty/Node2Blog.git blog-folder-name
$ cd blog-folder-name
$ npm install .
In order to initiate the blog server on your local machine, do the following command (You need node.js to run the following command)
$ node blog
The blog should be running on your localhost at the 3000 port; go to
http://localhost:3000 to view it. And it should look similar to the
screenshot below.
![][]
[]: https://raw.github.com/jawerty/Node2Blog/master/public/images/screenshot1.png
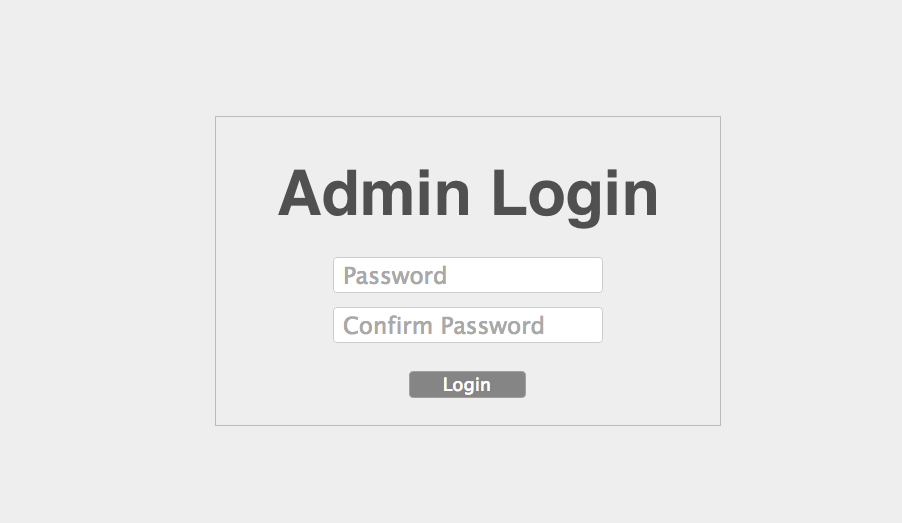
If you would like to make a post, go to the the url http://localhost:3000/admin in order to log in and use the admin settings. The password is 'narwhal' by default. To change the password, go to the file 'blog.js' and change the password variable at the top to your desired password.
Also, Change the st variable in 'blog.js' to whatever you would like your subtitle to be (i.e subTitle = 'I am an App developer').**
![][]
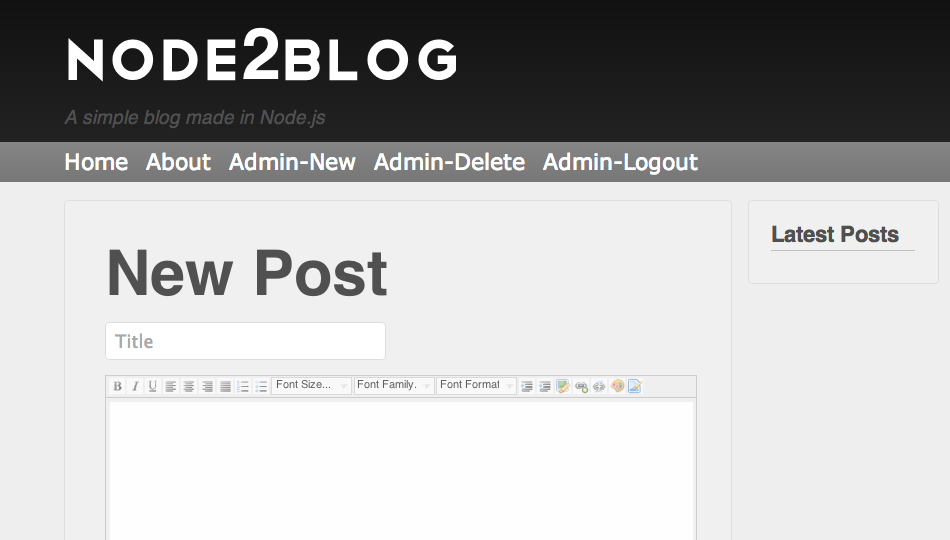
When successfully logged in, your navigation bar should have three new options appended to it...
- Admin-New (create a new post)
- Admin-Delete (delete a post)
- Admin-Logout (log out of admin view)
[]: https://raw.github.com/jawerty/Node2Blog/master/public/images/screenshot2.png 1: https://raw.github.com/jawerty/Node2Blog/master/public/images/screenshot3.png
Creating and deleting posts should be self-explanatory; however, creating a new static page similar to the default 'about' page is detailed below.
To create a new page, first you must go to the 'layout.jade' file in the /views folder. Add the following code under the about 'li' tag which is in the 'ol' tag in the #nav div.
a(href="/new-page-name")
	li new_page_name
Now create a new view with whatever name you want (i.e. new_page_name.jade) in the /views folder. Add the following code to your new view
extends layout

block wrapper_content
	.container
		h1 new_page_name
		br
		p random information
Now modify the get functions in the 'blog.js' file.
The new modified code
app.get('/', home.index);
app.get('/admin/delete', admin.delete);
app.get('/admin/new', admin.new);
app.get('/post/:id', post.post_view);
app.get('/admin' || '/admin/', admin.admin_check);
app.get('/admin/logout', function(req,res){
  delete req.session.admin;
  console.log('logged-out')
  res.redirect('/');
});

app.get('/about', function(req, res) {
  res.render('about', { title: t, admin:req.session.admin});

});

//The code you just added
app.get('/new-page-name', function(req, res) {
  res.render('new_page_name', { title: t, admin:req.session.admin});
});
///////////////////
You should now be able to go the the '/new-page-name' route and have a view similar to what is below
![][]
[]: https://raw.github.com/jawerty/Node2Blog/master/public/images/screenshot4.png
In order to add a side widget, or simply a box under the "Latest Posts" box, you must go to the file 'layout.jade' and insert this line
.widget
Exactly where it is inserted below
#box
#content
#wrapper
block wrapper_content
if(typeof posts == 'undefined')
.widget
a(href='/') Back to home
else
.widget
p(style='font-size: 150%; font-weight:bold; border-bottom: 1px solid #b1b1b1;padding-bottom: 5px;margin-bottom: 4px;') Latest Posts
br
pre
for post in posts
table(id='post_table', style='padding-top:10px;border-bottom:1px solid #ddd')
tr
td
#left
label(style='font-size: 130%;') -  
td
#right
a(href='/post/#{post._id}/#{post.title_sub}', style='font-size: 130%;')= post.title
tr(style='height:10px;')
.widget //the inserted code
Now you can input any sort of information you'd like in your new widget box.*Note: Without any posts on your blog, the widget boxes will not be positioned adequately.
All you're going to be doing here is change a few variables in the blog.js file. (At the top) Change the author variable to your name. Change the icon variable to the file of your icon and make sure it is in the '/public/images' directiory.
Go to [http://localhost:3000/rss.xml][] to see the generated rss file.
*Note: You must have a heroku account along with the Heroku Toolbelt to follow this part of the tutorial
Simply follow the directions on this page to deploy the blog with heroku. However, in order to use MongoDB, you must enter the following command in the directory of your project
$ heroku addons:add mongohq:sandbox
This addon is a free starter package for running a server with a MongoDB backend by MongoHQ. This is essentially all you need to setup the basic functions to your new blog.
Contact the developer here
Email: jawerty210@gmail.com
Website: http://jawerty.github.io
The MIT License (MIT) Copyright (c) 2012 Jared Wright
Permission is hereby granted, free of charge, to any person obtaining a copy of this software and associated documentation files (the "Software"), to deal in the Software without restriction, including without limitation the rights to use, copy, modify, merge, publish, distribute, sublicense, and/or sell copies of the Software, and to permit persons to whom the Software is furnished to do so, subject to the following conditions:
The above copyright notice and this permission notice shall be included in all copies or substantial portions of the Software.
THE SOFTWARE IS PROVIDED "AS IS", WITHOUT WARRANTY OF ANY KIND, EXPRESS OR IMPLIED, INCLUDING BUT NOT LIMITED TO THE WARRANTIES OF MERCHANTABILITY, FITNESS FOR A PARTICULAR PURPOSE AND NONINFRINGEMENT. IN NO EVENT SHALL THE AUTHORS OR COPYRIGHT HOLDERS BE LIABLE FOR ANY CLAIM, DAMAGES OR OTHER LIABILITY, WHETHER IN AN ACTION OF CONTRACT, TORT OR OTHERWISE, ARISING FROM, OUT OF OR IN CONNECTION WITH THE SOFTWARE OR THE USE OR OTHER DEALINGS IN THE SOFTWARE.